Table of Contents
Advertisement
Available languages
Available languages
Quick Links
Download this manual
See also:
Installation Manual
Advertisement
Chapters
Table of Contents

Related Manuals for INVENTOR V4MRFI-24


Summary of Contents for INVENTOR V4MRFI-24
- Page 1 AIR CONDITIONING SYSTEMS REMOTE CONTROLLER • USER’S MANUAL • ΕΓΧΕΙΡΙΔΙΟ ΧΡΗΣΗΣ • MANUAL UTILIZATORULUI MODELS: V4MRFI-24/ V4MRFO-24 ENGLISH | ΕΛΛΗΝΙΚΑ | ROMANA...
-
Page 2: Table Of Contents
CONTENTS Remote controller Specifications ..................3 Operation buttons ....................... 4 Indicators on LCD ......................... 7 How to use the buttons ....................... 9 Auto operation ........................9 Cooling/Heating ......................... 10 Fan operation ........................10 Dehumidifying operation ....................11 Adjusting air flow direction ....................11 Timer operation ......................... -
Page 3: Remote Controller Specifications
Remote Controller Specifications Model RG57G2/BGE Rated Voltage 3.0V (Dry batteries R03/LR03X2) Signal Receiving Range Environment -5°C~60°C... -
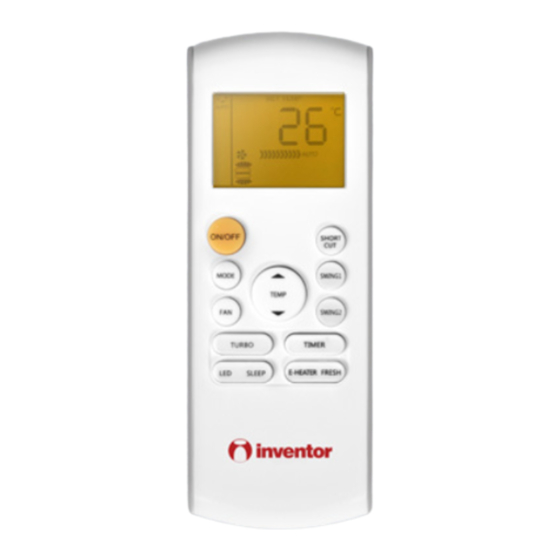
Page 4: Operation Buttons
Operation of buttons ON/OFF Button This button turns the air conditioner ON and OFF. MODE Button Press this button to modify the air conditioner mode in a sequence of following: COOL AUTO HEAT NOTE: Please do not select HEAT mode if the machine you purchased is cooling only type. - Page 5 Operation of buttons SLEEP Button It can maintain the most comfortable temperature and save energy. This function is available on COOL, HEAT or AUTO mode only . For the detail, see sleep operation in USER S MANUAL. – NOTE: While the unit is running under SLEEP mode, it would be cancelled if MODE, FAN SPEED or ON /OFF button is pressed.
- Page 6 Operation of buttons Swing 1 Button Used to stop or start the upside louver auto swing feature. Swing 2 Button Used to stop or start the downside louver auto swing feature. TIMER Button Press this button to initiate the auto-on/off time sequence.
-
Page 7: Indicators On Lcd
Indicators on LCD Mode display Information are displayed when the remote controller is powered up. AUTO COOL HEAT Displayed when data transmitted. Displayed when remote controller is ON. Battery display (low battery detection) Indicated LOCK feature is activated Displayed in ECO mode operation (not available) Displayed when TIMER ON time is set. - Page 8 Indicators on LCD Mode display Displayed in Fresh operation (not available). Displayed in Sleep Mode operation. Displayed when Swing Mode is set upside airflow. Displayed when Swing Mode is set downside airflow. Fan speed indication 1%~10% speed 11%~20% speed 21%~30% speed 31%~40% speed...
-
Page 9: How To Use The Buttons
How to use the buttons Auto operation Ensure the unit is plugged in and power is available. The OPERATION indicator on the display panel of the indoor unit starts flashing. 1. Press the MODE button to select Auto. 2. Press the UP/DOWN button to set the desired temperature. -
Page 10: Cooling/Heating
How to use the buttons Cooling /Heating Operation Ensure the unit is plugged in and power is available. 1. Press the ON/OFF button to start the air conditioner. 2. Press the MODE button to select COOL, HEAT(cooling & heating models only) mode. 3. -
Page 11: Dehumidifying Operation
How to use the buttons Dehumidifying operation Ensure the unit is plugged in and power is available. The OPERATION indicator on the display panel of the indoor unit starts flashing. 1. Press the MODE button to select DRY mode. 2. Press the UP/DOWN buttons to set the desired temperature. -
Page 12: Timer Operation
How to use the buttons Timer operation Press the TIMER ON button can set the auto-on time of the unit. Press the TIMER OFF button can set the auto-off time of the unit. To set the Auto-on time. 1. Press the TIMER button, the Timer on indicator “ ”... - Page 13 How to use the buttons To set the Auto-off time. 1. Press the TIMER button until the Timer off indicator “ ” displays and flashes, the last Auto-off setting time and the signal “h” will be shown on the LCD display area.
- Page 14 CAUTION • When you select the timer operation, the remote controller automatically transmits the timer signal to the indoor unit for the specified time. Therefore, keep the remote controller in a location where it can transmit the signal to the indoor unit properly. •...
- Page 15 Example of timer setting TIMER ON (Auto-on Operation) The TIMER ON feature is useful when you want the unit to turn on automatically before you return home. Start The air conditioner will automatically start operating at the set time. 6 hours later Example: To start the air conditioner in 6 hours.
- Page 16 Example of timer setting TIMER OFF (Auto-off Operation) The TIMER OFF feature is useful when you want the unit to turn off automatically after you go to bed. The air conditioner will stop automatically at the set time. Example: To stop the air conditioner in 10 hours. 1.
-
Page 17: Handling The Remote Controller
Handling the remote controller Location of the remote controller. • Use the remote controller within a distance of 8 meters from the appliance, pointing it towards the receiver. Reception is confirmed by a beep. CAUTION • The air conditioner will not operate if curtains, doors or other materials block the signals from the remote controller to the indoor unit. - Page 18 Handling the remote controller Replacing batteries The following cases signify exhausted batteries. Replace old batteries with new ones. • Receiving beep is not emitted when a signal is transmitted. • Indicator fades away. The remote controller is powed by two dry batteries (R03/LR03X2) housed in the back rear part and protected by a cover.
- Page 19 All the pictures in the manual are for explanatory purposes only. The actual shape of the unit you purchased may be slightly different, but the operations and functions are the same. The company may not be held responsible for any misprinted information. The design and the specifications of the product for reasons, such as product improvement, are subject to change without any prior notice.
- Page 20 ΠΕΡΙΕΧΟΜΕΝΑ Χαρακτηριστικά του Ασύρματου Τηλεχειριστηρίου ............ 21 Λειτουργίες Πλήκτρων ....................22 Ενδείξεις στην LCD Οθόνη ....................25 Χρήση των πλήκτρων ...................... 27 Αυτόματη Λειτουργία ....................... 27 Λειτουργίες Ψύξης/Θέρμανσης..................28 Λειτουργία Ανεμιστήρα ....................28 Λειτουργία Αφύγρανσης ....................29 Ρύθμιση της κατεύθυνσης της ροής του αέρα .............. 29 Λειτουργία...
-
Page 21: Χαρακτηριστικά Του Ασύρματου Τηλεχειριστηρίου
Χαρακτηριστικά Ασύρματου Τηλεχειριστηρίου Μοντέλο RG57G2/BGE Ονομαστική Τάση 3.0V (Dry batteries R03/LR03X2) Εμβέλεια Σήματος Λήψης Εύρος θερμοκρασίας -5°C~60°C περιβάλλοντος... -
Page 22: Λειτουργίες Πλήκτρων
Λειτουργίες Πλήκτρων Πλήκτρο ON/OFF Με αυτό το πλήκτρο γίνεται η εκκίνηση και η διακοπή της λειτουργίας της κλιματιστικής μονάδας. Πλήκτρο MODE Με αυτό το πλήκρο ρυθμίζετε την λειτουργία της κλιματιστικής μονάδας όπως παρακάτω: → AUTO → COOL→ DRY → HEAT → FAN →... - Page 23 Λειτουργίες Πλήκτρων Πλήκτρο ( • Πιέστε αυτό το πλήκτρο για να αυξήσετε την εσωτερική ρύθμιση της θερμοκρασίας σε βήματα 1°C έως 30°C. • Πιέστε αυτό το πλήκτρο για να αυξήσετε τη ταχύτητα ανεμιστήρα από εύρος 1% έως 100% αφότου έχετε πατήσει...
- Page 24 Λειτουργίες Πλήκτρων Πλήκτρο SWING 1 Χρησιμοποιείται για να διακόψει ή να ξεκινήσει τη λειτουργία της αυτόματης κίνησης της πάνω περσίδας. Πλήκτρο SWING 2 Χρησιμοποιείται για να διακόψει ή να ξεκινήσει τη λειτουργία της αυτόματης κίνησης της πάνω περσίδας. Πλήκτρο TIMER Πατήστε...
-
Page 25: Ενδείξεις Στην Lcd Οθόνη
Ενδείξεις στην LCD οθόνη Ενδείξεις λειτουργιών Οι ενδείξεις εμφανίζονται όταν το τηλεχειριστήριο είναι ενεργοποιημένο. AUTO COOL HEAT Ένδειξη μετάδοσης εντολών Εμφανίζεται όταν το τηλεχειριστήριο είναι ενεργοποιημένο Ένδειξη μπαταρίας (ανίχνευση χαμηλής μπαταρίας) Ενδείκνυται όταν είναι ενεργοποιημένη η λειτουργία LOCK Εμφανίζεται στη λειτουργία ΕCO (δεν διατίθεται) Εμφανίζεται... - Page 26 Ενδείξεις στην LCD οθόνη Ενδείξεις λειτουργιών Εμφανίζεται κατά τη λειτουργία Fresh (δεν διατίθεται) Εμφανίζεται κατά τη λειτουργία Sleep Εμφανίζεται όταν η λειτουργία SWING ορίζεται στην πάνω ροή αέρα. Εμφανίζεται όταν η λειτουργία SWING ορίζεται στην κάτω ροή αέρα. Ενδείξεις ταχύτητας ανεμιστήρα 1%~10% ταχύτητα...
-
Page 27: Χρήση Των Πλήκτρων
Χρήση των πλήκτρων Αυτόματη λειτουργία Βεβαιωθείτε πως η κλιματιστική μονάδα είναι συνδεδεμένη με την παροχή ρεύματος. Η ενδεικτική λυχνία OPERATION (λειτουργίας) στην οθόνη της εσωτερικής μονάδας είναι αναμμένη. 1. Πιέστε το πλήκτρο MODE και επιλέξτε Auto. 2. Πιέστε το πλήκτρο UP/DOWN για να ορίσετε την επιθυμητή... -
Page 28: Λειτουργίες Ψύξης/Θέρμανσης
Χρήση των πλήκτρων Λειτουργίες Ψύξης/Θέρμανσης Βεβαιωθείτε πως η κλιματιστική μονάδα είναι συνδεδεμένη με την παροχή ρεύματος. 1. Πιέστε το πλήκτρο ΟΝ/ΟFF για να ξεκινήσει η λειτουργία της κλιματιστικής μονάδας 2. Πιέστε το πλήκτρο MODE για να επιλέξετε τη λειτουργία ψύξης, θέρμανσης (για μοντέλα ψύξης & θέρμανσης). -
Page 29: Λειτουργία Αφύγρανσης
Χρήση των πλήκτρων Λειτουργία Αφύγρανσης Βεβαιωθείτε πως η κλιματιστική μονάδα είναι συνδεδεμένη με την παροχή ρεύματος. Η ένδειξη ενεργοποίησης της λειτουργίας στην οθόνη της εσωτερικής μονάδας αρχίζει να αναβοσβήνει. 1. Πιέστε το πλήκτρο MODE για να επιλέξετε τη λειτουργία AΦΥΓΡΑΝΣΗΣ. 2. -
Page 30: Λειτουργία Timer
Χρήση των πλήκτρων Λειτουργία Timer Με το πλήκτρο TIMER ON μπορείτε να ρυθμίσετε την αυτόματη ενεργοποίηση της μονάδας. Ρύθμιση της ώρας της αυτόματης ενεργοποίησης της μονάδας. 1. Πιέστε το πλήκτρο TIMER ON. Στην οθόνη του ασύρματου τηλεχειριστηρίου θα εμφανιστεί η ένδειξη... - Page 31 Χρήση των πλήκτρων Ρύθμιση της ώρας της αυτόματης απενεργοποίησης της μονάδας. 1. Πατήστε το πλήκτρο TIMER μέχρι η ένδειξη της αυτόματης απενεργοποίησης “ ” να εμφανιστεί και να αναβοσβήσει, με τη τελευταία επιλογή χρόνου της αυτόματης απενεργοποίησης και την ένδειξη ‘’h’’ να...
- Page 32 ΠΡΟΣΟΧΗ • Οταν επιλέξετε την λειτουργία ΤΙΜΕΚ, το τηλεχειριστήριο μεταδίδει αυτόματα το σήμα χρονδιακόπτη στην εσωτερική μονάδας για το καθορισμένο χρόνο. Ως εκ τούτου το τηλεχειριστήριο θα πρέπει να βρίσκεται σε θέση όπου μπορεί να μεταδίδει το σήμα στην εσωτερική μονάδα σωστά. •...
- Page 33 Παράδειγμα της ρύθμισης του timer TIMER ON (Αυτόματη ενεργοποίηση της μονάδας) Η λειτουργία ΤΙΜΕR ΟΝ είναι χρήσιμη όταν θέλετε η μονάδα να ενεργοποιηθεί αυτόματα πριν επιστρέφετε Εκκινήση Λειτουργίας σπίτι. Η κλιματιστική μονάδα θα εκκινήσει αυτόματα Απενεργοποίηση την λειτουργία την ώρα που έχει επιλεγεί. 6 ώρες...
- Page 34 Παράδειγμα της ρύθμισης του timer TIMER OFF (Αυτόματη απενεργοποίηση της μονάδας) Η λειτουργία TIMER OFF είναι χρήσιμη όταν θέλετε να απενεργοποιηθεί η μονάδα όταν πέσετε για ύπνο. Η κλιματιστική μονάδα θα απενεργοποιηθεί αυτόματα την ώρα που έχει επιλεγεί. Παράδειγμα: Τερματισμός λειτουργίας...
-
Page 35: Χειρισμός Του Ασύρματου Τηλεχειριστηρίου
Χειρισμός του Ασύρματου Τηλεχειριστηρίου Θέση του Ασύρματου Τηλεχειριστηρίου • Να χρησιμοποιείτε το ασύρματο τηλεχειριστήριο εντός 8μ από την κλιματιστική μονάδα στοχεύοντας στον δέκτη σήματος. Η αποδοχή της εντολής συνοδεύεται από ένα ήχο ΠΡΟΣΟΧΗ • Η κλιματιστική μονάδα δεν θα λειτουργεί αν εμποδίζονται... - Page 36 Χειρισμός του Ασύρματου Τηλεχειριστηρίου Αντικατάσταση μπαταριών Αντικαταστήστε τις μπαταρίες όταν δεν ακούτε τον αντίστοιχο ήχο από την εσωτερική μονάδα ή όταν η ένδειξη εντολής στο ασύρματο τηλεχειριστήριο δεν ανάβει. Το ασύρματο τηλεχειριστήριο χρειάζεται 2 ξηρού τύπου μπαταρίες (R03/LR03X2) που βρίσκονται στην πίσω...
- Page 37 Όλες οι εικόνες στο παρόν εγχειρίδιο εξυπηρετούν επεξηγηματικούς σκοπούς. Το προϊόν που προμηθευτήκατε μπορεί να εμφανίζει ορισμένες διαφορές ως προς το σχήμα, ωστόσο οι λειτουργίες και τα χαρακτηριστικά παραμένουν ίδια. Η εταιρεία δεν φέρει ευθύνη για τυχόν τυπογραφικά λάθη. Ο σχεδιασμός και οι προδιαγραφές...
- Page 38 CUPRINS Specificații telecomandă ....................39 Funcțiile butoanelor ......................40 Indicatori pe ecranul LCD ....................43 Modul de utilizare a butoanelor ..................45 Funcția AUTO ........................45 Funcția de răcire/încălzire ....................46 Funcția Ventilare ........................ 46 Funcția dezumidificare ...................... 47 Reglarea direcției fluxului de aer ..................47 Funcția temporizator ......................
-
Page 39: Specificații Telecomandă
Specificații telecomandă Model RG57G2/BGE Tensiune nominală 3.0V(baterii uscate R03/LR03 2) Distanță recepție semnal Ambient -5 ºC ~ 60 ºC... -
Page 40: Funcțiile Butoanelor
Funcțiile butoanelor Pornit/ oprit (ON/OFF) Pornește aparatul Pornește/ oprește aparatul. Modul de funcționare (MODE) Trece prin modulele de funcționare astfel: COOL AUTO HEAT • NOTĂ: Vă rugăm nu selectați modul HEAT (încălzire) dacă aparatul cumpărat de dumneavoastră are numai funcții de răcire. Modul încălzire nu este disponibil pentru aparatele care au numai funcții de răcire. - Page 41 Funcțiile butoanelor Hibernare (SLEEP) Poate menține cea mai confortabilă temperatură și economisi energie. Această funcție este disponibilă numai în modurile COOL, HEAT sau AUTO. Pentru detalii, consultați secțiunea „Hibernare” din manualul de utilizare. – NOTĂ: Când unitatea funcționează în mod SLEEP, această...
- Page 42 Funcțiile butoanelor Oscilare (SWING1) Folosit pentru a porni sau opri funcție de auto-oscilare a voletei superioare. Oscilare (SWING2) Folosit pentru a porni sau opri funcție de auto-oscilare a voletei inferioare. Temporizator (TIMER) Apăsați acest buton pentru a iniția secvența de temporizare automată.
-
Page 43: Indicatori Pe Ecranul Lcd
Indicatori pe ecranul LCD Mod afisaj Informațiile sunt afișate când telecomanda este pornită. AUTO COOL HEAT Afișat când sunt transmise date. Afișat când telecomanda este pornită. Afișarea bateriei (detecție baterie descărcată). Indică faptul că funcția LOCK este activată. Afișat în modul de funcționare ECO (nu e disponibil). Afișat când este activat temporizatorul TIMER ON Afișat când este dezactivat temporizatorul TIMER OFF. - Page 44 Indicatori pe ecranul LCD Mod afisaj Afișat când este activată funcția FRESH (nu e disponibil). Afișat în mod Hibernare. Afișat când este activată oscilarea voletei superioare. Afișat când este activată oscilarea voletei inferioare. Indicații pentru viteza ventilatorului 1%~10% speed 11%~20% speed 21%~30% speed...
-
Page 45: Modul De Utilizare A Butoanelor
Modul de utilizare a butoanelor Funcția AUTO AutoAsigurați-vă că unitatea este conectată la sursa de electricitate. Indicatorul MOD DE FUNCȚIONARE de pe ecranul de afișaj al unității de interior începe să semnalizeze. 1. Apăsați butonul MODE pentru a selecta Auto. 2. -
Page 46: Funcția De Răcire/Încălzire
Modul de utilizare a butoanelor Funcția de răcire/încălzire ÎncălzireAsigurați-vă că unitatea este conectată la sursa de electricitate. 1. Apăsați butonul ON/OFF pentru a porni aparatul de aer condiționat. 2. Apăsați butonul MODE pentru a selecta modul COOL, HEAT (numai pentru modelele cu funcție de răcire și încălzire). -
Page 47: Funcția Dezumidificare
Modul de utilizare a butoanelor Funcția dezumidificare Asigurați-vă că unitatea este conectată la sursa de electricitate. Indicatorul MOD DE FUNCȚIONARE de pe ecranul de afișaj al unității de interior începe să semnalizeze. 1. Apăsați butonul MODE pentru a selecta Dry. 2. -
Page 48: Funcția Temporizator
Modul de utilizare a butoanelor Funcția Temporizator TemporizatorApăsați butonul TIMER pentru a programa unitatea. Pentru a activa funcția Auto-on. 1. Apăsați butonul TIMER, indicatorul Timer on “ ” va fi afișat și va semnaliza, iar ultimul interval de timp stat și simbolul “h”... - Page 49 Modul de utilizare a butoanelor Pentru a activa funcția Auto-off 1. Apăsați butonul TIMER, indicatorul Timer off (“ ”) va fi afișat și va semnaliza, iar ultimul interval de timp stat și simbolul „h” vor fi afișate pe ecranul LCD. Acum funcția Auto- off poate fi activată.
- Page 50 ATENȚIE: • Când selectați funcția temporizator, telecomanda transmite automat semnalul către unitatea de interior pentru timpul specificat. Țineți așadar telecomanda într-un loc de unde să poată transmite informația unității de interior. • Timpul efective de funcționare setat de telecomandă pentru funcția temporizator este limitat la următoarele opțiuni: 0.5, 1.0, 1.5, 2.0, 2.5, 3.0, 3.5, 4.0, 4.5, 5.0, 5.5, 6.0, 6.5, 7.0, 7.5, 8.0, 8.5, 9.0, 9.5, 10, 11, 12, 13, 14, 15,16,17, 18, 19, 20, 21, 22, 23 și 24.
- Page 51 Exemplu de setare a temporizatorului TIMER ON (Funcția Auto-on) Funcția TIMER ON este utilă atunci când vreți ca unitatea să pornească automat înainte de a reveni Pornit acasă. Aparatul de aer condiționat va porni automat la Oprit ora stabilită. Setare 6 ore mai târziu Exemplu: Pentru a porni aparatul de aer condiționat în 6 ore...
- Page 52 Exemplu de setare a temporizatorului TIMER OFF (Funcția Auto-off) Funcția TIMER OFF este utilă atunci când vreți ca unitatea să se oprească automat atunci când vă culcați. Aparatul de aer condiționat se va opri automat la ora stabilită. Exemplu: Pentru a opri aparatul de aer condiționat în 10 ore. Oprit 1.
-
Page 53: Utilizarea Telecomenzii
Utilizarea telecomenzii Locația telecomenzii. • Folosiți telecomanda la o distanță de maxim 8 m de aparat, îndreptând-o către receptorul acestuia. Recepția este confirmată cu un semnal sonor. ATENTIE • Instalaţia de aer condiţionat nu va funcţiona dacă sunt perdele, uşi sau alte materiale care blochează semnalul de la telecomandă... - Page 54 Utilizarea telecomenzii Înlocuirea bateriilor • Următoarele situații indică descărcarea bateriilor. Înlocuiți bateriile descărcate cu unele noi. • Semnalul sonor nu este emis când un semnal este transmis. • Indicatorul se vede slab. • Telecomanda este activată de două baterii uscate (R03/LR03X2) ținute în partea din spate și protejate cu o carcasă.
- Page 55 Toate imaginile din acest manual, au scop pur informativ. Forma reala a produsului pe care l-ati cumparat poate fi usor diferita insa functiile si operatiile sunt aceleasi. Compania nu isi asuma nici o responsabilitate pentru greselile de tipar. Aspectul fizic si specificatiile tehnice se pot schimba fara o notificare prealabila datorita imbunatatirii continue a echipamentelor noastre.
- Page 56 AIR CONDITIONING SYSTEMS REMOTE CONTROLLER Please check the applicable models, F-GAS and manufacturer information from the “Owner’s Manual - Product Fiche” in the packaging of the outdoor unit. (European Union products only).
Need help?
Do you have a question about the V4MRFI-24 and is the answer not in the manual?
Questions and answers