Table of Contents
Advertisement
Quick Links
Advertisement
Table of Contents

Subscribe to Our Youtube Channel
Related Manuals for SBS SBS-3500


Summary of Contents for SBS SBS-3500
- Page 1 SBS-3500 Portable Density Meter From Firmware Version V1.54 Instruction Manual...
- Page 2 (print, photocopy, microfilm or any other process) without the prior written permission of SBS. Trademarks may be used in this instruction manual without being marked as such. These are the property of their respective owners and are legally protected.
-
Page 3: Table Of Contents
Contents About the Instruction Manual ......................6 Safety Instructions ..........................7 Measuring Principle ..........................9 SBS-3500 – An Overview ........................10 Checking the Supplied Parts ....................... 11 Description of the Instrument ......................13 Front View ........................... 13 Rear View ............................ 15 Display ............................ - Page 4 9.1.2 Calculating a Temperature Coefficient ................28 9.1.3 Importing Custom Functions ....................28 Selecting Measuring Methods ....................29 Application of the method selection ...................... 29 9.2.1 Entering a New Method ...................... 29 9.2.2 Entering Method Lists ......................30 9.2.3 Editing a Method ......................... 32 9.2.4 Deleting a Method ......................
- Page 5 Cleaning and Storing the Instrument ....................42 10.1 Cleaning the Measuring Cell ....................... 42 10.2 Cleaning the Filling Pump ......................42 10.3 Cleaning the Pump Housing ......................42 10.4 Cleaning the Housing and Display ....................43 10.5 Storing the Instrument ........................ 43 Maintenance ...........................
-
Page 6: About The Instruction Manual
About the Instruction Manual This instruction manual informs you about the installation and the safe handling and use of the product. Pay special attention to the safety instructions and warnings in the manual and on the product. This instruction manual is a part of the product. Keep this instruction manual for the complete working life of the product and make sure it is easily accessible to all people involved with the product. -
Page 7: Safety Instructions
SBS only warrants the proper functioning of the SBS-3500 if no adjustments have been made to the mechanics, electronics, and firmware. • Only use the SBS-3500 for the purpose described in this instruction manual. SBS is not liable for damages caused by incorrect use of the SBS-3500. Installation and Use •... - Page 8 • Do not leave sample/rinsing containers uncovered. Clean all spillages immediately. • Make sure that the setup location is sufficiently ventilated. The environment of the SBS-3500 must be kept free of flammable gases and vapors. • Supply a fire extinguisher.
-
Page 9: Measuring Principle
Measuring Principle Definition of Density The density ρ of a sample is defined as its mass divided by its volume: Density is a temperature-dependant measuring unit. The Oscillating U-Tube Principle The sample is introduced into a U-shaped borosilicate glass tube that is being excited to vibrate at its characteristic frequency electronically. -
Page 10: Sbs-3500 - An Overview
The SBS-3500 is operated via seven keys. 1024 measuring data including date, time and sample ID can be stored in the memory of the SBS-3500 density meter and can be recalled, exported to a PC or printed later. The transfer of the stored measuring data to a printer or PC is done wireless using an infrared interface (IrDA). -
Page 11: Checking The Supplied Parts
Checking the Supplied Parts The SBS-3500 was tested and packed carefully before shipment. However, damage may occur during transport. Keep the packaging material (box, foam piece) for possible returns and further questions from the transport company or insurance company. Check the delivery for completion by comparing the supplied parts to those given in Table 5.1 If a part is missing, contact your SBS representative. - Page 12 Table 5.1 – Supplied Parts Symbol Pcs. Article Description Mat. No. SBS-3500 portable density meter 84138 SBS-3500 Tag&Log portable density 87448 meter Instruction Manual English 88155 Filling tube (standard 180 mm) 68527 Luer adapter ¼” UNF (for syringe 64792 filling)
-
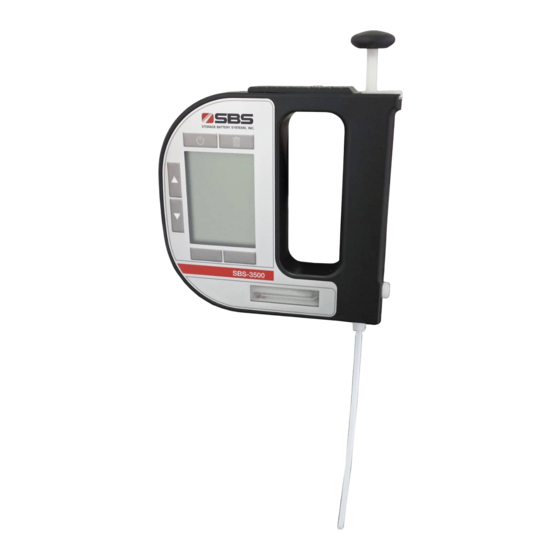
Page 13: Description Of The Instrument
Fig. 6-1 Front View of SBS-3500 1 – Built-In Pump 2 – Screw Plug 3 – Measuring Cell 4 – Softkeys 5 – Operating Keys 6 – RFID Interface (only for SBS-3500 versions with RFID Interface) 7 – Graphical, Monochrome LC Display Page 13... - Page 14 Fig. 6-2 Top View of SBS-3500 1 – Built-In Pump 2 – Fixing Screw of the Pump Lock 3 – Pump Lock 4 – Infrared Interface (IrDA) Keys at the Front Side For switching the instrument on and off. For deleting measuring data, entries and characters during an entry.
-
Page 15: Rear View
Rear View Fig. 6-3 Rear view of SBS-3500 1 – Data Storage Key 2 – Type Plate 3 – Custom Functions (Optional) 4 – Mark for the correct battery insertion 5 – Calibration Number (Optional) Key at the Rear Side For starting a measurement and storing results in the memory. -
Page 16: Display
5 – Warning Sign 6 – Measuring Value 7 – Sample Temperature ºC/ºF 8 – Softkey Configuration 9 – Sample ID 10 – Method 11 – Custom Offset 12 – Measuring Unit Only for SBS-3500 versions with RFID interface Page 16... - Page 17 Symbols on the Display Page 17...
-
Page 18: Operating The Sbs-3500
Operating the SBS-3500 Connecting the Filling Tube • Screw in the filling tube by hand until you feel some resistance against turning. Do not use any tools for screwing in the filling tube. Fig. 7-1 Connecting the filling tube Attaching the Syringe Adapter Remove the screw plug at the side of the instrument Screw in the Luer adapter (see Chapter 5) by hand until you feel some resistance against turning. -
Page 19: Switching The Instrument On
To switch the instrument off, press the key until “Power Off” is displayed. If the instrument is in the energy saving mode (see Chapter 8.4), the SBS-3500 switches automatically off after 3, 5, or 10 minutes inactivity (depending on the setting). -
Page 20: Defining The Basic Settings
Your settings are saved and the measuring results are shown in the selected units. Sound Settings When sound is enabled, the SBS-3500 beeps when it is switched on and off and when a key is pressed. When sound is disabled, the instrument only beeps when it is switched on and off. -
Page 21: Backlight
Allocation of the Softkey Function On the front side of the SBS-3500 are two softkeys. When the instrument displays the main screen, the left softkey always takes you to the main menu. The right softkey can be allocated with one out of three predefined functions. -
Page 22: Password Protection
RFID Enables importing RFID tags that are allocated to a method or sample ID. The method or sample ID allocated will automatically be used for the following measurements. Store Provides the same functionality as the key on the back of the instrument and starts and stores a measurement. -
Page 23: Date And Time Settings
Date and Time Settings During operation the information header always displays the current date and time. Date and time have to be set once during initial startup of the instrument. To set date and time Press <Menu> and select “Setup > Date and Time > Set Date and Time”. Enter the current day, month and year using the arrow keys and confirm each of your selections by pressing <OK>. -
Page 24: Exporting The System Settings To A Pc
If your PC has no IrDA interface, install the IrDA USB adapter on your PC. Hold the IrDA interface of SBS-3500 to the IrDA interface of your PC to establish communication between the two instruments. -
Page 25: Performing A Measurement
Performing a Measurement General Instructions for measuring WARNING Handling samples with temperatures of more than 70ºC bears the danger of heavy burns. Make sure you wear protective clothes or ensure alternative protection from burns when handling high temperature samples. NOTICE Before performing a measurement, make sure that the wetted parts are resistant to the sample (see Chapter 15). -
Page 26: Selecting The Measuring Unit
Contact your SBS representative to obtain a custom function from SBS. All measuring units are derived from the density of the sample at the measured temperature. - Page 27 α. For determining degree Baumé there are two different calculation methods depending on whether the density is above or below the density of water. Depending on the density of the measured liquid, SBS-3500 automatically switches between the two calculation methods. H2SO4 H2SO4 % w/w Concentration of sulfuric acid or battery acid in % by weight.
-
Page 28: Calculating A Temperature Coefficient
On your PC, right click on the file you want to transmit and choose “Send to > Infrared Recipient”. The custom function list is sent to the SBS-3500 and the custom functions are then available as measuring units. Page 28... -
Page 29: Selecting Measuring Methods
Selecting Measuring Methods Application of the method selection You can define and store measuring methods in your SBS-3500, providing a great contribution to a more efficient organization of your measuring processes, especially if you want to measure many different substances according to different measuring units. -
Page 30: Entering Method Lists
If you plan to set up or edit large method lists, you can do so conveniently on the PC and then import the list to the SBS-3500. If you own several SBS-3500 instruments, you can import the same method list to all instruments to get several identical instruments. - Page 31 To Enter Method Lists If your PC has no IrDA interface, install the IrDA USB adapter to your PC. Hold the IrDA interface of the SBS-3500 to the IrDA interface of your PC to establish communication between the two instruments.
-
Page 32: Editing A Method
Save your changes. Press <Menu> and select “Setup > Import / Export > Receive from PC”. Hold the IrDA interface of the SBS-3500 to the IrDA interface of your PC to again establish communication between the two instruments. On your PC, right click on the file you want to transmit and select “Send to > Infrared Recipient”. -
Page 33: Assigning A Sample Id
Assigning a Sample ID You can assign different sample IDs to samples. This function helps to uniquely assign measuring data to • Samples (sample identification) • Users who performed the measurement (user identification) • The measuring point where the sample was taken, etc. You can save up to 100 different sample IDs to samples. -
Page 34: Changing The Sample Id
Save your changes. Press <Menu> and select “Setup > Import / Export > Receive from PC”. Hold the IrDA interface of the SBS-3500 to the irDA interface of the PC again to establish communication between the two instruments. On the PC right mouse-click on the file you want to send and select “Send to > Infrared Recipient”. -
Page 35: Selecting A Sample Id
RFID tags that support data exchange on a frequency of 125 kHz and are equipped with chip type “Hitag S2048”. The communication range of the RFID receiver integrated in the SBS-3500 is about 2 cm. The tag has to be situation within this area to enable data exchange with the SBS-3500. -
Page 36: Selecting A Method And/Or Sample Id Via Rfid
Navigate to the tick symbol using the arrow keys and press <Save>. An RFID tag may only be allocated to one method and/or sample ID. If you try to allocate an RFID tag to more than one method and/or sample ID. If you try to allocate an RFID tag to more than one method and/or sample ID, the message “RFID in use”... -
Page 37: Filling With The Plastic Syringe
9.5.1 Filling Using the Filling Tube Press down the pump lever as far as it will go (see Fig. 9 – 1). Submerge the filling tube in the sample. Slowly release the pump lever. Fig. 9 – 1 Filling sample using the filling tube 9.5.2 Filling with the Plastic Syringe NOTICE... -
Page 38: Performing A Measurement
Switch on the printer with the IrDA interface. Press the <Print> key when the measured value appears on the display. Hold the IrDA interface of the SBS-3500 to the IrDA interface of the printer to establish communication between the printer and density meter. -
Page 39: Accessing Saved Measuring Data
Exporting measuring data to a PC does not require a special program. You just need a PC with an infrared interface or a PC with an IrDA USB adapter installed and connected. Contact your SBS representative if you need an IrDA USB adapter for your PC. - Page 40 Select the measured value required for export using the arrow keys. Press <Export>. Hold the IrDA interface of the SBS-3500 to the IrDA interface of the PC to establish communication between the two instruments. Select <Export Selected> to export the selected measured value to the PC.
-
Page 41: Printing The Saved Measuring Data
Select the measured value required for printing using the arrow keys. Press <Export>. Select <Print Selected> to print the selected measured value. Hold the IrDA interface of the SBS-3500 to the IrDA interface of the printer to allow communication between the printer and density meter. The measured value is printed. -
Page 42: Cleaning And Storing The Instrument
Insert the pump and close the pump lock. 10.3 Cleaning the Pump Housing The SBS-3500 is completely sealed against the outside and the pump. Therefore, you can rinse the pump housing with running tap water if the housing is dirty. -
Page 43: Cleaning The Housing And Display
10.4 Cleaning the Housing and Display To clean the housing and display, use a soft cloth dipped in ethanol or warm water. If necessary, you can use a mild solvent (pH < 10). 10.5 Storing the Instrument Before storing the instrument for a longer period of time, clean the measuring cell as described in Chapter 10.1. -
Page 44: Maintenance
Maintenance 11.1 Changing the Batteries You can see the status of the battery by looking at the battery symbol in the top right-hand corner of the display. The following statuses are possible: When the batteries are almost empty, the warning “Low Battery” is displayed. After the second warning “Battery Empty”, the instrument switches itself off. - Page 45 Fig. 11-1 Removing the pump Screw out the screw of the pump lock using an Allen key size 2.5 and remove the screw. Fig. 11-2 Removing the pump lock screw Remove the pump lock by sliding it outwards. Fig. 11-3 Removing the pump lock Page 45...
-
Page 46: Carrying Out A Firmware Update
Check that the instrument is working properly by switching it on and checking the display. 11.2 Carrying out a Firmware Update Your SBS representative will inform you when a new firmware update for your SBS-3500 is available. After receiving the update file, you can import it into the instrument. -
Page 47: Device Information
If your PC has no IrDA interface, install the IrDA USB adapter on your PC. Press <Menu> and select “Setup > Import / Export > Send to PC > Device Information.” Hold the IrDA interface of the SBS-3500 to the IrDA interface of the PC to establish communication between the two instruments. -
Page 48: Exporting Adjustment Date
If your PC has no IrDA interface, install the IrDA USB adapter of your PC. Press <Menu> and select “Setup > Import / Export > Send to PC > Adjustment.” Hold the IrDA interface of the SBS-3500 to the IrDA interface of the PC to establish communication between the two instruments. -
Page 49: Readjustment
Readjustment To ensure accurate results it is necessary to clean the measuring cell before and after each measurement series. If the measuring cell is not sufficiently cleaned, residue can form in the measuring cell. This can be noticed if the density values for deionized water begin to deviate. Therefore, perform regularly check measurements with deionized water. -
Page 50: Custom Adjustment
12.3 Custom Adjustment You can also use any other reference liquid with a known density at 20ºC and known temperature coefficient for your readjustment. We recommend using the customer adjustment e.g. if you measure only liquids in a specific density range (e.g. -
Page 51: Error Messages And Warnings
The battery is empty. Error 01 The temperature is invalid. Error 02 The period is invalid. Error 03 SBS-3500 has no adjustment data NOTICE If the error messages “Error 01” to “Error 04” occur, send in your instrument for service. Page 51... -
Page 52: Technical Data
Technical Data Measuring range: Density: 0 to 3 g/cm3 Temperature: 0 to 40ºC (32 to 104ºF) Viscosity: 0 to approx. 1000 mPa Accuracy: Density 0.001 g/cm Temperature: 0.2ºC Repeatability, s.d.: Density: 0.0005 g/cm Temperature: 0.1ºC Resolution: Density: 0.0001 g/cm Temperature: 0.1ºC Sample volume: Approx. -
Page 53: Wetted Parts
The following materials are in contact with samples and the cleaning liquids. Material Part Borosilicate glass Measuring cell PTFE (Polytetrafluoroethylene) Filling tube, piston for hand pump PVDF (Polyvinylidene fluoride) Connection block, bolt Kalez Oscillator sealing PP (Polypropylene) GF Housing for SBS-3500 Page 53... -
Page 54: Appendix A: Density Of Water (0ºc To 40ºc)
Appendix A: Density of Water (0ºC to 40ºC) Excerpt from: Spieweck, F. & Bettin, H.: Review: Solid and liquid density determination. Technisches Messen 59 (1992) pp. 285-292 Page 54... -
Page 55: Appendix B: Measuring Unit Details
Appendix B: Measuring Unit Details Page 55... - Page 56 Page 56...
- Page 57 Page 57...
-
Page 58: Appendix C: Menu Tree
Appendix C: Menu Tree Page 58... - Page 59 Page 59...
Need help?
Do you have a question about the SBS-3500 and is the answer not in the manual?
Questions and answers