
Related Manuals for SEFRAM 9862


Summary of Contents for SEFRAM 9862
- Page 1 SEFRAM 9862 Hot Wire Anemometer Instruction Manual Tel : 04 77 59 01 01 32, rue Edouard Martel Fax : 04 77 57 23 23 BP55 F42009 – Saint Étienne Cedex 2 Web : www.sefram.fr E-mail: sales@sefram.fr...
-
Page 2: Table Of Contents
Hot Wire Anemometer CONTENTS TITLE PAGE 1. General Description….…………………………………………………….……………..1 2. Safety Information………………………………………………………………………... 1 3. Application……………….……………………………………………………………….1 4. Features……………….…………………………………………………………………. 1 5. Specifications……………………………………………………………………………... 2 6. Symbol Definition and Button Location………............3 7. Button Instructions…….…………………….…………………........6 7.1 Power ON/OFF/ Backlight button……………………………......6 7.2 Data-Hold button……………................6 7.3 MAX/MIN/AVG button………................6 7.4 Flow button…..……………..................6 7.5 Unit button…..…………………….................7 7.6 °C /°F Button………………….………………………..........7... -
Page 3: General Description
Hot Wire Anemometer 1. GENERAL DESCRIPTION Thank you for choosing our Hot Wire Anemometer. To ensure the safety and the best performance of this instrument, we recommend you to read and follow the manual carefully before operation. 2. SAFETY INFORMATION Read the following safety information carefully before attempting to operate or service the meter. -
Page 4: Specifications
Hot Wire Anemometer Battery Life indicator. Adjustable auto power off timer. Air velocity compensation in atmospheric pressure. Tilt Stand. 5. SPECIFICATIONS Velocity Probe Range: 0 to 30 m/s(0 to 6000 ft/min) 0 to 999900 m /min(ft /min) -20 ºC ~60 ºC (-4 ºF ~140 ºC) 0~100%RH... -
Page 5: Symbol Definition And Button Location
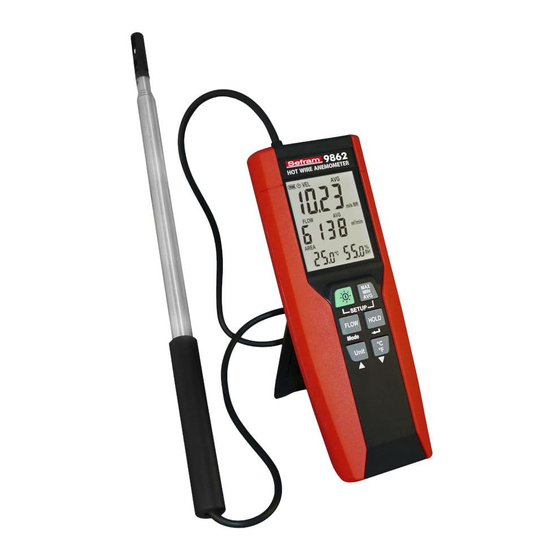
Hot Wire Anemometer Instruction manual, battery 9V Alkaline x 1 pcs, carrying Standard Accessories: case. 6. SYMBOL DEFINITION & BUTTON LOCATION : Battery condition indicator : Air velocity indicator : Air velocity Minimum indicator : Air velocity Maximum indicator : Air velocity Average indicator : Auto Power Off enabled indicator : Air velocity reading : Air velocity measurement units... - Page 6 Hot Wire Anemometer : Multiply reading by ten : Multiply reading by one hundred : Multiply reading by one thousand : Air flow measurement units : Area setting units : Duct Area indication : Round Duct diameter dimension indication : Rectangle Duct X and Y dimension indication : Pressure indication : Temperature reading : Temperature measurement units...
- Page 7 Hot Wire Anemometer ○ , ○ , Sensor Probe (Measurement direction) Protective Shutter ○ , ○ , Telescoping Probe Display Screen ○ , ○ , Power ON/OFF and Back Light Button MAX MIN AVG Button ○ , ○ , FLOW MAX 2/3VMAX AVG Button DATA HOLD Button ○...
-
Page 8: Button Instructions
Hot Wire Anemometer 7. BUTTON INSTRUCTIONS 7.1 Power ON/OFF/ Backlight Button: Press the button to turn on the meter and then press the to turn on the LD backlight. Press again to turn off backlight. This makes it easier to read in dark environment. The backlight will be automatically turned off after 30 seconds to save battery power. -
Page 9: Unit Button
Hot Wire Anemometer button again, the “ ” symbol blinks together, the (4) Press readings shows real time data. To exit MAX/2/3V MAX/AVG mode: Press and hold button for 2 seconds to exit MAX/2/3VMAX/AVG mode. 7.5 Unit Button: Press to select the desired unit of air velocity. 7.6 °C/°F Button: Press to select the desired unit of temperature. - Page 10 Hot Wire Anemometer Fig.3 Set Round Duct diameter dimension. Fig.4 Set Rectangle Duct X dimension. Fig.5 Set Rectangle Duct Y dimension. Fig.6 Set absolute pressure. Fig.7 Set auto power off time.
-
Page 11: Menu Description
Hot Wire Anemometer 8.3 Menu Description: 8.3.1 Set Duct Area ○ There are 3 types : Duct Area (AREA), Round Duct ( ), Rectangle Duct ( (1) Press the button to select the type and then press the button to confirm your choice. -
Page 12: Measuring Procedure
Hot Wire Anemometer 9. MEASURING PROCEDURE Extending the Probe Open the protective shutter and then extend the probe. Do not hold the cable while extending the probe. Using the telescoping Probe Put the probe in the right position and make sure that the sensor window is fully exposed and is facing upstream ✽... -
Page 13: Ac Adapter Connection
Hot Wire Anemometer 10.2 AC Adapter Connection: When the AC adapter is used, insert the plugs of the adapter into the USB connector on the side panel. Note: When the AC adapter is connected while battery is inserted, the unit will be powered from the adapter (the AC adapter has priority).
Need help?
Do you have a question about the 9862 and is the answer not in the manual?
Questions and answers