Table of Contents
Advertisement
Quick Links
OPERATING INSTRUCTIONS
Economical Minidrum
Hygrothermograph
R0 1/01
Visit us at www.TestEquipmentDepot.com
1. Introduction
Thank you for selecting the OAKTON economical minidrum hygrother-
mograph 35701-00. This precision instrument is useful for monitoring
temperature and relative humidity conditions over time. It creates a
permanent chart recording of these measurements for your records.
Features include:
• 7 day rotation chart
• quartz-controlled drive that maintains consistent drum speed even
when batteries are weak
• Built-in digital clock with date and time
Typical applications include general weather measurements, agriculture,
horticulture, test laboratories, humidity chambers, computer rooms,
machinery rooms, food storage facilities, warehouses, museums, bank
vaults, film and book storage facilities.
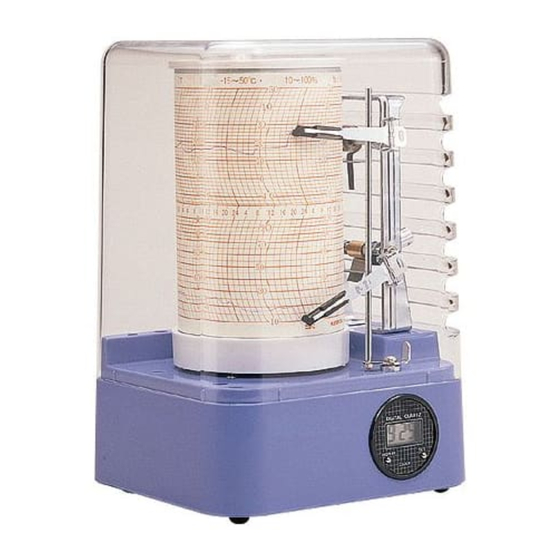
Components
1
1.
Protective cover
2
2.
Pen arm and pen tip
for temperature
3
3.
Paper holder
4
4.
Pen guide
5.
Cylinder drum with
5
quartz clock
6
6.
Pen arm and pen tip
for humidity
7
7.
Pen lift lever
8.
Mounting brackets
8
(located on back)
9
9.
Digital clock
Unpacking
Hygrothermograph includes: 55 sheets of 7-day, °C chart paper, one AA
battery, and one LR41 button cell battery.
1.
Remove all components from the packing material.
2.
Carefully lift up and remove the acrylic protective cover.
3.
Remove the air pack from the cylinder.
4.
Push the pen lift lever away from you to pull the temperature and
humidity pens to their resting position.
OAKTON 35701-00
99 Washington Street
Melrose, MA 02176
Phone 781-665-1400
Toll Free 1-800-517-8431
2. Hygrothermograph Set Up
2.1 Inserting cylinder drum battery
Gently turn the hygrothermograph base on
its side. Load the AA battery in the battery
compartment at the bottom of the hygro-
thermograph base. Note polarity as shown
inside the battery compartment and in
figure
at right.
A
We recommend that you replace the AA
battery every six months.
2.2 Chart paper
Make sure to write the recording start date
on top of the chart before replacing the
chart paper.
To replace chart paper:
1.
Gently lift the cylinder drum straight up
to remove it from the cylinder shaft.
2.
Release paper holder by pushing up the
top of the holder with your thumb.
B
See figure
3.
Wrap the new chart onto the cylinder so
that the two ends of the paper overlap.
C
See figure
4.
Snap the paper holder back into place to
secure this overlapping section.
5.
Make sure the markings on the paper
line up where the overlap occurs.
6.
Push the cylinder drum down onto the
cylinder shaft until the groove in the
cylinder shaft appears above the cylin-
der drum. Set chart time (see below).
NOTE: The cylinder drum comes with one
sheet of 7-day chart paper already attached,
plus 55 additional sheets of chart paper.
The graduations on the chart are specific to
this unit, so you need to use replacement
chart paper intended for this model. See
"Accessories" to order extra chart paper.
2.3 Setting the chart time
1.
Push the pen lift lever away from you
to move the temperature and humidity
pens to their resting position.
D
See figure
2.
Turn the cylinder drum one full
rotation clockwise.
See figure
E
3.
Turn the cylinder drum counterclock-
wise until the pen tips align with the
correct time of day or night. Numbers
indicating time are located at the center
of the chart paper.
4.
Pull the pen lift lever towards you to
return the temperature and humidity
pens to their ready position.
NOTE: Make sure that the numbers on the
graph are right side up. Change the chart
paper when the cylinder has completed
one rotation.
2.4 Cartridge Pens
To operate the pens:
1.
Push the pen lift lever away from you to
move the pens to their resting position.
F
See figure
2.
Gently pull off the pen caps.
3.
Pull the pen lift lever towards you until
the pens are touching the paper on the
cylinder drum.
NOTE: Do not touch the pen tips, because skin oils will prevent the ink
from flowing smoothly.
To replace the pens:
The pen tips can be used for up to a year, but we recommend that you
replace them at least every six months. Conditions such as high temper-
ature or low humidity may shorten pen life to three months. See
"Accessories" to order extra pens.
1.
Hold the pen arm in your right hand
and pull the pen cartridge off with your
left hand. If it is difficult to pull off, use
a small pliers.
See figure
G
2.
To attach the replacement cartridge pen, insert it over the arm until it
is fully attached.
+
–
A
push
paper
holder
up here
with
thumb
to
release
B
paper
overlap
C
D
E
F
G
Advertisement
Table of Contents

Subscribe to Our Youtube Channel
Related Manuals for Oakton 35701-00


Summary of Contents for Oakton 35701-00
- Page 1 Turn the cylinder drum one full Thank you for selecting the OAKTON economical minidrum hygrother- rotation clockwise. mograph 35701-00. This precision instrument is useful for monitoring See figure temperature and relative humidity conditions over time. It creates a Turn the cylinder drum counterclock- permanent chart recording of these measurements for your records.
- Page 2 09376-01 Replacement batteries, 1.5 V AA. Pack of four 9. Warranty OAKTON warrants this instrument to be free from significant deviations in material and workmanship for a period of one year from date of pur- chase. If repair or adjustment is necessary and has not been the result of abuse or misuse within the warrantied time period, please return—...
Need help?
Do you have a question about the 35701-00 and is the answer not in the manual?
Questions and answers