Table of Contents

Related Manuals for Addvent AVAC9000


Summary of Contents for Addvent AVAC9000
- Page 1 AVAC9000 Portable Air Conditioner Installation Instructions User Guide IMPORTANT SAFEGUARDS WHEN USING ANY ELECTRICAL APPLIANCE, BASIC SAFETY PRECAUTIONS SHOULD ALWAYS BE FOLLOWED. PLEASE READ ALL INSTRUCTIONS CAREFULLY AND RETAIN FOR FUTURE REFERENCE...
-
Page 2: Safety Instructions
Safety Instructions WARNING This appliance can be used by children aged from 8 years and above and persons with reduced physical, sensory or mental capabilities or lack of experience and knowledge if they have been given supervision or instruction concerning use of the appliance in a safe way and understand the hazards involved. - Page 3 To avoid tripping the circuit, do not use an extension cord for this unit. To turn on your unit, insert the plug into the socket and press the power button. Do not bend or crush the warm air exhaust hose. Do not place the power cord under a carpet.
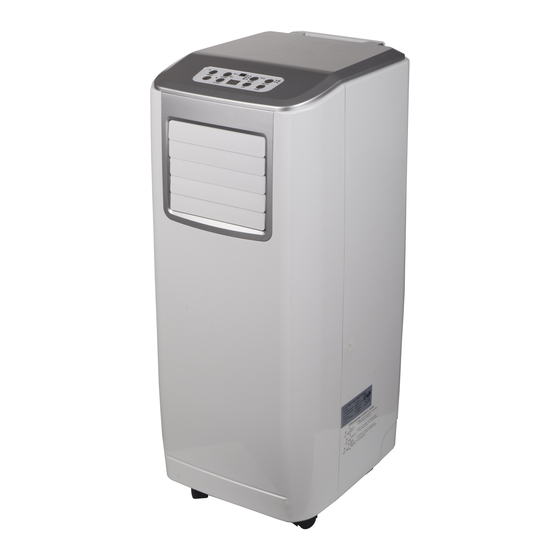
- Page 4 Components 1. Control panel 5. Exhaust air outlet 8. Air inlet 2. Carrying handle 6. Air filter 9. Cord storage 3. Air outlet 7. Water stopper/ 10. Air inlet drainage point 4. Air filter 11. Exhaust hose 12. Adaptor - for insertion over hose and into window spacer (or into hole in the wall/window).
-
Page 5: Installation Of The Exhaust Pipe
Installation Installation of the exhaust pipe The unit is a portable air conditioner that may be moved from room to room. Using the extendable slide Extendable slide FIG. 4 Offer window spacer to the window gap and adjust the length as you need. Feed exhaust hose through the window spacer and slide window across so that spacer is held securely. -
Page 6: Mounting Of The Exhaust Pipe
Mounting of the exhaust pipe Use only the hose provided FIG. 7 and clip exhaust hose to the back of the air conditioner FIG. 8 Avoid kinks and bends in the exhaust hose as this will cause expelled moist air to build up causing the unit to overheat and shut down. -
Page 7: Installation Of The Carbon Filter
Installation of the carbon filter FIG. 11 1. Remove the filter frame from the unit. 2. Remove the active carbon filter from its plastic bag. 3. Insert the active carbon filter into the back of the unit. 4. Re-fit the filter frame inside the unit. ... -
Page 8: Operation
Operation Control panel FIG. 13 ON/OFF (power) button Display window Mode (function) option Receiver for remote control button High ventilation indicator Speed (ventilation)button Low ventilation indicator “Timer” button Automatic mode indicator ‘Temperature down ‘ button Cooling mode indicator ‘Temperature up’ button Fan mode indicator “Sleep”... -
Page 9: Turning On/Off
Turning ON/OFF 1. Press ON/OFF button, the unit will start in AUTO (automatic) mode. Automatic mode In automatic mode, the unit can cool or ventilate depending on ambient temperature and setpoint adjustment. The unit is preset as follows: If ambient temperature is above 23°C the unit is in automatic cooling mode and is running according to the setpoint (Default setting 24°C). -
Page 10: Setting Mode/Function
Setting mode/function Press MODE button to select required working mode: automatic, cooling, fan or dehumidify. The indicator of your selected mode comes on. Setting temperature 1. Press ‘Temperature up’ or ‘Temperature down’ button to regulate the temperature you desired. 2. The display window will show the temperature you set as you press ‘Temperature up’... -
Page 11: Self-Diagnosis
3. The unit will shut down automatically after the SLEEP function running for 12 hours. 4. Please note, the sleep function is not available while the machine is working in AUTO, FAN (ventilation) or DEHUMIDIFICATION mode. 5. When the machine is in Sleep function, the Fan Speed would turn to be LOW speed. - Page 12 Drainage During the process of cooling, some water will be extracted from the air into the unit. If the reservoir is full, both of the compressor and motor will stop and the units would buzz (you can press any button to stop the buzz). The W.F. indicator will flash to show you.
- Page 13 The drain tube may be extended by adding an extension tube and using a suitable connector. FIG. 17 Please note 1. The drain must be at or below the outlet level. 2. Flashing ‘full water’ indicator will not function in this mode of drainage.
-
Page 14: Maintenance
Maintenance Always unplug the air conditioner from the mains before cleaning. To maximize the efficiency of the air conditioner, clean regularly. Cleaning the housing Use a soft, damp cloth to wipe the body clean. Never use aggressive chemicals, gasoline, detergents, chemically treated cloths, or other cleansing solutions. -
Page 15: Fault Check List
Fault Check List The air conditioner does not run Is the air conditioner plugged in? Is there a power failure? Is the comp / ‘full water’ indicator flashing? Is the room temperature below the set temperature? The machine seems to do little Is there direct sunshine? (Please put down the curtain.) Are too many windows or doors... -
Page 16: Specification
Specification Model no. AVAC9000 Power supply 220-240V~, 50Hz Cooling capacity 9000BTU/ 2.65KW 2.65KW Power consumption 1020W/4.5A Compressor rotary Refrigerant R-410A Fan speed Timer 1~24 hours Working temperature 18 oC- 32oC Exhaust pipe Ø 142 x 1500 mm N.W. 20.3 kg...
Need help?
Do you have a question about the AVAC9000 and is the answer not in the manual?
Questions and answers