Table of Contents
Advertisement
Available languages
Available languages
Advertisement
Chapters
Table of Contents

Related Manuals for urmet domus Hybrid DVR Series


Summary of Contents for urmet domus Hybrid DVR Series
- Page 1 1093 DS1093-184A Hybrid DVR H.264 CON HDMI / H.264 WITH HDMI Hybrid DVR Hybrid DVR Series 4 CANALI SCH. 1093/534P / 4 CH Ref. 1093/534P 8 CANALI SCH. 1093/538P / 8 CH Ref. 1093/538P 16 CANALI SCH. 1093/536P / 16 CH Ref. 1093/536P...
-
Page 2: Table Of Contents
ITALIANO INDICE Informazioni Generali ..........................3 Descrizione Prodotto ......................3 1.1.1 Caratteristiche Generali ..........................3 Apertura della confezione ....................... 4 1.2.1 Contenuto della confezione .......................... 4 Avvertenze ..........................4 1.3.1 Alimentazione ............................... 4 1.3.2 Precauzioni per la sicurezza ......................... 4 1.3.3 Precauzioni per l’installazione ........................ -
Page 3: Informazioni Generali
INFORMAZIONI GENERALI Caro cliente, La ringraziamo dell’acquisto di questo prodotto. Il presente documento vuole essere una semplice guida rapida che le permetterà una rapida messa in funzione dei modelli di Hybrid DVR URMET S.p.A Serie Hybrid DVR, Sch.1093/534P - Sch.1093/538P - Sch.1093/536P. Prima di usare l’apparecchiatura, leggere la presente guida rapida che ne descrive l’uso corretto e sicuro. -
Page 4: Apertura Della Confezione
APERTURA DELLA CONFEZIONE Verificare che l’imballo ed il contenuto non presentino danni visibili. Se alcune parti non sono presenti o risultano danneggiate, contattare immediatamente il rivenditore. In questi casi non tentare di utilizzare il dispositivo. Se il prodotto dovesse essere rimandato al fornitore, assicurarsi di spedirlo con il suo imballo originale. 1.2.1 CONTENUTO DELLA CONFEZIONE Videoregistratore digitale... -
Page 5: Pulizia Del Dispositivo
1.3.4 PULIZIA DEL DISPOSITIVO Usare un panno asciutto e strofinare leggermente per eliminare polvere e sporcizia. Nel caso in cui la sporcizia non fosse eliminabile con un panno asciutto, compiere l’operazione con un panno inumidito con detergente neutro. Non usare liquidi volatili come benzina, alcool, solventi ecc. o panni trattati chimicamente per pulire il dispositivo al fine di evitare deformazioni, deterioramenti o graffi della finitura della vernice. -
Page 6: Descrizioni Delle Parti
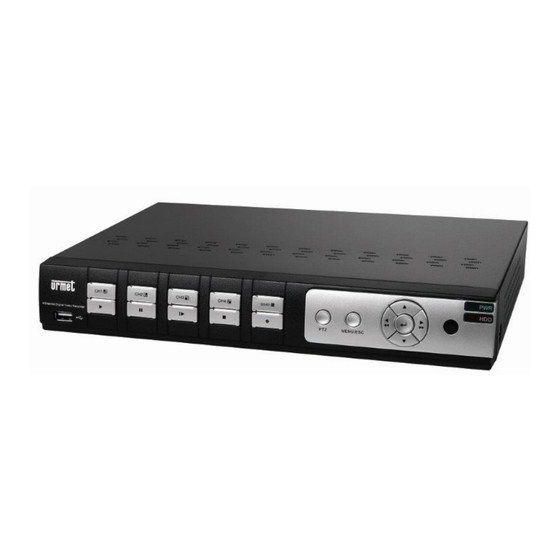
DESCRIZIONI DELLE PARTI PANNELLO ANTERIORE Si ricorda che DVR è l’acronimo di Digital Video Recorder Equipment (Dispositivo di video registrazione digitale). 2.1.1 PANNELLO ANTERIORE HYBRID DVR SCH. 1093/534P 16 17 Funzione Tasto Descrizione Indicatore Se l’indicatore è “verde” il sistema è regolarmente alimentato. accensione Ricevitore IR Riceve il segnale IR dal telecomando... -
Page 7: Pannello Anteriore Hybrid Dvr Sch. 1093/538P E Sch.1093/536P
2.1.2 PANNELLO ANTERIORE HYBRID DVR SCH. 1093/538P E SCH.1093/536P Tipo Funzione Tasto Descrizione Quando l'indicatore "rosso" lampeggia significa che è in corso la lettura o la Indicatore HDD scrittura sul disco rigido Indicatori Indicatore Se l’indicatore è “verde” il sistema è Power regolarmente alimentato Ricevitore... -
Page 8: Pannello Posteriore
PANNELLO POSTERIORE 2.2.1 PANNELLO POSTERIORE HYBRID DVR SCH. 1093/534P Porta fisica Descrizione Ingressi video Connettori CH1-CH4 per ingressi video (BNC) Ingressi audio Ingressi audio (RCA) Uscita audio Uscita audio (RCA) Connettore USB per mouse Porta USB Connettore HDMI per monitor Porta HDMI Connettore VGA per monitor e PC monitor Porta VGA... -
Page 9: Pannello Posteriore Hybrid Dvr Sch. 1093/536P
2.2.3 PANNELLO POSTERIORE HYBRID DVR SCH. 1093/536P Porta fisica Descrizione Ingresso video Connettori CH1-CH16 per ingressi video (BNC) Ingressi audio Ingressi audio CH1-CH8 (RCA) Ingressi audio Connettore per cavo con ingressi audio CH9-CH16 (RCA) Uscita audio Uscita audio (RCA) Connettore USB per mouse Porta USB Connettore HDMI per monitor Porta HDMI... -
Page 10: Funzioni Delle Porte Rs-485/Sensori/Allarme
2.2.4 FUNZIONI DELLE PORTE RS-485/SENSORI/ALLARME Sch. 1093/534P Sch. 1093/538P Sch. 1093/536P Ingresso allarme: collegare il segnale [-] del sensore al pin G (GND) e il segnale [+] all’ingresso del canale 1…16, come da dispositivo di allarme. Uscita allarme: collegare i due segnali contrassegnati da “ALARM”. Porta PTZ: collegare la linea seriale RS-485 della telecamera rispettivamente a RS485A(+) e RS485B(-). -
Page 11: Funzionamento Con Il Mouse
FUNZIONAMENTO CON IL MOUSE Oltre ai tasti del pannello anteriore e del telecomando, per operare sul sistema è possible utilizzare il mouse. TIPO Funzione In modalità menu bloccato, entrare nel menu pop-up e cliccare su qualsiasi sottomenu per far apparire la finestra di login; in modalità menu sbloccato, entrare nel menu pop- up e cliccare con il tasto sinistro del mouse per entrare direttamente in qualsiasi sottomenu. -
Page 12: Messa In Servizio Base Del Dispositivo
MESSA IN SERVIZIO BASE DEL DISPOSITIVO La Serie Hybrid DVR supporta Telecamere AHD, Telecamere Analogiche Standard e Telecamere IP. Per una rapida messa in servizio del dispositivo seguire le indicazioni base. Connettere ai BNC dei canali di ingresso le relative telecamere analogiche e/o AHD desiderate. Prima di installare l’Hybrid DVR controllare che le Telecamere IP funzionino correttamente e siano connesse via cavo alla stessa rete del Hybrid DVR. -
Page 13: Configurazioni Di Base
CONFIGURAZIONI DI BASE CONFIGURAZIONE IP CAMERA MEDIANTE ASSEGNAZIONE MANUALE Se la rete LAN cui è connesso l’Hybrid DVR è provvista di servizio di indirizzamento automatico (DHCP), all’Hybrid DVR verrà assegnato automaticamente un indirizzo IP valido. Per verificare l’indirizzo IP assegnato all’Hybrid DVR dalla rete LAN, è... - Page 14 Per proseguire l’aggiunta manuale delle Telecamere IP: Cliccare su [Search (Ricerca)] per trovare le telecamere IP nella rete, a questo punto selezionare • la telecamera IP che si desidera aggiungere e inserire la password (Default Password: admin), controllare che il protocollo e la porta siano impostati correttamente come mostrato nella figura sottostante (Esempio di Telecamera IP aggiunta nelle figure sottostanti: Porta default: 6060, Protocollo default: U-IPCy).
-
Page 15: Selezione Monitor
L’Hybrid DVR è impostato per avviare automaticamente la registrazione continua delle telecamere assegnate ai canali. Verificare che per ogni telecamera compaia a monitor il simbolo R di color rosso. Nella griglia di anteprima LIVE, di Default l’Hybrid DVR visualizza il MAIN STREAM di tutte le IP camere abilitate e configurate, ma se non ci sono abbastanza risorse in rete, il dispositivo automaticamente visualizza il SUB STREAM di tutti i canali IP. -
Page 16: Parametri Di Registrazione
Salvare le modifiche effettuate selezionando il tasto [Save (Salva)], uscire dal menu e riavviare il dispositivo affinché le modifiche abbiano effetto. PARAMETRI DI REGISTRAZIONE Selezionare [Menù Parameter (Parametri) Record (Registra)] per entrare nel menu [Registra]. Si elencano le seguenti funzioni: Il menu [Record Schedule (Programmazione)] permette l’impostazione delle registrazioni: 24 ore o Normale, su Motion/Allarme e si possono personalizzare per fasce orarie stabilite. -
Page 17: Configurazioni Avanzate
CONFIGURAZIONI AVANZATE CONFIGURAZIONE HARD DISK Selezionare [Menù Device (HDD) HDD (HDD)] e procedere con la configurazione dell’Hard Disk in funzione dell’utilizzo del Cliente, controllando le seguenti opzioni: OVERWRITE (SOVRASCRIVI): Selezionando “AUTO”, nel momento in cui l’Hard Disk è pieno il sistema sovrascriverà... -
Page 18: Aggiornamento Firmware E Caricamento Default
AGGIORNAMENTO FIRMWARE E CARICAMENTO DEFAULT Dopo aver controllato la versione Firmware dell’Hybrid DVR in [Menù System (Sistema) Info (Info)], se quest’ultima non è recente, è possibile aggiornare il software di sistema (Firmware) del Dispositivo, seguendo le istruzioni: Per aggiornare la versione firmware delle telecamere IP connesse all’Hybrid DVR, copiare su chiavetta USB il file di aggiornamento telecamere. -
Page 19: Visualizzazione Da Remoto
VISUALIZZAZIONE DA REMOTO VISUALIZZAZIONE DA SMARTPHONE Accertarsi dal menu “Network (Rete)” che sul DVR siano state impostate tutte le configurazioni appropriate affinché il dispositivo sia raggiungibile attraverso rete locale e, in presenza di connettività, anche attraverso internet. Per maggiori dettagli fare riferimento al paragrafo 4.1. Nel Menù... - Page 20 mancante) e inquadra il codice QR posto sul case del Hybrid DVR. Compilare il campo “Password” inserita precedentemente sul Hybrid DVR e selezionare su “Salva” e attendere una decina di secondi per il caricamento del LIVE del Hybrid DVR. DS1093-184A...
-
Page 21: Visualizzazione Da Browser Pc
VISUALIZZAZIONE DA BROWSER PC Una volta configurati Hybrid DVR e telecamere in rete è possibile collegarsi all’Hybrid DVR tramite browser da: Postazione PC con sistema operativo Windows e browser Internet Explorer o Firefox Postazione MAC con sistema operativo 10.8.0 o superiore e browser Safari versione 6.0 o superiore. La postazione PC o MAC dev’essere connessa sulla stessa rete locale (LAN) cui è... - Page 22 ENGLISH TABLE OF CONTENTS General Information ..........................23 Product description ....................... 23 1.1.1 General features ............................23 Opening the box ........................24 1.2.1 Contents of the box ............................. 24 Warnings ..........................25 1.3.1 Power ................................. 25 1.3.2 Safety precautions ............................25 1.3.3 Installation precautions ..........................
-
Page 23: General Information
Dear Customer, Thank you for having purchased this Urmet product. This document describes how to install and use the URMET Hybrid DVR Series Ref. 1093/534P – Ref. 1093/538P - Ref. 1093/536P. Read this quick guide which contains information for correct, safe use carefully. -
Page 24: Opening The Box
OPENING THE BOX Check that the packing and the contents are not visibly damaged. Contact the retailer immediately if parts are either missing or damaged. Do not attempt to use the device in this case. Send the product back in its original packing if it is damaged. -
Page 25: Warnings
WARNINGS 1.3.1 POWER Only use the power unit provided to power the device. Check mains rating before plugging the power unit in. Do not pull the cable to unplug the device. Switch the device off before unplugging power unit. This operation must not be performed when the Hybrid DVR is recording, playing or from the configuration menu. -
Page 26: Descriptions Of The Parts
DESCRIPTIONS OF THE PARTS FRONT PANEL 2.1.1 REF. 1093/534P HYBRID DVR FRONT PANEL 15 16 17 19 18 Key title Item Remark Function & Description Indicator If the “Green” indicator is on the system is getting power Power Indicator normally. IR Receiver Receives IR signal from Remote Controller When the “Red”... -
Page 27: Ref. 1093/538P And 1093/536P Hybrid Dvr Front Panel
2.1.2 REF. 1093/538P AND 1093/536P HYBRID DVR FRONT PANEL Key title Item Type Marks Function /Indicator When the “Red” indicator flashes it means HDD indicator the hard drive is being read or written to. Indicator If the “Green” indicator is on the system is Power indicator getting power normally. -
Page 28: Rear Panel
REAR PANEL 2.2.1 REF. 1093/534P HYBRID DVR BACK PANEL Item Physical port Connection method Connect CH1-CH4 (Virtual) video input device (BNC Video inputs interface) Audio Inputs 4CH audio input (RCA interface) Audio Output Audio output (RCA interface); Connect USB mouse USB Port Connect to HDMI monitor HDMI Port... -
Page 29: Ref. 1093/538P Hybrid Dvr Back Panel
2.2.2 REF. 1093/538P HYBRID DVR BACK PANEL Item Physical port Connection method Connect CH1-CH8 (Virtual) video input device (BNC Video inputs interface) Audio Inputs 8CH audio input CH1-CH8 (RCA interface) Audio Output Audio output (RCA interface); Connect USB mouse USB Port Connect to HDMI monitor HDMI Port Connect to VGA monitor, such as PC monitor... -
Page 30: Ref. 1093/536P Hybrid Dvr Back Panel
2.2.3 REF. 1093/536P HYBRID DVR BACK PANEL Item Physical port Connection method Connect CH1-CH16 (Virtual) video input device (BNC Video inputs interface) Audio Inputs 8CH audio input CH1-CH8 (RCA interface) Connector for audio cable with audio inputs CH9-CH16 Audio Inputs (RCA) Audio Output Audio output (RCA interface);... -
Page 31: Remote Controller
REMOTE CONTROLLER Item Key title Key function Channel select 1-9; Numeric key 0 Numeric key; Clicking numeric “0” has no effect Multiple display mode Enter into Main menu/Exit Menu Up arrow key, Volume adjust ▲ Down arrow key, Volume adjust ▼... -
Page 32: Mouse Operation
MOUSE OPERATION Except using buttons of front panel or remote controller, you also can use mouse to perform system operation. TYPE Function In menu lock mode, Enter into pop-up menu and clicking any sub menu to pop up Log- in window; on menu unlock mode, enter into pop-up menu, and then clicking left key to enter into any sub menu directly. -
Page 33: Device Basic Startup
DEVICE BASIC STARTUP Hybrid DVR Series is compatible with AHD cameras, standard analog cameras and IP cameras. For a quick startup of the device, follow the procedure below: Connect the desired analog/AHD cameras to BNC input channels. Before installing the Hybrid DVR, check that IP cameras are properly working and connected via cable to the same network as the Hybrid DVR. -
Page 34: Basic Configuration
BASIC CONFIGURATION IP CAMERA CONFIGURATION BY MANUAL ASSIGNMENT If the Hybrid DVR is connected to a LAN where a DHCP service is active, a valid IP address will automatically be assigned to the Hybrid DVR. To check the IP address assigned to the Hybrid DVR by the LAN network, perform as follows: Access the Hybrid DVR OSD menu by pressing the right mouse button and enter the administrator password (default: 00000000) - Page 35 In order to add manually the IP camera follow these steps: Select “Search” button, select the wished IP camera that you want to add manually and fill the password field • (i.e. Default Password: admin), then check that the Protocol and Port are set correctly as shown in picture below (Example for an IP Camera selected shown in the pictures below: Default port: 6060, Default protocol: U-IPCy).
-
Page 36: Monitor Selection
The Hybrid DVR is configured to automatically start the continuous recording of the cameras assigned to the channels. Check that the red icon R is displayed for each camera. In the LIVE Preview grid, by default the DVR displays the MAINSTREAM of all IP channels enabled and configured, but if there are not enough resources to do so, the DVR automatically displays the SUBSTREAM of all the IP channels. -
Page 37: Video Output Control
VIDEO OUTPUT CONTROL On the Hybrid DVR, select [Main Menu Parameter Display Output] to definitively set the HDMI/VGA Resolution according to the monitor. Using HDMI video Output on Hybrid DVR, in order to correct display about LIVE Preview, it is needed to set to Hybrid DVR the supported resolution from HDMI Monitor (Example: If you're using a HDMI Monitor and it supports only 1280x1024 and 1920x1080 Resolutions, on Hybrid DVR the resolution value in order to set is 1920x1080 in the "VGA/HDMI Resolution"... -
Page 38: Advanced Configurations
ADVANCED CONFIGURATIONS HARD DISK CONFIGURATION Select [Main Menu Device HDD] and start with the Hard Disk configuration, according to the user’s needings, checking the following options: OVERWRITE: If selecting “AUTO”, when the Hard Disk is full, the system will automatically overwrite the oldest records, so it is possible to define how many days the records will remain in the hard disk. - Page 39 IMPORTANT NOTES: It is strongly recommended to Backup the record files stored in the Hard Disk before Upgrade Firmware Version. After Backup Process, the files shall be played using the Player Software present in the current Firmware Release After Uploading Default Settings please set again the Basic Configurations (i.e. Video Output Control, Language, Date/Time and Record Parameters, etc.) If IP camera is set as ONVIF Protocol is not possible to upgrade it and Load Default Settings by Hybrid DVR.
-
Page 40: Remote Display
REMOTE DISPLAY DISPLAY FROM THE SMARTPHONE Make sure that the DVR has a valid network configuration in its “Network” menu to guarantee local and remote (internet) connection if available. For further details about the network menu please refer to the paragraph 4.1. In the Hybrid DVR menu, select “System”... - Page 41 Type in the “Password” field previously inserted on the Hybrid DVR and select “Save”. Wait for approximately ten seconds to load the Hybrid DVR live feed. DS1093-184A...
-
Page 42: Display With Pc Browser
DISPLAY WITH PC BROWSER Once the Hybrid DVR and cameras have been configured it is possible to connect to the Hybrid DVR by browser from: PC station with Windows operating system and Internet Explorer or Firefox browser MAC station with 10.8.0 operating system or higher version and Safari 6.0 version browser or higher version PC or MAC stations must be connected to the same LAN as the Hybrid DVR. - Page 43 DS1093-184A...
- Page 44 DS1093-184A Area tecnica URMET S.p.A. servizio clienti +39 011.23.39.810 10154 TORINO (ITALY) http://www.urmet.com VIA BOLOGNA 188/C e-mail: info@urmet.com Telef. +39 011.24.00.000 (RIC.AUT.) +39 011.24.00.300 - 323 MADE IN CHINA DS1093-184A...
Need help?
Do you have a question about the Hybrid DVR Series and is the answer not in the manual?
Questions and answers