Medela Thopaz+ Instructions For Use Manual
Cardiothoracic drainage
Hide thumbs
Also See for Thopaz+:
- Quick reference manual (16 pages) ,
- Instructions for use manual (424 pages) ,
- Instructions for use manual (479 pages)

Related Manuals for Medela Thopaz+


Summary of Contents for Medela Thopaz+
- Page 1 Thopaz + ™ Cardiothoracic drainage Instructions for use Gebrauchsanweisung Mode d’emploi Istruzioni per l’uso Gebruiksaanwijzing Bruksanvisning Instrucciones de uso Instruções de utilização...
- Page 3 Each video lasts no longer than 60 seconds and includes text bullet points and voice commentary. Thopaz + University can be found at www.medela-university.com or you can access it through www.medela.com via the “Education” tab. It is available on all formats including desktop, smartphone and tablet.
-
Page 4: Table Of Contents
Table of Contents Congratulations .......................... 6 Warnings and safety instructions ..................7 Safety instructions ........................10 Power supply and battery operation ................11 Backup battery ........................11 Charge battery ........................11 Battery low ...........................11 Battery empty ........................12 Description ..........................13 Introduction ..........................13 Intended use / indications .....................13 Contraindications .........................13 Intended user ........................13 Intended patient population ....................13... - Page 5 Check therapy progress .......................28 Main display .........................28 History ..........................29 Catheter check ........................31 Switching Thopaz + off ......................32 Transfering data to PC with ThopEasy ................33 Replace canister ........................ 34 Canister with solidifier: activation of the solidification process..........35 Changing pressure during operation ................
-
Page 6: Congratulations
Congratulations With Thopaz + , you have acquired an innovative digital chest drainage system that sets new stan- dards in therapy and chest drainage management. Thopaz + has an electronic measuring and monitoring system with optical and acoustic status indications. The device is a dry system, which means no fluids are necessary for operation. Important information regarding the course of therapy is indicated digitally and graphically on the display. -
Page 7: Warnings And Safety Instructions
Indicating useful information about the safe use of the device. Thopaz + is approved exclusively for the use as described in these instructions for use. Medela can only guarantee the safe functioning of the system when Thopaz + is used in combination with the original Thopaz + accessories (canisters, tubings, carrying strap, mains adapter, docking station –... - Page 8 WARNINGS – «Pressure» generally implies «negative pressure» – Consult this manual prior to use. – Data transfer via USB is not allowed during therapy. – After each use, the parts that have been in contact with aspirated secretions are to be cleaned and disinfected or disposed.
- Page 9 CAUTIONS – No modification of this equipment is allowed. – Before connecting Thopaz + to the power supply, please verify that the supply voltage corresponds to that given on the device specification plate. – Incorrect use of Thopaz + can cause pain and injury to the patient. –...
-
Page 10: Safety Instructions
– If the device shows clear safety defects. – Thopaz + has no user serviceable parts inside. For safety reasons, it is required that Thopaz + is repaired throughout its service life strictly and exclusively by Medela authorised service centres. -
Page 11: Power Supply And Battery Operation
During continuous operation, Medela guarantees a minimum run-time of 4 hours in battery operation after the device has been fully charged. In practical operation the real battery run time results in >10 hours. -
Page 12: Battery Empty
Battery empty The battery symbol will blink with an acoustical sound for 10 minutes prior to the battery fully discharging, unless the pump is switched off earlier. The acoustic sound cannot be muted during the 10 minutes. If Thopaz + is not connected to a power source the pump will switch off automatically after 10 minutes. -
Page 13: Description
3 Description Introduction Thopaz + is a high-quality digital chest drainage system. The compact system provides regulated negative pressure close to the patient’s chest. It monitors the air leak and the fluid collection. Thopaz + only applies vacuum required to maintain the negative pressure pre- scribed and set by the managing physician. -
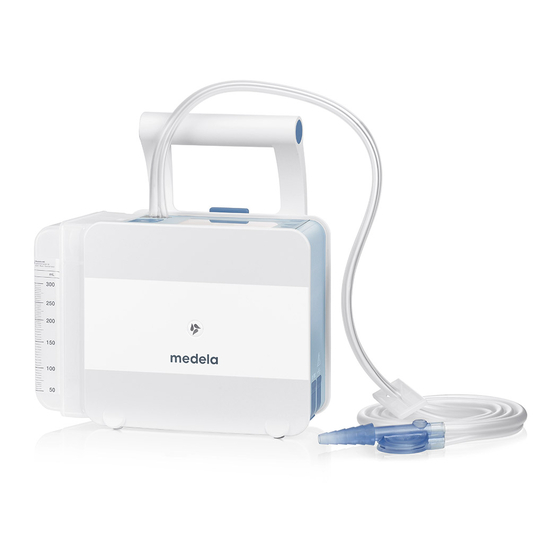
Page 14: Overview
4 Overview Main elements of Thopaz + Light sensor Suction port Display Release button Canister (ill. 0.3 l) USB port Mains adapter port Carrying handle Vacuum port with seal Bed holder Standard rail holder Specification plate 14 | Overview... -
Page 15: Display
Display Thopaz + is out of axis Patient number (fluid can currently not be measured) Not enough fluid for Action status of Thopaz + : valid fluid measurement Therapy time Thopaz + is on Standby USB connection Thopaz + is running Battery status Action bar Power on/off... -
Page 16: Tubings
Thopaz tubing double, small connector small connector 079.0023 079.0024 Thopaz tubing single, Thopaz tubing double, large connector large connector 079.0025 079.0026 Safety related tip Medela recommends to use the biggest possible connector size compatible for the catheter. 16 | Overview... -
Page 17: Canisters
Canisters With/without solidifier 0.3 l/0.8 l/2 l Material: Polypropylene, sterile Reading accuracy: + /- 2.5 % (in upright position) Solidifier: 0.3 l = 12 g / 0.8 l = 28 g / 2 l = 2 x 30 g Graduation Overflow protection/bacteria filter Pressure relief valve Sealing cap... -
Page 18: Additional Information
5 Additional information Definition of vacuum By the application of medical aspiration devices, vacuum is normally given as the difference (in absolute figures) between absolute pressure and atmospheric pressure or as negative val- ues in kPa. In this document, the indication of -10 kPa for example always refers to a pressure range in kPa below atmospheric ambient pressure (according to EN ISO 10079:1999). -
Page 19: Overflow Protection / Bacteria Filter
Overflow protection / bacteria filter A hydrophilic overflow protection/bacteria filter in the canister as well as in the tube sets (in the connector to Thopaz + ) protects Thopaz + from the entry of fluids and protects the environment from contamination. Light sensor Thopaz + is equipped with a light sensor. -
Page 20: Installation
6 Installation Check the delivery package of Thopaz + for completeness Check initial delivery and general condition. Thopaz + 079.1000 with Instructions for use 200.6841 079.1002 with Instructions for use 200.6842 079.1003 with Instructions for use 200.6843 Mains adapter international 077.0148 Thopaz + CD 079.1007... -
Page 21: Initial Startup
Initial startup WARNINGS For use only by medically trained and qualified persons who have been adequately trained in the use of Thopaz + . CAUTIONS Before the first application in accordance with the intended use, an inspection according to IEC 62353 (see Appendix B) is recommended to acquire the reference values. Important: Do not connect the patient to the system yet! 1.1 Select plug. - Page 22 5.1 Press [ ] to switch Thopaz + off. 6.1 Disconnect Thopaz + from the fixed mains socket by pulling on the plug housing. Do not pull on the cable or the bend protection. Thopaz + is ready for preparation for use. 22 | Installation...
-
Page 23: Preparation For Use /Operating Instructions
7 Preparation for use / operating instructions WARNINGS – For use only by medically trained and qualified persons who have been adequately trained in the use of Thopaz + . Wear gloves for all operations. «Pressure» generally implies «negative pressure». –... -
Page 24: Snap In Canister
Snap in canister 1.1 Unpack the canister. 1.2 Position the openings at the top and attach the bottom part of the canister to Thopaz + . 2.1 Push the canister into Thopaz + until you hear a click. 7.3.1 1.1 Unpack the canister. Using 2 l canister 1.2 Position the openings at the top and attach the... -
Page 25: Switch Thopaz + On
Important: Do switch Thopaz + on before connecting the Switch Thopaz + on system to the patient. 1.1 Press [ ] to switch Thopaz + on. A selftest starts. 1.2 Check acoustic signal (beep). If the selftest is not successful, follow the troubleshooting instructions on the display and refer to chapter 12 –... -
Page 26: Carry Out Functional Check
Carry out functional 1.1 Seal off the conical con- nector of the patient tub- check ing with your thumb (through the packaging). The tubing must not be kinked otherwise the measuring tube will be closed. 2.1 Switch on pressure by pressing «on»... - Page 27 Thopaz + is in Standby and is ready for use with the factory settings. (To change factory settings please refer to chapter 10 – Changing settings) Connect the Thopaz + system to the patient catheter (drain) according to hospital guidelines. To start the therapy press «On». Safety related tip The acoustic alarm «Leak in system –...
-
Page 28: Check Therapy Progress
Check therapy progress 7.6.1 Two different main displays are available. Main display Basic display In the basic display, the current size of the air leak (ml/min) is shown on the left side. The total amount of collected fluid (ml) during the therapy is shown on the right. Press «Advanced»... -
Page 29: History
– Thopaz + provides air leak history graphs and fluid history 7.6.2 History graphs. – For scrolling through the graphs press «Next». – To get back to your main display press «Home». Air leak history Press [ ] to get into the air leak history. - Page 30 Fluid history Press [ ] to get into the fluid history. – Three different fluid history graphs are available. 6 h/Autoscale, 24 h/100 ml and 72 h/Autoscale. – The fluid autoscale history graph shows the total collected fluid amount over the last 72 h. Pressure scale Fluid scale (in ml/h) Fluid amount (collected...
-
Page 31: Catheter Check
Catheter check Important: the catheter check works only with a patient catheter (drain) in the interpleural space. Press [ ] to get into the air leak history. Scroll to page 4/4 by pressing «Next» [ – The catheter check is only active if the air leak is 0 ml/min. –... -
Page 32: Switching Thopaz + Off
Switching Thopaz + off 1.1 Clamp patient tubing with the tube clamp. 1.2 Clamp patient catheter (drain). 1.3 Press «Standby» for longer 3 sec. than 3 seconds to switch off the pressure. 2.1 Press [ ] to switch off Thopaz + . Release, remove and seal the canister by the canister seal. -
Page 33: Transfering Data To Pc With Thopeasy
Transfering data to PC with ThopEasy With ThopEasy all stored data can be transferred to a PC as documentation, and for completion of the patient records. The data can be expanded with patient information, saved and printed. Operating instructions and the software can be found on the Thopaz + CD 079.1007 included in the scope of delivery. -
Page 34: Replace Canister
8 Replace canister WARNINGS The canister is replaced on the basis of a visual check or according to the instructions on the Thopaz + display (warning signal). Wear gloves for all operations. CAUTIONS Canister changes shall be recorded for safety reasons. 1. -
Page 35: Canister With Solidifier: Activation Of The Solidification Process
7.1 Check canister matching: Detected canister size vs. attached canister. No match: Dispose canister. 7.2 Press «On». Pressure is built up and unclamp the tube clamp. 8.1 Check credibility of air leak value. 9.1 Seal the used canister with the canister seal. 10. -
Page 36: Changing Pressure During Operation
9 Changing pressure during operation WARNINGS The negative pressure may only be changed by the physician or on medical orders. Important: Thopaz + is running. Change pressure 1.1 Press [ ] and [ simultaneously. 1.2 Change pressure by pressing [ ] or [ and confirm with «OK»... -
Page 37: Changing Settings
10 Changing settings Thopaz + is delivered with the following factory settings. These 10.1 Factory settings settings can be changed and saved as the new standard. -2.0 kPa Pressure: – Choose to max. -10 kPa (-100 cmH -100 mbar, -80 mmHg). Pressure unit: kPa –... -
Page 38: Change Settings
10.2 Change settings WARNINGS The settings may only be changed by the physician or on medical orders. CAUTIONS Adapt pressure settings for pediatric patients. Important: Thopaz + is on Standby. 1.1 Press «Menu» [ 2.1 Choose the desired parameter by pressing 2.2 Confirm with «OK»... -
Page 39: Taking A Drainage Sample
11 Taking a drainage sample WARNINGS To ensure Thopaz + can reduce the pressure, it is essential to wait 30 seconds between taking the sample from the sample port and unclamping the patient catheter (drain). 1. Before taking a drainage sample make sure that there is Sample port fluid in the patient tube. -
Page 40: Troubleshooting And Alarms
12 Troubleshooting and alarms Description Thopaz + distinguishes between warnings (yellow), alarms (red) and internal errors (red). If Thopaz + detects any of these situations, an acoustic signal sounds and a description of the problem appears on the display. By pressing the two selection buttons simultaneously, the acoustic alarms are suppressed for 60 seconds. - Page 41 Visible on display Error Problem Troubleshooting Remarks / Potential Pressure number description instructions source of error Canister full 1. Clamp tube 2. Go into Standby 3. Replace canister 4. Continue with «On» 5. Unclamp tubing Connect Thopaz + Battery low Remaining time of to mains battery approx.
-
Page 42: General Cleaning Guidelines
After each use, the parts that have been in contact with aspirated secretions are to be cleaned and disinfected or disposed. General notes – For detailed information refer to Medela cleaning guideline: 200.2391. – This cleaning guideline relates to the cleaning of the entire Thopaz + product ranges see Appendix A. -
Page 43: Disposables
Disposables This Symbol indicates a single used product. This product is not intended to be reprocessed. Reprocessing could cause loss of mechanical, chemical and/or biological characteristics. Reuse could cause cross contamination. 1. Thorough cleaning Thorough cleaning can either be done at the point of use with sterile cold water only or in dedicated health care facilities with the additional use of enzymatic detergents according the manufacturer’s instructions for use. -
Page 44: Warranty, Maintenance And Checks
The right to the replacement of faulty parts will not be recognized by Medela if any work has been carried out on Thopaz + by unauthorized persons. This warranty is subject to the appliance being returned to a Medela service centre. -
Page 45: Safety Check
There are no prescribed or recommended safety checks to be carried out. Rationales – The engineering of the Medela Thopaz + has been verified by independent test institutes for compliance with the EN / IEC 60601-1 standard. Copies of such certificates may be obtained on request. -
Page 46: Disposal
15 Disposal Thopaz + comprises metals and plastics and should be disposed of in accordance with the European directives 2002/95/EC and 2002/96/EC. Additional, local guidelines must also be observed. The electronic components and the rechargeable battery must be disposed of separately, in accordance with the local regulations. -
Page 47: Technical Specifications
17 Technical specifications low vacuum, Measured at 0 m, atmospheric - 10 kPa / - 75 mmHg / pressure: 1013.25 hPa Please 100 cmH O/mbar note: vacuum levels may vary Tolerance: + /- 15 % depending on location (meters above sea level, atmospheric pressure and temperature). -
Page 48: Signs And Symbols
18 Signs and symbols This symbol This symbol indicates This symbol indicates indicates the a class Il device. that the device should compliance with not be used after the the essential end of the year and This symbol indicates requirements month shown. - Page 49 This symbol indicates This symbol indicates This symbol indicates the atmospheric the maximum vacuum fluid pressure limitation for level of the system. operation, transport This symbol indicates and storage. This symbol indicates Patient number the flow levels of the This symbol indicates system.
-
Page 50: Technical Documentation
19 Technical documentation WARNINGS Do not use other accessories than those specified or sold by the manufacturer as replacement parts for internal components as it may result in increased emissions or decreased immunity of the Thopaz + device. Thopaz + is EMC-tested in conformity with the requirements of IEC 60601-1-2:2007 and can be used in the vicinity of other EMC-tested devices that fulfill the requirements of the relevant IEC 60601-1-2 standard. - Page 51 Electromagnetic compatibility (EMC, IEC 60601-1-2:2007, Table 1) Electromagnetic emissions Thopaz + is intended for use in the electromagnetic environment specified below. The customer or the user of Thopaz + should assure that they are used in such an environment. Emission Tests Compliance Electromagnetic environment –...
- Page 52 Electromagnetic compatibility (EMC, IEC 60601-1-2:2007, Table 2) Electromagnetic immunity Thopaz + is intended for use in the electromagnetic environment specified below. The customer or the user of Thopaz + should assure that they are used in such an environment. Immunity Tests IEC 60601 Compliance Electromagnetic...
- Page 53 Electromagnetic compatibility (EMC, IEC 60601-1-2:2007, Table 4) Electromagnetic immunity Thopaz + is intended for use in the electromagnetic environment specified below. The customer or the user of Thopaz + should assure that Thopaz + is used in such an environment. Immunity IEC 60601 Compliance...
- Page 54 Electromagnetic compatibility (EMC, IEC 60601-1-2:2007, Table 6) Recommended separation distance between portable and mobile RF communications equipment and Thopaz + Thopaz + is intended for use in an electromagnetic environment in which radiated RF disturbances are controlled. The customer or the user of Thopaz + can help prevent electromagnetic interference by maintaining a minimum distance between portable and mobile RF communications equipment (transmitters) and Thopaz + as recommended below, according to the maximum output power of the communications equipment.
- Page 55 Appendix A Thopaz + digital cardiothoracic drainage system 079.1000 with Instruction for use 200.6841 Thopaz + digital cardiothoracic drainage system 079.1002 with Instruction for use 200.6842 Thopaz + digital cardiothoracic drainage system 079.1003 with Instruction for use 200.6843 Disposables Thopaz canister 0.3 l* 079.0011 079.0012 Thopaz canister 0.3 l with solidifier*...
- Page 56 Accessories Carrying strap Thopaz + 079.1006 079.0037 Docking station 079.0038 Adapter docking station for Thopaz + canister 2 l 079.0034 USB cable 079.0039 Thopaz sealing cap* 079.0036 Holder with standard rail 079.0040 Universal holder with standard rail 077.1456 Vacuum gauge 077.0148 Mains adapter international Documents...
-
Page 57: Appendix B
Safety relevant errors were detected. ❑ 1 ______________ until the errors are 2 ______________ corrected. Send Thopaz + to Medela Service Centre. 3 ______________ Next test: __ __ / __ __ / __ __ __ __ Tester / Signature: Place / Date:... - Page 58 +86 21 62368103 www.medela.nl www.medela.co.uk info@medela.cn www.medela.be www.medela.cn Poland Medela Inc. France Medela Polska Sp. z o.o. 1101 Corporate Drive Medela France Sarl Ul. Lewinowska 8 McHenry, IL 60050 14, rue de la Butte Cordière 03-684 Warszawa 91154 Etampes cedex Poland...
Need help?
Do you have a question about the Thopaz+ and is the answer not in the manual?
Questions and answers