Table of Contents
Advertisement
Quick Links
Exclusively Manufactured & Distributed by:
SMART Worldwide
(an SMA Worldwide Ltd. Company)
SMA House, Langley Waters, Home Park
Kings Langley, Hertfordshire, WD4 8LZ
SMART Worldwide Ltd 2017 ©
www.smartworldwidefun.com
Model: SBM2000
SMART (an SMA Worldwide Ltd. Company) have a policy of continuous improvement
and we reserve the right to change specifications and colours without notice.
SMART is a registered trademark of SMA Worldwide Ltd, London, England.
www.smartworldwidefun.com
© SMA Worldwide Ltd. 2017
SBM2000_ENG_IM_16pp_v1.indd 1
12/06/2017 09:57
Advertisement
Table of Contents

Related Manuals for SMART SMART Breakfast Master SBM2000


Summary of Contents for SMART SMART Breakfast Master SBM2000
- Page 1 SMART Worldwide Ltd 2017 © www.smartworldwidefun.com Model: SBM2000 SMART (an SMA Worldwide Ltd. Company) have a policy of continuous improvement and we reserve the right to change specifications and colours without notice. SMART is a registered trademark of SMA Worldwide Ltd, London, England.
- Page 2 SMART Breakfast Master Instruction Manual SBM2000_ENG_IM_16pp_v1.indd 2 12/06/2017 09:57...
- Page 3 SBM2000_ENG_IM_16pp_v1.indd 3 12/06/2017 09:57...
-
Page 4: Table Of Contents
THE SMART CHOICE Visit www.smartworldwidefun.com for more fun products. CONTENTS IMPORTANT SAFETY AND GENERAL INSTRUCTIONS ....3 PARTS ..........4 BEFORE FIRST TIME USE . -
Page 5: Important Safety And General Instructions
SMART Breakfast Master. 13. Do NOT move or lift the SMART Breakfast Master while the power cord is still connected to the wall outlet or still on. Always ensure it is switched off and has cooled down before moving the appliance. -
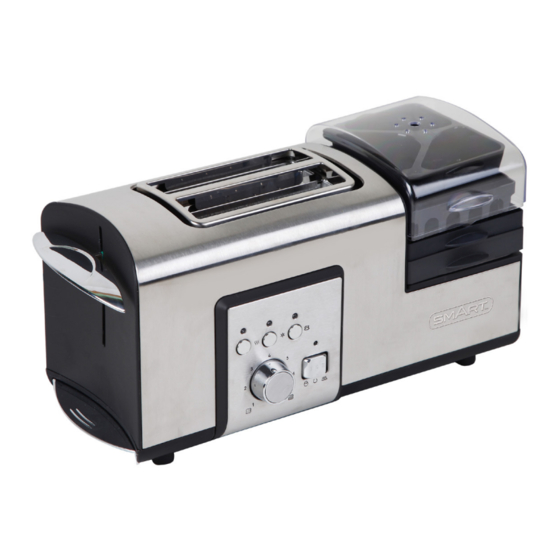
Page 6: Parts
25. Do NOT allow the appliance to touch curtains, wall coverings, clothing, or other flammable materials during use. 26. Do NOT wrap the cord around the outside of the SMART Breakfast Master. Use the cord storage cleats at the bottom of the unit. -
Page 7: Before First Time Use
This is normal and will subside with further use. TOASTING The SMART Breakfast Master allows you to toast up to 2 slices of bread, bagels and buns (with the included Bun Rack). Below are some general notes on toasting that you should be aware of before commencing to toast your bread: Different types of bread have different browning requirements. -
Page 8: Operating Instructions
OPERATING INSTRUCTIONS Insert 1 or 2 slices of bread into the Toaster Slot. Turn the rotary knob to the desired browning level. 1 – Lowest Setting, 7- Highest Setting. Push the Toasting Lever down until it locks. Toasting will commence automatically as soon as it is locked in place. -
Page 9: Using The Egg Cooker
USING THE EGG COOKER Functions The Egg Cooker allows you to: Fry Eggs (and other types of food, e.g. small strips of bacon) – Max 2 eggs Boil Eggs – Max 6 eggs Poach Eggs – Max 3 eggs Reheat foods •... - Page 10 Egg Preparation Times Refer to the guide below for approximate cooking times. Please note that this is a rough guide and will depend on the size of the egg and the number of eggs you are cooking. Measuring Cup A measuring cup is provided giving you an approximate guide as to how much water is required for each method of egg and the number of eggs.
- Page 11 Boiling Eggs Use measuring cup or refer to egg preparation table above to determine the amount of water required for desired number of eggs. Then pour water into the Mini Pan. Place Egg Holder Insert onto the Mini Pan. (Please note the Egg Holder Insert has been marked to indicate the correct position to be placed).
-
Page 12: Handy Hints
Steaming/Re-heating Other Foods Pour the required amount of water into the Mini Pan, depending on what you are re-heating or steaming. Generally the bigger it is the longer it will take and the more water is required. Place the Egg Holder Insert onto the Mini Pan (please note the Egg Holder Insert has been marked to indicate the correct position to be placed). -
Page 13: Cleaning, Care And Maintenance
To peel hard cooked eggs easily, roll gently on the counter using the palm of your hand to crack the shell. CLEANING, CARE AND MAINTENANCE Ensure the SMART Breakfast Master has cooled sufficiently and has been switched off and unplugged before cleaning. Mini Pan The Mini Pan has a non-stick surface. -
Page 14: Returns & Warranty
SHOULD YOUR UNIT NOT WORK OR IF DAMAGED WHEN YOU FIRST TAKE IT OUT OF THE BOX PLEASE RETURN IT TO THE PLACE OF PURCHASE IMMEDIATELY WITH THE PROOF OF PURCHASE. SMART Breakfast Master / SBM2000 Should you have any questions, please contact the seller. Exclusively Manufactured and Distributed by: SMART Worldwide (an SMA Worldwide Ltd.
Need help?
Do you have a question about the SMART Breakfast Master SBM2000 and is the answer not in the manual?
Questions and answers