
Related Manuals for Tsurumi Pump TE3 Series


Summary of Contents for Tsurumi Pump TE3 Series
- Page 1 OPERATION, SERVICE, AND REPAIR MANUAL FOR TSURUMI TE3-SERIES CENTRIFUGAL PUMPS MODELS TE3-50HA TE3-80HA TE3-100HA...
- Page 2 TSURUMI MANUFACTURING CO., LTD. (“TSURUMI”) warrants to the original end purchaser during the warranty period, every new TSURUMI pump or product to be free from defects in material and workmanship under normal use and service, when properly installed, used, and maintained (in accor- dance with Tsurumi’s Operation, Service, and Repair Manual) for a period of two years from the date...
-
Page 3: Table Of Contents
TABLE OF CONTENTS Section/Title Page Introduction ............1-1. -
Page 4: Introduction
Tsurumi’s Operation, Service, and Repair Manual INTRODUCTION 1-1 Using Your Tsurumi Operation, Repair and Service Manual We thank you for purchasing a Tsurumi centrifugal pump. We are sure that the centrifugal pump you have selected will meet your portable pumping needs. This manual applies to the Tsurumi centrifugal pumps listed below. -
Page 5: Safety Precautions
Tsurumi’s Operation, Service, and Repair Manual • Do not operate the centrifugal pump before you have read and understand the instructions and the engine manufacturer’s manual. Failure to do so could result in personal injury or equipment damage. 1-3 Safety Precautions WARNING: •... -
Page 6: Specifications / Key Features
28 1/2 x 16 1/2 x 18 7/8 25 x 18 x 23 1/2 Dimensions (L x W x H) Inches Shipping Weight Lbs. 1-5 Performance Curves Refer to the performance curves for the pumping capacity of TE3 series centrifugal pumps. GROUP PERFORMANCE MODELS TE3-50HA TE3-80HA TE3-100HA... - Page 7 Tsurumi’s Operation, Service, and Repair Manual INDIVIDUAL PERFORMANCE MODEL TE2-50HA INDIVIDUAL PERFORMANCE MODEL TE3-80HA INDIVIDUAL PERFORMANCE MODEL TE3-100HA Page 4 Introduction...
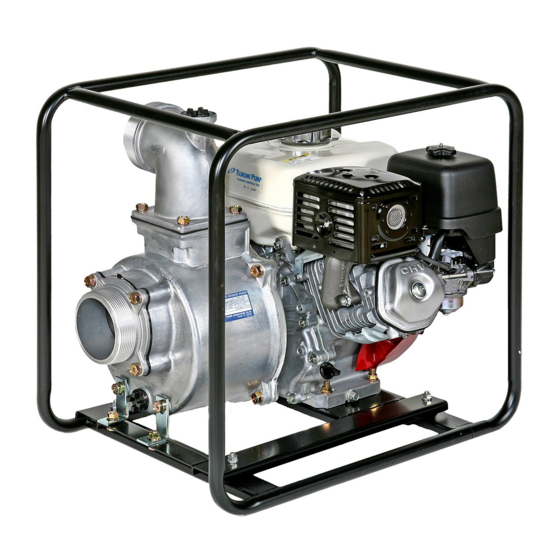
- Page 8 Tsurumi’s Operation, Service, and Repair Manual Engine Cleaner Muffler Fuel Tank Honda Engine Check Valve (Under Suction Fitting) MODEL TE3-80HA Drain Plug SHOWN Vibration Engine Controls Isolation Mounts (Next to Air Cleaner) Tubular Frame Discharge Fitting Pump Casing Suction Fitting Priming MODEL TE3-50HA Plug...
-
Page 9: Operating Instructions
Tsurumi’s Operation, Service, and Repair Manual OPERATING INSTRUCTIONS 2-1 Operating Controls The centrifugal pump is operated using the engine operating controls. The engine controls are located at the engine end of the pump frame. The controls consist of a throttle lever (for speed control), choke lever (for cold weather starting), fuel shutoff lever (to prevent fuel spills), and a recoil starter (to turnover engine by hand). - Page 10 Tsurumi’s Operation, Service, and Repair Manual Figure 2-2: Oil Viscosity Grade-to-Temperature Recommendations Figure 2-2: Oil Viscosity Grade-to-Temperature Recommendations When checking oil, observe the following (refer to Figure 2-3): Make sure the engine is in a level position. Remove the oil filler cap/dipstick and wipe it clean. Insert the filler cap/dipstick into the oil filler neck, but do not screw it in.
-
Page 11: Check Engine Fuel
Tsurumi’s Operation, Service, and Repair Manual 2-3 Check Engine Fuel WARNING • MAKE SURE YOU REVIEW EACH WARNING IN ORDER TO PREVENT FIRE HAZARD. • DO NOT REFILL TANK WHILE ENGINE IS RUNNING OR HOT. • CLOSE FUEL SHUT OFF VALVE BEFORE REFUELING. •... -
Page 12: Pre-Start Checks
Tsurumi’s Operation, Service, and Repair Manual 2-5 Pre-Start Checks WARNING: • MAKE SURE YOU REVIEW EACH WARNING IN ORDER TO PREVENT FIRE HAZARD. • KEEP AREA CLEAR OF FLAMMABLES OR OTHER HAZARDOUS MATERIALS. Check the following items before starting the engine. Fuel leakage from fuel hose, sediment cup, etc. -
Page 13: Using The Centrifugal Pump
Tsurumi’s Operation, Service, and Repair Manual NOTE: • The choke may not be needed if the engine is warm or the air temperature is high. Set the ON/OFF switch to ON (the ON/OFF switch is mounted on the recoil shroud). Move the throttle lever slightly to the left. -
Page 14: Troubleshooting
The troubleshooting tables below can be used as a guide to isolate centrifugal pump faults. Refer to these tables when the engine fails to start after several attempts. If, after following these procedures, the pump fails to start, contact the nearest Tsurumi pump dealer. Table 3-1: Troubleshooting Table... -
Page 15: Maintenance
Tsurumi’s Operation, Service, and Repair Manual MAINTENANCE 4-1 Maintenance Schedule To maintain the centrifugal pump in peak operating condition, observe and implement the maintenance and adjustment schedule in Table 4-1. Inspect and/or service the centrifugal pump at the intervals shown in Table 4-1. WARNING: •... -
Page 16: Changing Engine Oil
Tsurumi’s Operation, Service, and Repair Manual 4-2 Changing Engine Oil An initial oil change should be performed after the first twenty- (20) hours of use. Thereafter, change oil every 100 hours. Before changing the oil, check for a suitable way to dispose of the used oil. Do not pour it down sewer drains, onto garden soil or into open streams. -
Page 17: Air Cleaner Service
Tsurumi’s Operation, Service, and Repair Manual 4-3 Air Cleaner Service WARNING: • NEVER USE GASOLINE OR LOW FLASH POINT SOLVENTS FOR CLEANING THE AIR CLEANER ELEMENT. A FIRE OR EXPLOSION COULD RESULT. CAUTION: • NEVER RUN THE ENGINE WITHOUT THE AIR CLEANER. RAPID ENGINE WEAR WILL RESULT FROM CONTAMINANTS, SUCH AS DUST AND DIRT, BEING DRAWN THROUGH THE CARBURETOR AND INTO THE ENGINE. -
Page 18: Disassembly Of Centrifugal Pump
Tsurumi’s Operation, Service, and Repair Manual WARNING: • THE MUFFLER BECOMES VERY HOT DURING OPERATION AND REMAINS HOT FOR A WHILE AFTER STOPPING THE ENGINE. BE CAREFUL NOT TO TOUCH THE MUFFLER WHILE IT IS HOT. Visually inspect the spark plug. Discard spark plug if the insulator is cracked or chipped. Clean the spark plug with a wire brush if it is to be reused. - Page 19 Tsurumi’s Operation, Service, and Repair Manual Remove Centrifugal Pump Components Remove two screws (30) from bracket (25) and pump casing (1). Remove two spring nuts (27) and two brackets (25). Position the frame (21) so the pump is facing up (with the engine shroud down). Remove four bolts (18) and lift casing (1) from casing cover (2).
-
Page 20: Replacement Of Mechanical Seal
Tsurumi’s Operation, Service, and Repair Manual If installed, remove shim (31) from bore in impeller (or remove shim from end of engine crankshaft). Remove four bolts (14), spring washers (15), plain washers (16), and seals (17). Remove casing cover (2) from the engine (33). Check the condition of seals (17) and replace if damaged. - Page 21 Tsurumi’s Operation, Service, and Repair Manual LEGEND B + C (Tool length) Overall uninstalled height of mechanical seal. Length of casing cover center bore from start of bore to face of installed seal. Multiply length times 2. Outside diameter of tool to have a slip fit with inside diameter of mechanical seal. Inside diameter of recess to be sized to fit over the mechanical seal.
- Page 22 Tsurumi’s Operation, Service, and Repair Manual DEPTH GAG E VOLUTE CASING (4 ) Figure 4-6: Measuring Volute Casing (3 ) IMPELLER VOLUTE CASING (4 ) CASING COVER (2 ) Figure 4-7: Measuring Impeller Depth Model Number Shim Thickness OD x ID Part Number TE3-50HA 0.3 mm (0.012 Inch)
-
Page 23: Removal And Installation Of Engine
Tsurumi’s Operation, Service, and Repair Manual 4-8 Removal and Installation of Engine If you need to remove or replace engine (33) to access cushions (23 or 24), proceed as fol- lows: Refer to exploded view in REPLACEMENT PARTS section for parts location. Remove nuts (26 and 27). - Page 24 Tsurumi’s Operation, Service, and Repair Manual Remove nuts (26) and bolts (28) from base (22). Remove engine (33) from base (22). Remove nuts (26) from threaded ends of cushions (23). Lift the base (22) from cushions (23). Remove nuts (26) from underside of frame (22) and check cushions for damage. Replace damaged cushions.
-
Page 25: Assembly Of Centrifugal Pump
Tsurumi’s Operation, Service, and Repair Manual (10) Install bolts (28) from underside of base (22) through holes in engine mounting flange and secure with nuts (29). (11) Install remaining components. Refer to Assembly of Centrifugal Pump for installa- tion procedures. 4-10 Assembly of Centrifugal Pump WARNING: •... -
Page 26: Replacing Of Check Valve
Tsurumi’s Operation, Service, and Repair Manual Install impeller on end of engine crankshaft (32) and rotate impeller (3) (clockwise) until tight. Install packing (9) over raised lip on volute casing (4). Install volute casing (4). Align tab on volute casing (4) with raised alignment marks at the 0-degree position on casing cover (2). -
Page 27: Storage Instructions
Tsurumi’s Operation, Service, and Repair Manual STORAGE 5-1 Procedures for Storing Pump WARNING: • To avoid severe burns or fire hazards, let the engine cool before transporting it or storing it indoors. • When transporting the pump, turn the fuel shutoff valve to the OFF position and keep the engine level to prevent fuel spillage. -
Page 28: Replacement Parts
Tsurumi’s Operation, Service, and Repair Manual REPLACEMENT PARTS 6-1 Introduction This section provides exploded view illustrations that show the replacement parts for Tsurumi Centrifugal Pumps, Models TE3-50HA, TE3-80HA, and TE3-100HA. Also provided are parts listings that provide part number, description, and quantity. The item numbers shown on the illustrations cor- respond with the item numbers in the facing parts listing. -
Page 29: Exploded View/Parts Listing - Te3-50Ha
Tsurumi’s Operation, Service, and Repair Manual Exploded View - Model TE3-50HA Centrifugal Pump PUMP PUMP SIDE ENGINE FLANGE ENGINE SIDE Page 26 Replacement Parts... - Page 30 Tsurumi’s Operation, Service, and Repair Manual Parts List - Model TE3-50HA Centrifugal Pump Ref. Part Number Description Size 507-001 Casing 501-004 Cover, Casing 501-009 Impeller 501-011 Casing, Volute 501-019A Bend, Discharge 2- Inch NPT 501-013A Flange, Suction 2- Inch NPT 521-008 Seal, Mechanical 501-002...
-
Page 31: Exploded View/Parts Listing - Te3-80Ha
Tsurumi’s Operation, Service, and Repair Manual Exploded View - Model TE3-80HA Centrifugal Pump PUMP PUMP SIDE ENGINE FLANGE ENGINE SIDE Page 28 Replacement Parts... - Page 32 Tsurumi’s Operation, Service, and Repair Manual Parts List - Model TE3-80HA Centrifugal Pump Ref. Part Number Description Size 803-001 Casing 501-004 Cover, Casing 801-009 Impeller 801-011 Casing, Volute 801-019A Bend, Discharge 3- Inch NPT 801-013A Flange, Suction 3- Inch NPT 521-008 Seal, Mechanical 501-002...
-
Page 33: Exploded View/Parts Listing - Te3-100Ha
Tsurumi’s Operation, Service, and Repair Manual Exploded View - Model TE3-100HA Centrifugal Pump ENGINE MOUNTING FLANGE PUMP SIDE ENGINE SIDE Page 30 Replacement Parts... - Page 34 Tsurumi’s Operation, Service, and Repair Manual Parts Listing - Model TE3-100HA Centrifugal Pump Ref. Part Number Description Size 1001-001 Casing 1001-004 Cover, Casing 1001-009 Impeller 1001-011 Casing, Volute 1001-019A Bend, Discharge 4- Inch NPT 1001-013A Flange, Suction 4- Inch NPT 1001-010 Seal, Mechanical 1001-002...
Need help?
Do you have a question about the TE3 Series and is the answer not in the manual?
Questions and answers