
Subscribe to Our Youtube Channel
Related Manuals for Avaya Converged Platform 130 Series


Summary of Contents for Avaya Converged Platform 130 Series
- Page 1 Installing the Avaya Converged Platform 130 Series Release 4.0 Issue 4 October 2019...
- Page 2 RESERVES THE RIGHT TO TAKE LEGAL ACTION AGAINST YOU the express behalf of Avaya. End User agrees to indemnify and hold AND ANYONE ELSE USING OR SELLING THE SOFTWARE harmless Avaya, Avaya's agents, servants and employees against all WITHOUT A LICENSE.
- Page 3 MAY BE OBTAINED FROM MPEG LA, L.L.C. SEE HTTP:// written consent of Avaya can be a criminal, as well as a civil offense WWW.MPEGLA.COM. under the applicable law. Compliance with Laws...
- Page 4 All non-Avaya trademarks are the property of their respective owners. ® Linux is the registered trademark of Linus Torvalds in the U.S. and other countries.
-
Page 5: Table Of Contents
Adding the license key for server recovery or software remastering ..................66 Dell USB R640 RAID Configuration ........................66 Introduction ............... 66 Preparing to configure Dell R640 RAID controller ................. 69 Configuring the controller properties October 2019 Installing the Avaya Converged Platform 130 Series Comments on this document? infodev@avaya.com... - Page 6 ........................81 Documentation ............. 82 Finding documents on the Avaya Support website ................82 Avaya Documentation Portal navigation ....................83 Viewing Avaya Mentor videos ..........................84 Support October 2019 Installing the Avaya Converged Platform 130 Series Comments on this document? infodev@avaya.com...
-
Page 7: Chapter 1: Introduction
Chapter 1: Introduction Purpose This document provides installation procedures and information for the Avaya Converged Platform 130 Appliance server. This document is intended for the professional who is involved in installation activities for the Avaya Converged Platform 130 Appliance server. -
Page 8: Chapter 2: Overview
Platform 100 series. The PowerEdge R640 is a dual-socket, 1U platform designed for Avaya’s portfolio of applications. The R640 updates the CPU and other server technologies over previous Avaya Common Server releases. It will be used as the base platform for all new Avaya offers. The October 2019 Installing the Avaya Converged Platform 130 Series Comments on this document? infodev@avaya.com... -
Page 9: Supported Software
General information on registration can be found at https://support.avaya.com/registration. Avaya Global Registration Tool (GRT) The Avaya Associate and / or the Channel partner need to make sure that the customer FL reflects the install base information for the Avaya Converged Platform Server. The server serial number would be included in this information. -
Page 10: Avaya Technical Onboarding Process
The following onboarding process must be followed to ensure Secure Access Link remote access to your application. Ensure that you have the correct FL for the Onboarding process, at https://grt.avaya.com/grt/. Note: • US Sold To (functional location) location number format: 000XXXXXXX (000 + 7 digits or can be 00 + 8 digits as well). - Page 11 Please select the device you intend to technical onboard and follow the process. If you face any GRT issues, visit the general Knowledge Base at https://support.avaya.com/ext/ index?page=content&id=FAQ101925. October 2019 Installing the Avaya Converged Platform 130 Series Comments on this document? infodev@avaya.com...
-
Page 12: Dell Server Overview
• The iDRAC IP address is linked with the Avaya Converged Platform server. • The ESXi Host IP is linked with the Avaya Converged Platform ESXi host. You must enter Device IP Address, Device Hostname, and Gateway SEID for at least one SE code in your template. -
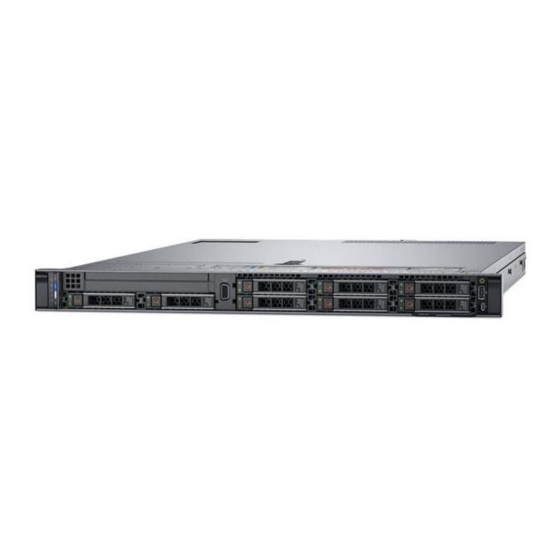
Page 13: Front View Of Dell Poweredge ™ R640 Server
• Avaya Converged Platform 130 servers must not be updated with BIOS or firmware updates from the vendor’s website. Only Avaya provided BIOS/Firmware updates can be used. -
Page 14: Back View Of Dell ™ Poweredge ™ R640 Server
Back view of Dell PowerEdge R640 Server Figure 2: Back view of Dell PowerEdge R640 single CPU server Figure 3: Back view of Dell PowerEdge R640 dual CPU server October 2019 Installing the Avaya Converged Platform 130 Series Comments on this document? infodev@avaya.com... -
Page 15: Avaya Converged Platform Appliance Profiles
BIOS using the Step Through mode. Avaya Converged Platform Appliance profiles In the Avaya Converged Platform 100 Series Release 4.0, the server constructs are reduced and shared among Avaya Converged Platform 110 Appliance, Avaya Converged Platform 120 Appliance, and Avaya Converged Platform 130 Appliance. -
Page 16: Dell Poweredge R640 Server Dimensions
434.0 mm 42.8 mm 35.84 mm 22.0 mm 683.05 mm 721.91 HDDs (18.97 (17.08 (1.68 (1.41 (0.87 (26.89 (28.42 inches) inches) inches) inches) inches inches) inches) October 2019 Installing the Avaya Converged Platform 130 Series Comments on this document? infodev@avaya.com... -
Page 17: Environmental Requirements
10°C to 35°C (50°F to 95°F) with no direct sunlight on the 950 m or 3117 ft) equipment. Fresh air For information about fresh air, see Expanded Operating Temperature at https://www.dell.com. Table continues… October 2019 Installing the Avaya Converged Platform 130 Series Comments on this document? infodev@avaya.com... - Page 18 950 m (3,117 ft). 40°C to 45°C (104°F to 113°F) Maximum temperature is reduced by 1°C/125 m (1°F/228 ft) above 950 m (3,117 ft). October 2019 Installing the Avaya Converged Platform 130 Series Comments on this document? infodev@avaya.com...
-
Page 19: Power Requirements
ACP100 Series Dell R640 System VA rating Heat Output (BTU/hr) Peak Power Max. (Watts) Profile 2 Profile 3 1161 Profile 4 1066 Profile 5 1721 Profile 51 1802 October 2019 Installing the Avaya Converged Platform 130 Series Comments on this document? infodev@avaya.com... -
Page 20: Chapter 3: Installation
While networking equipment is commonly designed and tested to withstand common mode ESD events, voltage can sometimes discharge to some connector pins, which can potentially damage the networking equipment. October 2019 Installing the Avaya Converged Platform 130 Series Comments on this document? infodev@avaya.com... -
Page 21: Package Contents
• Do not remove the wrist or ankle strap until the installation is complete. Package contents The following items are provided with your server. Contact Avaya Support if any of the following items are not present. • Dell A7 ReadyRails II sliding rail assembly kit... -
Page 22: Installing The Server
Note: • Avaya customers are required to have a VGA monitor, USB keyboard, and USB mouse available for use by installation and servicing technicians. • This rail kit is compatible with square, unthreaded round, and threaded round hole racks. - Page 23 Rail kit installation is performed using either Step 3 or Step 4 depending on the type of rails in use. Read each step carefully and consult your installation environment before proceeding. October 2019 Installing the Avaya Converged Platform 130 Series Comments on this document? infodev@avaya.com...
- Page 24 Engage the back end of the rail until it fully seats on the vertical rack flange and the latch clicks into place. Repeat these steps to position and seat the front end piece on the vertical rack flange. October 2019 Installing the Avaya Converged Platform 130 Series Comments on this document? infodev@avaya.com...
- Page 25 Attach the left and right mounting rails to the front vertical rack flanges using two pairs of screws. Slide the left and right back brackets forward against the rear vertical rack flanges and attach them using two pairs of screws. October 2019 Installing the Avaya Converged Platform 130 Series Comments on this document? infodev@avaya.com...
-
Page 26: Attaching Cables
Attaching cables About this task Use this procedure to attach network and I/O cables to the system. October 2019 Installing the Avaya Converged Platform 130 Series Comments on this document? infodev@avaya.com... -
Page 27: Connecting Power
ESXi for the first time, a VGA monitor will be required. Connecting power About this task Use this procedure to connect power to the system. October 2019 Installing the Avaya Converged Platform 130 Series Comments on this document? infodev@avaya.com... - Page 28 3. Attach USB keyboard and VGA monitor to system before powering up. 4. Power on the system. The following image shows the location of the power button. October 2019 Installing the Avaya Converged Platform 130 Series Comments on this document? infodev@avaya.com...
- Page 29 Connecting power October 2019 Installing the Avaya Converged Platform 130 Series Comments on this document? infodev@avaya.com...
-
Page 30: Chapter 4: Configuration
This chapter provides instructions required after physical installation to complete the system setup of an Avaya integrated staged server, prior to deploying Avaya Application OVAs. This chapter also includes instructions to disable TLS 1.0 and 1.1 and to configure SNMP v2 settings for ESXi. - Page 31 Connection points for VGA monitor and USB keyboard are also on the rear of the server. 2. Power on the server. The initialization process will take a few minutes. Do not press any additional keys strokes until prompted to do so. October 2019 Installing the Avaya Converged Platform 130 Series Comments on this document? infodev@avaya.com...
- Page 32 Configuration 3. Once ESXi has loaded, select F2 to administer configuration settings. October 2019 Installing the Avaya Converged Platform 130 Series Comments on this document? infodev@avaya.com...
- Page 33 Once a new password is configured, be sure to keep track of the new password. If the new password is lost or forgotten, ESXi will need to be reinstalled. October 2019 Installing the Avaya Converged Platform 130 Series Comments on this document? infodev@avaya.com...
- Page 34 Configuration 6. Select Configure Management Network and press Enter. October 2019 Installing the Avaya Converged Platform 130 Series Comments on this document? infodev@avaya.com...
- Page 35 Dell R640 XL ESXi Configuration 7. Select IPv4 Configuration and press Enter. October 2019 Installing the Avaya Converged Platform 130 Series Comments on this document? infodev@avaya.com...
- Page 36 8. Tab to Set static IPv4 address and network configuration and press the spacebar to select this option. Tab down to enter related IP information. When complete, press Enter. October 2019 Installing the Avaya Converged Platform 130 Series Comments on this document? infodev@avaya.com...
- Page 37 Dell R640 XL ESXi Configuration 9. The Manual label should now be associated with the IP address fields, indicating static addressing is now required. October 2019 Installing the Avaya Converged Platform 130 Series Comments on this document? infodev@avaya.com...
- Page 38 11. Obtain DNS server addresses and a hostname automatically will be selected as default. Tab to Use the following DNS server addresses and hostname and press the October 2019 Installing the Avaya Converged Platform 130 Series Comments on this document? infodev@avaya.com...
- Page 39 Dell R640 XL ESXi Configuration spacebar to select it. Tab down to enter the IP address(es) of the DNS server and the hostname of the server. When complete, press Enter. October 2019 Installing the Avaya Converged Platform 130 Series Comments on this document? infodev@avaya.com...
- Page 40 VMware prompts the administrator to save the configuration. Type Y (Yes) to save, and then press Esc to back out to the previous admin level. October 2019 Installing the Avaya Converged Platform 130 Series Comments on this document? infodev@avaya.com...
- Page 41 14. ESXi Shell is enabled by the Integrator. However, for a new install of ESXi, you must enable this setting. From the submenu, highlight Disable ESXi Shell. The function is October 2019 Installing the Avaya Converged Platform 130 Series Comments on this document? infodev@avaya.com...
- Page 42 Enter to change the state to Enabled, as seen on the right side of the screen. *Shell will be enabled for all deployments unless otherwise requested by the customer October 2019 Installing the Avaya Converged Platform 130 Series Comments on this document? infodev@avaya.com...
-
Page 43: Configuring Autostart On Esxi Host Using Embedded Host Client
1. Log into the ESXi Embedded Host Client using a web browser. 2. In the Navigator pane on the left, click Manage. 3. On the System tab, click Autostart. 4. Click Edit settings. October 2019 Installing the Avaya Converged Platform 130 Series Comments on this document? infodev@avaya.com... -
Page 44: Configuring Snmp V2 On An Esxi 6.5 Host
SNMP v2 setting is available on ESXi. This section provides steps on configuring SNMP v2. Note: The SSH functionality must be enabled on ESXi. The Avaya installation guidelines direct administrators to enable SSH, so this should not be an issue. If, however, ESXi shell is not enabled, refer to steps 14 and 15 above under the “Steps for Configuring ESXi Network... - Page 45 Example with multiple targets, separated by a comma: esxcli system snmp set –targets 10.1.1.1@162/avaya123,10.1.1.2@162/avaya123 4. Enable SNMP on the host using the following command: esxcli system snmp set --enable true October 2019 Installing the Avaya Converged Platform 130 Series Comments on this document? infodev@avaya.com...
-
Page 46: Services Port Configuration
Use this procedure to configure Avaya Converged Platform 130 Services Port. Important: For any Avaya Converged Platform 130 server shipped before March 15, 2019, the services port was not configured at the factory. Avaya Converged Platform 130 server recovery or software remastering will require the ACP130srvprt-cfg.sh script to be copied to the ESXi... - Page 47 - If the Services port is configured, then there is no need to run the script to configure the Services port. If the vSwitch1 has been created for another use besides a Services port, contact Avaya Support for configuration of the Services port if needed. Do not run the script and overwrite the existing vSwitch1 arrangement.
- Page 48 Configuration 3. Refer to the screen shot below for the steps to configure Avaya Services Port: a. Log in to the ACP130 ESXi 6.5 host SSH console using root credentials, using PuTTY. The default password is: ACP130_pw b. Run the following command: cd /bin c.
- Page 49 Use this procedure to verify vSwitch1 configuration using the the vSphere ESXi host interface under Networking. Procedure 1. Login into the vSphere Web Client for the ESXi Host. October 2019 Installing the Avaya Converged Platform 130 Series Comments on this document? infodev@avaya.com...
- Page 50 5. Select vSwitch1, and validate the following details: • VMkernel port (1): vmk1 should be configured with the 192.11.13.6 IP address. • Physical adapter is vmnic1 • VLAN ID 0 October 2019 Installing the Avaya Converged Platform 130 Series Comments on this document? infodev@avaya.com...
- Page 51 Dell R640 XL ESXi Configuration Sample Service’s vSwitch Configuration The following illustration represents a sample Application deployment with a pre-configured Services port: October 2019 Installing the Avaya Converged Platform 130 Series Comments on this document? infodev@avaya.com...
-
Page 52: Management Of The Tls Protocol Configuration For Vsphere 6.5 U2 Environment
Management of the TLS protocol configuration for vSphere 6.5 U2 Environment As of March 2019, TLS v1.0 and TLS v1.1 are disabled in Avaya Converged Platform 130 servers shipping from the Avaya integrator. TLS v1.0 and TLS v1.1 on servers shipped prior to March 2019 might be enabled. - Page 53 /usr/lib/vmware-TlsReconfigurator/VcTlsReconfigurator 3. Run the following command to view enabled TLS versions. The output of this command should be similar to the following example: ./reconfigureVc scan October 2019 Installing the Avaya Converged Platform 130 Series Comments on this document? infodev@avaya.com...
- Page 54 4. To disable TLSv1.0 and TLS v1.1 and enable only TLSv1.2, execute the following command: ./reconfigureVc update -p TLSv1.2 Note: It will provide a message stating that the vCenter Server is going to be restarted. Type Y to continue. October 2019 Installing the Avaya Converged Platform 130 Series Comments on this document? infodev@avaya.com...
- Page 55 • When running the script on an individual ESXi host it will prompt for a password. This is the vCenter Server Appliance root or administrator@vsphere.local password. October 2019 Installing the Avaya Converged Platform 130 Series Comments on this document? infodev@avaya.com...
- Page 56 Type the following command to validate if TLS v1.0 has been disabled: openssl s_client -connect localhost:443 -tls1 Command results should display that there is no certificate and no Master-Key assigned. See example below October 2019 Installing the Avaya Converged Platform 130 Series Comments on this document? infodev@avaya.com...
- Page 57 Type the following command to validate if TLS v1.1 has been disabled: openssl s_client -connect localhost:443 -tls1_1 Command results should display that there is no certificate and no Master-Key assigned. See example below: October 2019 Installing the Avaya Converged Platform 130 Series Comments on this document? infodev@avaya.com...
-
Page 58: Performing Server Recovery Or Software Remastering
Performing server recovery or software remastering About this task In the event of server failure, you should take necessary steps to recover the server data. You may also need to replace or remaster the system software on Avaya Converged Platform 130 Appliance. Before you begin Ensure that you have the following: •... - Page 59 The initialization process will take a few minutes. Do not press any additional keys until prompted to do so. 4. On the Welcome screen, press Enter to continue. October 2019 Installing the Avaya Converged Platform 130 Series Comments on this document? infodev@avaya.com...
- Page 60 6. On the Select a Disk to Install or Upgrade screen, ensure that the PERC H730P Mini drive is highlighted and press Enter to continue. October 2019 Installing the Avaya Converged Platform 130 Series Comments on this document? infodev@avaya.com...
- Page 61 RAID Controller first. For more information, see Dell R640 RAID Configuration page 66. Once the RAID configuration is complete, you can start the installation process again. October 2019 Installing the Avaya Converged Platform 130 Series Comments on this document? infodev@avaya.com...
- Page 62 ACP 130 solution, and press Enter to continue. 8. On the Enter a root password screen, type ACP130_pw in the Root password and Confirm password fields. 9. Press Enter to continue. October 2019 Installing the Avaya Converged Platform 130 Series Comments on this document? infodev@avaya.com...
- Page 63 11. After the installation is complete, remove the DVD from the tray. 12. Press Enter to reboot and load the ESXi software. The server will shutdown and reboot. 13. Proceed with the next steps. October 2019 Installing the Avaya Converged Platform 130 Series Comments on this document? infodev@avaya.com...
-
Page 64: Replacing The Host Server
Services Port Configuration on page 46. Replacing the host server About this task In the event of server failure, you may need to replace the host server on Avaya Converged Platform 130 Appliance. Before you begin Ensure that you have the following: •... -
Page 65: Adding The License Key For Server Recovery Or Software Remastering
Replace [IP Address of host] in the URL with the actual IP address of the host. 2. In the Navigator pane on the left, click Manage. 3. On the Licensing tab, click Assign license. October 2019 Installing the Avaya Converged Platform 130 Series Comments on this document? infodev@avaya.com... -
Page 66: Dell Usb R640 Raid Configuration
Preparing to configure Dell R640 RAID controller About this task Use this procedure to prepare the Dell R640 RAID controller (H730P Mini) for Avaya ACP 1XX RAID Array configuration. For that, you must delete all the existing configurations from the controller. - Page 67 Blue highlight indicates that you selected the System Setup Menu. 2. Clear all existing arrays by doing the following: a. Click Device Settings > Integrated RAID Controller 1: Dell <PERC H730P Mini> Configuration Utility. October 2019 Installing the Avaya Converged Platform 130 Series Comments on this document? infodev@avaya.com...
- Page 68 On the Main Menu, click Configuration Management > Clear Configuration. This command deletes all existing configurations from the RAID controller. c. Check the Confirm box, select Yes, and click OK. October 2019 Installing the Avaya Converged Platform 130 Series Comments on this document? infodev@avaya.com...
-
Page 69: Configuring The Controller Properties
About this task Use this procedure to manage the controller and configure its advance properties. Before you begin Delete all existing configurations on the RAID controller. October 2019 Installing the Avaya Converged Platform 130 Series Comments on this document? infodev@avaya.com... -
Page 70: October 2019 Installing The Avaya Converged Platform 130 Series
1. On the Main Menu of Integrated RAID Controller 1: Dell <PERC H730P Mini> Configuration Utility, click Controller Management. This section displays and allows modifications of the advance controller properties. 2. Scroll down and click Advanced Controller Properties. October 2019 Installing the Avaya Converged Platform 130 Series Comments on this document? infodev@avaya.com... -
Page 71: Creating A Virtual Disk
Before you begin • Delete all existing configurations on the RAID controller. • Configure the controller properties. • Ensure that Auto Import Foreign Configuration is set to Enabled. October 2019 Installing the Avaya Converged Platform 130 Series Comments on this document? infodev@avaya.com... - Page 72 You must delete all the existing configuration before creation of a new virtual disk. 3. Configure the virtual disk parameters as follows: a. In Select RAID Level, select the RAID level specified by the appropriate Avaya Converged Platform configuration. Following are the RAID configurations for Avaya Converged Platform.
- Page 73 4. On the Create Virtual Disk screen, click Select Physical Disks. 5. Under Choose Unconfigured Physical Disks, select all the unconfigured physical disks for the Avaya Converged Platform profile configuration, as mentioned in step 3. The following is an example with 4 physical disks selected.
-
Page 74: Virtual Disk Size
8x600 GB = 4.8 TB 3.6 3.27 Note: The table provides the usable capacity both in Terabytes and Tebibytes, as operating systems may calculate data storage space in Tebibytes. October 2019 Installing the Avaya Converged Platform 130 Series Comments on this document? infodev@avaya.com... -
Page 75: Checking Information About The Virtual Disk
3. Under Basic Properties, check the information about the virtual disk. You can see the following parameters of the virtual disk: • Name • RAID Level • Status • Size October 2019 Installing the Avaya Converged Platform 130 Series Comments on this document? infodev@avaya.com... -
Page 76: Dell R640 Snmp Trap Configuration Using Idrac9
Dell R640 SNMP trap configuration using iDRAC9 Configuring SNMP traps for Dell R640 using iDRAC9 About this task You can configure SNMP traps for Dell R640 Avaya Converged Platform 130 Appliance servers using the iDRAC9 interface. Before you begin Log into the iDRAC9 web interface using the IP address and login details that were specified while configuring iDRAC. -
Page 77: Snmp Alerts
Before you begin Log into the iDRAC9 web interface using the IP address and login details that were specified while configuring iDRAC. See Avaya iDRAC9 Best Practices document for configuring the iDRAC. October 2019 Installing the Avaya Converged Platform 130 Series... -
Page 78: Configuring A User Account For Snmp V3 Traps
3. In the Alerts and Remote System Log Configuration section, in the SNMP Trap column, select the required SNMP trap check boxes. For Avaya SAL systems, select the check box in the heading row of SNMP Trap column to select all the available SNMP traps. - Page 79 5. In the SNMP v3 field click Enabled. 6. In the Authentication type field, click the required authentication type. 7. In the Privacy type field, click the required privacy type. 8. Click Save. October 2019 Installing the Avaya Converged Platform 130 Series Comments on this document? infodev@avaya.com...
-
Page 80: Chapter 5: Regulatory Information
For a complete listing of the DELL PowerEdge R640 regulatory information, refer to the following links: • DELL Regulatory and Environmental Datasheet — http://downloads.dell.com/rdoc/dell %20emc%20poweredge%20r640,e39s,e39s001,dell%20regulatory%20and %20environmental%20datasheet.pdf • EUROPEAN UNION - CE Declaration of Conformity — http://downloads.dell.com/rdoc/dell %20emc%20poweredge%20r640,e39s,e39s001,european%20union%20-%20ce %20declaration%20of%20conformity.pdf October 2019 Installing the Avaya Converged Platform 130 Series Comments on this document? infodev@avaya.com... -
Page 81: Chapter 6: Resources
Chapter 6: Resources Documentation The following documents are available on Avaya support site at http://support.avaya.com/: Title Description Audience Avaya Converged Platform 100 Series Avaya Converged Platform Overview Describes the key features IT Management, sales and and Specification of Avaya Converged... -
Page 82: Finding Documents On The Avaya Support Website
Customer documentation for some programs is now available on the Avaya Documentation Portal at https://documentation.avaya.com. Important: For documents that are not available on the Avaya Documentation Portal, click Support on the top menu to open https://support.avaya.com. Using the Avaya Documentation Portal, you can: •... -
Page 83: Viewing Avaya Mentor Videos
Avaya Mentor videos provide technical content on how to install, configure, and troubleshoot Avaya products. About this task Videos are available on the Avaya Support website, listed under the video document type, and on the Avaya-run channel on YouTube. Procedure •... -
Page 84: Support
Resources • To find the Avaya Mentor videos on YouTube, go to www.youtube.com/AvayaMentor perform one of the following actions: - Enter a key word or key words in the Search Channel to search for a specific product or topic. - Scroll down Playlists, and click the name of a topic to see the available list of videos posted on the website. - Page 85 ............using embedded host client ..........43 environmental requirements ..........Avaya Converged Platform 130 Series Services Port ESXi configuration ............... configuration ................ Avaya Converged Platform appliance profiles ..... Avaya Technical Onboarding Process ......... finding content on documentation portal ......82...
- Page 86 .................. viewing Enabled TLS Version ............53 virtual disk ................75 virtual disk parameters ............71 virtual disk size ..............vSphere 6.5 U2 Environment ..........52 watch list ................October 2019 Installing the Avaya Converged Platform 130 Series Comments on this document? infodev@avaya.com...
Need help?
Do you have a question about the Converged Platform 130 Series and is the answer not in the manual?
Questions and answers