
Related Manuals for SKF FL15


Summary of Contents for SKF FL15
- Page 1 SKF Flowline monitor FL15, FL50 & FL100 (Operating and maintenance instructions compliant with EU Directive 2014/30/EU) FMON10JEN 07.04.2017 Rev. 10J...
-
Page 2: Table Of Contents
Ageing of lubricants ........................... 17 7 General description ............................ 18 8 Design ................................18 SKF Flowline monitor FL15 ........................18 SKF Flowline monitor FL50 ........................19 SKF Flowline monitor FL100 ........................19 9 Operation ..............................20 FMON10JEN 07.04.2017 Rev. - Page 3 Selecting a flow meter ..........................24 Selecting display mode ..........................24 Flow rate adjustment ..........................24 9.6.1 FL15 and FL50 flow meter adjustment ....................24 9.6.2 FL100 flow meter adjustment ......................25 Start-up sequence ............................25 ...
- Page 4 Individual alarms (HL) ..........................49 Common alarms (C) ............................ 50 Fault message ............................. 50 CAN module ............................52 14.2.1 CAN bus connectors .......................... 53 mA-output module ............................ 53 14.3.1 Features ............................54 14.3.2 Scaling of the analog outputs ......................
-
Page 5: Eu Declaration Of Conformity
Oy SKF Ab Teollisuustie 6 (P.O. Box 80) FIN-40951 MUURAME FINLAND herewith declares that the product SKF Flowline monitor FL15, FL50 and FL100 conforms to the relevant requirements of directives 2014/30/EU RoHS II 2011/65/EU The following harmonized standards have been applied: ... -
Page 6: Legal Disclosure
E-mail: skf-lube@skf.com www.skf.com/lubrication Training courses In order to provide a maximum of safety and economic viability, SKF carries out detailed training courses. It is recommended that the training courses are attended. For further information, please contact the provided SKF Service address. -
Page 7: Explanation Of Symbols, Signs And Abbreviations
3 Explanation of symbols, signs and abbreviations The following symbols are used in the safety instructions included in this manual to highlight conditions which are potentially harmful to people, materials or the environment. Please follow the instructions provided especially in the highlighted conditions. Also, be sure that all operators read this manual and all safety instructions. - Page 8 Symbol Meaning Chronological guidelines List items Indicates conditions which must be met before the activities described in the title clause can be completed Also indicates other factors, causes or consequences regarding °C degrees Celsius °F degrees Fahrenheit approx.
- Page 9 output 1 kW = 1,34109 hp acceleration 1 m/s² = 3,28084 ft./s² speed 1 m/s = 3,28084 f/s 1 m/s = 2,23694 m/h FMON10JEN 07.04.2017 Rev. 10J 8 (8)
-
Page 10: Safety Instructions
4 Safety instructions General instructions These safety instructions should be read and followed by any persons working on the product and those who supervise or instruct the group of persons mentioned above. In addition, the owner must ensure that the relevant personnel are fully familiar with the contents of the instructions. These instructions must be kept near these products for periodic review and for review by new users ... -
Page 11: Forseeable Misuse
Forseeable misuse Any use differing from that stated in these instructions is strictly prohibited, particularly the following: Use outside the indicated temperature range Use of non-specified lubricants Use without adequate pressure relief valve Use in continuous operation excluding oil circulation lubrication systems. ... -
Page 12: Notes Concerning The Type Identification Plate
Notes concerning the type identification plate The type identification plate indicates the type desig- nation, order code and other key details of the ma- chine. It locate inside of flowmeter (see page 35). To make sure no information is lost if the type identifica- tion plate becomes illegible, enter the details in this manual. -
Page 13: Providing Briefing For External Technicians
4.11.4 Providing briefing for external technicians Prior to commencing any activities, external technicians must be informed by the operator of the company’s safety policies, the applicable accident prevention procedures and the functions of the machine, in which the product is installed, and of its protective devices. 4.11.5 Provision of personal protective equipment The employer must provide to the operator suitable personal protective equipment for the location and pur- pose of the operation. -
Page 14: Commissioning And Daily Start-Up
All components used must be suitable for use in: – the system’s maximum operating pressure, and – the system’s minimum and maximum ambient temperature range. No parts of the centralised lubrication system may be subjected to twisting, shearing, or bending. ... -
Page 15: Residual Risk
Residual risk Residual risk Possible in lifecycle stage Prevention / remedy Personal injury / material damage A, B, C, G, H, K Keep unauthorised people away. due to falling of raised parts Make sure no one remains under suspended parts or loads. Lift parts with suitable and tested lif- ting devices. -
Page 16: Delivery, Returns And Storage
5 Delivery, returns and storage Delivery After receipt of the shipment, check the shipment for transport damage and completeness by comparing it to the shipping documents. Immediately report any damage suffered in transport to the forwarding agent. Keep the packaging material until any discrepancies are resolved. During in-house transport, ensure safe handling. Returns Clean all parts and pack them properly (i.e. -
Page 17: Lubricants
Meeting economic and ecological goals Immediately Lubrication selection SKF considers lubricants to be an element of system design. A suitable lubricant is selected when designing the machine and it forms the basis for centralised lubrication system planning. The selection is made by the manufacturer/ operator of the machine, preferably together with the lubricant supplier based on a defined requirement profile. -
Page 18: Material Compatibility
(e.g. no "bleeding"). Please contact SKF if you have further questions regarding lubricants. An overview of the lubricants tested by SKF is also available upon request. -
Page 19: General Description
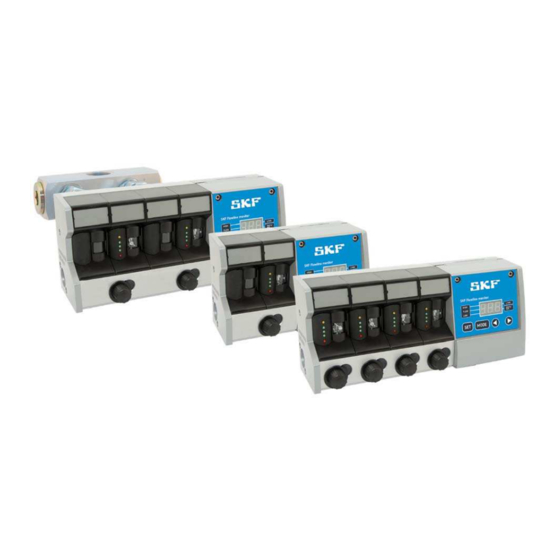
SKF Flowline monitor FL15 The SKF Flowline monitor FL15 is designed for 0,1 - 15 l/min flow range. FL15 monitor is comprised of a con- trol unit and a number of flow meters connected to the control unit. There can be 2, 4, 6, 8 or 10 flow meters ( fig. -
Page 20: Skf Flowline Monitor Fl50
SKF Flowline monitor FL50 The SKF Flowline monitor FL50 is designed for 15 - 50 l/min flow range. FL50 monitor is comprised of a con- trol unit, one flow meter connected to the control unit and free flow tube. (fig. 3). -
Page 21: Operation
All Flowline monitors include a serial port for communicating with a PC. An optional SKF Flowline software is available which can be used for setting the measuring parameters and for monitoring the flows instead of the local user’s interface. -
Page 22: Leds In Flow Meters
LEDs in flow meters Each flow meter has five LEDs which indicate the oil flow rate in relation to the set nominal flow rate and alarm limits. Refer to the section 9 Settings. The accepted flow rate range is indicated with three green LEDs. When the LED in the middle is lit, flow rate is close to the set nominal flow rate. -
Page 23: User's Interface In The Control Unit
User’s interface in the control unit The user’s interface in the control unit can be used for monitoring lubrication point flow rates and lubrication oil temperature and for setting the measuring parameters for each flow meter and general parameters like oil vis- cosity and temperature unit. - Page 24 Function keys Table 4 Function key Description When pressed momentarily, the set nominal flow of the selected flow meter is displayed for 5 seconds instead of the measured flow rate. When pressed 3 seconds, setting mode is entered. Setting mode requires password ap- proval.
-
Page 25: Selecting A Flow Meter
20,0…100,0 Flow rate adjustment 9.6.1 FL15 and FL50 flow meter adjustment Oil flow rate is adjusted individually for each lubrication point. Flow valves are located in flow meters ( fig. 1). The flow rate decreases when the flow valve knob is turned clockwise. The flow rate increases when the flow valve knob is turned counterclockwise. -
Page 26: Fl100 Flow Meter Adjustment
9.6.2 FL100 flow meter adjustment The oil flow rate is adjusted with two separated flow valves, which are located in flow meter ( fig. 4). The flow rate decreases when the flow valve knob is turned clockwise. The flow rate increases when the flow valve knob is turned counterclockwise. -
Page 27: Settings
Password is a combination of numbers within the range of 000…999. It must be entered before monitor settings can be changed. The default password is 000. It can be changed only by SKF Flowline Software (optional). Press SET-key for about 3 seconds, until text "PPP" appears on display. -
Page 28: Exiting The Setting Mode
Exiting the setting mode 10.3.1 Saving parameters and exiting Press SET key for approx. 3 seconds until message "END" is displayed. The monitor saves the changed pa- rameters and goes back to measuring mode. 10.3.2 Exiting without saving parameters If monitor is in setting mode and the keys have not been used for 2 minutes, the monitor goes back to measur- ing mode without saving any changes. -
Page 29: Alarm Limits
10.4.2 Alarm limits Flow meter alarm limits are set as follows: Press SET-key to select a flow meter. Flow meter LED blinks to indicate that the flow meter has been se- lected. Use MODE-key to select the parameter to be set. LOW indicates the low limit value and HIGH indicates the high limit value. -
Page 30: Optional Flow Meter- Specific Settings
Pre-alarm limits are: When the flow increases 1 l/min + (3 l/min-1 l/min) * 80% = 2.6 l/min When the flow decreases 1 l/min + (0,5 l/min-1 l/min) * 80% = 0,6 l/min Example 2: Nominal value is set to 1 l/min. Low alarm limit is set to 0,5 l/min. -
Page 31: Monitor-Specific Settings
Use arrow keys to change the flow meter type. The numeric value displayed refers to the flow meter type. "15" refers to type FL15, “50” refers to type FL50 and “100” refers to type FL100 Exit setting mode or adjust other settings. -
Page 32: Pre-Alarm Limit
CAN-bus. If CAN bus is not used, the ID-number can be set to any value. If the monitors are connected to CAN-bus, every monitor has a unique CAN ID-number 1…100 for communi- cation. More information in SKF Flowline monitor CAN interface manual. FMON10JEN 07.04.2017 Rev. 10J... -
Page 33: Installation
Free space is required on the right side and above of the monitor for the motherboard and flowtube installation ( Figure 18)) Type L [mm] FL15-02 FL15-04 FL15-06 FL15-08 FL15-10 FL50-01 Monitor dimensions FL15 and FL50 Figure 7 Type L [mm] D [mm] FL100- 01-R FL100- 01-U Monitor dimensions FL100... -
Page 34: Pipe Connections
11.1.2 Pipe connections Table 7 Pipe connections, FL15 Connection Flowmeter type Type and size A = Oil input FL15-XX-R G 1” NPT 1” FL15-XX-U B = Oil output FL15-XX-R G 1/2” FL15-XX-U NPT 1/2” Figure 9 Pipe connections, FL15 Pipe connections, FL50... - Page 35 Table 9 Pipe connections standard, FL100 comes with one connection block Connection Flowmeter type Type and size A = Oil input FL100-01-R 2 x G 1” 2 x NPT 1” FL100-01-U B = Oil output FL100-01-R 1 x G 1 1/4” 1 x NPT 1 1/4”...
-
Page 36: Electrical Connections
Electrical connections The terminals for external electrical connections locate in the control unit. The group electronics board is equipped with plug-in screw connectors for the electrical cables. Connections within monitor between flow meters and control unit are performed through a motherboard. Con- trol unit is connected to the motherboard with a flat cable. - Page 37 Figure 13 Group electronics connections Description Connector Type Flat cable, flow sensor connection Sens RS232 port connector for a local PC Auxiliary connector for special applications Control 24V AC/DC power supply connector(in) PWR in 24V AC/DC power supply connector (out to next monitor) PWR out CAN cable connector (in) CAN in...
- Page 38 X11: 10 Not connected Contact open in alarm mode and when monitor is not powered. Max load: 30 VDC/1A, 120VAC/1A, resistive load Interface for SKF Flowline Hub or X12,X13: 1 CAN GND CAN cable connector X12, CAN In, process control system X13, CAN Out CAN 2.0A (Control Area Network)
-
Page 39: Maintenance
12 Maintenance WARNING Before disassembling or removing the monitor, the monitor must be disconnect- ed from its power source and all lubrication point oil connections to the monitor must be closed. WARNING Before and after disassembling or removing the monitor make sure that the monitor is not hot and/or environment is clean. - Page 40 Figure 14 Removing sensor. Spare part: Sensor unit (Refer to section 16 Spare parts). When the first sensor is reinstalled, make sure that the motherboard connectors inside the frame of the moni- tor are in their correct positions in relation to the connectors in the sensor. Push sensor manually to its correct position.
-
Page 41: Removing And Reinstalling Flowmeter Cover
Twist carefully with a screwdriver, first detaching the bottom of the cover from the monitor body. Detach the top of the cover. Cover can be reinstalled by repeating the steps in reverse order. Figure 15 Removing flowmeter cover FL15, FL50 and FL100. (Refer to section 16 Spare parts). FMON10JEN 07.04.2017 Rev. 10J 40 (40) -
Page 42: Removing And Reinstalling Flow Tube Assembly
Make sure that the visible groove in the flow tube is at the lower end of the tube (see arrow in the figure 16 . Figure 16 Replacing a flowtube assembly and visible groove Spare parts: FL15-KIT-FLOWTUBE-A 13120472, FL50-KIT-FLOWTUBE-A 13120477 and FL NON-RETURN VALVE 13771880 (Refer to section 16 Spare parts). FMON10JEN 07.04.2017 Rev. 10J... -
Page 43: Removing And Reinstalling Flow Valve
Pull flow valve out of its drillings. (part 3) Replace required parts and reinstall the flow valve in reverse order. Figure 17 Replacing a flow valve Spare parts: FL15-KIT-VALVE-A 13120480, FL50-KIT-VALVE 13120485 and 13120487 FL-KIT-KNOB (Refer to section 16 Spare parts). FMON10JEN 07.04.2017 Rev. 10J... -
Page 44: Removing And Reinstalling Motherboard
12.1.5 Removing and reinstalling motherboard Remove all sensors and the flat cable before removing the motherboard. Pull motherboard out of its slot as far as you can and maneuver it gently out of its position by twisting it slight- The maximal twist angle is 60°. See the figure below. Reinstall the motherboard by repeating the above steps in reverse order. -
Page 45: Technical Specifications
FL 50 & FL 100: +-5% of reading * for low and high flows and viscosities, contact to SKF reseller to ensure flow meter proper operation ** FL50 and FL100 can also be used in the flow range below minimum, 15l/min for FL50 and 50 l/min for FL100, but measuring accuracy is not sufficient for the low volumes. - Page 46 Flowmeter type, FL15 Flowmeter type, FL50 Flowmeter type, FL100 Monitor FL50 or FL100 single flowmeter Monitor FL15 with 2 pcs flowmeters Monitor FL15 with 4 pcs flowmeters Monitor FL15 with 6 pcs flowmeters Monitor FL15 with 8 pcs flowmeters Monitor FL15 with 10 pcs flowmeters...
-
Page 47: Optional Modules
14 Optional modules Relay-CAN module overall FL Relay-CAN module is a plug-in interface board for SKF Flowline monitor. Features -Individual alarms of flowmeters or specified common alarms, depending on the selected mode. -CAN bus communication See part 13.2 CAN Module The module is compatible with Flowline monitor models FL-15, FL-50 and FL-100. -
Page 48: Operation Of Alarm Relays
Individual alarm relay for each flowmeter in SKF Flowline monitor (configuration SHL and SL) Two individual alarm relays for each flowmeter in SKF Flowline monitor (configurations DHL, DL and Common alarm relays for all flowmeters in SKF Flowline monitor (configuration C) Relay 11 indicates faults in electronics. -
Page 49: Individual Alarms (Dhl, Dl And Hl)
With these operation modes every flowmeter in the Monitor has two (2) relays. Because the maximum amount of relays is 10, this operation mode can be used only if there are 1 to 5 flowmeters in a SKF Flowline monitor FL15. -
Page 50: Individual Alarms (Hl)
Configurations: DL, Double alarm low, flowmeter specific low level alarm and pre-alarm for decrease of the flow. DHL, Double alarm high and low, flowmeter specific low and high level alarm and pre-alarm for increase and decrease of the flow. Table 14 Individual alarms (DHL, DL), relay operation and screw terminals Relay nr Operation... -
Page 51: Common Alarms (C)
Common alarms (C) Relays are common alarm relays. Relay is in alarm mode when one or several flowmeters of the Monitor are in alarm mode. Every relay has a fixed operation mode. Table 16 Common alarms (C), relay operation and screw terminals Relay nr Operation Screw termi-... - Page 52 Possible faults: Power failure Fault detected by fault diagnostic of Monitor electronics, for example “flow sensor does not respond”. Fault in temperature sensor In operation mode C all other relays go to alarm mode, too, when a fault is detected. In other operation modes the relays which belong to the defective flowmeter go to alarm mode in addition to the fault relay.
-
Page 53: Can Module
General, 1: CAN- module, 2: FL Group electronics Figure 21 SKF Flowline Hub and SKF Flowline software can be used with CAN bus interface for building a stand -alone PC based control and monitoring system. The features and the applications of the CAN bus interface of Flowline monitor can be found in: SKF Flowline monitor CAN-interface manual. -
Page 54: Can Bus Connectors
Figure 22 mA-output module FL mA module is a plug-in interface board for SKF Flowline monitor. It has ten channels of flow rate depend- ent, scalable, 4- 20 mA analog output for each flowmeter in the monitor. The module is compatible with Flowline monitor models FL-15, FL-50 and FL-100. -
Page 55: Features
Figure 23 General, 1: FL mA output module, 2: FL Group electronics 14.3.1 Features Compatible with all models of Flowline monitor FL-15, FL-50 and FL-100. Each output is scalable independently by the user interface of Flowline monitor. Current outputs are active type. Each output supplies current to the customer’s measuring circuit. The module has a separate 24VDC power supply input for current loops The power supply and current loops has galvanic isolation from the supply voltage of Flowline monitor It can be supplied from:... -
Page 56: Connections
Flows < SCL: mA output is linear down to 3,5mA, Fault indication: If flowline monitor indicates fault in flow measurement ( dashes - - - on display) the current output is 3,5mA. Figure 24 Scaling figure 14.3.3 Connections There are screw terminals for max. 1,5mm2 wires on the module. The FL mA module requires that a separate voltage supply for current outputs is connected to terminals 24VDC+-20%. - Page 57 The current outputs are galvanically isolated from the supply voltage of FL monitor. If isolation is not required, terminals 71 and 72 can be connected to the supply voltage of FL monitor. In this case the supply voltage of the monitor is limited to 24VDC+-20%. Table 19 Connections Terminal...
-
Page 58: Troubleshooting
>0. limit values of the non-existing flow meters to “0”. (For example in FL15-06 the flow meters 7 – 10 are non-existing.) Code E02 is displayed, when tem- Temperature measurement failed. Check the flat cable between the perature is selected on the display. -
Page 59: Cleaning
Interior cleaning Interior cleaning is not usually required. However, if incorrect or contaminated lubricant has been used, the product must be cleaned on the inside. To do so, contact the SKF Customer Service for further instructions. FMON10JEN 07.04.2017 Rev. 10J... -
Page 60: Spare Parts
17 Spare parts 1 pc end plate 2 pcs O-rings 3 pcs screws Figure 25 FL-KIT-END 13120450 1 pc cover with membrane keyboard, 1 pc seal Figure 26 FL-KIT-COVER 13120460 FMON10JEN 07.04.2017 Rev. 10J 59 (59) - Page 61 1 pc laminator 1 pc spring 1 pc cover 1 pc plug 1 pc upper flange Figure 27 FL15-KIT-FLOWTUBE-A 13120472 1 pc flowtube assembly 1 pc flowtube kit B 2 pcs springs 2 pcs laminators 2 pcs covers 2 pcs plugs...
- Page 62 1 pc flow valve assembly 1 pc locking ring 1 pc flow valve wheel 1 pc ring 1 pc flow valve knob Figure 30 FL50-KIT-VALVE 13120485 (2 pcs in FL100) Figure 31 FL NON RETURN VALVE 13771880 10 pcs knobs Figure 32 FL-KIT-KNOB 13120487 1 pc casing bottom...
- Page 63 1 pc sensor unit Figure 34 SENSOR-UNIT 13500310 Figure 35 FL-MOTHERBOARD Table 21 FL-MOTHERBOAR ITEM NUMBERS 1. 13500320 For FL15-02-XXX For FL50-01-XXX 2. 13500321 For FL15-04-XXX For FL100-01-XXX 3. 13500322 For FL15-06-XXX 4. 13500323 For FL15-08-XXX 5. 13500324 For FL15-10-XXX FMON10JEN 07.04.2017 Rev.
- Page 64 Figure 36 FL GROUP ELECTRONICS V2.1 13500360 Figure 37 RELAY-CAN MODULE v.2.1 13500375 (OPTIONAL) FMON10JEN 07.04.2017 Rev. 10J 63 (63)
- Page 65 Figure 38 CAN BUS INTERFACE MODULE v.2.1 13500365 (OPTIONAL) Figure 39 mA-OUTPUT MODULE v.2.1 13500380 (OPTIONAL) FMON10JEN 07.04.2017 Rev. 10J 64 (64)
- Page 66 9. O-ring 25.3x2.4 14. CAN module, Relay-CAN module or mA-output module card 5. Seal 10. O-ring 22.2x3 15. Plug SKF Flowline monitor FL 15, parts Table 22 Figure 40 SKF Flowline monitor FL15, exploded view FMON10JEN 07.04.2017 Rev. 10J 65 (65)
- Page 67 Table 23 SKF Flowline monitor FL 50 and FL100, parts 1. Body 8. Flow valve shaft 2. Flowtube assembly 9. PTFE ring 3. Position sign 10. Grooved ring 4. Sensor unit B 11. Ring 23,5x1 5. Flowtube 12. Locking ring 6.
- Page 68 1. Body 9. PTFE ring 2. Flowtube assembly 10. Grooved ring 3. Position sign 11. Ring 23,5x1 4. Sensor unit B 12. Locking ring 5. Flowtube 13. Laminator FL-50 6. Flow valve 14. Laminator FL 7. O-ring 15,3x2,4 15. Postion sign 8.
Need help?
Do you have a question about the FL15 and is the answer not in the manual?
Questions and answers