Table of Contents
Advertisement
Warning! - Read this manual before using this product. Failure to
follow the instructions and safety precautions in this manual can result in
serious injury. Keep this manual in a safe location for future reference.
Copyright 2014 by SKF
All rights reserved.
2 Michaelson Square, Kirkton Campus, Livingston, UK EH54 7DP
Tel: +44 (0) 1506 470011 Fax: +44 (0) 1506 470012
Customer Service: +1 858-496-3627 or 1-800-523-7514
How to Use the SKF TKSA 60 and
TKSA 80 Alignment Tools
P/N 32233700 -EN
Revision F
User Manual
Advertisement
Table of Contents

Related Manuals for SKF TKSA 60


Summary of Contents for SKF TKSA 60
- Page 1 How to Use the SKF TKSA 60 and TKSA 80 Alignment Tools P/N 32233700 -EN Revision F Warning! - Read this manual before using this product. Failure to follow the instructions and safety precautions in this manual can result in serious injury.
- Page 2 SKF reserves the right to alter any part of this publication without prior notice.
- Page 3 General Notice to Users Users are not permitted to make changes or modify the device in any way. FCC Notice to Users Contains FCC ID: U6TZIGBIT-A2 The enclosed device complies with Part 15 of the FCC Rules. Operation is subject to the following two conditions: (i.) this device may not cause harmful interference and (ii.) this device must accept any interference received, including interference that may cause undesired operation.
- Page 5 Shaft Alignment Systems TKSA 60 and TKSA 80 provided, however, that SKF shall not be liable for any claim for which notice is received by SKF including hand-held computer, measuring units more than thirty (30) days following the and accessories.
- Page 6 As a condition to SKF’s warranty obligations by SKF. hereunder and if requested or authorized in writing by SKF, Buyer shall forward to SKF any Criteria 2. Product claimed by Buyer as being defective. Buyer shall prepay all transportation charges to SKF’s factory or authorized service center.
- Page 7 SKF is willing the Product which is the subject of the Buyer’s and able to perform to the extent and in the warranty claim.
-
Page 9: Table Of Contents
Verify Corrections (Horizontal) ......5-22 How to Set Up a Quick Alignment (Vertical) ..5-27 How to Perform a Quick Alignment (Vertical) ..5-31 How to Use the SKF TKSA 60 and TKSA 80 Alignment Tools TOC - 1 User Manual... - Page 10 How to Work with Previously Save Jobs ....7-1 How to Create a New Machine Train ..... 7-5 How to Create a New Machine Component ..7-6 TOC- 2 How to Use the SKF TKSA 60 and TKSA 80 Alignment Tools User Manual...
-
Page 11: Introduction
Do not attempt to open the device. Device service must be performed only by qualified SKF repair personnel. Use only accessories recommended or provided by SKF. How to Use the SKF TKSA 60 and TKSA 80 Alignment Tools 1 - 1 User Manual... -
Page 12: Organization Of Your Tksa 60 / 80 Manual
TKSA 60 / 80 setup screens, alignment procedures and data collection displays, and data review options. This information is essential when setting up the TKSA 60 / 80 tools and when using the TKSA 60 / 80 systems to perform precision alignment jobs. -
Page 13: Alignment System Overview
Chapter 1, Introduction – Introduces manual conventions and overviews the TKSA 60 / 80 alignment process. Chapter 2, The Display Unit - Introduces the new user to the TKSA 60 / 80 alignment display units. This chapter provides information about display unit screens, keypads, connectors, batteries, etc. -
Page 14: Principle Of Operation
During the alignment procedure we will refer to the part of the machinery that will be adjusted as the “moveable machine.” The other part will be referred to as the “stationary machine.” 1 - 4 How to Use the SKF TKSA 60 and TKSA 80 Alignment Tools User Manual... - Page 15 Also, while it is strongly recommended to take measurements that are 90 degrees apart, How to Use the SKF TKSA 60 and TKSA 80 Alignment Tools 1 - 5 User Manual...
-
Page 16: What Are The Tksa 60 / 80 Alignment Systems
Introduction What are the TKSA 60 / 80 Alignment Systems? the TKSA 60 / 80 Alignment Tools will accept a minimum rotation angle of 30 degrees from the previous measurement position. What are the TKSA 60 / 80 Alignment Systems? - Page 17 Save the Job – Save the job for historical reference and for use with future alignment jobs. How to Use the SKF TKSA 60 and TKSA 80 Alignment Tools 1 - 7 User Manual...
-
Page 18: Technical Specifications
Storage memory: 64 MB Housing: PC / ABS plastic with integrated lockable stand TKSA 60 Dimensions (height x width x depth): 234 x 132 x 48 mm (9.2 x 5.2 x 1.9 in.) TKSA 80 Dimensions (height x width x depth): 276 x 160 x 53 mm (10.9 x 6.3 x 2.1 in.) - Page 19 Length: 4 of 90 mm, 4 of 150 mm, can be screwed together to increase length Standard shaft diameter Up to 300 mm (11.8 in.) How to Use the SKF TKSA 60 and TKSA 80 Alignment Tools 1 - 9 User Manual...
-
Page 21: The Display Unit
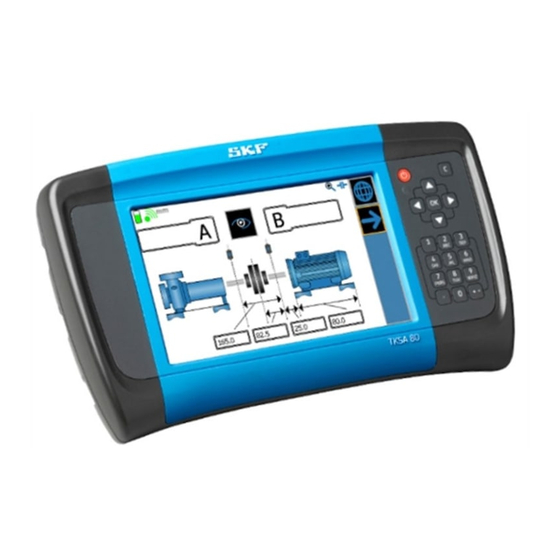
The Display Unit Overview The SKF TKSA 60 and TKSA 80 display units are shown below. Both display units are rugged and designed for use in harsh environments. Both units have built in wireless technology for communication with the system’s measuring units. The TKSA 60 display unit provides a 4.3 inch WQVGA (480 x 272) backlit color LCD... -
Page 22: How To Use The Buttons And Keypad
/ OK button - use to navigate display screens and select the highlighted item alpha/numeric data entry keypad cancel (C) button - delete last character typed battery charging LED indicator 2 - 2 How to Use the SKF TKSA 60 and TKSA 80 Alignment Tools User Manual... -
Page 23: Power Button
SKF title screen initially displays, showing your unit’s firmware version number. After a few seconds, the display unit automatically displays its Home screen. How to Use the SKF TKSA 60 and TKSA 80 Alignment Tools 2 - 3 User Manual... - Page 24 The red LED indicator located below the power button lights when connected to the AC power supply, to indicate the battery is being charged. 2 - 4 How to Use the SKF TKSA 60 and TKSA 80 Alignment Tools User Manual...
-
Page 25: Battery Operations
10 hours of life remain* of life remain* Good – approximately 9 hours Good – approximately 8 hours of life of life remain* remain* How to Use the SKF TKSA 60 and TKSA 80 Alignment Tools 2 - 5 User Manual... - Page 26 * Remaining battery life ratings are for typical use and will vary between units and operating scenarios. How to Install the Battery IMPORTANT: To ensure proper and safe TKSA 60 / TKSA 80 operation, ONLY use the supplied battery. To install the Lithium-Ion battery in your display unit: •...
-
Page 27: Battery Maintenance
Press the Power button. Battery Maintenance Dispose your SKF TKSA 60 / TKSA 80 battery according to your local regional requirements. If you are unable to dispose the battery locally, contact an SKF Certified Repair depot to request a Return Authorization (RA) number to return the battery to SKF for recycling. -
Page 28: Wireless Communications
Figure 2 - 5. Connections. external power supply connector USB A connector USB B connector 2 - 8 How to Use the SKF TKSA 60 and TKSA 80 Alignment Tools User Manual... -
Page 29: The Home Screen
When first powered on, the display unit displays its Home screen. The Home screen’s title bar displays battery and system status. Home screen menu icons allow you to initiate alignment jobs, and to specify TKSA 60 / 80 system settings. Figure 2 - 6. The Home Screen. - Page 30 Global Functions section. When accessed, the Help screen displays information about the currently displayed screen and options available. Figure 2 - 7. The Home Screen’s Help Screen. 2 - 10 How to Use the SKF TKSA 60 and TKSA 80 Alignment Tools User Manual...
- Page 31 If you encounter a problem that requires assistance from SKF Technical Support, you may be asked to provide information from the “more system information” screen. How to Use the SKF TKSA 60 and TKSA 80 Alignment Tools 2 - 11 User Manual...
- Page 32 Display the main Settings screen. Add free text note for current inspection/job which will be included as part of the final job report. Display context sensitive Help. 2 - 12 How to Use the SKF TKSA 60 and TKSA 80 Alignment Tools User Manual...
-
Page 33: The Measuring Units
Figure 3 - 2. The TKSA HA and TKSA HB Measuring Units (Rear). With the SKF TKSA 60 / 80 alignment application, the measuring units are referred to individually as measuring unit A and measuring unit B. The user can attach either of the measuring units to either side of the machine train (stationary or moveable sides). -
Page 34: Battery Information
Two v-brackets are provided. Both must be mounted on the shaft in accordance with the following instructions. 3 - 2 How to Use the SKF TKSA 60 and TKSA 80 Alignment Tools User Manual... - Page 35 Figure 3 - 6. Tightening with the Tommy Bar. The supplied tommy bar can be used to tighten the rods, if required. How to Use the SKF TKSA 60 and TKSA 80 Alignment Tools 3 - 3 User Manual...
- Page 36 To assemble the chain assembly, place the pivot over the threaded pull bar. Then screw the knurled knob onto the pull bar to keep the pivot captive. 3 - 4 How to Use the SKF TKSA 60 and TKSA 80 Alignment Tools User Manual...
- Page 37 Then, drop the pivot into the slots on the top surface of the v-bracket to hold this end of the chain in place. How to Use the SKF TKSA 60 and TKSA 80 Alignment Tools 3 - 5 User Manual...
- Page 38 Now that the v-brackets are secured on the shaft, your next step is to mount the measuring units onto the v-brackets’ rods. 3 - 6 How to Use the SKF TKSA 60 and TKSA 80 Alignment Tools User Manual...
- Page 39 It does not matter which measuring unit you mount on which shaft, the TKSA 60 / 80 application allows you to specify your setup. • Position the A measuring unit as low as possible on the rods without it being blocked by the coupling.
- Page 40 “operating range” band can be seen. Faulty measurements may result when operating the measuring unit outside its designed operating range. 3 - 8 How to Use the SKF TKSA 60 and TKSA 80 Alignment Tools User Manual...
-
Page 41: Power Button And Led
Information on pairing measuring units with your display unit and using the measuring units during an alignment job is found in the next Chapter 4, Preparing for an Alignment Job. How to Use the SKF TKSA 60 and TKSA 80 Alignment Tools 3 - 9 User Manual... -
Page 43: Preparing For An Alignment Job
(TKSA 80 only) Enable to display a touch screen keyboard when a data entry field is selected. (TKSA 80 only) Select the Calibrate button to re-calibrate the touch screen – follow on-screen prompts. How to Use the SKF TKSA 60 and TKSA 80 Alignment Tools 4 - 1 User Manual... - Page 44 This screen’s icons and menus allow you to configure your system’s two laser measuring units. Measuring Unit settings icons and menus are overviewed in the following table. 4 - 2 How to Use the SKF TKSA 60 and TKSA 80 Alignment Tools User Manual...
- Page 45 From any Settings screen, select the Measuring Units Settings icon and then select the Measuring Units Setting icon to display the Measuring Units Settings screen. Figure 4 - 3. The Measuring Units Settings Screen. How to Use the SKF TKSA 60 and TKSA 80 Alignment Tools 4 - 3 User Manual...
- Page 46 After changing your settings, use the right panel menu to change other settings or use the Global Functions menu to exit the Settings screen and return to the Home screen. 4 - 4 How to Use the SKF TKSA 60 and TKSA 80 Alignment Tools User Manual...
- Page 47 After changing your settings, use the right panel menu to change other settings or use the Global Functions menu to exit the Settings screen and return to the Home screen. How to Use the SKF TKSA 60 and TKSA 80 Alignment Tools 4 - 5 User Manual...
-
Page 48: Pairing The Display Unit With The Two Measuring Units
Overview The pairing procedure enables wireless communications between the display unit and two specific measuring units. The TKSA 60 / 80 Systems are shipped to you with your measuring units already paired to your display unit. However, if at some future time you change or replace one or both of your measuring units, you must use the pairing process to enable communications with the new measuring unit(s). - Page 49 From the Measuring Units Settings screen, select the “Enter / Exit Pairing Mode” icon to enter pairing mode. The pairing mode screen displays. How to Use the SKF TKSA 60 and TKSA 80 Alignment Tools 4 - 7 User Manual...
- Page 50 Pair with measuring units - select to pair with the currently selected measuring units in each list. Enters / Exits pairing mode. 4 - 8 How to Use the SKF TKSA 60 and TKSA 80 Alignment Tools User Manual...
- Page 51 Exit pairing mode without attempting to pair with any measuring units and return to the Measuring Unit Setup screen. Figure 4 - 8. A Successful Pairing. How to Use the SKF TKSA 60 and TKSA 80 Alignment Tools 4 - 9 User Manual...
- Page 52 Status The measuring unit is paired and active The measuring unit is not paired, or is in-active. Error condition, contact SKF Technical Support 4 - 10 How to Use the SKF TKSA 60 and TKSA 80 Alignment Tools User Manual...
-
Page 53: How To Perform A Quick Alignment (Horizontal)
To learn more about performing full alignment jobs, reference Chapter 6, How to Set Up and Perform Full Alignment Jobs. Figure 5 - 1. Selecting Quick Alignment. quick alignment icon How to Use the SKF TKSA 60 and TKSA 80 Alignment Tools 5 - 1 User Manual... - Page 54 This should be done before measuring anything, to provide the most accurate results possible. 5 - 2 How to Use the SKF TKSA 60 and TKSA 80 Alignment Tools User Manual...
- Page 55 Quick Alignment jobs are limited to two machines, a motor and a pump. Dimensions screen items for horizontal machine alignments are overviewed in the following table and discussed in detail later in this section. How to Use the SKF TKSA 60 and TKSA 80 Alignment Tools 5 - 3 User Manual...
- Page 56 You can proceed to the next step without entering the foot dimensions. You will be prompted later to specify the foot dimensions if they are required. 5 - 4 How to Use the SKF TKSA 60 and TKSA 80 Alignment Tools User Manual...
- Page 57 On the Alignment Tolerances screen, specify how to measure angular misalignment, and the alignment tolerances (i.e., how close you must get to the 0, 0 alignment targets). How to Use the SKF TKSA 60 and TKSA 80 Alignment Tools 5 - 5 User Manual...
- Page 58 (e.g., mm / 100 mm or mil / 1 in) or as a proportion of the coupling diameter (i.e., measure angular misalignment as coupling gap). • Next, enter the angular and offset tolerances for your alignment job. 5 - 6 How to Use the SKF TKSA 60 and TKSA 80 Alignment Tools User Manual...
- Page 59 This screen enables you to specify the permitted alignment tolerances (angular and offset) by selecting from a table of entries based on RPM. How to Use the SKF TKSA 60 and TKSA 80 Alignment Tools 5 - 7 User Manual...
- Page 60 Also, while the 90 degree rule states that it is strongly recommended to take measurements that are 90 degrees apart, the TKSA 60 / 80 Alignment Tools will accept a minimum rotation angle of 30 degrees from the previous measurement position.
- Page 61 Discards the last recorded measurement, allowing you to retake the measurement. If necessary, switch the viewing perspective, as if viewing the machine train from the opposite end. How to Use the SKF TKSA 60 and TKSA 80 Alignment Tools 5 - 9 User Manual...
- Page 62 A two headed arrow prompts you to move the measuring units to the next measurement position. 5 - 10 How to Use the SKF TKSA 60 and TKSA 80 Alignment Tools User Manual...
- Page 63 With the measuring units in their second position, select the checkmark icon to record the second measurement. You are prompted to move the measuring units to the next measurement position. How to Use the SKF TKSA 60 and TKSA 80 Alignment Tools 5 - 11 User Manual...
-
Page 64: How To Perform Additional Inspections
For inspections that require the laser measuring units, you will be prompted to input necessary machine dimensions, if you haven’t previously input them. 5 - 12 How to Use the SKF TKSA 60 and TKSA 80 Alignment Tools User Manual... - Page 65 The Select Inspection screen allows you to select additional inspections to perform as part of a Quick Alignment job. The available inspections vary depending on features that you have licensed. Contact your SKF sales associate if you wish to license additional features.
- Page 66 The Runout Inspection screen’s right panel menu icons are similar for most inspections and are overviewed in the following table. 5 - 14 How to Use the SKF TKSA 60 and TKSA 80 Alignment Tools User Manual...
- Page 67 TKSA 60 / 80 laser measuring units. Using laser soft foot vs. manual soft foot is specified on the main Settings screen. How to Use the SKF TKSA 60 and TKSA 80 Alignment Tools 5 - 15 User Manual...
- Page 68 During the inspection, the above screen displays for both machines in the machine train, allowing you to perform the inspection for both machines. 5 - 16 How to Use the SKF TKSA 60 and TKSA 80 Alignment Tools User Manual...
- Page 69 Inspection allows you to record how much each foot has been shimmed. On the Shims Inspection screen, the shimming arrangement for each foot is displayed as a stack of shims or chocks of varying thicknesses. How to Use the SKF TKSA 60 and TKSA 80 Alignment Tools 5 - 17 User Manual...
- Page 70 After completing the as-found alignment measurements and any selected inspections, from the Select Inspection screen, select the right panel’s Next Screen icon, the Alignment Results screen displays.. 5 - 18 How to Use the SKF TKSA 60 and TKSA 80 Alignment Tools User Manual...
-
Page 71: How To View Alignment Results (Horizontal)
• Select the “correction” icon if you wish to correct the machinery alignment (default setting if tolerances are exceeded), or How to Use the SKF TKSA 60 and TKSA 80 Alignment Tools 5 - 19 User Manual... - Page 72 After reviewing runout results for both machines in the machine train, select the right panel’s Next Screen icon to progress to the next inspection’s results. 5 - 20 How to Use the SKF TKSA 60 and TKSA 80 Alignment Tools User Manual...
- Page 73 Measurement screen for those inspections where corrections were specified. If corrections were not selected for any inspection’s results, then you advance to the Job Report screen. How to Use the SKF TKSA 60 and TKSA 80 Alignment Tools 5 - 21 User Manual...
-
Page 74: How To Correct As-Found Conditions And Verify Corrections (Horizontal)
How to Correct As-Found Conditions and Verify Corrections (Horizontal) If you specified corrections for multiple inspections, the order in which corrections are performed is automatically optimized by the TKSA 60 / 80 alignment process. Therefore, depending on which inspections / corrections were specified, corrections will be performed as sequenced below: •... - Page 75 The Alignment Corrections screen’s information and right panel menu icons are overviewed in the following table. How to Use the SKF TKSA 60 and TKSA 80 Alignment Tools 5 - 23 User Manual...
- Page 76 Displays the Shims Inspection screen, allowing you to update the machine’s shim / chock data after your machinery moves. 5 - 24 How to Use the SKF TKSA 60 and TKSA 80 Alignment Tools User Manual...
- Page 77 , press the switch plane icon and follow the on screen prompts. Figure 5 - 23. Horizontal Alignment Corrections Screen Before Machinery Correction Moves. How to Use the SKF TKSA 60 and TKSA 80 Alignment Tools 5 - 25 User Manual...
- Page 78 If the inclinometers are switched off , press the switch plane icon and follow the on screen prompts to switch to vertical or horizontal correction view: 5 - 26 How to Use the SKF TKSA 60 and TKSA 80 Alignment Tools User Manual...
-
Page 79: How To Set Up A Quick Alignment (Vertical)
From the Home screen, select the Quick Alignment icon. The Quick Alignment Menu screen prompts you for the orientation of machine train on which you are performing the alignment, Horizontal or Vertical. How to Use the SKF TKSA 60 and TKSA 80 Alignment Tools 5 - 27 User Manual... - Page 80 The two measuring units (A and B) are also shown. Dimensions screen items for vertical machine alignments are overviewed in the following table and discussed in detail later in this section. 5 - 28 How to Use the SKF TKSA 60 and TKSA 80 Alignment Tools User Manual...
- Page 81 On the Alignment Tolerances screen, specify how to measure angular misalignment, and the alignment tolerances (i.e., how close you must get to the 0, 0 alignment targets). How to Use the SKF TKSA 60 and TKSA 80 Alignment Tools 5 - 29 User Manual...
- Page 82 When measurement results are between 1x and 2x the specified tolerance, they are displayed with an amber wavy-lines mark. 5 - 30 How to Use the SKF TKSA 60 and TKSA 80 Alignment Tools User Manual...
-
Page 83: How To Perform A Quick Alignment (Vertical)
Hereafter, this location is referred to as the “reference” bolt. The second How to Use the SKF TKSA 60 and TKSA 80 Alignment Tools 5 - 31... - Page 84 When the three measurements have been collected, the Next Screen icon displays in the right panel menu, allowing you to progress to the next step. 5 - 32 How to Use the SKF TKSA 60 and TKSA 80 Alignment Tools User Manual...
- Page 85 With the measuring units in their second position, select the checkmark icon to record the second measurement. You are prompted to move the measuring units to the next measurement position. How to Use the SKF TKSA 60 and TKSA 80 Alignment Tools 5 - 33 User Manual...
-
Page 86: How To View Alignment Results (Vertical)
1 and 3 (Plane 1), and the plane through measurement position 2 and the position where no measurement was taken (Plane 2). 5 - 34 How to Use the SKF TKSA 60 and TKSA 80 Alignment Tools User Manual... - Page 87 (default setting if tolerances are not exceeded). Then press the right panel’s Next Screen icon to progress to the next inspection’s results. How to Use the SKF TKSA 60 and TKSA 80 Alignment Tools 5 - 35 User Manual...
-
Page 88: How To Correct As-Found Conditions And Verify Corrections (Vertical)
Parallel misalignment is corrected by moving the flange in the same plane as the moveable measuring unit. The vertical Alignment Corrections screen’s information and right panel menu icons are overviewed in the following table. 5 - 36 How to Use the SKF TKSA 60 and TKSA 80 Alignment Tools User Manual... - Page 89 The flange reference bolt indicator graphic and the shim values for all other bolts in the bolt shim list adjust for the new reference bolt. How to Use the SKF TKSA 60 and TKSA 80 Alignment Tools 5 - 37 User Manual...
-
Page 90: How To Save The Alignment Job
If you select Yes at the prompt, the Save Job screen displays. Figure 5 - 34. An Example Save Job Screen. reference fields and selection buttons job name field 5 - 38 How to Use the SKF TKSA 60 and TKSA 80 Alignment Tools User Manual... - Page 91 USB memory stick in .pdf format for transfer to PC. You may select the right panel’s Discard icon to discard the current job without saving it. How to Use the SKF TKSA 60 and TKSA 80 Alignment Tools 5 - 39 User Manual...
-
Page 92: The Alignment Job Report
PC. After reviewing the Job Report, select the right panel’s Next Screen icon to progress to the next screen. 5 - 40 How to Use the SKF TKSA 60 and TKSA 80 Alignment Tools User Manual... -
Page 93: Inspections
All other inspections are detailed below. Machine Foundation Inspection Visual inspections (e.g., machine foundation status, oil leak status, etc.) are recorded using a "traffic light" type indicator. How to Use the SKF TKSA 60 and TKSA 80 Alignment Tools 5 - 41 User Manual... - Page 94 Since you’ve now performed the inspection, its icon no longer displays on the Select Inspection screen. 5 - 42 How to Use the SKF TKSA 60 and TKSA 80 Alignment Tools User Manual...
- Page 95 Since you’ve now performed the inspection, its icon no longer displays on the Select Inspection screen. How to Use the SKF TKSA 60 and TKSA 80 Alignment Tools 5 - 43 User Manual...
- Page 96 Inspect all washers and bolts for the displayed machine. • Select either the “all good” or “all bad” icon to indicate all washer / bolt conditions. 5 - 44 How to Use the SKF TKSA 60 and TKSA 80 Alignment Tools User Manual...
- Page 97 The machine’s foundation bolt torque is displayed. Use it as the reference when inspecting/correcting. How to Use the SKF TKSA 60 and TKSA 80 Alignment Tools 5 - 45 User Manual...
- Page 98 Since you’ve now performed the inspection, its icon no longer displays on the Select Inspection screen. All remaining inspections operate in a similar manner. 5 - 46 How to Use the SKF TKSA 60 and TKSA 80 Alignment Tools User Manual...
-
Page 99: How To Set Up And Perform Full Alignment Jobs
In chapter five, we discussed how to perform Quick Alignment jobs. Now we will discuss how the TKSA 60 / 80 Alignment Tools perform a full alignment job. In general, the process for performing a full alignment is similar to that for performing a Quick Alignment (i.e., job setup –... -
Page 100: Machine Train Setup
Select the right panel’s Next Screen icon to continue. The Setup Inspections screen displays, allowing you to specify which inspections to perform as part of the alignment job. 6 - 2 How to Use the SKF TKSA 60 and TKSA 80 Alignment Tools User Manual... -
Page 101: Inspections Setup
The Setup Inspections screen displays all available inspections that may be included as part of your full alignment job. The inspections are listed in the sequence in which they are executed by the TKSA 60 / 80 full alignment process. The order for initial inspections is as follows:... -
Page 102: Shims / Chocking Setup
• After specifying information for all machines in the machine train, select the right panel’s Next Screen icon. The Bolt Setup screen displays. 6 - 4 How to Use the SKF TKSA 60 and TKSA 80 Alignment Tools User Manual... -
Page 103: Bolt Setup
The TKSA 60 / 80 provides a method to specify the details of the foundation bolts (material grade and dimensions), the lubricant that is applied for thread connection and mating surfaces of the nut and bolt head (Oil or MoS2) and a field to enter the desired torque force (at desk calculated Moment). -
Page 104: Alignment Target Setup
If required, consult the manufacturer's machinery data sheets to determine the alignment targets. • Select the right panel’s Next Screen icon to continue. The vertical alignment Target Setup screen displays. 6 - 6 How to Use the SKF TKSA 60 and TKSA 80 Alignment Tools User Manual... -
Page 105: Alignment Tolerances
(i.e., how close you must get to the specified horizontal and vertical alignment targets). Figure 6 - 8. The Alignment Tolerances Screen. How to Use the SKF TKSA 60 and TKSA 80 Alignment Tools 6 - 7 User Manual... - Page 106 Repeat for all couplings in the machine train. • After entering all coupling alignment tolerances, select the right panel’s Next Screen icon to continue. The Tools Setup screen displays. 6 - 8 How to Use the SKF TKSA 60 and TKSA 80 Alignment Tools User Manual...
-
Page 107: Tools Setup
(e.g., from the All Tools list) Press the left arrow to remove the highlighted tool from the machine train list. If necessary, press the C keypad button to unselect the currently selected list. How to Use the SKF TKSA 60 and TKSA 80 Alignment Tools 6 - 9 User Manual... - Page 108 Alignment Job section. In the future, the saved New Job will be available for use from the Job Database (reference Chapter 7, Working with the Job Database. 6 - 10 How to Use the SKF TKSA 60 and TKSA 80 Alignment Tools User Manual...
-
Page 109: Working With The Job Database
Create a new machine component (TKSA 80 only) How to Work with Previously Save Jobs The Database screen’s Job Cards option allows you to select and perform operations with previously saved jobs stored in the TKSA 60 /80’s database. To recall a saved job: •... - Page 110 Apply the Machine train filter and the Job location filter as desired. • Select the desired job from the jobs list. Additional icons display on the Job Selection screen. 7 - 2 How to Use the SKF TKSA 60 and TKSA 80 Alignment Tools User Manual...
- Page 111 Job Report screen for your review. Continue – Displays the Continue Job screen for the selected saved job. How to Use the SKF TKSA 60 and TKSA 80 Alignment Tools 7 - 3 User Manual...
- Page 112 Dimensions screen where you can edit the previously entered machine dimensions for the saved job, and then resume the alignment job based upon the edited dimensions. 7 - 4 How to Use the SKF TKSA 60 and TKSA 80 Alignment Tools User Manual...
-
Page 113: How To Create A New Machine Train
For the active machine, select the machine type selection list, then select the type of machine for the active machine in the machine train. A list showing How to Use the SKF TKSA 60 and TKSA 80 Alignment Tools 7 - 5... -
Page 114: How To Create A New Machine Component
Type – Type of new component (e.g., gas motor, fan, gearbox, etc.) machine type selection list number of feet on machine (not active at this time – defaults to 4 feet only) 7 - 6 How to Use the SKF TKSA 60 and TKSA 80 Alignment Tools User Manual... - Page 115 After defining the new component, select the right panel’s Next Screen icon to continue. You are returned to the Database screen. The new component is now an available machine type when creating new machine trains. How to Use the SKF TKSA 60 and TKSA 80 Alignment Tools 7 - 7 User Manual...
- Page 117 2-9 clone job 7-3 help 2-10 connectors 2-8 home screen 2-3, 2-9 continue job 7-3 horizontal alignment 5-2, 5-27 correction additional inspections 5-27 How to Use the SKF TKSA 60 and TKSA 80 Alignment Tools Index - 1 User Manual...
- Page 118 MAC address 4-3 positions, measurement 5-8, 5-31 machine dimensions 5-3, 5-28 power button 2-3 machine train power supply 2-5 component 7-6 creating 7-5 filter 7-2 Index - 2 How to Use the SKF TKSA 60 and TKSA 80 Alignment Tools User Manual...
- Page 119 1-4, 3-1, 5-5, 5-29 suspend mode 2-3 system information 2-10 target 5-6 target setup 6-6 time zone 4-6 title screen 2-3 tolerances 6-7 How to Use the SKF TKSA 60 and TKSA 80 Alignment Tools Index - 3 User Manual...
Need help?
Do you have a question about the TKSA 60 and is the answer not in the manual?
Questions and answers