Table of Contents
Advertisement
Quick Links
Advertisement
Table of Contents

Related Manuals for ICP DAS USA iCAM-721F


Summary of Contents for ICP DAS USA iCAM-721F
- Page 1 3 MP IR Bullet Network Camera User’s Manual Version 1.0...
- Page 2 Warranty All products manufactured by ICP DAS are under warranty regarding defective materials for a period of one year, starting from the date of delivery to the original purchaser. Warning ICP DAS CO., LTD. assumes no liability for damages consequent to the use of this product.
-
Page 3: Table Of Contents
4.3 Video & Audio Setup ....................47 4.3.1 Stream Tab ....................48 4.3.2 Video Tab ..................... 51 4.3.3 Audio Tab ....................55 4.3.4 Privacy Mask Tab ..................56 4.3.5 ROI Tab ......................58 4.4 Event Setup ....................... 60 iCAM-721F User’s Manual ICP DAS... - Page 4 4.5 Local Storage Setup ....................74 4.5.1 Local Storage Tab ..................75 4.5.2 Playback Tab ....................76 5 Appendix 5.1 Firmware Upgrade and Trouble Shooting ..............77 5.2 How to let camera to do Hardware Reset ..............87 iCAM-721F User’s Manual ICP DAS...
- Page 5 WISE controller to perform a WISE Surveillance Solution. 4. For Chapter 3, modify the “Live View” button related descriptions. 5. For Chapter 1 to 5, modify its description for more detail and clear. 6. Add section 5.2 about the hardware reset. iCAM-721F User’s Manual ICP DAS...
- Page 6 Do not continue to operate the device if it appears to malfuntion. Contact qualified service personnel from our distibutor/dealer for help. Installation of the product should be made by qualified service personnel or system installers from our distibutor/dealer. iCAM-721F User’s Manual ICP DAS...
-
Page 7: Read Me First
H.264/MPEG-4/MJPEG compression technology, the iCAM-721F offers extra-smooth video and wide coverage. iCAM-721F employs many advanced features to allow users to fully utilize the high definition video. Focus on a region of interest (ROI) in the camera view to enhance image quality. It also saves the cost of network and backend storage without network bandwidth of video streaming. - Page 8 Chapter 2 Built-in microSD card slot, support microSDHC/microSDXC 64GB or above Weather-proof IP67-rated Housing Built-in 802.3af Compliant PoE ONVIF Compliant for interoperability iCAM-721F User’s Manual ICP DAS...
-
Page 9: Hardware Overview
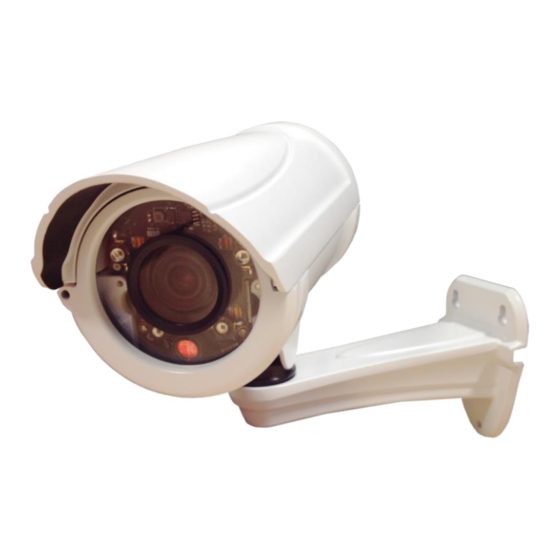
Chapter 2 1.1 Hardware Overview iCAM-721F Dimensions Cable Connections: iCAM-721F User’s Manual ICP DAS... -
Page 10: Specifications
Above 39 dB Dynamic Range 100 dB Adjustable resolution, quality and bitrate Video Streaming ROI (Region of Interest) for Enhancement of Image Quality Adjustable image size, quality and bitrate Image Settings Configurable brightness, saturation, exposure control, iCAM-721F User’s Manual ICP DAS... - Page 11 Digital input * 1 Digital output * 1 IEEE 802.3af PoE Power Input DC 12V IR ON Max. 12W (PoE) Power Consumption IR OFF Max. 5W (PoE) Dimensions Ø :200 L x 81H x 81W mm iCAM-721F User’s Manual ICP DAS...
- Page 12 Working : -40°C ~ 50°C Operating Humidity 10% ~ 80% System Requirements Operating System Microsoft Windows 10/8/Vista/XP Mozilla Firefox 7 ~ 52, Web Browser Internet Explorer 7 ~ 11 Other Players VLC: 1.1.11 or above iCAM-721F User’s Manual ICP DAS...
-
Page 13: Installation And Setup
2 Installation and Setup 2.1 Install microSD Card The iCAM-721F built-in microSD card slot supports microSDHC/microSDXC 64 GB or above for local storage application. The user can prepare a microSD card to install into the camera via the following steps. -
Page 14: Connecting Camera To Network
Camera via CAM FINDER), or directly set up the camera via the Microsoft IE browser using the following default IP information: IP: 192.168.255.2 (Default Username/Password: admin/admin) Submask: 255.255.0.0 Gateway address: 192.168.0.1 DNS Server address: 8.8.8.8 iCAM-721F User’s Manual ICP DAS... -
Page 15: Configuring Camera Via Cam Finder
Check if the Camera is powered on and correctly connected to the network. In order to connect to the Web-based user interface of the camera, the host PC must be in the same subnet. For more information about subnets, please consult your network administrator. iCAM-721F User’s Manual ICP DAS... - Page 16 If want to change the software language, please click the right key of mouse on the gray area and select the [Language] to choose one language from the [Traditional Chinese], [English], [Spanish] and [Simplified Chinese]. iCAM-721F User’s Manual ICP DAS...
-
Page 17: Use Cam Finder To Assign Ip Address
Click the [Device Search] to search the camera on the network. Under your selected item, double-click the left Mouse button or Right-click the Mouse button to open the Property Page of the [Single Device Setting]. iCAM-721F User’s Manual ICP DAS... - Page 18 Chapter 2 Check [Static IP address] item to select the network connection method of the camera. After modifying the camera properties, click [Set] button to save and enable the configuration modifications. iCAM-721F User’s Manual ICP DAS...
- Page 19 Chapter 2 Use “Ctrl” or “Shift” key on 5. This Utility can batch modify IP address automatically. the keyboard to choose several Camera Devices. Then click the [Batch Device Setting] to configure them together. iCAM-721F User’s Manual ICP DAS...
-
Page 20: Open The Web-Based Ui Of The Camera
Manual input the username and password for the login authentication of camera webpage. For the first time login of setting or using, please use the admin admin default username , password NOTE: Use of Microsoft IE browser is recommended as it offers a better compatibility. iCAM-721F User’s Manual ICP DAS... - Page 21 Besides, use of Microsoft IE browser is recommended as it offers a better compatibility. Please click the NetcamViewer hyper-link to download and install it. NOTE: Please also note to close all browser applications before NetcamViewer web component installation. iCAM-721F User’s Manual ICP DAS...
- Page 22 1. From the IE Browser menu, select [Internet Options] -> [Security] -> [Custom Level] 2. Set the security level to Low and click [OK]. 3. Don’t forget to restore the security level after the ActiveX installation. iCAM-721F User’s Manual ICP DAS...
-
Page 23: Live View Ui Settings
You may enter “admin” for both. Click OK button when completed. (Note that same Browser with different version or different vendor Browser will behave different dialog window. Below picture is belonging to IE Browser’s diagram.) iCAM-721F User’s Manual ICP DAS... - Page 24 3) The “Live View” setting window will then display offering all the necessary set up tools for changing the live view reconfigurations. The functions of each of these tools are explained in the following sections. iCAM-721F User’s Manual ICP DAS...
-
Page 25: Quick Access Buttons
To display the whole live view into full screen mode, double click the mouse left button on the video; and press “ESC” key on the keyboard could exit full screen view. iCAM-721F User’s Manual ICP DAS... -
Page 26: Camera Live View Ui Setting Tools
Select the default language of the user-interface. Setup button: Figure 3-4 Camera Live Click Setup button can change or update more Camera View Reconfiguration Tools settings, including Video & Audio, System, Network, Event, Local Storage and Remote Storage. iCAM-721F User’s Manual ICP DAS... - Page 27 EX: set as “night456”. It will auto-expand date & time for each saved snapshot file as “night456 _20170510_102808.jpg”. To start capturing snapshots, click the Snapshot button in the Quick Access Button area. iCAM-721F User’s Manual ICP DAS...
- Page 28 This can be accomplished by clicking the Setup button (indicated in the above figure). The Setup dialog (see following figure) will then display to provide the range of setup categories you will be able to change. iCAM-721F User’s Manual ICP DAS...
-
Page 29: Setup
4 Setup NOTE For “Live View” setup execution, please refer to the previous chapter “Live View UI Settings” iCAM-721F User’s Manual ICP DAS... -
Page 30: System Setup
System Setup Clicking the System button will display the following tabbed panes relative to system configurations. iCAM-721F User’s Manual ICP DAS... -
Page 31: Information Tab
4.1.1 Information Tab The Information tabbed pane provides the existing system status of the Camera which includes Model Name, System Time, Firmware Version, MAC Address, ActiveX Control Version, Wired Network, Wireless Network and DDNS Server Status. iCAM-721F User’s Manual ICP DAS... -
Page 32: Time Tab
Camera clock with your manually entered Network Time Protocol (NTP) Server. Keep current date and time setting: Select this option in lieu of automatic synchronization if the Camera is not connected to NTP Server and uses its own embedded clock. iCAM-721F User’s Manual ICP DAS... - Page 33 Saving: Select this option only when applicable at your location. Two setup settings; the Start time and End time are needed to implement the feature. After setups are completed, click Save button to apply the settings. iCAM-721F User’s Manual ICP DAS...
-
Page 34: Security Tab
Remove: Click Remove button can remove the added security setting. Click the button to access the security setup dialog (shown below). iCAM-721F User’s Manual ICP DAS... - Page 35 Camera parameter are prohibited. User is only allowed to login “Live View” Viewer: Webpage and perform all functions within this page. Changing Camera settings is prohibited. After setups are completed, click Save button to apply the settings. iCAM-721F User’s Manual ICP DAS...
-
Page 36: Maintenance Tab
The Maintenance tabbed pane allows you to upgrade the firmware with the latest version and to restore the Network Camera settings to factory default. ※ Please specify the correct firmware version mapped with your camera to upgrade, or there will be danger to damage camera system. iCAM-721F User’s Manual ICP DAS... - Page 37 Camera system proceed to restore step, there’ll be a dialog window popped and then ask if you would like to keep “Network setting” parameters. Besides, all configured data in the “System Time”, “Security” and “Maintenance” tab will be remained current. iCAM-721F User’s Manual ICP DAS...
-
Page 38: System Log Tab
The connected or disconnected of Status tell you if the IP Address of Remote Log Server is existence or not. After setups are completed, click Save button to apply the settings. Then Status would shows “connected” or “disconnected”. iCAM-721F User’s Manual ICP DAS... -
Page 39: Network Setup
Network Setup Clicking the Network button will display the following tabbed panes on configuring Camera connection with the network. iCAM-721F User’s Manual ICP DAS... -
Page 40: General Tab
This option obtains the available dynamic IP address assigned by the DHCP server each time the Camera is connected to the network. Fixed IP Address: This option manually assigns a static IP address to the Network Camera. iCAM-721F User’s Manual ICP DAS... - Page 41 HTTP Port: Re-define the existing HTTP Port number in the text box. RTSP Port: Re-define the existing RTSP Port number in the text box. After setups are completed, click Save button to apply the settings. iCAM-721F User’s Manual ICP DAS...
-
Page 42: Ddns Tab
Enabled check box to display password in decoded format. Update Time: Define a time interval for the device to periodically update and check its access status with website of DNS Service Provider. After setups are completed, click Save button to apply the settings. iCAM-721F User’s Manual ICP DAS... -
Page 43: Multicast Tab
In other words, the camera can send just one streaming and each client can receive the streaming with Multicast Protocol. iCAM-721F User’s Manual ICP DAS... - Page 44 Even with the client number increasing, the network bandwidth is still the same loading with one camera. Check the “Enable” box to open UDP Multicast Streaming Enable: function of stream. After checking the “Enable” box to open this function, click Save button to apply the settings. iCAM-721F User’s Manual ICP DAS...
-
Page 45: Ip Filter Tab
Filling the IP range, then click Save button to implement the settings. If you would like to re-open the access right of those listed device, select it from the list and then click Remove button to apply the settings. iCAM-721F User’s Manual ICP DAS... -
Page 46: Wise Tab
Fill in the IP address of WISE-5231. When the IP address is set, the CGI command is automatically sent to the WISE-5231 when an event occurs in this camera. After setups are completed, click Save button to apply the settings. iCAM-721F User’s Manual ICP DAS... -
Page 47: Video & Audio Setup
Video & Audio Setup Clicking the Video & Audio button will display the following tabbed panes for defining Camera streaming, video, and audio functions. iCAM-721F User’s Manual ICP DAS... -
Page 48: Stream Tab
Video quality settings for stream 2: This is the secondary quality setting for live view streaming. Video quality settings for stream 3 : This is the third quality setting for live view streaming. iCAM-721F User’s Manual ICP DAS... - Page 49 VQCB - The video quality and the frame rate will be variable to meet the provided bit rate. iCAM-721F User’s Manual ICP DAS...
- Page 50 For example: the default RTSP Port Access Name is live1.sdp;it means your stream name would be “RTSP://camera’s IP address/live1.sdp” After setups are completed, click Save button to implement the settings. iCAM-721F User’s Manual ICP DAS...
-
Page 51: Video Tab
4.3.2 Video Tab iCAM-721F User’s Manual ICP DAS... - Page 52 Adjust the Saturation value to 200. Contrast: The brightness ratio of the lightest to the darkest part of the video image. Try to assign the fit value according to the environment. Adjust the Contrast value to 100. iCAM-721F User’s Manual ICP DAS...
- Page 53 Try to set them according to the stream quality. Wide Dynamic Range: Enable this function could let camera provide clear images even under backlighting. Set WDR function to Disable. Set WDR function to Enable. iCAM-721F User’s Manual ICP DAS...
- Page 54 Camera will auto switch to “day” or “color” mode. Otherwise, it will remain at “night” or “mono” mode with IR. Camera switches to Night or Mono mode with IR on. iCAM-721F User’s Manual ICP DAS...
-
Page 55: Audio Tab
And its playback volume could be adjusted by moving the slider to the left to decrease; and to the right to increase the volume. After setups are completed, click Save button to implement the settings. iCAM-721F User’s Manual ICP DAS... -
Page 56: Privacy Mask Tab
4) Click the Save button. This will turn the laid out screen into solid block. If the laid out screen needs correction, click Delete button and redo the masking screen lay out process. iCAM-721F User’s Manual ICP DAS... - Page 57 2) Click Save button and wait a while. Then the screen is permanently removed. 2. Then click the “Save” button and wait the state finished. 1. Please click “Delete” button. 3) To permanently disable the Privacy Mask function, disable the Enable Privacy Mask check box iCAM-721F User’s Manual ICP DAS...
-
Page 58: Roi Tab
4) Click the Save button to apply. ※Only support H.264 1. Check “Enable” ROI function. 3. Enhance video quality of ROI. 2. Click Add to draw a region to define the detection range. 4. Click Save iCAM-721F User’s Manual ICP DAS... - Page 59 Add button again. A second default frame will pop-up on the screen. Drag & resize the frame at the desired location. 2) Repeat the above step to add more detection area frames. (Max. 4 frames) iCAM-721F User’s Manual ICP DAS...
-
Page 60: Event Setup
Clicking the Event button will display the tabbed panes (see figure below) for defining event recording of the Camera. The iCAM-721F is equipped with a card slot for microSD / microSDHC / microSDXC 64 GB memory card. This storage card is utilized to store recording of local video and still JPEG images taken in response to set events. -
Page 61: Motion Tab
Resize the frame by dragging its corners or borders. 4) Click the Save button to apply. 5) Repeat above steps to add more motion detections. The maximum number of motion detections is 10. NOTE Total defined motion detection areas cannot exceed 10 regions. iCAM-721F User’s Manual ICP DAS... - Page 62 Delete button. The frame will disappear after a while. 8) To delete multiple frames that are not yet saved, directly click the Refresh button instead of deleting them individually. The Refresh button will automatically clears all unsaved frames. iCAM-721F User’s Manual ICP DAS...
-
Page 63: Video Tab
Motion is ignored with this method. Target: Each recording time is in accordance with the setting value of Recording Length (in seconds) and the video record is stored in the Target of SD card. iCAM-721F User’s Manual ICP DAS... - Page 64 Time Lapse (in seconds) whenever motion is detected. Target: The video record may be stored in the SD card, provided to host by E-mail / FTP as selected or through all of them. iCAM-721F User’s Manual ICP DAS...
- Page 65 Pre-event recording and Post event recording (in seconds). Target: The video record may be stored in the SD card, provided to host by E-mail/FTP, activated GPIO Output Port as selected or through all of them. iCAM-721F User’s Manual ICP DAS...
- Page 66 Pre-event recording and Post event recording (in seconds). Target: The video record may be stored in the SD card, provided to host by E-mail/FTP, activated GPIO Output Port as selected, or through all of them. iCAM-721F User’s Manual ICP DAS...
- Page 67 Filename Prefix: EX: If set the prefix as “721Favi”, the filename will show as “721Favi_20170615151326.jpg”. The files will be stored in folders named by date and sub-folders named by time under the assigned Path. iCAM-721F User’s Manual ICP DAS...
-
Page 68: Snapshot Tab
1, 2 or 3 seconds interval (Time Lapse). Target: The stream of accumulated snapshots may be stored in the SD Card, sent to host by E-mail or FTP, or through all of them. iCAM-721F User’s Manual ICP DAS... - Page 69 1, 2 or 3 seconds intervals. Target: The stream of accumulated snapshots may be stored in the SD Card, sent to host by E-mail or FTP as preferred, or through all of them. iCAM-721F User’s Manual ICP DAS...
- Page 70 (3 frames before and 3 frames after motion frame). Target: The stream of accumulated snapshots may be stored in the SD Card, sent to host by E-mail or FTP, activated GPIO Output Port as preferred, or through all of them. iCAM-721F User’s Manual ICP DAS...
- Page 71 The stream of accumulated snapshots may be sent to host through E-mail, FTP, stored in the SD card, Remote Disk, activated GPIO Output Port; per selection or through all of them. When selected, the setup dialog for these methods will display is illustrated in the following figure. iCAM-721F User’s Manual ICP DAS...
- Page 72 Filename Prefix: EX: If set the prefix as “721Favi”, the filename will show as “721Favi_20170615151326.jpg”. The files will be stored in folders named by date and sub-folders named by time under the assigned Path. iCAM-721F User’s Manual ICP DAS...
-
Page 73: Gpio Tab
Options: Low to High, High to Low, or State Change. GPIO Output: To set how long the GPIO Output device would be kept active high status. Then click the Save button to take effect the change. iCAM-721F User’s Manual ICP DAS... -
Page 74: Local Storage Setup
If recording is in progress when clicking the Local Storage button, a warning message will occur. NOTE remove the micro SD card while Camera is in recording process. iCAM-721F User’s Manual ICP DAS... -
Page 75: Local Storage Tab
: Click this button to save changes to the SD card control setting. : Click this button to format the SD memory card (take note of the message in red). : Click this button to refresh the SD card information. iCAM-721F User’s Manual ICP DAS... -
Page 76: Playback Tab
4) Select the file to playback and enable the corresponding check box. The dialog strip below will then pops up. 5) Click Open button will playback the file. Click Save button will save file to a designated folder. iCAM-721F User’s Manual ICP DAS... -
Page 77: Appendix
PC. Please help to check if your IE Browser version is 11 first. If it is yes, please kindly refer to the below steps to enable Compatible View settings of IE 11 Browser. iCAM-721F User’s Manual ICP DAS... - Page 78 Find Tools icon and then select Compatibility View settings. iCAM-721F User’s Manual ICP DAS...
- Page 79 Click button to add camera webpage as a compatible website. After successful adding, camera webpage should be set as compatible view website. iCAM-721F User’s Manual ICP DAS...
- Page 80 Then camera webpage would be refreshing real-time and starting to load camera webpage. button to enable NetcamViewer component running… Click Allow Manual enter camera’s username/password to pass authentication. Camera live stream is successful playing in IE11 Browser iCAM-721F User’s Manual ICP DAS...
- Page 81 CDWizard application, and then try NetcamViewer installation again. So before NetcamViewer installation, please make sure there’s no “iexplore” process running in Windows Task Manager Window. If there is “iexplore” process existing, select “End Process” to force its stop. iCAM-721F User’s Manual ICP DAS...
- Page 82 During NetcamViewer installation, you may see below prompt windows are always popped. This will mainly remind you to close all running browser applications and then “OK” press button to continue NetcamViewer installation. Or these two windows will pop continuously until all browsers are closed. iCAM-721F User’s Manual ICP DAS...
- Page 83 Manual input username and password of the camera to pass login authentication of camera webpage. (Default username and password are admin and admin.) “SETUP” After Live View page is entering successfully, find the button. Clicking it could change or update more Camera settings. iCAM-721F User’s Manual ICP DAS...
- Page 84 After downloading it, click the Browse button to open the file open dialog for firmware choosing. Download and save the latest firmware in the PC Click here to browse and select it. iCAM-721F User’s Manual ICP DAS...
- Page 85 Then you will see Camera Webpage is reloading, it means all processes of camera are stopping at the same time. After all processes are stopped, the camera will start to upgrade the firmware you chose. iCAM-721F User’s Manual ICP DAS...
- Page 86 After camera Web-based UI is re-login successfully, go to Information Tab of Camera Setup Webpage to check if the firmware version is different with before; or check if the firmware version is the same with distributor/dealer provided. iCAM-721F User’s Manual ICP DAS...
-
Page 87: How To Let Camera To Do Hardware Reset
1) Please make sure camera is power on first. 2) Refer the below GPIO Port pin definition table of the cable; connect Default Setting(5) and GND(4) pins to short, remove the connection 10 seconds later. iCAM-721F User’s Manual ICP DAS... - Page 88 Default Setting: Short Pin4 and Pin5 with a wire PIN with a short wire to revert to factory default settings. Break the short when the LED starts quick Default flashing, and then camera will reboot automatically Setting a few minutes later. iCAM-721F User’s Manual ICP DAS...