
Related Manuals for EcubMaker TOYDIY 4in1


Summary of Contents for EcubMaker TOYDIY 4in1
- Page 1 TOYDIY 4in1 3D Printer ------------------------------------- Manual ------------------------------------...
-
Page 3: Table Of Contents
Directory ------------------------------------------------------------------------------------------------------------------------------------------ A. Product overview Disclaier------------------------------------------------------------------------------------- Safety Instructions------------------------------------------------------------------------ Structural Schematic-------------------------------------------------------------------- 05-09 Specification------------------------------------------------------------------------------- Packing List-------------------------------------------------------------------------------- 12-13 B. Equipment Set UnI------------------------------------------------------------------------------------------- Unboxing---------------------------------------------------------------------------------- Initial Start-Up--------------------------------------------------------------------------- Menu Feature----------------------------------------------------------------------------- FDM single 3D print-------------------------------------------------------------------- FDM-Dual 3D print---------------------------------------------------------------------- 19-22 Laser Engraving-------------------------------------------------------------------------- 23-26 CNC Carving------------------------------------------------------------------------------- 27-30 31-33 C. EcubWare slice Settings Setup EcubWare------------------------------------------------------------------------- FDM Setting 35-37... - Page 4 Welcome to choose EcubMaker ...
- Page 5 Settings. Section C~E mainly introduces how to level, print, maintain and repair. We are glad that you choose TOYDIY 4in1 3D printer. This manual will let you know about the operation of TOYDIY, make you create more possibilities in the 3D world.
- Page 6 TOYDIY in the same room. Flammable vapors could be ignited during operation. ● When engraving complete, certain materials, like plastics, can remain hot. Wait for them cooling down before you touch them. ------------------------------------------------------------------------------------------------------------------------------------------ A Welcome to choose EcubMaker...
- Page 7 (referred to here as “smoke and fumes”). The smoke and fumes can include carbon monoxide and other chemicals depending on the material being lasered and can Causes health hazards. The fan in the ------------------------------------------------------------------------------------------------------------------------------------------ A Welcome to choose EcubMaker...
- Page 8 ● The size of the material must be smaller than 180 x180 mm (7.0” x 7.0”). ● Do not place rolled-up material in the TOYDIY. It may be too tall, or unroll during laser engraving, obstructing operation. ------------------------------------------------------------------------------------------------------------------------------------------ A Welcome to choose EcubMaker...
- Page 9 ● The size of the material must be smaller than 150 x150 x40 mm (5.9” x 5.9” x 1.5”). ● Do not place rolled-up material in the Snapmaker. It may be too tall, or unroll during carving, obstructing operation. ------------------------------------------------------------------------------------------------------------------------------------------ A Welcome to choose EcubMaker...
- Page 10 ● The TOYDIY stops unexpectedly. ● You see any damage to the interior components of the TOYDIY. ● You notice an unusual sound coming from the TOYDIY that was not occur previously. ------------------------------------------------------------------------------------------------------------------------------------------ A Welcome to choose EcubMaker...
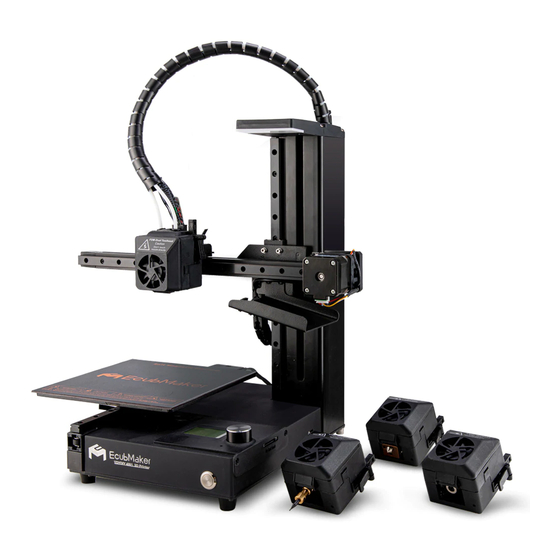
- Page 11 X-Axis stpper motor Y-Axis stpper motor Menu Button Display SD Card slot Heating platform USB interface Y-shaft Power switch Filament tube ① Extruder ② Extruder Filament Power jack FDM Toolhead Laser Toolhead FDM-Dual Toolhead CNC Toolhead ------------------------------------------------------------------------------------------------------------------------------------------- A Welcome to choose EcubMaker...
- Page 12 Specification -------------------------------------------------------------------------------------------------------------------------------------------- Modle EcubMaker ToyDIY 4in1 3D printer Technology FDM/LASER/CNC Specialty 4 funcation 、automatic leveling、easy to use Nozzle FDMToolhead;FDM-DualToolhead; LaserToolhead;CNCToolhead Printing Size 180mm*180mm*180mm Color Black Interface 128*64 LED screen Language English LED Light Molding Precision ±0.1mm Position Accuracy Z Axis 2.5um,XY Axis 11um Layer Thickness 0.05mm-0.4mm...
-
Page 13: Packing List
FDM Toolhead SD Card,SD reader and USB FDM-Dual Toolhead Laser Toolhead Safety Glasses CNC Toolhead Spanners and Accessories The accessory list of different configurations will be different, please refer to the real one. ------------------------------------------------------------------------------------------------------------------------------------------- A Welcome to choose EcubMaker... - Page 14 Packing List -------------------------------------------------------------------------------------------------------------------------------------------- FDM Mountings Plate Sticker x2 Filament Support Solid glue CNC Mountings CNC Tool CNC Baseplate x2 CNC Fixture Processed raw material Wood Material PMMA Material(Acrylic) ----------------------------------------------------------------------------------------------------------------------------------------- A Welcome to chooseEcubMaker...
- Page 15 Equipment Set...
- Page 16 Tip: Please take TOYDIY out of the box lightly and carefully. So as to avoid the damage of TOYDIY . If you tear too hard, it may scratches o and even damage TOYDIY. ----------------------------------------------------------------------------------------------------------------------------------------- B EcubMaker TOYDIY basic setup and installation...
- Page 17 (1)Remove TOYDIY from the box, place it on a stable place, and remove the plastic protective bag. Tip:The Toolhead Flat Cable is not a handle. Never pull or twist the Toolhead Flat Cable. ------------------------------------------------------------------------------------------------------------------------------------------ B EcubMaker TOYDIY basic setup and installation...
- Page 18 After unboxing, let's assemble TOYDIY. 1.Mounting Toolhead(The initial default Toolhead is the FDM Toolhead) 2. Plug into the adapter 3.Press the button, the handle light and the screen will be light up. ------------------------------------------------------------------------------------------------------------------------------------------ B EcubMaker TOYDIY basic setup and installation...
-
Page 19: Fdm 3D Print
Move Axis Manual shaft Set Origin Set the machining origin of CNC Toolhead Z-Offset Set the Z-Offset value Change ToolHead Change ToolHead Restore defaults Restore defaults Printer info Equipment information ------------------------------------------------------------------------------------------------------------------------------------------ B EcubMaker TOYDIY basic setup and installation... - Page 20 (4) Loose the ToolHead Screw fixing the current Toolhead, remove the original Toolhead upward but keep the cable connected. Remove it and put it aside. Pay attention not to unplug the cable at this moment. ------------------------------------------------------------------------------------------------------------------------------------------ B EcubMaker TOYDIY basic setup and installation...
- Page 21 ●When pressing the filament tube, make sure to press it to the bottom and then pull out the filament tube, otherwise it is difficult to pull out the filament tube. ------------------------------------------------------------------------------------------------------------------------------------------ B EcubMaker TOYDIY basic setup and installation...
- Page 22 If no thread come out from nozzle, please check refer to the first step to check out if filament is inserted into the specified extruder and the specified position as required. ------------------------------------------------------------------------------------------------------------------------------------------ B EcubMaker TOYDIY basic setup and installation...
- Page 23 A4 paper. At this time, the value displayed on the screen is an appropriate Z-offset value, and then return to the current interface and click Save Settings to Save. ------------------------------------------------------------------------------------------------------------------------------------------ B EcubMaker TOYDIY basic setup and installation...
- Page 24 (4) (4) Loose the ToolHead Screw fixing the current Toolhead, remove the original Toolhead upward but keep the cable connected. Remove it and put it aside. Pay attention not to unplug the cable at this moment. ------------------------------------------------------------------------------------------------------------------------------------------ B EcubMaker TOYDIY basic setup and installation...
- Page 25 ●When pressing the filament tube, make sure to press it to the bottom and then pull out the filament tube, otherwise it is difficult to pull out the filament tube. ------------------------------------------------------------------------------------------------------------------------------------------ B EcubMaker TOYDIY basic setup and installation...
- Page 26 "Load Up Filament" section) ------------------------------------------------------------------------------------------------------------------------------------------ B EcubMaker TOYDIY basic setup and installation...
- Page 27 (2) Go to the menu Print from SD > FDM-Dual 3D Printing Test Modle.gcode, select the file and click Print. (3) Wait for finish (4) Take off soft magnetic plate and take the model ------------------------------------------------------------------------------------------------------------------------------------------ B EcubMaker TOYDIY basic setup and installation...
-
Page 28: Laser Engraving
(4) Loose the hand screw fixing the current Toolhead, remove the original Toolhead upward but keep the cable connected. Remove it and put it aside. Pay attention not to unplug the cable at this moment. ------------------------------------------------------------------------------------------------------------------------------------------ B EcubMaker TOYDIY basic setup and installation... - Page 29 If it is not Laser Toolhead, repeat the third step until the firmware program switch is completed. EcubMaker TOYDIY Laser 3D Printer Displays the current firmware Toolhead type > Print Form SD Filament Utility ------------------------------------------------------------------------------------------------------------------------------------------ B EcubMaker TOYDIY basic setup and installation...
- Page 30 (2) Go to the menu Print from SD > Laser Engraving Test Modle.gcode, select the file and click Print. (3) Wait for finish .Please wear safety glasses when observe the processing. (4) Take off soft magnetic plate and take the model ------------------------------------------------------------------------------------------------------------------------------------------ B EcubMaker TOYDIY basic setup and installation...
- Page 31 When the spot is the smallest, the current state is the focal length state. Tip: Users are not allowed to adjust the laser focal length unless they are authorized maintenance personnel. ------------------------------------------------------------------------------------------------------------------------------------------ B EcubMaker TOYDIY basic setup and installation...
- Page 32 (4) Loose the Toolhead Screw fixing the current toolhead, remove the original Toolhead upward but keep the cable connected. Remove it and put it aside. Pay attention not to unplug the cable at this moment. ------------------------------------------------------------------------------------------------------------------------------------------ B EcubMaker TOYDIY basic setup and installation...
- Page 33 Toolhead, repeat the third step until the firmware program switch complete. EcubMaker TOYDIY CNC 3D Printer Displays the current firmware Toolhead type > Print Form SD Filament Utility 2 Install CNC working platform and fixture ------------------------------------------------------------------------------------------------------------------------------------------ B EcubMaker TOYDIY basic setup and installation...
- Page 34 Start using CNC Toolhead when printing. Set Origin, the central point in the slicing EcubWare, must be Set first. ●The coupling between the tool head and the tool head of a CNC Tool must be tightened, otherwise accidents may occur. ------------------------------------------------------------------------------------------------------------------------------------------ B EcubMaker TOYDIY basic setup and installation...
- Page 35 C EcubWare slice Settings ------------------------------------------------------------------------------------------------------------------------------------------ D 软件安装和使用说明...
-
Page 36: Setup Ecubware
Setup Ecubware -------------------------------------------------------------------------------------------------------------------------------------------- 1. Description of slicing EcubWare EcubWare is a 3D model slicing software that applicable for TOYDIY . Please enter the EcubMaker official website (http://ecubmaker.com.cn/) and get further details in the "download center". 2.EcubWare Download File self-extracting... Click next... - Page 37 Setup Ecubware -------------------------------------------------------------------------------------------------------------------------------------------- Set the path and click next Click next Click next --------------------------------------------------------------------------------------------------------------------------------------- C EcubWare installation and instructions...
- Page 38 Setup Ecubware -------------------------------------------------------------------------------------------------------------------------------------------- Installing... The installation complete --------------------------------------------------------------------------------------------------------------------------------------- C EcubWare installation and instructions...
- Page 39 3.FDM 3D print Applicable Toolhead: FDM Toolhead (1)FDM 3D print Function: Mainly use to slice single model. ① Open the EcubWare -- select printer type:TOYDIY 4in1 ② select STL model and import the model --------------------------------------------------------------------------------------------------------------------------------------- C EcubWare installation and instructions...
- Page 40 EcubWare Setting -------------------------------------------------------------------------------------------------------------------------------------------- ③ Choose FDM Toolhead ④ Adjust the model and parameters ④ Click the "prepare" button to slice. Then, save the generated Gcode file into the SD card. You can print it in TOYDIY 3D printer. Note: When saving Gcode file, please use English file name. --------------------------------------------------------------------------------------------------------------------------------------- C EcubWare installation and instructions...
- Page 41 EcubWare Setting -------------------------------------------------------------------------------------------------------------------------------------------- (2)FDM_Multi-Color 3D print Applicable Toolhead: FDM-Dual Toolhead FDM_Multi-Color 3D print means those two filaments are the same material but different color, the material parameters and printing configuration are the same way to print. ① Open the EcubWare -- select printer model TOYDIY for FDM-Dual ToolHead only ②...
- Page 42 EcubWare Setting -------------------------------------------------------------------------------------------------------------------------------------------- ③ Select the same print Filament for each stl file and choose the extruder for both stl file. ④ Select two models and merge the two stl models into a composite model. --------------------------------------------------------------------------------------------------------------------------------------- C EcubWare installation and instructions...
- Page 43 EcubWare Setting -------------------------------------------------------------------------------------------------------------------------------------------- ⑤ Set printing parameters for the materials of extruder ① and extruder ② , respectively. ⑥ Click the "prepare" button to slice. Then, save the generated Gcode file into the SD card. You can print it in TOYDIY 3D printer. Note: When saving as Gcode file, please use English name file which does not support Chinese name.
-
Page 44: Fdm_Multi-Material 3D Print
EcubWare Setting -------------------------------------------------------------------------------------------------------------------------------------------- (3)FDM_Multi-material 3D print Applicable Toolhead: FDM-Dual Toolhead FDM_Multi-material 3D print means different materials of Filaments, their printing temperature and configuration parameters are different. The main Filament is PLA and the supporting Filament is PVA . ① Open the EcubWare -- select printer model TOYDIY for FDM-Dual ToolHead only ②... - Page 45 EcubWare Setting -------------------------------------------------------------------------------------------------------------------------------------------- ④ Click generate support, and select the extruder ② to generate support Adjust model parameters ⑥ Click the "prepare" button to slice. Then, save the generated Gcode file into the SD card. You can print it in TOYDIY 3D printer. Note: When saving Gcode file, please use English filename.
- Page 46 -------------------------------------------------------------------------------------------------------------------------------------------- 4.Laser Engraving Applicable Toolhead: Laser Toolhead ① Open the EcubWare -- select printer model TOYDIY 4in1 ② import pictures. Image format need to be *.png or *.jpg; The color in the picture must only include black and white , otherwise will affect the engraving effect.
- Page 47 EcubWare Setting -------------------------------------------------------------------------------------------------------------------------------------------- ④ Set up the workpiece material. Among them: Paper Leather three-ply Acrylic User defined Different materials need different engraving speed . ⑤ Set the thickness of the material under test and the laser engraving speed. Engraving Speed:The smaller the speed, the slower the engrave, the darker the color.
- Page 48 -------------------------------------------------------------------------------------------------------------------------------------------- 5.CNC Carving Applicable Toolhead: CNC Toolhead ① Open the EcubWare -- select printer model TOYDIY 4in1 CNC Toolhead shall be selected for CNC Carving. If the other head are selected, the printed Gcode will return error message. ② Import pictures.
- Page 49 EcubWare Setting -------------------------------------------------------------------------------------------------------------------------------------------- ② Set the depth of CNC Craving and milling The larger the number, the deeper the carving ,the depth range is 0-0.4mm. ⑥ Depth of material under test (mm/s). The larger the number, the deeper the carving, Note: When saving Gcode file, please use English file name.
- Page 50 EcubWare Setting -------------------------------------------------------------------------------------------------------------------------------------------- 6.Other function (1)View shows ① Entity view Description: Display the entity of the model intuitively, offer multi-angle observation. The default view in the software is "Solid view", and each view is switch through the buttons in the following red area. ②...
- Page 51 EcubWare Setting -------------------------------------------------------------------------------------------------------------------------------------------- ③ Layer shows Description: Observe each layer of the model, including color, speed, filling and support。 ④ Routing type display ⑤ Speed display --------------------------------------------------------------------------------------------------------------------------------------- --------------------------------------------------------------------------------------------------------------------------------------- C EcubWare installation and instructions...
- Page 52 EcubWare setup -------------------------------------------------------------------------------------------------------------------------------------------- ⑥ Layer density display ⑦ Drag the slider to display --------------------------------------------------------------------------------------------------------------------------------------- C EcubWare installation and instructions...
- Page 53 EcubWare setup -------------------------------------------------------------------------------------------------------------------------------------------- (2)Model color Settings ① Same materials multi-color display Description: easy to observe the multi-color model a.Enter Manage Materials b. Edit colors Description: create filament type --------------------------------------------------------------------------------------------------------------------------------------- --------------------------------------------------------------------------------------------------------------------------------------- C EcubWare installation and instructions...
- Page 54 EcubWare Setting -------------------------------------------------------------------------------------------------------------------------------------------- c.Edit the color d.Activate the color --------------------------------------------------------------------------------------------------------------------------------------- C EcubWare installation and instructions...
- Page 55 EcubWare Setting -------------------------------------------------------------------------------------------------------------------------------------------- ② Two color display for different Filaments a.Set the Filaments Description: the material types of the two extruders are different and need to be set separately. --------------------------------------------------------------------------------------------------------------------------------------- --------------------------------------------------------------------------------------------------------------------------------------- ----------------------------------------------------------------------------------------------------------------------------------------- C EcubWare installation and instructions...
- Page 56 EcubWare Setting -------------------------------------------------------------------------------------------------------------------------------------------- b.Go to the color editor c.Edit filament color --------------------------------------------------------------------------------------------------------------------------------------- C EcubWare installation and instructions...
- Page 57 EcubWare Setting -------------------------------------------------------------------------------------------------------------------------------------------- --------------------------------------------------------------------------------------------------------------------------------------- --------------------------------------------------------------------------------------------------------------------------------------- ----------------------------------------------------------------------------------------------------------------------------------------- C EcubWare installation and instructions...
- Page 58 EcubWare Setting -------------------------------------------------------------------------------------------------------------------------------------------- (3)Language Settings The EcubWare supports multi-language Settings, with English as the default. The language setting method is as follows: Open Preferences -- Configure EcubWare: ② Language selection: ③ Reboot the EcubWare to implement the language switch. --------------------------------------------------------------------------------------------------------------------------------------- C EcubWare installation and instructions...
- Page 59 Craving; TOYDIY for FDM-Dual Toolhead only:Used for FDM-Dual print. ② :Filament selection. ③ :TOYDIY 4in1:Select the corresponding function such as FDM, Laser or CNC. ④ : Recommended Settings.(Quickly set common parameters) a:Layer height, 0.1mm print slow, 0.2mm print fast .
- Page 60 TOYDIY 4in1:Used for FDM_single print, Laser Engraving and CNC Craving; TOYDIY for FDM-Dual Toolhead only:Used for FDM-Dual print. ② :Filament selection. ③ :TOYDIY 4in1:Select the corresponding function such as FDM, Laser or CNC. ④ : Custom Settings. a:Configuration files. Draft and fine Settings. Draft is general setting, print layer height is 0.2mm, fine is fine setting, print layer height is 0.1mm.
- Page 61 Equipment maintenance ...
-
Page 62: Cnc Plate
Equipment maintenance ------------------------------------------------------------------------------------------------------------------------------------------- 1.Maintenance and cleaning of guide rail This product USES the stainless steel guide rail, used in the normal environment (25 degrees temperature, 30~60% humidity) will not get rusty. In order to ensure the better performance of the guide rail, it is necessary to coat XYZ three linear guide rail with lubricating oil regularly(usually 1 month) . - Page 63 Common faults ...
- Page 64 Common faults ------------------------------------------------------------------------------------------------------------------------------------------- 1.Unable to start-up Phenomenon: after plugging in the power, turn on the power button. The indicator light is not lighten up and the screen is not lighten up also. Reason check: this phenomenon usually means there is no power on the whole machine, please check whether the power adapter light, if there is no light, please check whether the city power socket is work is working or not.
-
Page 65: The Toolhead Can Not Be Reset After Changing
Common faults ------------------------------------------------------------------------------------------------------------------------------------------- Phenomenon: When FDM Toolhead is printed, the first layer is so close or so far to the printing platform. Reason check: When the equipment leaves the factory, we will set an appropriate Z-offset value, but when the equipment hardware is replaced, remove and assemble, the Z-offset value may change accordingly. Generally, when FDM prints the first layer, if the nozzle is too far away from the platform, the Z-offset value needs to be reduced (for example, from -0.2mm to -0.8mm). - Page 66 Jinhua EcubMaker technology Co. LTD Add:Room 1111, 1-1 / f, zhongke science park, no. 589 longtan road, jinhua, zhejiang E-mail:ecubmaker@zd3dp.com Cloud printing platform:www.yun.3dp.com.cn...
Need help?
Do you have a question about the TOYDIY 4in1 and is the answer not in the manual?
Questions and answers