Table of Contents
Advertisement
Quick Links
Advertisement
Table of Contents

Related Manuals for Sygonix UH-730


Summary of Contents for Sygonix UH-730
- Page 1 Operating instructions Outdoor 360° Surveillance camera 1080p Item No. 1674346...
-
Page 2: Table Of Contents
Table of contents Page 1. Introduction ..........................3 2. Explanation of symbols .......................3 3. Intended use ........................4 4. Delivery content ........................5 5. Safety instructions .......................5 6. Product overview .........................7 7. Installation and start-up .......................9 a) Mounting the camera ....................9 b) Inserting the SD card ....................11 c) Installing the camera ....................11 8. -
Page 3: Introduction
1. Introduction Dear customer, Thank you for purchasing this product. This product complies with statutory national and European regulations. To ensure that the product remains in this state and to guarantee safe operation, always follow the instructions in this manual. These operating instructions are part of this product. -
Page 4: Intended Use
3. Intended use The product is used to monitor and protect blind or critical areas (such as entrances, courtyard entrances, underground garages, staircases). The camera is only intended to be used with a stabilised direct current of 12 V/DC. The product is designed for operation indoors and outdoors (IP66). The video and image data are transmitted to your smartphone or tablet via WLAN or LAN. -
Page 5: Delivery Content
4. Delivery content • Surveillance camera • Antenna • Thicknesses • Mounting material • Operating instructions Up-to-date operating instructions Download the latest operating instructions via the link www.conrad.com/ downloads or scan the QR code. Follow the instructions on the website. 5. - Page 6 • Protect the product from extreme temperatures, direct sunlight, strong jolts, flam- mable gases, vapours and solvents. • Please handle the product carefully. Jolts, impacts or a fall even from a low height may damage the product. • Never expose the product to mechanical stress. • Always observe the safety information and operating instructions of any other devices which are connected to the product.
-
Page 7: Product Overview
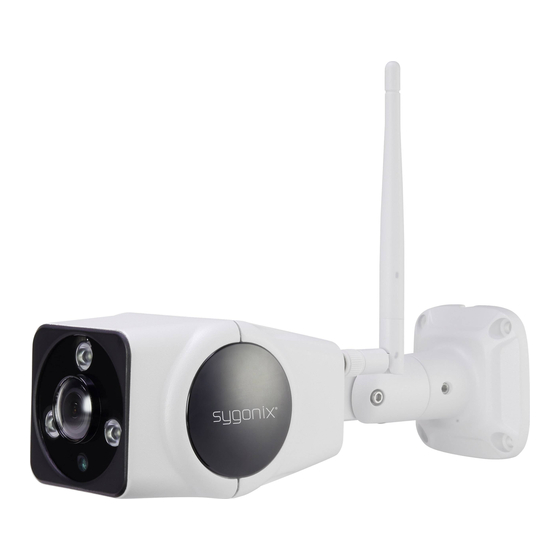
6. Product overview... - Page 8 A9 A10 WLAN antenna IR-LEDs (3x High-Power-LED-Array) Camera lens Light sensor Connection for the power supply 12 V/DC Network connection RJ45 Status LED (it is independent of a connected network cable, but only applies to the WLAN connection!) LED flashes approx. every 0.5 sec. - the camera is in pairing mode LED flashes approx. every 2 sec. - the camera is in AP mode LED is on permanently - the camera is set up and online Cover for the SD card slot Reset button...
-
Page 9: Installation And Start-Up
7. Installation and start-up The camera can be used both indoors and outdoors. It has the degree of protection IP66, i.e. it can also be mounted outdoors without protection against the weather. Nevertheless, we recommend that you install the camera in a protected place as far as possible. a) Mounting the camera As a rule, the wall bracket is disconnected from the camera during the delivery. - Page 10 • Attach the wall bracket with the enclosed screws. Tighten the two screws on the side where you pulled the cable out, so that the cable is still movable for you to push it. Also pay attention to the mounting direction. The cable should preferably be led out down- wards.
-
Page 11: B) Inserting The Sd Card
b) Inserting the SD card If you want to save pictures taken with the camera on an SD card, insert them before proceeding with the commissioning. If you want to insert or change the card later, be sure to first disconnect the power to the camera, otherwise the SD card and the camera may be damaged! • Unscrew the two screws of the SD card slot cover (A8) and remove the cover along with the gasket. -
Page 12: Setting Up The App
8. Setting up the app These instructions refer to a smartphone. But this always means an Android smart- phone or tablet or iPhone or iPad. a) Installing the app • Open the respective App Store on your smartphone. For example, it is “Google Play Store”... -
Page 13: B) Configuring The App And Creating An Account
b) Configuring the app and creating an account • Open the previously installed “IP PRO3”. • If you have not yet created an account, tap the “Register” button. If you have already created an account, skip the registration and continue with the fourth image. •... - Page 14 • Enter the verification code in the top field. • Then enter a secure password twice. We recommend a password with at least 8 characters, consisting of uppercase and lowercase letters as well as numbers and special characters. • Tap the blue button to complete the registration. The settings are only saved in the cloud when the registration is completed.
- Page 15 • After you have logged in, the app’ s home page will be displayed.- Resetting the password • If you have forgotten your password, tap the “Forget password?” button on the login page (first image of this chapter). • Enter your e-mail address again and tap the blue button. •...
-
Page 16: C) Functions On The Home Page Of The App
c) Functions on the home page of the app Here is a brief overview of the controls on the home page of the app. The big “+” adds a device over the selection; this item has the same function as B3 The “+”... -
Page 17: Setting Up The Camera In The App
9. Setting up the camera in the app a) Setting up via network For the following description, the camera must be connected to your router/network switch via a network cable. In addition, a DHCP server must be active in your network. The status LED must flash slowly. - Page 18 • Tap “LAN scan”. • The app will search for new devices. • When the camera has been found, it will be displayed again with its ID number (see arrow). The same number is also printed on the camera. • Tap it.
- Page 19 • Enter a name for the camera. You do not need to enter a password during initial setup. The “Password” field must therefore remain empty. • Then tap on the button in the top right corner (upper arrow in the picture). • Once the settings are saved, the camera will now also be displayed on the home page of the app.
- Page 20 • Scroll down in the device settings and tap the “Password” button. You can also change the password of the camera later. • Now enter a secure password in the top field. The password should contain at least eight characters and consist of uppercase and lowercase letters as well as numbers and special characters.
- Page 21 • So the camera is basically set up and online. Please note! Because there is no Wi-Fi is set up in this case, the camera’s status LED will continue to flash slowly after the setup. In addition, the Wi-Fi hotspot integrated in the camera is still active. However, external access is not possible because the camera setup via the hotspot is blocked when the camera has an access password assigned to it.
- Page 22 • Select your Wi-Fi from the list for it to be used. • Tap the button on the top right to continue. • Now enter the password for your Wi-Fi. • Then tap the blue button below to save the Wi-Fi.
-
Page 23: B) Setting Up Via Wlan
• The camera is now set up and online. b) Setting up via WLAN For the following description, no network cable should be connected to the camera. In addition, the camera must be in APP mode (status LED (A7) flashes slowly). If you have already set up the camera, reset it to the factory settings first or go to the description in chapter “9. - Page 24 • Then tap “WIFI camera”, to set the camera as a Wi-Fi camera. • Ensure that the camera’s status LED is flashing slowly and then tap “YES”.
- Page 25 • The app is now looking for new devices. • If the camera is found, it will be displayed with its ID number (see arrow). The same number is also printed on the camera. Tap it. • Now your WLAN, to which the camera should connect, will be selected.
- Page 26 • Now the WLAN settings are transferred to the camera. Warning! To do this, the app automatically connects your smartphone to the camera’s WLAN network. After the configuration, the connection to your normal WLAN is automatically re-established. If during the configuration your smartphone displays a message indicating that there is no Internet connection and prompting you to connect to another WLAN network, please decline!
- Page 27 • Now enter a name for the camera. • Tap the button on the top right to continue.. • Now, the camera is basically set up and online.
-
Page 28: C) Alternative Method For Setting Up The Camera
c) Alternative method for setting up the camera For the following description, the same conditions apply as in the previous chapter “9. b) Setting up via WLAN”. • Open your smartphone’s Wi-Fi settings and connect it to the camera’s Wi-Fi network. The Wi-Fi name is “IPC…” and the password is “11111111”. - Page 29 • So the camera is basically set up and online. • From here, the setup is identical, as described in chapter “9. a) LAN setup”. • Assign a secure password to the camera and connect it to your Wi-Fi network. Then the basic configuration is completed..
-
Page 30: D) Removing The Set Up Camera From The App
d) Removing the set up camera from the app To remove a camera from the app, follow the steps below. Besides, it does not matter if the camera is online or offline. • In the app, tap the 3 points near the camera you want to remove. - Page 31 • Confirm the deletion of the camera again. • Now the camera is removed from the app. To add the camera later, please refer to the following chapter.
-
Page 32: E) Adding An Already Set Up Camera In The App
e) Adding an already set up camera in the app To add a camera that is already set up in the app, follow the steps below • Tap “+” on the app’s home page. • Tap “LAN scan”. - Page 33 • The app is now looking for new devices. • When the camera has been found, it will be displayed again with its ID number (see arrow). The same number is also printed on the camera. Tap it. • Enter a name for the camera. Incidentally, this does not have to be the name you assigned during the initial setup.
- Page 34 • After a few seconds, the camera will be displayed again on the home page of the app..
-
Page 35: Advanced Settings
10. Advanced settings a) App and account settings • To open the app and account settings, tap the “My center” button on the bottom right of the app’s home page. Right arrow near your e-mail address Here, you can manage your account, log out and change the password to your account. -
Page 36: B) Camera Settings
b) Camera settings • To open the settings, tap the 3 dots near the desired camera in the app. “Screenshot/Recording” Here you can view and manage manually captured images and videos. “Edit” Here you can change the name of the camera. No username or password is required for this. - Page 37 • To open the device settings of the camera, tap “Setup”. “Audio frequency” Switches the audio function of the device (if supported) on or off. “Voice prompt” Switches the language assistant of the device (if supported) on or off. “Voice prompt language” Here you can set the language for the language assistant.
- Page 38 “Choose time zone” Here you can set the correct time zone. “Daylight Saving Time” Here you can enable the summer time manually. “Motion detection alarm” Here you can turn the alarm notifications for the camera on or off. “Motion detection recording” Here you can switch on or off the automatic recording for motion detection.
- Page 39 “Password” Here you can change the password of the camera. Just enter a new, secure password in the field. If you want to save the password, tap the arrow on the top left. “Euipment WIFI” Here you can adjust the Wi-Fi settings of the camera manually. For the changes to be saved, you have to tap on the tick mark in the upper right corner to finish.
-
Page 40: Operation
11. Operation a) In-app options To open the subsequent view of the camera (live image), simply tap the camera image on the main page of the app. Live view of the camera... -
Page 41: B) General Touch Control
Returns to the main view of the app Current data transfer rate in KB/s Current date and time Live view of the camera Intercom function; not supported by this camera Starts and stops manual video recording Creates an image of the current camera view Switches to the “Video backup”... -
Page 42: C) Overview Of The Automatic Recording Playback
c) Overview of the automatic recording playback To switch to the automatic recording playback mode, tap the C13 button in the live view of the camera.. - Page 43 Returns directly to the main page of the app Opens the calendar The right and left arrows switch to the next or previous recording Recorded area; to select the area, simply swipe left or right on the timeline Creates an image of the current view on the display Starts and stops video recording of the current view on the display Opens a menu with the “Video backup”...
-
Page 44: D) Functions And Operation In Play Mode
d) Functions and operation in Play mode The following requirements must be met for that the camera records automatically and to allow you to view the pictures on your smartphone later: • Make sure that the camera is already time-synchronised. You will find the “Time sync” function in the camera settings. -
Page 45: Troubleshooting
12. Troubleshooting With this camera, you have purchased a reliable product that was built according to state of the art. However, problems and malfunctions may still occur. Therefore, we would like to describe here how you can solve the possible problems. If the device is added via LAN or serial number, a warning is issued, the device is not online or the device is not registered. -
Page 46: Resetting Factory Settings
Why does not the camera record consistently? • Due to the limited life of memory cards, the video recording of the camera has been limited. It will only be recorded on motion detection or if you manually trigger the recording. Does the camera support a USB power supply for the power supply? •... -
Page 47: Disposal
15. Disposal This product must not be placed in household waste! At the end of its service life, dispose of the product according to the relevant statutory regulations. 16. Declaration of Conformity (DOC) Conrad Electronic SE, Klaus-Conrad-Straße 1, D-92240 Hirschau, hereby declares that this product conforms to Directive 2014/53/EU. -
Page 48: Technical Data
17. Technical data Operating voltage ......12 V/DC Current consumption ......max. 500 mA Power consumption ......max. 6 W Connections ........Circular socket (outer Ø 5.5 mm, inner Ø 2.1 mm, outer contact leads minus/GND, inner contact leads Plus/+), RJ45, Micro SD slot Memory cards .........Micro-SD, max. - Page 52 This is a publication by Conrad Electronic SE, Klaus-Conrad-Str. 1, D-92240 Hirschau (www.conrad.com). All rights including translation reserved. Reproduction by any method, e.g. photocopy, microfilming, or the capture in electronic data processing systems require the prior written approval by the editor. Reprinting, also in part, is prohibited. This publication represent the technical status at the time of printing. Copyright 2019 by Conrad Electronic SE.
Need help?
Do you have a question about the UH-730 and is the answer not in the manual?
Questions and answers