
Related Manuals for Ceyear 4041 Series


Summary of Contents for Ceyear 4041 Series
- Page 1 4041 Series Spectrum Analyzer User Manual China Electronics Technology Instruments Co., Ltd.
- Page 3 4041 Series Spectrum Analyzer User Manual 2.731.1098SSCN China Electronics Technology Instruments Co., Ltd...
- Page 7 For a proper use of this instrument, please carefully read and strictly follow this manual. This manual consists of 12 chapters: Chapter I describes the basic information of the 4041 series spectrum analyzer, including main technical features, already available or potentially available functions, and technical specifications.
- Page 8 Chapter XII contains maintenance instructions, including fault diagnosis steps, fault information description and repair methods. However, due to limitations of the author, the manual may be subject to errors or deficiencies. We sincerely welcome your corrections! We apologize for any inconvenience caused by our mistake in our work. The Author Oct.
- Page 9 Environment and Safety Instructions I. Safety Protection 1. Safety precautions for the instrument Please use the designated packaging box for transportation, and protect the instrument against damage from dropping or violent impacting. Please select 100 V~120 V or 200 V~240 V AC 3-core stabilized power supply, so as to prevent the internal hardware from being damaged by high-power peak pulse interference.
- Page 10 otherwise, short circuit may occur inside the unit and/or cause electrical shock, fire hazard or personal injury. Like other industrial products, the use of allergic materials (allergens including aluminum) is inevitable. In case of any anaphylactic reaction (for instance, rash, repeated sneezes, eye irritation or breath with difficulty), please seek medical advice immediately to find out the causes.
-
Page 11: Table Of Contents
Table of Contents CONTENTS CHAPTER I OVERVIEW ........................... 1 Section 1 Product Overview ........................2 Section 2 Main Technical Specifications ....................5 ARTICLE I INSTRUCTIONS ........................8 CHAPTER II USER GUIDE ........................10 Section 1 Self-inspection after Unpacking.................... 10 Section 2 Safety Instructions ........................ 10 Section 3 User Checks ......................... - Page 12 Table of Contents 11.2 Frequency readout accuracy ...................... 138 11.3 Span accuracy ..........................139 11.4 Sweep time ..........................141 11.5 RBW ............................142 11.6 RBW switching uncertainty ......................144 11.7 Sideband noise ........................... 145 11.8 Displayed average noise level ....................146 11.9 Second harmonic distortion ......................
-
Page 13: Chapter I Overview
Chapter I Overview Chapter I Overview For the purpose of this manual, the following safety symbols apply, and please be familiar with them and their meanings before operating this instrument! A “WARNING” sign indicates for an existing danger. It reminds the user to pay WARNING attention to a certain operation process, operation method or the similar. -
Page 14: Section 1 Product Overview
1.1.1 Introduction The 4041 series spectrum analyzer is adopted with the compact portable box structure, which has advantages of small size, light weight, low power consumption and convenient carrying. The broadband millimeter-wave receiver miniaturization integrated design technology, whole phase locking technology based on the broadband... - Page 15 1.1.3 Functions The 4041 series spectrum analyzer is featured with abundant measurement functions, mainly including: Spectrum Analyzer function, which allows basic Spectrum Analyzer to the signals, including field strength measurement, channel power, occupied bandwidth, adjacent channel power, emission mask, carrier-to-noise ratio, audio demodulation, IQ capture, tracking generation and other intelligent measurement functions;...
- Page 16 Chapter I Overview ■ Test and Diagnosis of the Transmitter and Receiver The 4041 spectrum analyzer has a number of measurement function modes including the Spectrum Analyzer, Interference Analyzer, AM/FM/PM analyzer, USB Power meter, and Channel scanner, and it also has a number of measurement functions including the channel power, occupied bandwidth, adjacent channel power, carrier-to-noise ratio, field strength, and emission mask;...
-
Page 17: Section 2 Main Technical Specifications
Section 2 Main Technical Specifications The 4041 series spectrum analyzer has been subject to strict test of technical specifications before delivery, and the user can choose to prove the technical specifications given in this manual by test. For the main technical specifications of the 4141 series spectrum analyzer, see the Table 1-1 below. - Page 18 Chapter I Overview Video Bandwidth 1 Hz~10 MHz (1-3 times step) ≤-102 dBc/Hz@10 kHz frequency offset ≤-106 dBc/Hz@100 kHz frequency offset SSB phase noise ≤-111 dBc/Hz@1MHz frequency offset (Carrier 1 GHz, 20℃~30℃) ≤-123 dBc/Hz@10MHz frequency offset Preamplifier off ≤ -135 dBm (2 MHz~10 MHz) ≤...
- Page 19 Chapter I Overview (after 30 minute warm-up,input ±2.3 dB (13 GHz ~40 GHz) signal 0 dBm ~-50 dBm, all set as auto coupling,20℃~30℃) Attenuation range: 0 dB~50 dB, 10 dB step Input attenuator Switching uncertainty: ±1.20 dB +30dBm, typical value (≥10dB attenuation, preamplifier off ) Maximum safe input level +23dBm, typical value (<10dB attenuation, preamplifier off ) (CW input)...
-
Page 20: Article I Instructions
Article I Instructions... -
Page 22: Chapter Ii User Guide
In order to ensure your safety and proper use of the instrument, please read the following safety precautions carefully before use. 2.2.1 Environmental requirements To ensure long service life and effective and accurate measurement of the 4041 series instrument, test it under the following environmental conditions: Temperature range: Storage temperature range: -40℃~+70℃... - Page 23 2.2.5 Input/output port protection The standard impedance of RF ports for the 4041 series spectrum analyzer is 50 Ω, so add test signals or connect appropriate load impedance in strict accordance with the port requirements to prevent damaging power amplifying circuit.
- Page 24 Chapter II User Guide There is a layer of ESD protection coating on the surface of the display, so never use CAUTION any cleaning agent containing fluoride, acid or alkali. Do not spray the cleaning agent directly onto the display panel, otherwise the cleaning agent may leak into the internal of the instrument, causing damages.
-
Page 25: Section 3 User Checks
Power-on of spectrum analyzer Connect the 4041 series spectrum analyzer to the external power supply, press and hold the white power key [ on the front panel for more than 3 s, then the backlight of the display comes on to show that the startup process takes about 30 s, displaying the normal startup status interface. -
Page 26: Chapter Iii Basic Operations
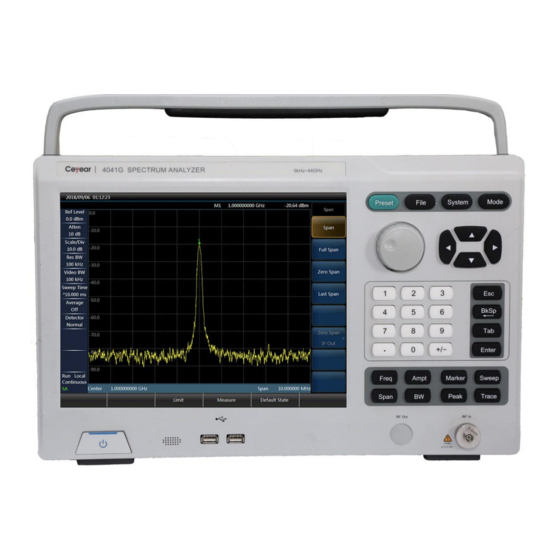
3.1.1 Display area The 4041 series spectrum analyzer is designed with a 12.1-inch color touch screen for realizing parameter setting and information displaying of the instrument, eliminating the need for complicated hard and soft key menu setting steps, and greatly simplifying the user's operation. - Page 27 Fig 3-2 Display area The screen display area of the 4041 series spectrum analyzer displays information on various settings and instrument status of the current measurement in the information display area. According to the positions of the information on the screen, it can be divided into 7 zones, that is, top information display area, display area of marker, signal standard and title, left information display area, measurement data display area, software menu display area, bottom information display area, and bottom function key zone.
- Page 28 In order to improve the operation flexibility of the 4041 series spectrum analyzer and give full play to the advantages of the touch screen, the 4041 series resident software is designed with 8 blue touch keys on the right. The corresponding functions of these 8 keys are directly displayed on the corresponding key zones.
- Page 29 Chapter III Basic Operations 3.1.2 Digital input area This zone contains arrow keys, knob, numeric keys, backspace key, cancel key and confirmation key. All inputs can be changed by the keys and knob in the input zone. The keys in the input zone are described as follows. Arrow keys: That is, up/down/left/right keys.
- Page 30 Chapter III Basic Operations power key for more than 3 s can turn on the spectrum analyzer. When the instrument is in the working state, pressing and holding the power key for more than 3 s can turn off the spectrum analyzer.
-
Page 31: Section 2 Introduction To Interfaces
3.2.2 Test ports RF input port: for the input of the measured signals. The 4041 series test signal input port is 50 Ω. 4041D/E model uses N-type female port, and 4041F/G model uses 2.4 mm male port. Tracking generator output port (option): for the output of the tracking generator signal. The range of the output signal power is -5 dBm ~ -35 dBm. - Page 32 LAN (network) port: This is a network port of 10/100 Mbps for connecting to the computer (PC) via network cable. The PC uses the programmable commands or programmable function library to achieve 4041 series program control or data transmission.
- Page 33 Chapter III Basic Operations...
-
Page 34: Chapter Iv Spectrum Analyzer Mode
Analyzer mode has been selected and will no longer be described separately hereinafter. Since the 4041 series Spectrum Analyzer mode has many measurement functions, it contains various complex parameters, such as frequency parameter, amplitude parameter, average bandwidth parameter, trace parameter, scan parameter and marker parameter and other the most basic function parameters. - Page 35 Chapter IV Spectrum Analyzer Mode video trigger. The scan will be triggered as long as the positive ramp portion of the input trigger signal passes the video trigger level set by the [Slope Rising Falling] command. When the trigger mode is set to external trigger, the scan and measurement will be synchronized with the next voltage cycle.
-
Page 36: Section 1 Introduction To Typical Measurement
The 4041 series spectrum analyzer may be used to measure the channel power of FM signal. Since the FM signal and the CW signal differ in many respects, accurate setting will make the measured FM signal more accurate. - Page 37 Chapter IV Spectrum Analyzer Mode Set the frequency to 1 GHz, the power to -10 dBm, the frequency modulation frequency offset to 500 kHz, the modulation rate to 10 kHz, and then connect the output of signal generator to the RF input of spectrum analyzer with the cable, as shown in Fig 4-1, in order to generate a FM signal with the signal generator.
- Page 38 The occupied bandwidth measurement function of 4041 series spectrum analyzer can give measurements quickly, clearly and accurately. There are two calculation methods for occupied bandwidth according to the modulation mode.
- Page 39 The power down dBc of the signal is to be set by the user. Measurement procedure The procedure for measuring the occupied bandwidth with the 4041 series spectrum analyzer is as follows: Set the signal generator so as to output FM signal:...
- Page 40 After that, the analyzer will switch back to the spectrum measurement interface. 4.1.3 Adjacent channel Power meter In this section, the adjacent channel power ratio measurement of FM signal is taken as an example to demonstrate the method to measure the adjacent channel power ratio with the 4041 series spectrum analyzer.
- Page 41 (ACPR) is a better way to measure the nonlinear distortion of WBFM signals. The procedure for measuring the adjacent channel power ratio of WBFM signal with the adjacent channel power ratio measurement function of 4041 series spectrum analyzer is as follows: Set the signal generator so as to output WBFM signal:...
- Page 42 Chapter IV Spectrum Analyzer Mode measurement interface. Set the center frequency of main channel: Press [Center Freq], and then set the center frequency of the main channel to 1 GHz with the numeric key. Set the main channel bandwidth: Press [Main Ch BW], and then set the bandwidth of main channel to 1 MHz with the numeric key. Set the adjacent channel bandwidth: Press [Adj Ch BW], and then set the adjacent channel bandwidth to 2 MHz with the numeric key.
- Page 43 Chapter IV Spectrum Analyzer Mode Press [Limit Test Off On] to enable the limit test function. If the adjacent channel power ratio goes above the set limit, its background on the screen will turn red. 4.1.4 Third-order intermodulation distortion measurement Definition of third-order intermodulation distortion In the crowded working environment of communication system, mutual interference of devices is an ubiquitous problem.
- Page 44 Chapter IV Spectrum Analyzer Mode Press 【Span】and 5 [MHz]. As shown in Fig 4-6, the two signals are at the center of the screen. If the applied frequency interval is different from that in this example, a span three times greater than the frequency interval of signal generator should be used.
- Page 45 Chapter IV Spectrum Analyzer Mode Fig 4-7 Place the signal peak at the reference level Set the second marker and measure the distortion product: Once the marker is activated, the differential marker function can generate the second marker and display the difference of the two markers.
- Page 46 Chapter IV Spectrum Analyzer Mode Fig 4-8 Relative measurement of internal modulation distortion Calculation method of third-order intercept point TOI: The ratio of the distortion component level to the signal level (in dB) does not specify the distortion of system significantly, unless the signal level is also specified.
- Page 47 Chapter IV Spectrum Analyzer Mode hold function of the spectrum analyzer will be applied to observe the amplitude trace and occupied bandwidth of the drift signal. Measurement of frequency drift of signal generator The spectrum analyzer can measure the short-term and long-term stability of the signal generator. The spectrum analyzer with the trace maximum hold function can display the maximum peak amplitude and frequency drift of the input signal.
- Page 48 The contents below describe how the marker function of the 4041 series spectrum analyzer is used to measure the signal to noise ratio, and noise. The instance describes the signal to noise ratio measurement of signal (carrier) of a single frequency point.
- Page 49 Chapter IV Spectrum Analyzer Mode Place the marker at the signal peak position, and then place the detla marker at the noise position whose frequency offset is 200 kHz: Press 【Peak】, [Peak Search]. Press 【Marker】, [Delta], 200 [kHz]. Activate the noise marker function to observe the signal to noise ratio: Press 【Marker】, [Marker Noise Off On].
- Page 50 Chapter IV Spectrum Analyzer Mode Press 【Preset】. Press 【Freq】, [Center Freq], 999.98 [MHz]. Press 【Span】, [Span], 100 [kHz]. Press 【Ampt】, [Ref level], -10 [dBm]. Press 【Ampt】, [Atten Auto Man], 40 [dB]. Activate the noise marker. Press 【Marker】, [Marker Noise Off On]. It should be noted that the current detection mode will be automatically set as the sampling detection.
- Page 51 Chapter IV Spectrum Analyzer Mode Press 【Marker】. At this time, the amplitude readings of noise marker are correct, because the average values of all points are based on the same frequency, and will not be affected by the resolution bandwidth filter shape. The noise marker is obtained based on the average calculation of interested frequency points.
- Page 52 Chapter IV Spectrum Analyzer Mode Set the attenuator to 0 dB. Press 【Ampt】, [Atten Auto Man], 0 [dB]. Press 【Peak】, [Peak Track Off On]. Press 【Marker】, [Detla]. Fig 4-12 Observation of harmonic distortion Increase the attenuator setting to 10 dB; Press 【Ampt】, [Atten Auto Man], 10 [dB].
- Page 53 Chapter IV Spectrum Analyzer Mode Fig 4-13 Attenuator set at 10 dB The amplitude reading of differential marker has two sources: first, increasing the RF attenuation will cause the signal to noise ratio decreased, making this reading inclined to be positive; second, reduction of harmonic distortion generated by the spectrum analyzer circuit will cause this reading inclined to be negative.
- Page 54 Chapter IV Spectrum Analyzer Mode Fig 4-14 Input signal and harmonic wave Set the video bandwidth to smooth the noise in order to increase the resolution. Press 【BW】, [Video BW Auto Man] to activate the manual function. Reduce the video bandwidth by the key 【↓】 to decrease the video bandwidth. In order to improve the measurement precision, set the fundamental wave peak level to the reference level.
- Page 55 Chapter IV Spectrum Analyzer Mode Activate the second marker. Press 【Marker】, [Detla], 【Peak】, [Next Pk]. At this time, the fixed marker marks the fundamental wave, and the movable marker is at the peak point of the second harmonic wave, as shown in Fig 4-16. Fig 4-16 Measurement of second harmonic wave by using the marker difference Measure the harmonic distortion (method 1).
- Page 56 Chapter IV Spectrum Analyzer Mode At this time, the differential marker unit changes to Volt automatically. A simple method to determine the distortion percentage is to change the unit to volt. Move the decimal point of displayed ratio of differential marker rightward by two digits to obtain the distortion percentage.
- Page 57 Chapter IV Spectrum Analyzer Mode Fig 4-18 Input signal displayed at 100kHz span Set the center frequency step to the fundamental wave signal frequency. Press 【Freq】, [CF Step Auto Man], 1 [GHz]. Measure the second harmonic wave. Press 【Marker】, [Marker ], [Marker→Center] and the step key 【↑】. Conduct the step operation to shift the center frequency of spectrum analyzer to the second harmonic wave.
- Page 58 Chapter IV Spectrum Analyzer Mode Fig 4-19 Second harmonic wave amplitude Calculate the harmonic distortion. Convert the distortion percentage between the second harmonic wave and fundamental wave as per Fig 4-17. The unit can be converted to Volt for the convenience of reading the voltage ratio of two signals. Measure other harmonic waves.
- Page 59 Chapter IV Spectrum Analyzer Mode 4.1.8 Measurement of pulse RF signal Definition of pulse RF signal The pulse RF signal is a RF pulse string of the same repeated frequency, constant pulse width, constant shape and amplitude. This section introduces several measurement methods of the pulse RF signal parameter. These methods explain how to measure the center frequency, pulse width and pulse repetition frequency.
- Page 60 Chapter IV Spectrum Analyzer Mode Fig 4-20 Main lobe and side lobe Add the sweep time (to slow down the scanning) until the Fig is filled completely and becomes a solid line, as shown in Fig 4-21. If the spectral line can not fill, the analyzer is not at the wide band mode. In this case, the steps to measure the sidelobe ratio, pulse width and peak pulse power are all not applicable, and the resolution bandwidth should be set to more than 1 kHz.
- Page 61 Chapter IV Spectrum Analyzer Mode Press 【Peak】, 【Marker】, [Detla], 【Peak】, [Next Pk]. The amplitude difference between the main lobe and sidelobe is the sidelobe ratio, as shown in Fig 4-22. Fig 4-22 Sidelobe ratio displayed beside the marker Measure the pulse width, which equals the reciprocal of frequency difference between the two sidelobe envelope peaks: Press 【Marker】, [Detla], 【Peak】, [Next Pk Right], [Next Pk Right].
- Page 62 Chapter IV Spectrum Analyzer Mode Fig 4-23 Pulse width displayed by marker Measurement of pulse repetition frequency (PRF) The pulse repetition frequency (PRI) is the time interval between any two adjacent pulse responses. Set the signal generator output signal: Set the signal generator frequency at 1 GHz and signal power at -20 dBm, and connect the signal generator output to the input port of spectrum analyzer.
- Page 63 Chapter IV Spectrum Analyzer Mode pulse repetition interval (PRI), and its reciprocal is the pulse repetition frequency (PRF). Fig 4-24 Measurement of pulse repetition frequency Measurement of peak pulse power As so far, we have known the main lobe amplitude and pulse width, and it is easy to know the resolution bandwidth of the spectrum analyzer.
- Page 64 Chapter IV Spectrum Analyzer Mode While measuring the main lobe amplitude, change the spectrum analyzer attenuator, and CAUTION verify that the main lobe amplitude will not vary accordingly. If the variation exceeds 1 dB, the spectrum analyzer is at the gain compression state, and the attenuation of attenuator must be increased.
- Page 65 Chapter IV Spectrum Analyzer Mode Press 【Freq】→ [Start Freq], and set the start frequency to 100 MHz; Press 【Freq】→ [Stop Freq], and set the start frequency to 4 GHz; Press 【Measure】→ [Generator]→ [Generator Off On] to turn on the generator switch; Press 【Measure】→...
- Page 66 Chapter IV Spectrum Analyzer Mode Wait until the sweep finishes. The filter of tested object will be added for direct observation of amplitude-frequency characteristic of tested object. The screen of amplitude-frequency characteristic of 2.3 GHz~2.4 GHz band-pass filter is shown in Fig 4-27 below: Fig 4-27 Amplitude-frequency characteristic of 2.3 GHz~2.4 GHz filter...
-
Page 67: Section 2 Spectrum Analyzer Menu Structure
Chapter IV Spectrum Analyzer Mode Section 2 Spectrum Analyzer Menu Structure 频率 Frequency Span Units Units Amplitude Ref Level 中心频率 Span Center Freq Sginal Std 0.0dBm 起始频率 Full Span Start Freq Head dBmV Ref Position Atten 终止频率 Zero Span Stop Freq Tail dBuV Auto... - Page 68 Chapter IV Spectrum Analyzer Mode 频率 Points Mode Triggering Edit List Sweep Sweep Spectrum Sweep Time Sweep Mode 中心频率 Free Run Add Seg Analyzer Auto List Interference Sweep 扫宽 > Video Delete Seg Edit List > Analyzer Cont Single AM/FM/PM External(TTL) 1001 起始频率...
- Page 69 Chapter IV Spectrum Analyzer Mode Measure Field Strength Channel Pwr Field Field Strength > Edit Antenna Strength Channel Pwr Channel Recall > > Add Point Power Atenna Center Freq Edit Method > > Delete Point Antenna Channel BW Save ACPR >...
- Page 70 Chapter IV Spectrum Analyzer Mode Date & Time File File Manager Location Year Save State Src File Internal Recall Month > Dst File State Save Data Copy Recall Delete Hour > Data Src File Minute Save Pic > 信号跟踪 Second Default State <...
- Page 71 Chapter IV Spectrum Analyzer Mode System Language Error Log > 简体中文 Head Language System English Tail Info Date Format > Error Log > Page Up Y/M/D Date 信号跟踪 > Page Down < Back Format 关 开 M/D/Y Title D/M/Y Delete All Admin More >...
-
Page 72: Section 3 Description Of Spectrum Analyzer Menu
Chapter IV Spectrum Analyzer Mode Section 3 Description of Spectrum Analyzer Menu 4.3.1 Frequency menu · [Center Freq]: Press 【Freq】 →[Center Freq], use the numeric keys on the front panel, and then select [GHz], [MHz], [kHz] and [Hz] in the frequency unit menu or 【↑】 , 【↓】 and the knob to set the center frequency. - Page 73 Chapter IV Spectrum Analyzer Mode 4.3.2 Span menu · [Span]: Press 【Span】→[Span], use the numeric keys on the front panel, and then select [GHz], [MHz], [kHz] and [Hz] in the frequency unit menu or 【↑】, 【↓】 and the knob to set the span in the current state. The stepping of span shall be done as per 1, Span 2 and 5.
- Page 74 Chapter IV Spectrum Analyzer Mode 4.3.4 Amplitude menu · [Ref Level]: Press 【Ampt】→[Ref Level], use the numeric keys on the front panel, and then select [dBm], [-dBm], [mV] and [μV] in the frequency unit menu or 【↑】, 【↓】 and the knob to set the reference level. Amplitude ·...
- Page 75 Chapter IV Spectrum Analyzer Mode 4.3.5 Bandwidth menu · [Res BW Auto Man]: Press 【BW】→[Res BW Auto Man] to adjust the resolution bandwidth, which is within 1 Hz - 10 MHz. The numeric keys, step key or knob can be used to change the resolution bandwidth by 1, 3 and 10 steps in the manual mode.
- Page 76 Chapter IV Spectrum Analyzer Mode 4.3.6 Detection menu · [Auto]: The mode will be standard automatically by default after the detection menu is entered. · [Normal]: In this mode, the measuring results of positive peak and negative peak will Detector be displayed to realize the display effect similar to the analog instrument when noise is detected, and only positive peak will be displayed when a signal is detected.
- Page 77 Chapter IV Spectrum Analyzer Mode 4.3.7 Marker menu · [Marker 1 2 3 4 5 6]: Press 【Marker】→[Marker 1 2 3 4 5 6] to select different frequency standards, activate a single frequency standard, place the frequency standard at the central location of trace, and display these values in the frequency standard display area in the upper right corner of screen.
- Page 78 Chapter IV Spectrum Analyzer Mode ·[Marker→Center]: Press 【Marker】→[Marker→]→[Marker→Center] to move the Marker-> marker to the position of center frequency and display the reading at this position on the screen. Marker-> Center ·[Marker→Step]: Press 【Marker】 →[Marker→]→[Marker→Step] to set the step size of center frequency.
- Page 79 Chapter IV Spectrum Analyzer Mode 4.3.9 Mode menu The default function mode in the mode menu is the Spectrum Analyzer mode, which, according to user requirements, allows the addition of following function options: Interference Analyzer, AM/FM/PM analyzer, Power meter, Channel scanner and field strength measurement. ·...
- Page 80 Chapter IV Spectrum Analyzer Mode · [Sweep Time Auto Man]: Press 【Sweep】 →[Sweep Time] to set the sweep time of the spectrum analyzer. Use the numeric keys, step button or knob to adjust time setting. When “Manual” is underlined, the sweep time can be set manually. When “Automatic”is underlined, the sweep time is automatically coupled to the RBW, frequency bandwidth and VBW.
- Page 81 Chapter IV Spectrum Analyzer Mode · [Free Run]: After a continuous sweep or single sweep is completed, start a new Triggering sweep when the free trigger is set. · [Video]: Set the trigger mode to the video trigger. When the voltage of an input video Free Run signal exceed the specified video trigger level, a sweep is triggered.
- Page 82 Chapter IV Spectrum Analyzer Mode 4.3.13 Limit menu · [Limit Upper Lower]: Press [Limit] →[Limit Upper Lower] to select the desired Limit limit line (upper or lower). · [Limit Off On]: Press [Limit] →[Limit Off On] to enable or disable the limit Limit Upper Lower function.
- Page 83 Chapter IV Spectrum Analyzer Mode · [Tune & Listen]: Press 【Measure】, [More 1 of 2] →[Tune & Listen] to enable the Measure audio demodulation function. Refer to [Audio Demodulation] menu for details. Tune · [IQ Capture]: Press 【Measure】, [More 1 of 2] →[IQ Capture] to enable the IQ >...
- Page 84 Chapter IV Spectrum Analyzer Mode The spectrum analyzer provides the function of channel Power meter. Set the parameters in the menu and select appropriate RBW and span to measure the channel power. Please refer to “Channel Power meter” in the first section of this chapter.
- Page 85 Chapter IV Spectrum Analyzer Mode · [OBW Off On]: Press 【Measure】 →[OBW]→[OBW Off On] to enable or disable the occupied bandwidth measurement. · [Method]: Press 【Measure】→[OBW]→[Method % dBc] to select corresponding measurement method, power percentage or dBc down method. The percentage method is used to obtain the occupied bandwidth of the signal by calculating the bandwidth of Method the portion of the frequency that contains a certain percentage of the power of the...
- Page 86 Chapter IV Spectrum Analyzer Mode The spectrum analyzer provides the function of ACPR measurement. You can set the parameters of the channel to acquire the measurement result of ACPR. You can activate the threshold test function and set the adjacent channel threshold to observe whether the adjacent channel power exceeds the specified range.
- Page 87 Chapter IV Spectrum Analyzer Mode The spectrum analyzer provides the function of carrier-to-noise ratio measurement to measure the ratio of carrier power to noise power. · [C/N Off On]: Press 【Measure】→[C/N]→[C/N Off On] to enable or disable the carrier-to-noise ratio function. ·...
- Page 88 Chapter IV Spectrum Analyzer Mode · [Emission Mask Off On]: Press 【Measure】→[Emission Mask]→[Emission Mask Emission Mask Off On] to enable or disable the emission mask. Emission Mask · [Reference Channel Bandwidth]: Press 【Measure】→[Emission Mask]→[Channel BW],and use the numeric keys to set the reference channel width. Channel BW ·...
- Page 89 Chapter IV Spectrum Analyzer Mode · [IQ Capture Off On]: Press 【Measure】→[More 1 of 2]→[IQ Capture]→[IQ IQ Capture Capture Off On] to enable or disable the IQ capture function. IQ Capture · [Start Capture]: Press 【Measure】 →[More 1 of 2]→[IQ Capture]→[Start Capture] to start to acquire IQ data.
- Page 90 Chapter IV Spectrum Analyzer Mode · [Generator Off On]: Press 【Measure】→[More 1 of 2]]→[Generator]→[Generator Off On] to enable or disable the tracking generator. Generator · [Mode Off On]: Press 【Measure】 →[More 1 of 2]→[Generator]→[Mode CW Track] Generator to enable or disable the frequency sweep mode of tracking generator. ·...
- Page 91 Chapter IV Spectrum Analyzer Mode than 1, and 1 dB step when more than 1; valid when both the tracking mode and the normalization are enabled. Adjust the precision of the trace on the Y-axis of the screen by adjusting the scale/division value when normalization is enabled. ·...
- Page 92 The GPS function is an option of the 4041 series. It can be realized through an external GPS antenna. Users can view the current number of satellites, latitude and longitude, and altitude information.
- Page 93 Chapter IV Spectrum Analyzer Mode · [Language]: Press 【System】→[Language] to select the languages, including [简体 System 中文] and [English]. · [System Info]: Press 【 System 】 →[System Info] to view the system related > Language information, including application software version, image customization version, and other related information.
-
Page 94: Chapter V Interference Analyzer Measurement Mode (Option)
Chapter V Interference Analyzer Measurement Mode (Option) Section 1 Introduction to Typical Measurement The interference analyzer mode is an extension of the spectrum analyzer mode. In 4041 series spectrum analyzer, the interference analyzer mode is divided into the following three modes: Spectrum measurement (refer to the relevant chapter of Spectrum Analyzer requirements for specific operations, not repeated here);... - Page 95 Chapter V Interference Analyzer Mode (Option) only show an example). Fig. 5-1 Interference Analyzer Spectrogram 5.1.2 RSSI measurement RSSI measurement is mainly applied to measure the strength changes of one CW signal within a certain period. In order to better observe the measured signal, the following steps can be taken: Press [Record]→[Sweep Interval] to set the sweep interval, which represents the sweep time between two adjacent points in each sweeping.
- Page 96 Chapter V Interference Analyzer Mode (Option) Fig. 5-2 RSSI Test Diagram of Interference Analyzer...
-
Page 97: Section 2 Interference Analyzer Menu Structure
Chapter V Interference Analyzer Mode (Option) Section 2 Interference Analyzer Menu Structure Frequency Span Amplitude Detector Level Center Freq Span Auto 0.0dBm Auto Manual Start Freq Full Span Ref Position Normal Auto Manual Atten Average Stop Freq Peak Zero Span Auto Man CF Step Scale/Div... - Page 98 Chapter V Interference Analyzer Mode (Option) Measure Record File File Manager Sweep Interval Spectrum Header Save State Src File Auto Sweep Span Spectrogram Footer Recall state Dst File > Auto Record RSSI Page up Save Data Copy Time Cursor Page down Recall Data >...
-
Page 99: Section 3 Description Of Interference Analyzer Menu
Chapter V Interference Analyzer Mode (Option) Section 3 Description of Interference Analyzer Menu 5.3.1 Frequency menu · [Center Freq]: Press 【Freq】 →[Center Freq], and select [GHz], [MHz], [kHz] or [Hz] in the frequency unit menu by using the numeric keys on the front panel, or 【↑】 【↓】 keys and the knob. - Page 100 Chapter V Interference Analyzer Mode (Option) 5.3.2 Span menu · [Span]: Press 【Span】→[Span] to activate the span submenu. You can change it by Span using the numeric keys and selecting a frequency unit, or by using 【↑】 【↓】 keys and the knob.
- Page 101 Chapter V Interference Analyzer Mode (Option) 5.3.4 Bandwidth menu · [Res BW Auto Man]: Press 【BW】 →[Res BW Auto Man] to set by using the numeric keys on the front panel or by using 【↑】 【↓】 keys and the knob. ·...
- Page 102 Chapter V Interference Analyzer Mode (Option) · [Auto]: Press 【BW】→[Detector]→[Auto] for detection and Spectrum Analyzer Detector mode. · [Normal]: Press 【BW】→[Detector]→[Normal]. It is the most commonly used Auto detection method that can detect both signal and noise floors at the same time without losing any signal.
- Page 103 Chapter V Interference Analyzer Mode (Option) ·[Marker→Center]: Press 【Marker】→[Marker→]→[Marker→Center] so that the Marker-> marker moves to the center frequency and the reading at the center frequency is displayed on the screen. Marker-> ·[Marker→CF Step]: Press 【Marker】→[Marker→]→[Marker→CF Step] to set the Center step of the center frequency, that is, the value of the frequency step is equal to the Marker->...
- Page 104 Chapter V Interference Analyzer Mode (Option) 5.3.7 Sweep menu · [Sweep Time Auto Man]: Press 【Sweep】→[Sweep Time Auto Man] and switch between auto and manual sweep time. The current status is underlined. In the case of auto sweep time, the integrated tester automatically sets the fastest sweep time based on the state of the current instrument, and what displayed on the screen is the fastest sweep time under the current setting.
- Page 105 Chapter V Interference Analyzer Mode (Option) 5.3.9 Measurement menu · [Spectrum]: Press 【Measure】→[Spectrum] to switch the measurement mode to Measure spectrum measurement. · [Spectrogram]: Press 【Measure】→[Spectrogram] to switch the measurement mode Spectrum to the Spectrogram. · [RSSI]: Press 【Measure】→[RSSI] to switch the measurement mode to RSSI. Spectrogram RSSI 5.3.10 File menu...
-
Page 106: Chapter Vi Power Meter Mode (Option)
40 GHz and carry out real average Power meter within a high dynamic range of -60 dBm to + 20 dBm. The measurement reading is displayed on the display interface of the 4041 series USB Power meter mode. The test block diagram is shown in Fig 6-1, and the attenuator is added as needed. - Page 107 Chapter VI Power Meter Mode (Option) interfaces developed by CETI. There are mainly some types in the following and you can purchase them based on your test needs: Observe the maximum input power range identified on USB power probes and ensure CAUTION that the input is within the specified range to avoid damage to such probes due to excessive power.
-
Page 108: Section 2 Power Meter Menu Structure
Chapter VI Powe Meter Mode (Option) Section 2 Power Meter Menu Structure Frequency Amplitude Average Calibrate Limit Average Limit Frequency Auto Scale Zero Resolution Max Value Upper Limit 0 1 2 3 Min Value Lower Limit Relative Alarm Offset Max Hold File File Manager Storage positions... -
Page 109: Section 3 Description Of Power Meter Menu
Chapter VI Power Meter Mode (Option) Section 3 Description of Power meter Menu 6.3.1 Frequency menu · 【Freq】: Press 【Freq】→[Frequency]. You can use the numeric keys to select the corresponding frequency menu, or change the frequency by using 【↑】 【↓】 or the Frequency knob, and the step of frequency change is 10 MHz. - Page 110 Chapter VI Powe Meter Mode (Option) 6.3.3 Average menu · [Average Off On]: Press 【BW】→[Average Off On]. You can change it by using the numeric keys, or by using 【↑】 【↓】 or the knob. The step of the average change is Average ·...
- Page 111 Chapter VI Power Meter Mode (Option) The functions of saving and recalling the data file are not available in the power meter CAUTION mode!
-
Page 112: Chapter Vii Am-Fm-Pm Analyzer Mode (Optional)
Chapter VIII Channel Scanner Mode (Option) Chapter VII AM-FM-PM Analyzer Mode (optional) Section 1 Introduction to Typical Measurement The AM-FM-PM analyzer mode is used for displaying the spectrum of AM, FM and PM signals and analyzing relevant parameters. The main spectrum and relevant parameters are shown below: RF spectrum: Similar to the spectrum analyzer mode, the frequency spectrum of the modulation signal will be displayed, and the occupied bandwidth can be measured. - Page 113 Chapter VII AM-FM-PM Analyzer Mode (optional) 2) Press 【Freq】→ [Center Freq] and set the center frequency of the measured signal as 6GHz. 3) Press 【BW】→ [IFBW] and set the IF bandwidth as 100kHz. 4) Press [Audio Spectrum]→ [Span], and set the span as 100kHz. 5) Press [ [Audio Waveform] →...
-
Page 114: Section 2 Am/Fm/Pm Analyzer Menu Structure
Chapter VIII Channel Scanner Mode (Option) Section 2 AM/FM/PM analyzer Menu Structure Amplitude Signal Std Frequency Span Ref level IFBW Head Center Freq Span 0.0dBm Average Ref Position Tail Start Freq Last span Atten Page Up Stop Freq > Auto Scale/Div CF Step Page Down... - Page 115 Chapter VII AM-FM-PM Analyzer Mode (optional) Audio Waveform Measurement File File Management Demod type Sweep Time Head Save State Src File AM FM PM Scale/Div Recall RF Spectrum Tail Dst File > 20.0% State Audio Page Up Save Data Copy Spectrum Audio Recall...
-
Page 116: Section 3 Description Of Am/Fm/Pm Analyzer Menu
Chapter VIII Channel Scanner Mode (Option) Section 3 Description of AM/FM/PM analyzer Menu 7.3.1 Frequency menu · [Center Freq]: Press 【Freq】 →[Center Freq], and select [GHz], [MHz], [kHz] or [Hz] in the frequency unit menu by using the numeric keys on the front panel, or set the center frequency by using 【↑】... - Page 117 Chapter VII AM-FM-PM Analyzer Mode (optional) 7.3.2 Span menu · [Span]: Press【Span】→[Span] to activate the span submenu. You can change it by Span using the numeric keys and selecting a frequency unit, or by using 【↑】 【↓】 keys and the knob. Span ·...
- Page 118 Chapter VIII Channel Scanner Mode (Option) · [Average Off On]: Press 【BW】→[Average Off On]. The average function can smoothen the displayed traces. When such function is turned on, you can select the number of average by using the numeric keys or change it by using 【↑】 【↓】 keys and the knob.
- Page 119 Chapter VII AM-FM-PM Analyzer Mode (optional) 7.3.6 Peak menu · [Peak Search]: Press 【Peak】→[Peak Search] to set the current active marker to the maximum peak point of the measurement trace and display the frequency and amplitude of such marker at the upper middle position of the screen. Peak ·...
- Page 120 Chapter VIII Channel Scanner Mode (Option) 7.3.8 Audio spectrum menu · [Span]: Press 【Audio Spectrum】→[Span] to set the span of the audio spectrum. The span set here shall be big enough to display the audio signal and related harmonics. You can change it by using the numeric keys and selecting a frequency unit, or by Audio Spectrum using 【↑】...
- Page 121 Chapter VII AM-FM-PM Analyzer Mode (optional) 7.3.10 Measurement menu · [Demod Type AM FM PM]: Press 【Measurement】 →[Demod Type AM FM PM] to Measurement select the type of the signal to be demodulated. · [RF Spectrum]: Press 【Measurement】 →[RF Spectrum] to select display of the radio Demod type frequency spectrum only.
-
Page 122: Chapter Viii Channel Scanner Mode (Option)
Chapter VIII Channel Scanner Mode (Option) Chapter VIII Channel Scanner Mode (Option) Section 1 Introduction to Typical Measurement The channel scanner mode can be applied to measure the signal power of multiple channels. The signal power is displayed in the bar graph or list form. At most, the signal power of 20 channels can be displayed. This can be divided into three modes according to the channel setting: channel scanner, frequency scanner and List sweep. - Page 123 Chapter VIII Channel Scanner Mode (Option) Fig. 8-1 Schematic Diagram of Channel Scanner 8.1.2 Frequency Scanner Below is an example of the Frequency Scanner mode, mainly involving the following procedures. Press 【Sweep】→ [FScan] → [Start Freq], and set the center frequency of the starting channel. Press 【Sweep】→...
- Page 124 Chapter VIII Channel Scanner Mode (Option) Fig 8-2 Schematic Diagram of the Frequency Scanning 8.1.3 List sweep Below is an example of the Frequency Scanner mode, mainly involving the following procedures. Press【Sweep】→[MScan] → [Edit List] and edit the channel list to be swept. The information of each channel can be set by setting the signal standard and channel number or setting the frequency and bandwidth in the list.
- Page 125 Chapter VIII Channel Scanner Mode (Option) Fig. 8-3 Schematic Diagram of List sweep...
-
Page 126: Section 2 Structure Of The Channel Scanner Menu
Chapter VIII Channel Scanner Mode (Option) Section 2 Structure of the Channel scanner Menu Ch Scanner Signal Std Amplitude Scanner Freq Scanner Signal Std Refer level Channel > 0.0dBm Scanner > Start Freq Start Channel Scale/Div 890.000MHz Freq 10.0dB Scanner > Step Freq Number of List... -
Page 127: Section 3 Description Of Channel Scanner Menu
Chapter VIII Channel Scanner Mode (Option) Section 3 Description of Channel scanner Menu 8.3.1 Scanner menu · [Channel Scanner]: Press【Scanner】→[Channel Scanner] to set the Channel scanner measurement mode and activate the[Channel Scanner] submenu in which the Scanner parameters of the channel to be scanned can be set. For details, see the [Channel Scanner] submenu. - Page 128 Chapter VIII Channel Scanner Mode (Option) 8.3.3 Frequency Scanner Menu · [Start Freq]: Press 【Scanner】→[Freq Scanner]→[Start Freq] to set the center Freq Scanner frequency of the start channel to be scanned. Start Freq · [Step Freq]: Press 【Scanner】 →[Freq Scanner]→[Step Freq] to set the frequency step 890.000MHz between the channels.
- Page 129 Chapter VIII Channel Scanner Mode (Option) 8.3.5 Measurement menu · [Display Graph Table]: Press 【Measurement】→[Display Graph Table] to select the Measure graph display mode, and the two graphs are shown as Figs 8-7 and 8-8. Display · [Max Hold Off On]: Press 【Measurement】 →[Max Hold Off On] to set the On or Off Graph Table state of Max Hold.
-
Page 130: Chapter Ix Field Strength Measurement Mode (Option)
Chapter IX Field Strength Measurement Mode (Option) Chapter IX Field Strength Measurement Mode (Option) Section 1 Introduction to Typical Measurement The field strength measurement is indispensable in radiation strength measurement of the tested equipment and can be divided into three modes: PScan, FScan and MScan. PScan: Observe the offset, amplitude and field strength of the current point by setting the point frequency. - Page 131 Chapter IX Field Strength Measurement Mode (Option) 1) Press 【Measure】→ [FScan] to enable the frequency sweeping mode. 2) Press 【Freq】→ [Stt Freq] and set the starting frequency of sweeping. 3) Press 【Freq】→ [Step Freq] and set the step frequency of sweeping. 4) Press 【Freq】→...
- Page 132 Chapter IX Field Strength Measurement Mode (Option) 6) Press 【Swp/Ant】→ [Dwell Time +∞ Man], and set the dwell time. 7) Press 【Swp/Ant】→ [Dwell Time Off On] to enable or disable the dwell time. 8) Press 【Marker】→ [Marker Off On] to enable or disable the marker. 9) Press 【Peak】...
-
Page 133: Section 2 Field Strength Measurement Menu Structure
Chapter IX Field Strength Measurement Mode (Option) Section 2 Field Strength Measurement Menu Structure Demod Frequency Frequency Amplitude Unit Pot Freq Stt Freq Ref Level 500MHz 500MHz 107dBuV Freq Step Step Freq Atten dBmV Auto 10MHz Auto Freq Track point Scale/Div dBuV 20.0dB... - Page 134 Chapter IX Field Strength Measurement Mode (Option) File File Manager Header Save State Src File Tail Recall state Dst File > Page up Save Data Copy Page down Recall Data > Delete Src File Done Save Pic < Back Delete Default State Location File...
-
Page 135: Section 3 Description Of The Field Strength Measurement Menu
Chapter IX Field Strength Measurement Mode (Option) Section 3 Description of the Field Strength Measurement Menu 9.3.1 Frequency Menu (PScan Measurement Mode) · [Pot Freq]: Press 【Freq】→[Pot Freq] to set the dot frequency by selecting [GHz], [MHz], [kHz] or [Hz] in the frequency unit menu through the numeric keys on the front panel or using 【↑】... - Page 136 Chapter IX Field Strength Measurement Mode (Option) 9.3.2 Frequency Menu (FScan Measurement Mode) · [Stt Freq 500MHz]: Press 【Freq】 →[Start Freq] to set the start frequency by selecting Frequency [GHz], [MHz], [kHz] or [Hz] in the frequency unit menu through the numeric keys on the front panel or using 【↑】...
- Page 137 Chapter IX Field Strength Measurement Mode (Option) 9.3.4 Bandwidth menu · [BW 30 kHz]: Press 【BW】→[BW 30 kHz] to set the reference value by selecting [GHz], [MHz], [kHz] or [Hz] in the frequency unit menu through the numeric keys on the front panel or using 【↑】...
- Page 138 Chapter IX Field Strength Measurement Mode (Option) 9.3.7 Sweep/Antenna Menu · [Sweep Type Cont Single]: Press 【Swp/Ant】 →[Sweep Type Cont Single] to set the continuous or single scanning mode. · [Sweep Once]: Press 【Swp/Ant】→[Sweep Once] to scan again. · [Dwell Time +∞ Man]: Press 【Swp/Ant】→[Dwell Time +∞ Man] to set the dwell Swp/Ant time which is the time for staying at the swept point at which the amplitude exceeds the limit value when the limit switch is turned on.
- Page 139 Chapter IX Field Strength Measurement Mode (Option) 9.3.8 Demodulation Menu · [CW]: Press 【Demod】→[CW] to disable the demodulation mode. Demod · [FM]: Press【Demod】→[FM] to switch the demodulation mode to FM. · [AM]: Press【Demod】→[AM] to switch the demodulation mode to AM. ·...
- Page 140 Chapter IX Field Strength Measurement Mode (Option) 9.3.11 File menu Please refer to the description of the file menu in the Spectrum Analyzer mode.
- Page 141 Chapter IX Field Strength Measurement Mode (Option)
-
Page 142: Article Ii Technical Instructions
Article II Technical Instructions... - Page 143 Chapter IX Field Strength Measurement Mode (Option)
-
Page 144: Chapter X Working Principle
Chapter X Working Principle Chapter X Working Principle Spectrum analyzer 4041 includes the products working on 9 kHz ~ 20 GHz, 9 kHz ~ 26.5 GHz, 9 kHz ~ 32 GHz, and 9 kHz ~ 44 GHz, with the spectrum measurement and analysis, field strength measurement, occupied bandwidth, channel power, adjacent channel power, audio demodulation, IQ data capture and other measurement functions, and provides the Interference Analyzer, AM/FM/PM analyzer of analog modulation signal, USB Power meter and other options. - Page 145 Chapter X Working Principle FPGA after the AD conversion to complete the digital down-conversion, IF filtering. video filtering, etc. CPU board consists of the power conversion and management circuit, interface and display circuit, FPGA/CPLD control and digital signal processing circuit, and ARM core module to realize the AC/DC conversion of power supply, power supply management, digital signal processing, logic circuit control, etc., and outputs the test results to the liquid crystal display in the form of sweep curve, waterfall map, etc.
-
Page 146: Chapter Xi Performance Characteristics Test
Chapter XI Performance Characteristics Test Chapter XI Performance Characteristics Test The test device and inspection facilities shall comply with the provisions in GB/T 6592-1996. The equipment and facilities necessary for the sufficient accuracy, quality, and quantity shall be provided and qualified by the measurement department. - Page 147 Chapter XI Performance Characteristics Test out-of-band rejection >50 dB Stop frequency 18 GHz, insertion loss <2 dB, out-of-band Low pass filter FLP-1800 rejection >40 dB Stop frequency 26.5 GHz, insertion loss <2 dB, Low pass filter FLP-2650 out-of-band rejection >40 dB 50Ω...
- Page 148 Chapter XI Performance Characteristics Test Table 11-2 (Continued) Instrument and equipment recommended for spectrum analyzer 4041 Instrument name Main technical specifications Recommended model Adapter 2.4 mm(f)-2.4 mm(f) 711120 Adapter 3.5 mm(m)-3.5 mm(m) 71119 Adapter 2.4 mm(f)-3.5 mm(f) 71125 Adapter 2.4 mm(m)-3.5 mm(m) 71122 Adapter 3.5 mm(f)-3.5 mm(f)
-
Page 149: Frequency Range
Chapter XI Performance Characteristics Test This section provides the recommended test methods for the main technical specifications of spectrum analyzer 4041. These specifications can fully reflect the performance and status of spectrum analyzer. The spectrum analyzer to be measured shall store for at least 2 hours in the working temperature range, and the indicator test can only be started after 15min warm-up without the error indication. -
Page 150: Frequency Readout Accuracy
The center frequency value at this time is the lower limit measurement value of frequency range. Compare this value with the corresponding value in the Performance Test Record Table of 4041 Series Spectrum Analyzer (hereinafter referred to as "4041 Series Spectrum Analyzer Record Sheet"), and √... -
Page 151: Span Accuracy
6) Record Δf as the test result in the corresponding item in the 4041 Series Spectrum Analyzer Record Sheet. 7) Repeat the 2nd ~ 6th steps according to the combination of frequencies and spans in the 4041 Series Spectrum Analyzer Record Sheet. - Page 152 2) Set the spectrum analyzer as follows: center frequency f : 22 GHz (10 GHz for 4041 D, 13.25 GHz for 4041 E, and 16 GHz for 4041 F), reference level: 0 dBm, span: according to the item "span accuracy" in the 4041 Series Spectrum Analyzer Record Sheet.
-
Page 153: Sweep Time
7) Record the frequency difference Δf and calculate the span accuracy as follows: Span accuracy = 100×[Δf-(0.8×span)]/(0.8×span)% Record the result in the corresponding item in the 4041 Series Spectrum Analyzer Record Sheet. 8) Turn off all frequency markers, set the span of spectrum analyzer and the frequency of signal generator according to the span of spectrum analyzer in the record, and repeat steps 3 to 8 until all the span tests are completed. -
Page 154: Rbw
The readings with the 3 dB bandwidth test function in the 4041 series can be used as test values. The error of span of 4041 series may introduce a certain error in the RBW accuracy. The error of span is negligible relative to the... - Page 155 5) Adjust the output power of the synthesized signal generator to make the signal below the reference level by 2 to 3 divisions. 6) Search the peak for the 4041 series, records the 3 dB bandwidth marker differential reading Δf at this time, -3dB calculate the RBW accuracy δ...
-
Page 156: Rbw Switching Uncertainty
Chapter XI Performance Characteristics Test 11.6 RBW switching uncertainty Description: Connect the RF output of synthesized signal generator to the input of spectrum analyzer, and adjust the amplitude of output signal to make the signal below the spectrum analyzer reference level by 2 to 3 divisions. Fix the amplitude of synthesized signal generator and change the RBW of spectrum analyzer to make the difference between them equal to the RBW switching uncertainty. -
Page 157: Sideband Noise
Spectrum Analyzer Record Sheet, and set the ratio between the span and RBW to 100. 5) Search for the peak and read out the amplitude differential of marker, and record it in the 4041 Series Spectrum Analyzer Record Sheet as the current RBW conversion uncertainty 6) Repeat the steps 4~5 until all RBWs are tested. -
Page 158: Displayed Average Noise Level
Spectrum Analyzer Record Sheet as the sideband noise at the offset point of +10 kHz. Press 【Marker】 at -10 [kHz] on the spectrum analyzer. Record the differential marker amplitude at the corresponding test item in the 4041 Series Spectrum Analyzer Record Sheet as the sideband noise at the offset of -10 kHz. - Page 159 Analyzer Record Sheet". Disable the noise marker and averaging function. Displayed average noise, preamplifier on (4 GHz~6 GHz) Set the start frequency of the 4041 series spectrum analyzer to 4 GHz and the stop frequency to 6 GHz, with others left unchanged.
- Page 160 Analyzer Record Sheet". Disable the noise marker and averaging function. Displayed average noise, preamplifier on (6 GHz~20 GHz) 12) Set the start frequency of the 4041 series spectrum analyzer to 6 GHz and the stop frequency to 20 GHz, with others left unchanged.
- Page 161 Displayed average noise, preamplifier off (10 MHz~4 GHz) 27) Set the start frequency of the 4041 series spectrum analyzer to 10 MHz, the stop frequency to 4 GHz, the reference level to -20 dBm, and the preamplifier \OFF, with others left unchanged.
-
Page 162: Second Harmonic Distortion
Displayed average noise, preamplifier off (40 GHz~44 GHz) 42) Set the start frequency of the 4041 series spectrum analyzer to 40 GHz, the stop frequency to 44 GHz, the reference level to -20 dBm, and the preamplifier \OFF, with others left unchanged. - Page 163 Press 【Marker】 [" Differential Mode] to set the center frequency to 1.8 GHz. Press 【Peak】 after the spectrum analyzer completes a new sweep. Record the differential marker reading in the corresponding test item of the "4041 Series Spectrum Analyzer Record Sheet" as the second harmonic distortion value (4 GHz).
-
Page 164: Third-Order Intermodulation Distortion
12) Wait for completion of new sweep, and then press 【Peak】. Record the differential marker reading in the corresponding test item of the "4041 Series Spectrum Analyzer Record Sheet" as the second harmonic distortion value from 4 GHz to 10 GHz. - Page 165 Chapter XI Performance Characteristics Test Power meter ML2437A Power sensor ............................MA2445D Synthesized signal generator#1 ........................1464C Synthetic signal generator #2 ..........................1461 Millimeter wave directional coupler ....................... 70603 RF directional coupler ............................ 70607 1.0 GHz low pass filter * 2 6.8 GHz low pass filter * 2 18 GHz low pass filter * 2 b) Adapter...
- Page 166 Chapter XI Performance Characteristics Test BNC cable BNC T connector BNC cable 10 MHz IN Synthesized signal Synthesized signal 10MHz IN generator #2 generator#1 10 MHz output Adapter Adapter 3.5 mm cable Spectrum 3.5 mm cable Analyzer pass Low pass filter filter Adapter Adapter...
- Page 167 Equation 6 and compare the high-end intermodulation distortion product with the low-end intermodulation distortion product. Record the smaller value as the final test result in the corresponding test item in the “4041 Series Spectrum Analyzer Record Sheet”.
- Page 168 Chapter XI Performance Characteristics Test BNC T connector BNC cable BNC cable Synthesized signal Synthesized signal 10 MHz IN 10MHz output generator#1 generator #2 Adapter Adapter Spectrum 2.4 mm cable 2.4 mm cable Analyzer Adapte Adapter Low pass filter Low pass filter Adapter Adapter Direct connection, non-cable...
-
Page 169: 1Db Gain Compression
Chapter XI Performance Characteristics Test 26) Set the frequency of the calibration factor of the power meter to 15 GHz. 27) Disable the difference marker function of the spectrum analyzer and set the frequency to 15 GHz, with other settings left unchanged. 28) Repeat steps 6~16. - Page 170 Chapter XI Performance Characteristics Test BNC cable 10 MHz reference output BNC T connector 10 MHz IN 10 MHz IN Spectrum Analyzer Synthesized signal Synthesized signal RF output generator#1 generator #2 RF output Adapter Adapter Do not use cables to connect the directional coupler and the spectrum analyzer Directional coupler...
-
Page 171: Image, Multiple, And Out-Of-Band Responses
Fig 11-12. At this time, the reading of power meter is the 1 dB compression point at 4 GHz to 13 GHz band. Record it as test result in the "4041 Series Spectrum Analyzer Record Sheet". - Page 172 Set the 1464C to each frequency point where image, multi and out-of-band responses can occur at 2GHz in the corresponding test item listed in the “ 4041 Series Spectrum Analyzer Record Sheet” . Set the reference level of spectrum analyzer to -40 dBm and the resolution bandwidth to10Hz. Press 【Peak】, and record the differential marker amplitude as the response amplitude in the corresponding test item of the “...
-
Page 173: Residual Response
Change the center frequency according to [Frequency [Center Freq] 【↑】. Repeat step 3 Check the residual response of the frequency to 20 GHz, and record the tested maximum response value in the measurement result of the corresponding test item in the 4041 Series Spectrum Analyzer Record Sheet. Residual response, 20 GHz~44 GHz (preamplifier on) - Page 174 Change the center frequency according to [Frequency [Center Freq] 【↑】. Repeat step 7 Check the residual response of the frequency to 44 GHz, and record the tested maximum response value in the measurement result of the corresponding test item in the 4041 Series Spectrum Analyzer Record Sheet. Residual response, 10 MHz~13 GHz (preamplifier off) Set up the spectrum analyzer as follows: Center frequency ............................
-
Page 175: Center Frequency
12) Change the center frequency according to [Frequency [Center Freq] 【↑】 . Repeat step 11. Check the residual response of the frequency to 13 GHz when the preamplifier is off, and record the tested maximum response value in the corresponding test item in the 4041 Series Spectrum Analyzer Record Sheet. Residual response, 13 GHz~20 GHz (preamplifier off) 13) Set up the spectrum analyzer as follows: Center frequency ............................13.055 GHz... -
Page 176: Reference Level
20) Change the center frequency according to [Frequency [Center Freq] 【↑】 . Repeat step 19. Check the residual response of the frequency to 44 GHz when the preamplifier is off, and record the tested maximum response value in the corresponding test item in the 4041 Series Spectrum Analyzer Record Sheet. 11.14 Reference level Description: The calibrated vertical scale position on the screen of the spectrum analyzer is used as a reference for amplitude measurement, and the reference level usually indicates the top division of the scale. -
Page 177: Resolution Bandwidth
Set the 【Ampt】 [Ref Level] on 4041 series, and use the knob or step key 【↑】 【↓】. If the maximum reference level can be set to +30 dBm and the minimum reference level can be set to -120 dBm, the “... -
Page 178: Scale Fidelity
4041 Series Spectrum Analyzer Record Sheet. 11) For remaining settings of the residual reference level of the spectrum analyzer listed in the corresponding test item of the 4041 Series Spectrum Analyzer Record Sheet, repeat steps 7~9. 11.15 Scale fidelity Description: The scale fidelity is the error between the vertical scale and the theoretical value on the screen of the spectrum analyzer, which is used to evaluate the linearity of the analog-digital converter of the spectrum analyzer. -
Page 179: Total Level Uncertainty
Carry out the following calculation (reading of the differential marker amplitude of the spectrum analyzer - power change value of the signal source); record the calculated data in the corresponding test item of the 4041 Series Spectrum Analyzer Record Sheet, and repeat steps 8-9. 11.16 Total level uncertainty... -
Page 180: Video Bandwidth
L L L 功率计 Record the calculated △L as the test result of the total level uncertainty in the 4041 Series Spectrum Analyzer Record Sheet. Repeat step 6 to test the total level uncertainty indicator when the attenuation value of the internal programmed step attenuator is 10 dB and 20 dB. -
Page 181: Input Attenuator
14) Change the frequency setting of the signal generator 1464C, power meter and spectrum analyzer according to the 4041 Series Spectrum Analyzer Record Sheet, and repeat steps 11~13 until the test of all frequency points when the attenuation is 0 dB is completed. -
Page 182: Input Voltage Standing Wave Ratio Test
Repeat steps 5-6 until the test of all the attenuation values of the attenuator is completed, and then record the test result in the 4041 Series Spectrum Analyzer Record Sheet. 11.18 Input voltage standing wave ratio test... -
Page 183: Maximum Fail-Safe Input Level
11.21 Video BW After the 4041 series spectrum analyzer is powered on and normally started, set the resolution BW to 10 MHz, and press 【↓】. In case of every change of the resolution BW, the corresponding BW will be deemed to be... - Page 184 Chapter XI Performance Characteristics Test minimum frequency of 1 Hz, and 1-3 steps.
-
Page 185: Article Iii Maintenance Instructions
Article III Maintenance Instructions... -
Page 187: Chapter Xii Fault Information Description And Repair Methods
If there is a problem with the 4041 series you use, you can check it according to the following tips. If the problem still exists, please contact us. -
Page 188: Appendix A Test Results Of Performance Characteristics
Appendix A Test Results of Performance Characteristics Appendix A Test Results of Performance Characteristics Attached Table Test Results for Performance Characteristics of 4041 Series Spectrum Analyzer Instrument No.: Tested by: Test conditions: Test date: MM Table A.1 4041 Series Spectrum Analyzer Record Sheet... - Page 189 Appendix A Test Results of Performance Characteristics (frequency ±14.70 width 500 kHz): (frequency ±1.03 width 50 MHz): (frequency ±10.30 width 500 MHz): (frequency ±15.90 width 500 kHz): (frequency ±1.03 width 50 MHz): (frequency ±10.30 width 500 MHz): (frequency ±17.10 width 500 kHz): (frequency ±1.03 width 50 MHz):...
- Page 190 Appendix A Test Results of Performance Characteristics Table A.1 (Continued 1) 4041 Series Spectrum Analyzer Record Sheet Test Item Unit Standard Requirements Test Result 12.0 GHz (frequency width 500 ±10.30 MHz): 15.0 GHz (frequency width 500 ±22.30 kHz): 15.0 GHz (frequency width 50 ±1.04...
- Page 191 Appendix A Test Results of Performance Characteristics 43.0 GHz (frequency width 500 ±10.33 MHz): 1 kHz ±2.0% 10 kHz ±2.0% 100 kHz ±2.0% 1 MHz ±2.0% Span accuracy 10 MHz ±2.0% 100 MHz ±2.0% 1GHz ±2.0% 10 GHz ±2.0% 10 μs~600 s (zero span) Range 1 ms ±2.0%...
- Page 192 Appendix A Test Results of Performance Characteristics Table A.1 (Continued 2) 4041 Series Spectrum Analyzer Record Sheet Test Item Unit Standard Requirements Test Result 10 kHz ±10.0% Resolution BW 3 kHz ±10.0% accuracy 1 kHz ±10.0% 10 MHz ±1.20 3 MHz ±1.20...
- Page 193 Appendix A Test Results of Performance Characteristics 2 MHz~10 MHz (preamplifier ≤ -150 10 MHz~20 GHz (preamplifier ≤ -157 20 GHz~32 GHz (preamplifier ≤ -154 32 GHz~40 GHz (preamplifier ≤ -148 40 GHz~44 GHz (preamplifier ≤ -140 Displayed average noise level 2 MHz~10 MHz (preamplifier ≤...
- Page 194 Appendix A Test Results of Performance Characteristics Table A.1 (Continued 3) 4041 Series Spectrum Analyzer Record Sheet Unit Test Test Item Standard Requirements Result ≥ +7 50 MHz~4 GHz Third-order ≥ +6 intermodulation 4 GHz~13 GHz distortion ≥ +6 13 GHz~44 GHz ≥...
- Page 195 Appendix A Test Results of Performance Characteristics ≤ -90 10 MHz~13 GHz (preamplifier off) ≤ -85 13 GHz~20 GHz (preamplifier off) GHz~upper frequency limit ≤ -80 (preamplifier off) Logarithmic scale: -120 dBm~+30 dBm, 1 dB step Range Linear scale: 22.36uV~7.07V, 0.1% step 0 dBm Reference -10 dBm...
- Page 196 Appendix A Test Results of Performance Characteristics Table A.1 (Continued 4) 4041 Series Spectrum Analyzer Record Sheet Test Item Unit Standard Requirements Test Result 50 MHz (attenuation 0 dB, input -25 dBm): ±1.80 50 MHz (attenuation 10 dB, input -25 dBm): ±1.80...
- Page 197 Appendix A Test Results of Performance Characteristics 20 GHz (attenuation 30 dB, input -5 dBm): ±2.30 20 GHz (attenuation 40 dB, input -5 dBm): ±2.30 20 GHz (attenuation 50 dB, input -5 dBm): ±2.30 25 GHz (attenuation 0 dB, input -25 dBm): ±2.30 25 GHz (attenuation 10 dB, input -25 dBm): ±2.30...
- Page 198 Appendix A Test Results of Performance Characteristics Table A.1 (Continued 5) 4041 Series Spectrum Analyzer Record Sheet Test Item Unit Standard Requirements Test Result 32GHz (attenuation 50 dB, input -5 dBm): ±2.30 40GHz (attenuation 0 dB, input -25 dBm): ±2.30 40GHz (attenuation 10 dB, input -25 dBm): ±2.30...
- Page 199 Appendix A Test Results of Performance Characteristics 20.5GHz(attenuation 0 dB, input -25 dBm): ±2.30 21.5GHz(attenuation 0 dB, input -25 dBm): ±2.30 22.5GHz(attenuation 0 dB, input -25 dBm): ±2.30 23.5GHz(attenuation 0 dB, input -25 dBm): ±2.30 24.5GHz(attenuation 0 dB, input -25 dBm): ±2.30 25.5GHz(attenuation 0 dB, input -25 dBm): ±2.30...
- Page 200 Appendix A Test Results of Performance Characteristics Table A.1 (Continued 6) 4041 Series Spectrum Analyzer Record Sheet Test Test Item Unit Standard Requirements Result 33.5GHz (attenuation 0 dB, input -25 ±2.30 dBm): 34.5GHz (attenuation 0 dB, input -25 ±2.30 dBm): 35.5GHz (attenuation 0 dB, input -25...
- Page 201 Appendix A Test Results of Performance Characteristics configured) Front panel USB interface: Type A, two Communication Rear panel USB interface: Type A, two; type interface B, one LAN interface: RJ45 type Frequency Reference input/output, BNC female type reference GPS antenna, external trigger output, zero span medium frequency output: BNC female Other interface type...
- Page 202 Appendix A Test Results of Performance Characteristics Table A.2 4041 Series Spectrum Analyzer Record Sheet (Tracking Generator Option) Test Item Unit Standard Requirements Test Result Lower limit of the frequency range: 100 kHz Frequency range Upper limit of the frequency range:...
- Page 203 Appendix A Test Results of Performance Characteristics 8 GHz, -35 dBm output ±3.5 12GHz, -5 dBm output ±3.5 12GHz,-10 dBm output ±3.5 12GHz,-20 dBm output ±3.5 12GHz,-30 dBm output ±3.5 12GHz,-35 dBm output ±3.5 16 GHz, -5 dBm output ±3.5 16GHz,-10 dBm output ±3.5 16GHz,-20 dBm output...
Need help?
Do you have a question about the 4041 Series and is the answer not in the manual?
Questions and answers