Silvercrest SNS 45 A2 Operating Instructions Manual
Nail studio set
Hide thumbs
Also See for SNS 45 A2:
- Operating instructions manual (174 pages) ,
- Operating instruction (150 pages) ,
- Operating instructions manual (90 pages)
Table of Contents
Advertisement
Available languages
Available languages
Quick Links
KOMPERNASS GMBH
Burgstraße 21
D-44867 Bochum
www.kompernass.com
Stand der Informationen · Version des informations
Versione delle informazioni · Stand van de informatie
Last Information Update: 04 / 2012 Ident.-No.: SNS45A2022012-2
IAN 74073
NAGELSTUDIO-SET SNS 45 A2
NAGELSTUDIO-SET
Bedienungsanleitung
SET PER MANICURE
Istruzioni per l'uso
NAIL STUDIO SET
Operating instructions
IAN 74073
1
Klappen Sie vor dem Lesen die Seite mit den Abbildungen aus und machen Sie sich anschließend mit allen
Funktionen des Gerätes vertraut.
Avant de lire le mode d'emploi, ouvrez la page contenant les illustrations et familiarisez-vous ensuite avec
toutes les fonctions de l'appareil.
Prima di leggere aprire la pagina con le immagini e prendere confi denza con le diverse funzioni
dell'apparecchio.
Vouw vóór het lezen de pagina met de afbeeldingen open en maak u vertrouwd met alle functies van het
apparaat.
Before reading, unfold the page containing the illustrations and familiarise yourself with all functions of
the device.
DE / AT / CH
SET DE MANUCURE
FR / CH
Mode d'emploi
IT / CH
NL
GB
NAGELSTUDIOSET
Gebruiksaanwijzing
1
Bedienungsanleitung
Mode d'emploi
Istruzioni per l'uso
Gebruiksaanwijzing
Operating instructions
Seite
1
Page
31
Pagina 61
Pagina 91
Page 121
Advertisement
Chapters
Table of Contents

Related Manuals for Silvercrest SNS 45 A2


Summary of Contents for Silvercrest SNS 45 A2
- Page 1 Vouw vóór het lezen de pagina met de afbeeldingen open en maak u vertrouwd met alle functies van het apparaat. Before reading, unfold the page containing the illustrations and familiarise yourself with all functions of the device. NAGELSTUDIO-SET SNS 45 A2 DE / AT / CH Bedienungsanleitung Seite...
-
Page 3: Table Of Contents
Aufsetzen der Nagel-Tips ..16 Importeur ....30 Nagelansatz anpassen ..19 SNS 45 A2... -
Page 4: Einführung
Eine andere oder darüber hinausgehende Benutzung gilt als nicht bestimmungs- gemäß. WARNUNG Gefahr durch nicht bestimmungsgemäße Verwendung! Von dem Gerät können bei nicht bestimmungsgemäßer Verwendung und/ oder andersartiger Nutzung Gefahren ausgehen. ► Das Gerät ausschließlich bestimmungsgemäß verwenden. ► Die in dieser Bedienungsanleitung beschriebenen Vorgehensweisen einhalten. SNS 45 A2... -
Page 5: Warnhinweise
Sachschaden. Falls die Situation nicht vermieden wird, kann dies zu Sachschäden führen. ► Die Anweisungen in diesem Warnhinweis befolgen, um Sachschäden zu vermeiden. HINWEIS ► Ein Hinweis kennzeichnet zusätzliche Informationen, die den Umgang mit dem Gerät erleichtern. SNS 45 A2... -
Page 6: Sicherheitshinweise
Direkter Blick in das UV-Licht der UV-Lampen im Gerät kann zu Augenverlet- zungen und Minderung der Sehfähigkeit führen! ► Niemals direkt in das ultraviolette Licht der UV-Lampen blicken. ► UV-Lampen bei Nichtgebrauch ausschalten. ► Nicht-Anwender und insbesondere Kinder dürfen bei dem Betrieb des Geräts nicht anwesend sein. SNS 45 A2... - Page 7 Das Einatmen von lösemittelhaltigen Substanzen und Dämpfen kann zu Ge- sundheitsschäden führen! ► Dämpfe von lösemittelhaltigen Substanzen (z. B. Aceton) nicht einatmen. ► Für ausreichende Belüftung beim Umgang mit lösemittelhaltigen Substan- zen sorgen. ► Hinweise auf den Behältern der lösemittelhaltigen Substanzen beachten. SNS 45 A2...
- Page 8 Das Gerät nicht in der Nähe von off enen Flammen (z.B. Kerzen) betreiben. ► Vermeiden Sie direkte Sonneneinstrahlung. ► Das Netzkabel immer am Anschlussstecker aus der Steckdose ziehen, nicht am Kabel selbst. ► Ziehen Sie bei auftretenden Störungen und bei Gewitter den Netzstecker aus der Steckdose. SNS 45 A2...
- Page 9 Personen, die überhaupt nicht bräunen können oder nicht bräunen können, ohne einen Sonnenbrand zu bekommen, wenn sie der Sonne ausgesetzt sind, ► Personen, die leicht einen Sonnenbrand bekommen, wenn sie der Sonne ausgesetzt sind, ► in der Schwangerschaft. SNS 45 A2...
- Page 10 Einige Medikamente oder Kosmetika erhöhen die Sensibilität gegenüber UV-Strahlung. ■ Das ungeschützte Auge kann oberfl ächliche Entzündungen erleiden und in ei- nigen Fällen können nach übermäßiger Bestrahlung Schäden an der Netzhaut entstehen. Häufi g wiederholte Bestrahlungen können zu grauem Star führen. SNS 45 A2...
- Page 11 Überschreiten Sie die empfohlene Anzahl von 400 Behandlungen pro Jahr nicht. ■ Entfernen Sie Kosmetik und Sonnenschutzprodukte vor der Inbretriebnahme des Gerätes. Ansonsten kann es zu Hautirritationen führen. HINWEIS ► Erkundigen Sie sich im Zweifelsfall vor Benutzung des Gerätes bei Ihrem Arzt über die Anwendungsmöglichkeit. SNS 45 A2...
-
Page 12: Gerät Und Zubehör
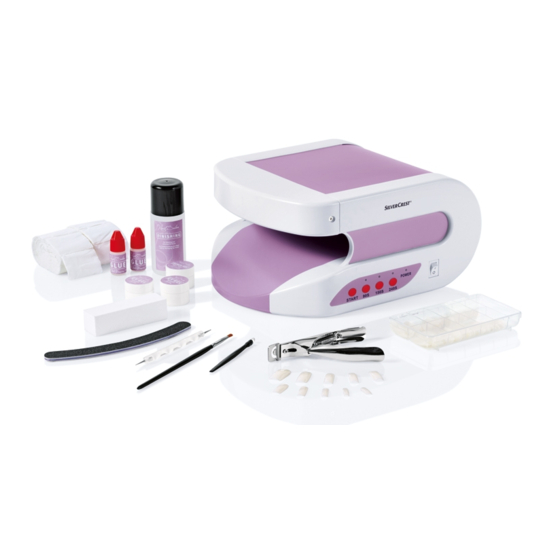
Nagel-Tips (künstliche Fingernägel) p Finishing-Lösung (zur Endbehandlung und für Pinselreinigung) a Nagelkleber (zum Aufkleben der Nagel-Tips „GLUE“) s UV-Gel (zum Auff üllen der Nägel) d Nagelöl (zum Pfl egen der Nägel und der Nagelhaut „NAIL CARE“) SNS 45 A2... -
Page 13: Aufstellen Und Anschließen
Aufbewahrungstasche Bedienungsanleitung HINWEIS ► Prüfen Sie die Lieferung auf Vollständigkeit und auf sichtbare Schäden. ► Bei einer unvollständigen Lieferung oder bei Schäden infolge mangelhafter Verpackung oder durch Transport wenden Sie sich an die Service-Hotline (siehe Kapitel Service). SNS 45 A2... -
Page 14: Auspacken
Stellen Sie das Gerät nicht in einer nassen Umgebung und nicht im Spritzwas- ser-Bereich auf. ■ Stellen Sie das Gerät nicht direkt neben einem Heizkörper oder einem Heiz- strahler auf. ■ Die Steckdose muss gut zugänglich sein, so dass der Netzstecker notfalls leicht abgezogen werden kann. SNS 45 A2... -
Page 15: Elektrischer Anschluss
über heiße Flächen und/oder scharfe Kanten verlegt wird. Achten Sie darauf, dass das Netzkabel nicht straff gespannt oder geknickt wird. Lassen Sie das Netzkabel nicht über Ecken hängen (Stolperdrahteff ekt). Stecken Sie den Netzstecker in die Steckdose. SNS 45 A2... -
Page 16: Bedienung Und Betrieb
Zeitvorwahl-Taste 9, 7 oder 5. HINWEIS ► Die UV-Lampen schalten sich nach Ablauf der voreingestellten Zeit automa- tisch wieder aus. Drücken Sie die Zeitvorwahl-Taste 9, 7 oder 5 und die Start-Taste 0 für jede weitere Behandlung wie oben beschrieben erneut. SNS 45 A2... -
Page 17: Anwendung
Wählen Sie einen Nagel-Tip o, dessen Krümmung so genau wie möglich der Krümmung Ihres Naturnagels entspricht. Wählen Sie einen Nagel-Tip o, der exakt am Rand Ihres Naturnagels ab- schließt, wobei die Seiten parallel zu Ihrem Naturnagel sind. SNS 45 A2... -
Page 18: Aufsetzen Der Nagel-Tips
Behandeln Sie nun die Nageloberfl äche mit dem Schleifblock r, bis der Fingernagel nicht mehr glänzt. Entfernen Sie den Schleifstaub mit einem Papiertuch. Reiben Sie die Nägel mit der Finishing-Lösung p ab, damit letzte Staub- und Fettreste entfernt werden. SNS 45 A2... - Page 19 Kante des Nagel-Tips o an der Kante des Naturnagels liegt. Kippen Sie den Nagel-Tip o nun mit leichtem Druck auf den Naturnagel, so das eventuelle Lufteinschlüsse herausgedrückt werden. HINWEIS Wischen Sie überschüssigen Nagelkleber a mit einem Wattestäbchen ► oder Papiertuch weg. SNS 45 A2...
- Page 20 Feilen Sie sehr vorsichtig, da die Nagel-Tips o nur mit Nagelkleber a ► fi xiert sind. ► Falls Sie lange Nägel nicht gewohnt sind, schneiden Sie sie vorher etwas zu, um ein Anstoßen und Abfallen der Nagel-Tips o zu vermeiden. SNS 45 A2...
-
Page 21: Nagelansatz Anpassen
Feilen Sie ausschließlich den Nagel-Tip o! Beschädigen Sie nicht Ihren Na- turnagel. Feilen Sie die Nagelseiten vorsichtig mit der Sandblatt-Feile i, bis sie gera- de sind und keine „Flügel“ aufweisen. Wiederholen Sie diese Schritte für jeden einzelnen Nagel. Entfernen Sie den Schleifstaub mit einem Papiertuch. SNS 45 A2... -
Page 22: Auftragen Des Uv-Gels
Sollte versehentlich UV-Gel s auf die Nagelhaut oder das Nagelbett ► gelangen, entfernen Sie es vor dem Aushärten, z. B. mit einem Wattestäb- chen. Wiederholen Sie den beschriebenen Vorgang bei allen Nägeln. HINWEIS Achten Sie darauf, dass der Nagel gleichmäßig mit UV-Gel s bedeckt ist. ► SNS 45 A2... -
Page 23: Aushärten Des Uv-Gels
Unebenheiten, kleine Kratzer oder Rillen. Wenn Sie Unebenheiten entdecken, tragen Sie eine weitere, dünne Schicht UV-Gel s auf und härten Sie den Nagel mit der Einstellung 150 Sekunden oder 90 Sekunden (je nach Menge des aufgetragenen UV-Gels s). SNS 45 A2... - Page 24 Sie damit über den Nagel. Mattieren Sie danach jeden Nagel mit dem Schleifblock r. Verwenden Sie abschließend die Polierfeilen u, z und t und polieren Sie jeden einzelnen Nagel solange, bis die Nageloberfl äche eine ebene und glatte Fläche hat. SNS 45 A2...
-
Page 25: Auff Üllen
Schneiden Sie zuerst die Nägel mit dem Nagelschneider q ganz zurück. Feilen Sie dann die Nagel-Tips o mit der Sandblatt-Feile i ab. Polieren Sie danach Ihre Naturnägel mit den unterschiedlichen Polierfeilen u, z und t. Tragen Sie abschließend zur Pfl ege Ihrer Naturnägel etwas Nagelöl d auf. SNS 45 A2... -
Page 26: Pfl Ege
Stellen Sie sicher, dass bei der Reinigung keine Feuchtigkeit in das UV- Gerät 1 eindringt, um eine irreparable Beschädigung des Gerätes zu vermeiden. Gerät reinigen Reinigen Sie die Oberfl ächen des UV-Gerätes 1 nur mit einem weichen, trockenen Tuch. SNS 45 A2... -
Page 27: Zubehör Reinigen
UV-Lampen beginnen! HINWEIS ► Die UV-Lampen dürfen nur durch den gleichen Lampentyp ersetzt werden. Entnehmen Sie den genauen Lampentyp bitte dem Kapitel „Technische Daten“. Schrauben Sie die beiden Schrauben an den Seiten des Gerätes mit einem Kreuzschlitzschraubendreher heraus. SNS 45 A2... -
Page 28: Fehlerbehebung
Beachten Sie die folgenden Sicherheitshinweise um Gefahren und Sachschä- den zu vermeiden: ► Reparaturen an Elektrogeräten dürfen nur von Fachleuten durchgeführt werden, die vom Hersteller geschult sind. Durch unsachgemäße Reparatu- ren können erhebliche Gefahren für den Benutzer und Schäden am Gerät entstehen. SNS 45 A2... -
Page 29: Fehlerursachen Und -Behebung
Schicht UV-Gel s auf und härten Sie aufgetragen. diese aus. Eine UV-Lampe Tauschen Sie die defekte UV-Lampe UV-Lampe defekt. leuchtet nicht. aus. HINWEIS ► Wenn Sie mit den vorstehend genannten Schritten das Problem nicht lösen können, wenden Sie sich bitte an den Service. SNS 45 A2... -
Page 30: Lagerung/Entsorgung
Hinweise zur EG-Konformitätserklärung Dieses Gerät entspricht hinsichtlich Übereinstimmung mit den grundlegenden Anforderungen und den anderen relevanten Vorschriften der europäischen Richtlinie für elektromagnetische Verträglichkeit 2004/108/EC sowie der Niederspannungs- richtlinie 2006/95/EC. Die vollständige Original-Konformitätserklärung ist beim Impor- teur erhältlich. SNS 45 A2... -
Page 31: Technische Daten
Technische Daten Modell SNS 45 A2 Betriebsspannung 220 - 240 V ~ / 50 Hz Leistungsaufnahme 45 W Betriebstemperatur +5 - +45 °C Feuchtigkeit (keine Kondensation) 5 - 90 Abmessungen (H x B x T) 23,1 x 29,6 x 14,3 Gewicht ca. -
Page 32: Service
IAN 74073 Service Österreich Tel.: 0820 201 222 (0,15 EUR/Min.) E-Mail: kompernass@lidl.at IAN 74073 Service Schweiz Tel.: 0842 665566 (0,08 CHF/Min., Mobilfunk max. 0,40 CHF/Min.) E-Mail: kompernass@lidl.ch IAN 74073 Importeur KOMPERNASS GMBH BURGSTRASSE 21 44867 BOCHUM, GERMANY www.kompernass.com SNS 45 A2... - Page 33 Service après-vente... . . 60 Importateur ....60 Adapter la racine des ongles ..49 SNS 45 A2...
-
Page 34: Introduction
Danger suite à un usage non conforme ! L'appareil peut présenter un danger en cas d'utilisation non conforme ou anormale. ► Utiliser l'appareil exclusivement de manière conforme à sa destination. ► Respecter les procédures décrites dans la présente notice d'utilisation. SNS 45 A2... -
Page 35: Avertissements
Si vous ne pouvez éviter la situation dangereuse, cela peut entraîner des dommages matériels. ► Suivre les instructions dans cet avertissement, pour éviter tous dommages matériels. REMARQUE ► Une remarque signale des informations supplémentaires qui facilitent la manipulation de l'appareil. SNS 45 A2... -
Page 36: Consignes De Sécurité
Ne regardez jamais directement dans les rayons ultraviolets des ampoules ► Eteindre les ampoules UV lorsque vous ne les utilisez pas. ► Les non-utilisateurs et en particulier les enfants ne doivent pas être présents lors de l'opération de l'appareil. SNS 45 A2... - Page 37 Ne pas inhaler les vapeurs de substances contenant des solvants (par ex. de l'acétone). ► Assurer une aération suffi sante lors de la manipulation de substances contenant des solvants. ► Respecter les remarques sur les conteneurs des substances contenant des solvants. SNS 45 A2...
- Page 38 Retirez toujours le cordon d'alimentation de la prise au niveau de la fi che, pas au niveau du cordon en tant que tel. ► En cas de perturbations et d'orage, retirez la fi che secteur de la prise secteur. SNS 45 A2...
- Page 39 ► les personnes qui prennent facilement un coup de soleil, lorsqu'elles sont exposées au soleil, ► les femmes enceintes. SNS 45 A2...
- Page 40 Les rayons UV peuvent entraîner des blessures au niveau des yeux et de la peau, comme par exemple un vieillissement prématuré de la peau, voire même un cancer. Lisez attentivement la notice d'utilisation. Certains médicaments ou produits cosmétiques accroissent la sensibilité aux rayons UV. SNS 45 A2...
- Page 41 Retirez les produits cosmétiques et les produits de protection solaire avant la mise en service de l'appareil. Sinon, il peut en résulter des irritations cutanées. REMARQUE ► En cas de doute, renseignez-vous auprès de votre médecin pour savoir si vous pouvez utiliser l'appareil sans problèmes. SNS 45 A2...
-
Page 42: Appareil Et Accessoires
(pour le traitement fi nal et le nettoyage du pinceau) a Colle à ongles (pour coller les faux-ongles "GLUE") s Gel UV (pour remplir les ongles) d Huile pour ongles (pour le soin des ongles et des cuticules "NAIL CARE") SNS 45 A2... -
Page 43: Installation Et Raccordement
Vérifi ez que la livraison est bien complète et qu'elle ne présente pas de dommages apparents. ► En cas de livraison incomplète ou de dommages résultant d'un emballage défi cient ou du transport, veuillez vous adresser à la hotline du service après-vente (cf. le chapitre Service après-vente). SNS 45 A2... -
Page 44: Déballage
éclaboussures. ■ N'installez pas l'appareil directement à côté d'un radiateur ou d'un corps de chauff e. ■ La prise doit être facilement accessible, de sorte qu'en cas d'urgence, la fi che secteur puisse être facilement retirée. SNS 45 A2... -
Page 45: Raccord Électrique
Veillez à ce que le cordon d'alimentation ne soit pas tendu ou plié. Ne laissez pas le cordon secteur pendre sur les angles (danger de trébuche- ment). Insérez la fi che secteur dans la prise secteur. SNS 45 A2... -
Page 46: Fonctionnement Et Opération
Les ampoules UV s'éteignent automatiquement après écoulement du temps prédéfi ni. Appuyez à nouveau sur la touche de départ diff éré 9, 7 ou 5 et la touche de démarrage 0 pour chaque nouveau traitement comme décrit ci-dessus. SNS 45 A2... -
Page 47: Utilisation
Sélectionnez un faux-ongle o, dont la courbure correspond au plus près à la courbure de votre ongle naturel. Sélectionnez un faux-ongle o, qui s'achève au bord de votre ongle naturel, le tracé des côtés étant parallèle à ceux de votre ongle naturel. SNS 45 A2... -
Page 48: Mise En Place Des Faux-Ongles
Supprimez la poussière de ponçage à l'aide d'un essuie-tout en papier. Frottez les ongles à l'aide de la solution de fi nition p afi n de supprimer les derniers résidus de poussière et de graisse. SNS 45 A2... - Page 49 Basculez à présent le faux-ongle o sur l'ongle naturel en exerçant une légère pression, afi n de faire sortir toutes les occlusions d'air éventuelles. REMARQUE Essuyez la colle à ongles a excédentaire à l'aide d'un coton-tige ou d'un ► mouchoir en papier. SNS 45 A2...
- Page 50 ► ment fi xés par la colle à ongles a. ► Si vous n'avez pas l'habitude des ongles longs, coupez-les un peu au préa- lable, pour éviter que les faux-ongles o ne se cognent ou ne tombent. SNS 45 A2...
-
Page 51: Adapter La Racine Des Ongles
Limez les côtés de l'ongle à l'aide de la lime émeri i, jusqu'à ce qu'ils soient droits et ne présentent pas "d'ailes". Répétez ces étapes pour chaque ongle. Supprimez la poussière de ponçage à l'aide d'un essuie-tout. SNS 45 A2... -
Page 52: Application Du Gel Uv
Si du gel UV s devait accidentellement tomber sur le cuticule ou le lit de ► l'ongle, retirez-le avant le durcissement, par ex. à l'aide d'un coton-tige. Répétez le processus décrit pour tous les ongles. REMARQUE Veillez à ce que l'ongle soit recouvert uniformément de gel UV s. ► SNS 45 A2... -
Page 53: Durcissement Du Gel Uv
Si vous découvrez des irrégularités, appliquez une nouvelle couche fi ne de gel UV s et durcissez l'ongle avec le réglage 150 secondes ou 90 secondes (selon la quantité de gel UV s appliqué). SNS 45 A2... - Page 54 Matifi ez ensuite chaque ongle à l'aide du bloc polissoir r. Pour fi nir, utilisez les limes de polissage u, z et t et polissez chaque ongle individuel jusqu’à ce que la surface de l’ongle soit plane et lisse. SNS 45 A2...
-
Page 55: Remplissage
Limez ensuite les faux-ongles o avec la lime émeri i. Polissez ensuite vos ongles naturels avec les diff érents limes de polissage u, z et t. Pour fi nir et pour l'entretien de vos ongles naturels, appliquez un peu d'huile pour ongles d. SNS 45 A2... -
Page 56: Entretien
Lors du nettoyage, assurez-vous qu'aucune humidité ne pénètre dans l'appa- reil UV 1, pour éviter tous dommages irréparables sur l'appareil. Nettoyage de l'appareil Nettoyez les surfaces de l'appareil UV 1 uniquement à l'aide d'un chiff on doux et sec. SNS 45 A2... -
Page 57: Nettoyage Des Accessoires
Les ampoules UV doivent uniquement être remplacées par des ampoules du même type. Vous trouverez le type d'ampoules précis dans le chapitre "Caractéristiques techniques". Dévissez les deux vis sur les côtés de l'appareil à l'aide d'un tournevis cruci- forme. SNS 45 A2... -
Page 58: Dépannage
► Les réparations sur les appareils électriques doivent exclusivement être confi ées à des spécialistes qui ont été formés par le fabricant. Toutes réparations non conformes peuvent entraîner des dangers signifi catifs pour l'utilisateur et endommager l'appareil. SNS 45 A2... -
Page 59: Causes Des Pannes Et Remèdes
Une ampoule UV Une ampoule UV est Remplacez l'ampoule UV défectueuse. n'est pas allumée. défectueuse. REMARQUE ► Si vous ne parvenez pas à résoudre le problème à l'aide des mesures suscitées, veuillez vous adresser au service après-vente. SNS 45 A2... -
Page 60: Entreposage/Elimination
Cet appareil est conforme aux exigences de base et aux autres prescriptions pertinentes de la directive européenne en matière de compatibilité électromagnétique 2004/108/EC ainsi que de la directive "basse tension" 2006/95/EC. La déclaration de conformité originale est disponible chez l'im- portateur. SNS 45 A2... -
Page 61: Caractéristiques Techniques
Caractéristiques techniques Modèle SNS 45 A2 Tension de service 220 - 240 V ~ / 50 Hz Puissance absorbée 45 W Température de service +5 - +45 °C Humidité (pas de condensation) 5 - 90 Dimensions (h x l x p) -
Page 62: Service Après-Vente
Service après-vente Service France Tel.: 0800 919270 E-Mail: kompernass@lidl.fr IAN 74073 Service Suisse Tel.: 0842 665566 (0,08 CHF/Min., mobile max. 0,40 CHF/Min.) E-Mail: kompernass@lidl.ch IAN 74073 Importateur KOMPERNASS GMBH BURGSTRASSE 21 44867 BOCHUM, GERMANY www.kompernass.com SNS 45 A2... - Page 63 ....79 Importatore ... . .90 Applicazione del gel UV ..80 SNS 45 A2...
-
Page 64: Introduzione
Attenersi alle procedure descritte nel presente manuale di istruzioni. Si esclude qualsiasi rivendicazione per i danni derivanti da uso non conforme, riparazioni non professionali, modifi che non autorizzate o impiego di parti di ricambio non omologate. Il rischio è esclusivamente a carico dell'utente. SNS 45 A2... -
Page 65: Avvertenze
Qualora sia impossibile evitare tale situazione pericolosa, essa può dare luogo a danni materiali. ► Seguire le istruzioni contenute in questa avvertenza, per evitare danni materiali. AVVERTENZA ► Un avviso contrassegna ulteriori informazioni volte a facilitare l'uso dell'appa- recchio. SNS 45 A2... -
Page 66: Indicazioni Di Sicurezza
Non guardare mai direttamente nella luce ultravioletta delle lampadine UV. ► Spegnere le lampadine a raggi UV in caso di mancato utilizzo. ► Coloro che non utilizzano l'apparecchio e in particolare i bambini non devono essere presenti durante l'uso dell'apparecchio. SNS 45 A2... - Page 67 ► Non inalare i vapori di sostanze contenenti solventi (ad es. acetone). ► Provvedere a un'aerazione suffi ciente in caso di uso di sostanze contenenti solventi. ► Rispettare le indicazioni riportate sui contenitori delle sostanze contenenti solventi. SNS 45 A2...
- Page 68 ► Evitare l'esposizione diretta ai raggi solari. ► Disconnettere il cavo di rete tirando sempre dalla spina, mai dal cavo stesso. ► In caso di guasti e in presenza di temporali, disconnettere sempre la spina dalla presa. SNS 45 A2...
- Page 69 Persone che non riescono ad abbronzarsi aff atto ovvero non riescono ad ab- bronzarsi senza riportare scottature solari dopo l'esposizione ai raggi solari, ► Persone che si scottano facilmente se esposte ai raggi solari, ► In gravidanza. SNS 45 A2...
- Page 70 L'irradiazione UV può provocare lesioni agli occhi e alla pelle, come ad esempio invecchiamento cutaneo precoce o anche cancro alla pelle. Leggere attentamente il presente manuale di istruzioni per l'uso. Alcuni farmaci o co- smetici aumentano la sensibilità ai raggi UV. SNS 45 A2...
- Page 71 Rimuovere cosmetici e prodotti solari prima della messa in funzione dell'appa- recchio. In caso contrario si possono riportare irritazioni cutanee. AVVERTENZA ► In caso di dubbi, prima di utilizzare l'apparecchio, informarsi presso il proprio medico sulle possibilità di impiego. SNS 45 A2...
-
Page 72: Apparecchio E Accessori
(per il trattamento fi nale e la pulizia pennello) a Colla per unghie (per incollare le tip "GLUE") s Gel UV (per riempire le unghie) d Olio per unghie (per la cura delle unghie e delle cuticole "NAIL CARE") SNS 45 A2... -
Page 73: Installazione E Collegamento
Controllare la completezza e integrità della fornitura in relazione ai danni visibili. ► In caso di fornitura incompleta o in presenza di danni derivanti da imballaggio insuffi ciente o causati dal trasporto, rivolgersi alla Hotline di assistenza (v. capitolo Assistenza). SNS 45 A2... -
Page 74: Estrazione Dalla Confezione
Non collocare l'apparecchio in un ambiente umido e in un'area interessata da spruzzi d'acqua. ■ Non collocare l'apparecchio direttamente accanto a un termosifone o un ra- diatore. ■ La presa di rete dev'essere facilmente accessibile in modo da poter estrarre la spina facilmente in caso di emergenza. SNS 45 A2... -
Page 75: Connessione Elettrica
Assicurarsi che il cavo di rete non sia teso o schiacciato. Non lasciare pendere il cavo di rete agli angoli (eff etto di inciampo). Inserire la spina elettrica nella presa di corrente. SNS 45 A2... -
Page 76: Comandi E Funzionamento
9, 7 o 5. AVVERTENZA ► Le lampadine UV si spengono automaticamente alla scadenza del tempo impostato. Premere il tasto di preselezione del tempo 9, 7 o 5 e il tasto Start 0 per ogni ulteriore trattamento, come precedentemente descritto. SNS 45 A2... -
Page 77: Impiego
Selezionare una tip o la cui curvatura si avvicini il più possibile a quella delle proprie unghie naturali. Selezionare una tip o che si connetta esattamente al margine dell'unghia naturale, e i cui lati siano paralleli all'unghia naturale. SNS 45 A2... -
Page 78: Applicazione Delle Tip
Trattare la superfi cie dell'unghia con il buff er per unghie r fi no a eliminare la lucidità dell'unghia. Rimuovere la polvere della limatura con un fazzolettino di carta. Strofi nare la soluzione di fi nissaggio p sulle unghie per rimuovere gli ultimi resti di polvere e grasso. SNS 45 A2... - Page 79 Poggiare quindi la tip o con una leggera pressione sull'unghia naturale in modo da eliminare eventuali inclusioni d'aria. AVVERTENZA Eliminare eventuali resti di colla per unghie a in eccesso con un bastoncino ► ovattato o un fazzolettino di carta. SNS 45 A2...
- Page 80 Eseguire la limatura con cautela, poiché le tip o sono fi ssate solo con la ► colla per unghie a. ► Se non si fosse abituati alle unghie lunghe, tagliarle un po' prima di appli- carle, al fi ne di evitare urti e cadute delle tip o. SNS 45 A2...
-
Page 81: Adeguamento Delle Unghie Applicate
Limare cautamentei lati delle unghie con la lima sabbiata i, fi no a quando non risultino diritti e non mostrino "ali". Ripetere questi passaggi per ogni singola unghia. Rimuovere la polvere della limatura con un fazzolettino di carta. SNS 45 A2... -
Page 82: Applicazione Del Gel Uv
Se il gel UV s fi nisse inavvertitamente sulla cuticola o sul letto ungue- ► ale, rimuoverlo prima che si indurisca, utilizzando ad es. un bastoncino ovattato. Ripetere il procedimento su descritto per ogni unghia. AVVERTENZA Assicurarsi che l'unghia sia uniformemente ricoperta dal gel UV s. ► SNS 45 A2... -
Page 83: Indurimento Del Gel Uv
Se si scoprono diff ormità, applicare un altro sottile strato di gel UV s e fare indurire l'unghia con l'impostazione a 150 secondi o 90 secondi (in base alla quantità di gel UV s applicato). SNS 45 A2... - Page 84 Opacizzare quindi ogni unghia con il buff er per unghie r. Infi ne utilizzate le lime dolci u, z e t e limare ogni singola unghia fi nché la superfi cie delle unghie non sia divenuta piana e liscia. SNS 45 A2...
-
Page 85: Riempimento
Limare le tip o con la lima sabbiata i. Lucidare quindi le unghie naturali con le varie lime u, z e t. Applicare infi ne un po' di olio per unghie d per la cura delle proprie unghie naturali. SNS 45 A2... -
Page 86: Cura
Assicurarsi che nel corso della pulizia non penetri umidità nell'apparecchio UV 1, al fi ne di evitare l'irreparabile danneggiamento dell'apparecchio stesso. Pulizia dell'apparecchio Pulire le superfi ci dell'apparecchio UV 1 solo con un panno morbido e asciutto. SNS 45 A2... -
Page 87: Pulizia Degli Accessori
► Le lampadine UV devono essere sostituite solo da lampadine dello stesso tipo. Per conoscere il tipo di lampadina preciso, consultare il capitolo "Dati tecnici". Svitare le due viti sui lati dell'apparecchio con un cacciavite a stella. SNS 45 A2... -
Page 88: Guasti E Possibili Rimedi
Rispettare le seguenti indicazioni di sicurezza per evitare rischi e danni materiali: ► Le riparazioni agli apparecchi elettrici devono essere eseguite solo da personale specializzato addestrato dal produttore. Le riparazioni non eseguite a regola d'arte possono causare gravi pericoli per l'utente e danni all'apparecchio. SNS 45 A2... -
Page 89: Cause Ed Eliminazione
Lampadina a raggi UV Sostituire la lampadina a raggi UV a raggi UV non si guasta. guasta. accende. AVVERTENZA ► Se non si riesce a risolvere il problema con le istruzioni precedentemente riportate, rivolgersi al servizio di assistenza ai clienti. SNS 45 A2... -
Page 90: Conservazione/Smaltimento
Il presente apparecchio corrisponde ai requisiti fondamentali in relazione alla conformità e alle relative prescrizioni della Direttiva europea di compatibilità elettromagnetica 2004/108/EC e della Direttiva basse tensioni 2006/95/EC. La dichiarazione di conformità originale e completa è a dispo- sizione presso l'importatore. SNS 45 A2... -
Page 91: Dati Tecnici
Dati tecnici Modello SNS 45 A2 Tensione di esercizio 220 - 240 V ~ / 50 Hz Assorbimento di potenza 45 W Temperatura di esercizio +5 - +45 °C Umidità (nessuna condensa) 5 - 90 Dimensioni (A x L x P) -
Page 92: Assistenza
Assistenza Assistenza Italia Tel.: 02 36003201 E-Mail: kompernass@lidl.it IAN 74073 Assistenza Svizzera Tel.: 0842 665566 (0,08 CHF/Min., telefonia mobile max. 0,40 CHF/Min.) E-Mail: kompernass@lidl.ch IAN 74073 Importatore KOMPERNASS GMBH BURGSTRASSE 21 44867 BOCHUM, GERMANY www.kompernass.com SNS 45 A2... - Page 93 Service .....120 Importeur ....120 Nagelbed aanpassen ..109 SNS 45 A2...
-
Page 94: Inleiding
Er kan gevaar van het apparaat uitgaan in geval van gebruik dat niet in overeenstemming is met de bestemming en/of andersoortig gebruik. ► Het apparaat uitsluitend gebruiken in overeenstemming met de bestemming. ► De beschreven procedures in deze gebruiksaanwijzing nakomen. SNS 45 A2... -
Page 95: Waarschuwingen
Als de gevaarlijke situatie niet wordt vermeden, kan dit materiële schade tot gevolg hebben. ► De aanwijzingen in deze waarschuwing opvolgen om materiële schade te vermijden. OPMERKING ► Een opmerking wijst op extra informatie, die de omgang met het apparaat vergemakkelijkt. SNS 45 A2... -
Page 96: Veiligheidsvoorschriften
Kijk nooit direct in het ultraviolette licht van de UV-lampen. ► UV-lampen uitschakelen als deze niet worden gebruikt. ► Personen die het apparaat niet gebruiken en vooral kinderen mogen bij het gebruik van het apparaat niet aanwezig zijn. SNS 45 A2... - Page 97 ► Dampen van oplosmiddelhoudende substanties (bijv. aceton) niet inademen. ► Zorg voor voldoende ventilatie bij de omgang met oplosmiddelhoudende substanties. ► Let op de aanwijzingen op de reservoirs van de oplosmiddelhoudende substanties. SNS 45 A2...
- Page 98 Gebruik het apparaat niet in de buurt van open vlammen (bijv. kaarsen). ► Vermijd rechtstreeks zonlicht. ► Trek het netsnoer altijd aan de netstekker uit het stopcontact, niet aan het snoer zelf. ► Trek de netstekker uit het stopcontact in geval van storingen en bij onweer. SNS 45 A2...
- Page 99 ► personen, die gemakkelijk een zonnebrand krijgen, als zijn blootgesteld zijn aan de zon, ► tijdens de zwangerschap. SNS 45 A2...
- Page 100 ■ UV-straling kan letsel aan ogen en huid teweegbrengen, zoals bijvoorbeeld voortijdige huidveroudering of zelfs huidkanker. Lees de gebruiksaanwijzing zorgvuldig. Een aantal medicijnen of cosmetica verhogen ook de gevoelig- heid ten opzichte van UV-straling. SNS 45 A2...
- Page 101 Ga het geadviseerde aantal van 400 behandelingen per jaar niet te boven. ■ Verwijder cosmetica en zonnebrandproducten alvorens het apparaat in gebruik te nemen. Anders kunnen er huidirritaties optreden. OPMERKING ► Informeer in geval van twijfel alvorens het apparaat te gebruiken bij uw arts over de toepassingsmogelijkheid. SNS 45 A2...
-
Page 102: Apparaat En Accessoires
Finishing-oplossing (voor de eindbehandeling en reinigen van het kwastje) a Nagellijm (om de nagel-tips op te plakken „GLUE“) s UV-gel (om de nagels op te vullen) d Nagelolie (om de nagels en de nagelhuid te verzorgen „NAIL CARE“) SNS 45 A2... -
Page 103: Opstellen En Aansluiten
Controleer of de levering compleet is en of er sprake is van zichtbare schade. ► In geval de levering niet compleet is of indien er sprake is van schade door gebrekkige verpakking of door transport, neemt u contact op met de Service-Hotline (zie hoofdstuk Service). SNS 45 A2... -
Page 104: Uitpakken
Plaats het apparaat niet in een natte omgeving en niet in het bereik van spat- water. ■ Plaats het apparaat niet direct naast een verwarming of een straalkachel. ■ Het stopcontact moet goed te bereiken zijn, zodat de netstekker in geval van nood gemakkelijk uit het stopcontact gehaald kan worden. SNS 45 A2... -
Page 105: Elektrische Aansluiting
♦ Let erop, dat het netsnoer niet strak gespannen of geknikt wordt. ♦ Laat het netsnoer niet over hoeken hangen (struikelblokeff ect). ♦ Steek de stekker in het stopcontact. SNS 45 A2... -
Page 106: Bediening En Bedrijf
OPMERKING ► De UV-lampen worden na afl oop van de vooraf ingestelde tijd automatisch weer uitgeschakeld. Druk opnieuw op de tijdvoorkeuze-toets 9, 7 of 5 en de start-toets 0 voor ♦ iedere verdere behandeling zoals boven beschreven. SNS 45 A2... -
Page 107: Gebruik
Kies een nagel-tip o, waarvan de kromming zo precies mogelijk overeen- ♦ komt met de kromming van uw natuurlijke nagel. Kies een nagel-tip o, die exact afsluit aan de rand van uw natuurlijke nagel, ♦ waarbij de zijkanten parallel verlopen aan uw natuurlijke nagel. SNS 45 A2... -
Page 108: De Nagel-Tips Opzetten
Behandel het nageloppervlak nu met het schuurblok r, totdat de vinger- ♦ nagel niet meer glanst. ♦ Verwijder het schuurstof met een tissue. Neem de nagels af met de fi nishing-oplossing p, zodat de laatste stof- en ♦ vetresten worden verwijderd. SNS 45 A2... - Page 109 Kantel de nagel-tip o nu met lichte druk op de natuurlijke nagel, zodat even- ♦ tuele luchtbellen eruit worden gedrukt. OPMERKING Veeg overtollige nagellijm a af met een wattenstaafje of een tissue. ► SNS 45 A2...
- Page 110 Vijl erg voorzichtig, omdat de nagel-tips o alleen met nagellijm a gefi xeerd ► zijn. ► Als u geen lange nagels gewend bent, knipt u ze eerst een beetje af, om een aanstoten en afvallen van de nagel-tips o te vermijden. SNS 45 A2...
-
Page 111: Nagelbed Aanpassen
Vijl uitsluitend de nagel-tip o! Beschadig niet uw natuurlijke nagel. Vijl de zijkanten van de nagel voorzichtig met de zandvijl i, totdat zij recht ♦ zijn en geen „vleugels“ vertonen. ♦ Herhaal deze stappen voor iedere afzonderlijke nagel. ♦ Verwijder het schuurstof met een tissue. SNS 45 A2... -
Page 112: Uv-Gel Aanbrengen
Mocht er per ongeluk UV-gel s op de nagelhuid of het nagelbed terecht- ► komen, verwijdert u dit voordat het uithardt, bijv. met een wattenstaafje. ♦ Herhaal de beschreven procedure bij alle nagels. OPMERKING Let erop, dat de nagel gelijkmatig is bedekt met UV-gel s. ► SNS 45 A2... -
Page 113: Uv-Gel Laten Uitharden
Als u oneff enheden ontdekt, brengt u nog een dunne laag UV-gel s aan ♦ en hardt u de nagel met de instelling 150 seconden of 90 seconden (naar gelang hoeveelheid van het aangebrachte UV-gel s). SNS 45 A2... - Page 114 Matteer daarna iedere nagel met het schuurblok r. ♦ Gebruik ten slotte de polijstvijlen u, z en t en polijst elke nagel tot het ♦ oppervlak van de nagels eff en en glad is. SNS 45 A2...
-
Page 115: Opvullen
Vijl de nagel-tips o dan met de zandvijl i af. ♦ Polijst daarna uw natuurlijke nagels met de verschillende polijstvijlen u, z ♦ en t. ♦ Breng vervolgens voor de verzorging van uw natuurlijke nagels een beetje nagelolie d aan. SNS 45 A2... -
Page 116: Verzorging
Verzeker u ervan, dat bij de reiniging geen vochtigheid binnendringt in het UV-apparaat 1, om een onherstelbare beschadiging van het apparaat te vermijden. Apparaat reinigen Reinig de oppervlakken van het UV-apparaat 1 alleen met een zachte, ♦ droge doek. SNS 45 A2... -
Page 117: Accessoires Reinigen
► De UV-lampen mogen alleen worden vervangen door hetzelfde type lamp. Het exacte type lamp leest u in het hoofdstuk „Technische gegevens“. ♦ Draai de beide schroeven aan de zijkanten van het apparaat eruit met een kruiskopschroevendraaier. SNS 45 A2... -
Page 118: Problemen Oplossen
► Reparaties aan elektrische apparatuur mogen alleen worden uitgevoerd door vakmensen, die door de fabrikant zijn geschoold. Door onvakkundige reparaties kunnen aanzienlijke gevaren optreden voor de gebruiker en kan er schade ontstaan aan het apparaat. SNS 45 A2... -
Page 119: Oorzaken Van Storingen En Het Verhelpen Ervan
Nog een dunne laag UV-gel s aangebracht. aanbrengen en deze uitharden. Een UV-lamp brandt UV-lamp defect. Vervang de defecte UV-lamp. niet. OPMERKING ► Als u met de eerdergenoemde stappen het probleem niet kunt verhelpen, neem dan a.u.b. contact op met de klantenservice. SNS 45 A2... -
Page 120: Opslag/Milieurichtlijnen
Dit apparaat voldoet met betrekking tot overeenstemming aan de fundamentele eisen en de andere relevante voorschriften van de Europese richtlijn voor elektromagnetische compatibiliteit 2004/108/EC en de laagspanningsrichtlijn 2006/95/EC. De volledige originele conformiteitsverklaring is te verkrijgen bij de importeur. SNS 45 A2... -
Page 121: Technische Gegevens
Technische gegevens Model SNS 45 A2 Bedrijfsspanning 220 - 240 V ~ / 50 Hz Vermogen 45 W Bedrijfstemperatuur +5 - +45 °C Vochtigheid (geen condensatie) 5 - 90 Afmetingen (H x B x D) 23,1 x 29,6 x 14,3... -
Page 122: Service
Service Service Nederland Tel.: 0900 0400223 (0,10 EUR/Min.) E-Mail: kompernass@lidl.nl IAN 74073 Importeur KOMPERNASS GMBH BURGSTRASSE 21 44867 BOCHUM, GERMANY www.kompernass.com SNS 45 A2... - Page 123 Importer ....147 Matching a nail set ... .137 SNS 45 A2...
-
Page 124: Introduction
Risks from unintended use! Risks can be engendered by the appliance if it is used for unintended purposes and/or other types of use. ► Use the appliance exclusively for intended purposes. ► Observe the procedures described in these operating instructions. SNS 45 A2... -
Page 125: Warning Notices
If the situation is not avoided it can lead to property damage. ► The directives in this warning are there to avoid property damage. NOTICE ► A notice signifi es additional information that assists in the handling of the appliance. SNS 45 A2... -
Page 126: Safety Instructions
NEVER look directly into the ultraviolet light from the UV lamps. ► If the UV lamps are not in use, switch them off . ► Non-users, and especially children, may not be present during the opera- tion of the appliance. SNS 45 A2... - Page 127 ► Do not breathe in the vapours from solvent-containing substances (e.g. acetone). ► Ensure there is adequate ventilation when interacting with solvent-containing substances. ► Pay heed to the instructions on the containers of the solvent-containing substances. SNS 45 A2...
- Page 128 Always pull the plug itself out of the mains power socket, do not pull it with the power cable. ► In the case of a malfunction occurring or a thunderstorm, disconnect the plug from the mains power socket. SNS 45 A2...
- Page 129 People who absolutely cannot tan at all, or who cannot tan without getting sunburned, when they are exposed to the sun, ► People who are easily sunburned when they are exposed to the sun, ► during pregnancy. SNS 45 A2...
- Page 130 Do not carry out more than 5 treatments per day. This could lead to skin irritation. ■ Do not exceed the recommended number of 400 treatments per year. ■ Remove cosmetics and sun care products before using the appliance. If you do not, it could lead to skin irritation. SNS 45 A2...
-
Page 131: Appliance And Accessories
(for fi nal treatment and for cleaning brushes) a Nail Glue (to glue the nail tips on "GLUE") s UV Gel (for topping up nails) d Nail Oil (for care of the nails and cuticles "NAIL CARE") SNS 45 A2... -
Page 132: Setting Up And Connecting To The Power Supply
Check the contents to ensure everything has been provided, and for signs of visible damage. ► If the contents are incomplete, or have been damaged due to defective packaging or transportation, contact the Service Hotline (see chapter Service). SNS 45 A2... -
Page 133: Unpacking
Do not place the appliance in a damp environment and not in an area at risk from spraywater. ■ Do not place the appliance adjacent to a radiator or a raiation heater. ■ The mains power socket must be easily accessible, so that the plug can be easily removed in an emergency. SNS 45 A2... -
Page 134: Electrical Connection
Ensure that the power cable is not over-taut or kinked. Do not let the power cable hang over edges (trip wire eff ect). Insert the plug into the mains power socket. SNS 45 A2... -
Page 135: Handling And Operation
► The UV lamps switch off automatically after the lapse of the preset time. Press the time preselect button 9, 7 or 5 and the Start button 0 once again as described above for any further treatments. SNS 45 A2... -
Page 136: Utilisation
Select a nail tip o whose curvature corresponds as closely as possible to the natural curve of your nail. Select a nail tip o which closes exactly at the edge of your natural nail and whereby the sides are parallel to your natural nail. SNS 45 A2... -
Page 137: Attaching Artifi Cial Nails
Now treat the nail surface with the sanding block r until the fi ngernail is no longer shiny. Remove the sanding dust with a paper towel. Rub the nails with the fi nishing solution p so that the last remnants of dust and grease are removed. SNS 45 A2... - Page 138 Hold the nail tip o fi rmly for 10-12 seconds and, at the same time, press it down with suffi cient pressure onto the natural nail. Ensure that no air bubbles are formed and that the tip is glued on perfectly straight. SNS 45 A2...
-
Page 139: Matching A Nail Set
Carefullly fi le the sides of the nail with the Sand sheet fi le i until it is straight and does not exhibit a "wing". Repeat this step for each individual nail. Remove the sanding dust with a paper towel. SNS 45 A2... -
Page 140: Application Of The Uv-Gel
Should any UV Gel s inadvertantly come onto the cuticle or the nail bed, ► remove it before the hardening, for example, with a cotton wool swab. Repeat the above process for all nails. NOTICE Ensure that the nail is covered evenly with UV Gel s. ► SNS 45 A2... -
Page 141: Hardening Of The Uv-Gel
If you discover unevenness, apply a further thin layer of UV Gel s and harden the nail with the setting of 150 seconds or 90 seconds (depending on the amount of applied UV Gel s). SNS 45 A2... -
Page 142: Topping Up
Use the sanding block r until the nail is no longer shiny. When done, reapply UV Gel s and harden it again. NOTICE ► In this regard, see the previous chapters Application of the UV-Gel and Hardening of the UV-Gel SNS 45 A2... -
Page 143: Removal Of Artifi Cial Nails
Do not use an acetone-based nail polish remover for removing nail polish, because this would loosen and damage the artifi cial nails. ■ Wear rubber gloves when using detergents or bleaching agents. ■ Wear a pair of rubber gloves for all work/activities that may damage the nails. SNS 45 A2... -
Page 144: Cleaning
Remove the nail oil d before each new utilisation of the brush e. ► To remove the nail oil d dip the brush e in the fi nishing solution p and then wipe it on a paper towel. SNS 45 A2... -
Page 145: Exchanging The Uv Lamps
Insert the new UV lamp into the socket. Slide the appliance cover with the UV lamps back onto the appliance, thereby ensuring that the cable connection on the side does not get snagged or trapped. Re-attach the appliance cover with the two side screws. SNS 45 A2... -
Page 146: Troubleshooting
fi ngernails show unevenness. Apply a further and thinner layer UV Gel s unevenly applied. of UV Gel s and then harden it. A UV lamp does UV lamp defect. Replace the defective UV lamp. not glow. SNS 45 A2... -
Page 147: Storage/Disposal
With regard to conformity with essential requirements and other relevant provisions, this appliance complies with the guidelines of the Electromagnetic Compatibility Directive 2004/108/EC and the Low Voltage Directive 2006/95/EC. The complete original declaration of conformity can be obtained from the importer. SNS 45 A2... -
Page 148: Technical Data
Technical data Model SNS 45 A2 Operating voltage 220 - 240 V ~ / 50 Hz Power consumption 45 W Operating temperature +5 - +45 °C Humidity (no condensation) 5 - 90 Dimensions (W x H x D): 23,1 x 29,6 x 14,3... -
Page 149: Service
Service Service Great Britain Tel.: 0871 5000 720 (£ 0.10/Min.) E-Mail: kompernass@lidl.co.uk IAN 74073 Importer KOMPERNASS GMBH BURGSTRASSE 21 44867 BOCHUM, GERMANY www.kompernass.com SNS 45 A2... - Page 150 Vouw vóór het lezen de pagina met de afbeeldingen open en maak u vertrouwd met alle functies van he apparaat. Before reading, unfold the page containing the illustrations and familiarise yourself with all functions of the device. NAGELSTUDIO-SET SNS 45 A2 DE / AT / CH Bedienungsanleitung Seite...
Need help?
Do you have a question about the SNS 45 A2 and is the answer not in the manual?
Questions and answers