Zoom Handy Recorder H8 Quick Manual
Hide thumbs
Also See for Handy Recorder H8:
- Operation manual (136 pages) ,
- Firmware update manual (6 pages)
Advertisement
Table of Contents
- 1 Names of Parts
- 2 Connection Examples
- 3 Installing Batteries
- 4 Turning the Power On/Off
- 5 Screen Appearance
- 6 Input and Output Settings
- 7 Operations During Recording
- 8 Playing Recordings
- 9 Operations During Playback
- 10 Other Functions
- 11 Creating New Projects
- 12 Main Specifications
- Download this manual
You must read the Usage and Safety Precautions before use.
The Operation Manual can be downloaded from the ZOOM website (www.zoom.jp/docs/h8).
This page has files in PDF and ePub formats.
The PDF file format is suitable for printing on paper and reading on a computer.
The ePub format can be read with electronic document readers and is designed for reading on
smartphones and tablets.
© 2020 ZOOM CORPORATION
Copying or reprinting this manual in part or in whole without permission is prohibited.
Product names, registered trademarks and company names in this document are the property of their respective
companies.
All trademarks and registered trademarks in this document are for identification purposes only and are not intended
to infringe on the copyrights of their respective owners.
You might need this manual in the future. Always keep it in a place where you can access it easily.
The contents of this manual and the specifications of the product could be changed without notice.
H8
Handy Recorder
Quick Guide
Advertisement
Table of Contents

Related Manuals for Zoom Handy Recorder H8


Summary of Contents for Zoom Handy Recorder H8
- Page 1 Quick Guide You must read the Usage and Safety Precautions before use. The Operation Manual can be downloaded from the ZOOM website (www.zoom.jp/docs/h8). This page has files in PDF and ePub formats. The PDF file format is suitable for printing on paper and reading on a computer.
-
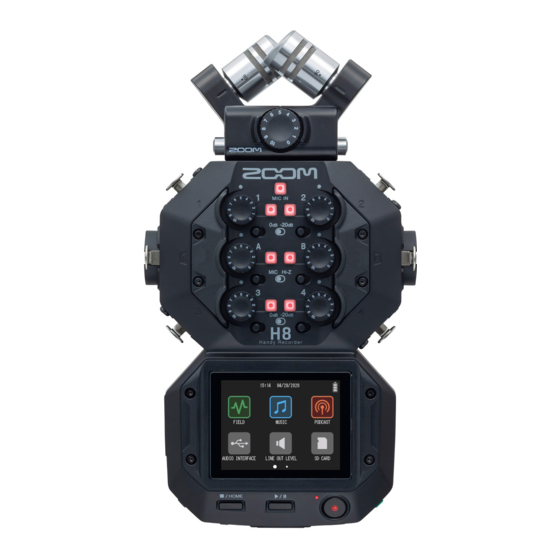
Page 2: Names Of Parts
PHONE OUT jack Input 3 Input 4 jack Strap attachment holes SD card slot By connecting a ZOOM BTA-1 or other dedicated wireless adapter to the REMOTE jack and using the dedicated controller app, the can be operated from an iOS/iPadOS device. -
Page 3: Connection Examples
Connection examples Field recording Wireless lavalier mics Gun mic Ambient Lavalier Lavalier Ambient receivers receivers Music creation Vocal mic Drum mic Electric bass Electric guitar Keyboard Podcasting Audio device, etc. Headphone Mics with tabletop stands... -
Page 4: Installing Batteries
• SD cards must be formatted by before use. To format, use Home Screen > SD CARD > Format. HINT AC power can be used by connecting a dedicated AC adapter (ZOOM AD-17) to the USB port. Turning the power on/off Slide toward to turn the power on. - Page 5 HINT • Sliding to toward HOLD will disable button and touchscreen operations. Setting the language (first time starting up) The first time you turn the power on after purchase, set the touchscreen display language when the language setting screen opens. Tap the language you want to set.
-
Page 6: Screen Appearance
Screen appearance On the , tap, swipe and slide on the screen to make settings and select functions to adjust. Home Screen The Home Screen appears when the starts up. From the Home Screen, three recording applications, various setting screens and other functions can be launched. - Page 7 folder and file structure When recording with the , folders and files are created on SD cards in the following manner. All three apps (FIELD, MUSIC and PODCASTS) can be used with projects that have been made. (Recording and playback of 96 kHz/16-bit and 96 kHz/24-bit WAV files is only supported by the FIELD app.) manages recording and playback data in units called projects.
-
Page 8: Input And Output Settings
Input and output settings Setting input sources Set according to the devices connected to Inputs 1–4/A/B. Connecting a mixer or other device with a +4 dBu standard output level (Inputs 1–4) Set the corresponding PAD switches ( ) to –20dB. ... - Page 9 Enabling tracks (and stereo linking) Select which tracks to record from MIC IN, 1–4 and A/B. The MIC IN, 1–4 and A/B tracks correspond to the MIC IN, 1–4 and A/B inputs. Launch the recording app, and press the track buttons ( ) for the tracks to record so that the corresponding LED indicators light red.
-
Page 10: Operations During Recording
Using the FIELD app Time display Progress bar Remaining battery charge Recording/playback project name (Red) Empty Full Headphone/speaker Status icon volume button Level meters Track numbers Clipping indicators REW/FF buttons Settings button Track settings button Recording format button Recording Press on the FIELD app screen. -
Page 11: Playing Recordings
Playing recordings Press on the FIELD app screen. Operations during playback Function Touchscreen/control operation Select playback project/move to mark Search forward/backward Press and hold Slide left/right. Pause/resume playback Press Stop Press Other functions Function name Details Automatic recording Recording can be started and stopped automatically in response to the input level. -
Page 12: Creating New Projects
Using the MUSIC app Time display Progress bar Remaining battery charge Recording/playback project name (Red) Empty Full Headphone/speaker Status icon volume button Clipping indicators Level meters Faders Track display switching button Track buttons Settings button Tap to change screens Track settings button Low/Mid/High equalization Effect settings button... - Page 13 Effects These alter the sounds of instruments, voices and other sources. The included effects, which are equivalent to those in ZOOM multi-effects processors, can be used with a variety of instruments. Using the free Guitar Lab effect management application on a computer (Mac/Windows), you can add effects that are distributed online as well as edit and back up patch memories, for example.
- Page 14 Using the PODCAST app Time display Progress bar Remaining battery charge Recording/playback project name (Red) Empty Full Headphone/speaker Status icon volume button Clipping indicators Sound pads Pad level Level meters Track settings button Settings button Recording Press on the PODCAST app screen. ...
- Page 15 Effects These alter the sounds of instruments, voices and other sources. The included effects, which are equivalent to those in ZOOM multi- effects processors, can be used with a variety of instruments. Using the free Guitar Lab effect management application on a computer (Mac/Windows), you can add effects that are distributed online as well as edit and back up patch memories, for example.
-
Page 16: Main Specifications
400 mW 8Ω mono speaker Display 2.4" (320×240) full-color touchscreen LCD Power • 4 AA batteries (alkaline, NiMH or lithium) • AC adapter (ZOOM AD-17): DC 5 V/1A • USB bus power Estimated continuous operation time using batteries Using alkaline batteries (hours: minutes) Using XY mic, 44.1 kHz/24-bit (stereo ×...
Need help?
Do you have a question about the Handy Recorder H8 and is the answer not in the manual?
Questions and answers