
Related Manuals for Zoom ARQ AR-96


Summary of Contents for Zoom ARQ AR-96
- Page 1 Aero RhythmTrak Quick Manual The Operation Manual can be downloaded from the ZOOM website (www.zoom.co.jp) © 2016 ZOOM CORPORATION Copying or reprinting this manual in part or in whole without permission is prohibited.
-
Page 2: Table Of Contents
Contents Usage and Safety Precautions .......3 SONG mode Introduction ...........6 SONG mode overview .........26 Explanation of terms ........7 Operation procedure ........27 Overview Capturing audio (recording) Names of parts ..........8 Capture overview .........28 Using the A ........11 Operation procedure ........29 Ring Controller overview ......12 LOOPER mode Connecting other devices ......14... -
Page 3: Usage And Safety Precautions
If this occurs, place the A and Operation using an AC adapter the other device farther apart. Never use any AC adapter other than a ZOOM AD- With any type of electronic device that uses digital control, including the A, electromagnetic inter- 14. - Page 4 Do not allow the battery to be wet by any liquid, personal use is prohibited by law. including water, seawater, milk, soft drinks or ZOOM CORPORATION will not assume any responsibility re- soapy water. Do not charge or use a battery that is lated to infringements of copyrights.
- Page 5 Usage and Safety Precautions (continued) For U.S.A. and CANADA FCC regulation warning (for U.S.A.) This equipment has been tested and found to This device complies with part 15 of the FCC comply with the limits for a Class B digital device, Rules and Industry Canada license-exempt RSS pursuant to Part 15 of the FCC Rules.
-
Page 6: Introduction
Introduction ● Built-in sound sources can be edited Thank you very much for purchasing a ZOOM Aero RhythmTrak A. The A has the in various ways The sounds included in the A have following features. various setting parameters that increase their ●... -
Page 7: Explanation Of Terms
Explanation of terms Pattern This is a short musical part of several bars. The A has preset patterns that cover a variety of musical genres. Song This is a combination of multiple patterns that form a single musical piece. Step These are the smallest parts of patterns. -
Page 8: Overview
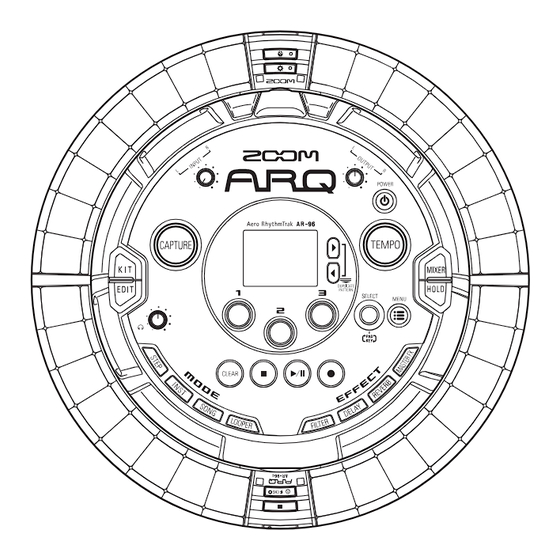
Overview Names of parts Base Station ■ Top LCD screen Ring Controller charging connector Right and left buttons INPUT volume OUTPUT volume Parameter POWER button knobs 1–3 TEMPO button CAPTURE button MIXER button KIT button HOLD button EDIT button Headphone MENU button volume SELECT knob... - Page 9 Names of parts (continued) ■ Left side ■ Right side INPUT OUTPUT jack jack External power jack USB jack SD card Headphone slot jack...
- Page 10 Names of parts (continued) Ring Controller (Side) button button SETUP button GRIP button Pads Charging connector (Bottom) DELAY button FILTER button (Bottom) MASTER FX button REVERB button POWER button STOP button (Side) PLAY/PAUSE button REC button HINT • You can use the Ring Controller buttons for the same operations as the Base Station buttons. •...
-
Page 11: Using The A
Using the A The A consists of a Base Station and a Ring Controller. Ring Controller Base Station With the Base Station, you can edit tones, create songs and save them, for example. Use the Ring Controller for input when creating songs. Since the Ring Controller can be detached from the Base Station, you can hold it in your hand and play it like an instrument. -
Page 12: Ring Controller Overview
Ring Controller overview The A Controller surface has 5 ring-shaped areas. The top, side and bottom rings each have 32 pressure-sensitive pads. Using these pads, you can input and edit songs and perform in real-time, for example. Top inner ring LED indicators (no input) Pad locations... - Page 13 Ring Controller overview (continued) Playback position Grip area During playback of a pattern or song, for exam- You can set a grip area that does not respond ple, the LEDs of the top and bottom inner rings to touch in order to prevent pads from being light green at the step currently playing.
-
Page 14: Connecting Other Devices
Connecting other devices Audio source for Mixer, audio system or capturing recordings other playback equipment INPUT OUTPUT AC adapter Headphones Computer (USB connection) -
Page 15: Switching Modes
Switching modes With the A, you can create patterns and performance as a pattern by playing the pads combine multiple patterns to create songs. in real-time. Editing with the A mainly uses the follow- Use SONG and LOOPER modes to create ing four modes. -
Page 16: Instrument Overview
Instrument overview The A can use up to 33 sound sources in a single kit. Each of these is called an instrument and produces sound from waveform data, such as a drum hit, or from the built-in synthesizer. You can choose from hundreds of types of sounds and assign ones you like to each instrument. -
Page 17: Preparations
Preparations Turning the power on and off Base Station power Ring Controller power ■ Charging the Ring Controller Connect the included AC adapter Place the Ring Controller on the to the Base Station. Base Station. Press and hold p on the Base Station. - Page 18 Turning the power on and off (continued) ■ Putting the Ring Controller to sleep ■ Turn the Ring Controller OFF When the Ring Controller is charging, the power To turn the Ring Controller OFF, follow these will not turn OFF. Instead, it will go to sleep. steps when it is not charging.
-
Page 19: Loading An Sd Card
Loading SD cards ■ Loading and removing SD cards Turn the power off. Open the SD card slot cover on the Base Station. Insert the SD card into the slot. To eject an SD card: Push the card further into the slot and then pull it out. -
Page 20: Inst Mode
INST mode INST mode overview You can tap pads to perform as you like. You can also record performances in real-time to create patterns. In this mode, each pad around the Ring Controller corresponds to a single instrument (PAD layout) or note (KEY layout). -
Page 21: Operation Procedure
INST mode overview (continued) Pattern creation in KEY layout: After starting real-time input, tap pads for notes to input them. The pattern will start loop playback, and you can overdub as many times as you like (when set to polyphonic). Bar 1 Bar 2 Notes... - Page 22 Operation procedure (continued) Start input Press R to enter standby, and press P to start real-time input. Start real-time input In PAD layout: Tap the pads of the instrument to input it in time with the looping pattern that is playing back. Instrument Input in real time Bar 1...
-
Page 23: Step Mode
STEP mode STEP mode overview In STEP mode, you can create patterns by inputting them one step at a time. In this mode, each pad around the Ring Controller corresponds to a single sequential step. Step Step Bar 1 Bar 2 1 2 3 …... - Page 24 STEP mode overview (continued) In PAD layout: The 5 rings (3 when set to Guideline display) on the Ring Controller each show a different instrument. You can use to change which instruments are shown by which rings (2). Since multiple instruments can be shown by the Ring Controller, you can check instruments that have already been input as you input the next instrument (3).
-
Page 25: Operation Procedure
Operation procedure Enter STEP mode Press W to enter STEP mode. Select a pattern Use u to select a pattern number. Select a sound set Press K, and use e to select a sound set (kit) that suits the pattern being made. You can press D to edit the sounds. -
Page 26: Song Mode
SONG mode SONG mode overview In SONG mode, you can combine multiple patterns that you have created into one complete song. Song Playback order → … Pattern A Pattern B Pattern C … From all the patterns, a range of 96 patterns is assigned to the pads (32 each on top, side and bottom rings). -
Page 27: Operation Procedure
Operation procedure Enter SONG mode Press Y to enter SONG mode. Select a song Press M to open the song sequence list, and use e and E to select a song Select a pattern to play Tap a pad or use to change the selected pattern and select the pattern to play. -
Page 28: Capturing Audio (Recording)
Capturing audio (recording) Capture overview The A can capture (record) audio it is playing back and audio input through its INPUT jacks in every mode. The contents of WAV files saved on an SD card can also be added as captured materials. You can use captured audio in LOOPER mode. -
Page 29: Operation Procedure
Operation procedure Play the material to capture Play a pattern or song, for example, that you want to use as a captured recording. You can also capture audio sources input through the INPUT jacks, and load audio files saved on SD cards. External input Audio files Play patterns,... -
Page 30: Looper Mode
LOOPER mode LOOPER mode overview In LOOPER mode, you can combine patterns and songs that have already been created, input from the INPUT jacks, WAV files and other captured audio into a single song as a looper sequence. Looper sequence Playback order →... -
Page 31: Operation Procedure
Operation procedure Enter LOOPER mode Press Z to enter LOOPER mode. Select the looper sequence Press M to open the looper sequence list, and use e and E to select a loop sequence. Select captured audio for playback Tap a pad or use to change the captured audio for playback. -
Page 32: Other Functions
Other functions Editing sounds Press D to edit sounds by changing settings related to oscillator and noise types, insert effects, level, pan, send effects, LFOs and envelopes, for example. You can also set Ring Controller display settings in SONG mode and capture settings in LOOPER mode. -
Page 33: Troubleshooting
• Confirm that nothing is wrong with the • Confirm the grip setting. shielded cable. • If using it as a MIDI controller, check the Mac • Use a genuine ZOOM AC adapter. or iOS device settings. HINT See the Operation Manual for detailed informa-... -
Page 34: Specifications
Specifications Base Station Inputs INPUT L/R Connector type Standard mono phone jacks (unbalanced) Input gain +10 to −65 dB Input impedance 50 kΩ Outputs OUTPUT L/R Connector type Standard mono phone jacks (unbalanced) Output impedance 200 Ω PHONES Connector type Standard stereo phone jack 20mW ×... - Page 35 Specifications (continued) Ring Controller MIDI IN/OUT MIDI over Bluetooth LE Sensors PAD pressure sensors, 3-axis accelerometer Power Lithium polymer rechargeable battery (DC4.2V maximum voltage, 3.7V nominal voltage, 3.7V 450mAh capacity), direct supply from Base Station Power consumption When using battery: 2 W maximum Recharging time About 2.5 hours Battery operation time...
- Page 36 ZOOM CORPORATION 4-4-3 Kandasurugadai, Chiyoda-ku, Tokyo 101-0062 Japan http://www.zoom.co.jp Z2I-2711-03...
Need help?
Do you have a question about the ARQ AR-96 and is the answer not in the manual?
Questions and answers