Flexco Alligator Ready Set RSC187 Training Manual
Light-duty belt splicing
Hide thumbs
Also See for Alligator Ready Set RSC187:
- Instructions for installation (2 pages) ,
- Instructions for installation (2 pages) ,
- Installation instructions (2 pages)
Table of Contents
Advertisement
Quick Links
Advertisement
Table of Contents
Troubleshooting

Related Manuals for Flexco Alligator Ready Set RSC187


Summary of Contents for Flexco Alligator Ready Set RSC187
- Page 1 Alligator Light-Duty Belt Splicing ® Training Manual...
-
Page 2: Table Of Contents
Table of Contents Proper Belt End Preparation .............. 3 Alligator Ready Set Staple Belt Fasteners ® ™ Overview......................4 Installation Tools ....................5 Installation Accessories ..................6 Identifying a Properly Installed Alligator Ready Set Splice ......... 7 Troubleshooting ....................8-9 Tips ........................ -
Page 3: Proper Belt End Preparation
Proper Belt End Preparation Importance of a Square Cut To prevent mistracking and extend splice life, it is critical to obtain a square cut off from the centerline of the belt. To achieve this, follow these simple steps: 1. Prior to any work on your conveyors, make certain that the power has been turned off and the belt is “locked out”. -
Page 4: Alligator Ready Set
Alligator Staple Overview ® Advantages of Alligator Ready Set Staple Fastening System: ® ™ • High strength splice • Abrasion resistant splice • Inexpensive, portable installation tool • Easy installation procedures • Easy to mesh lacing and insert pin Two Styles of Alligator Staple Fasteners: Ready Set : Available in Steel, 430 Stainless Steel and 316 Stainless Steel. -
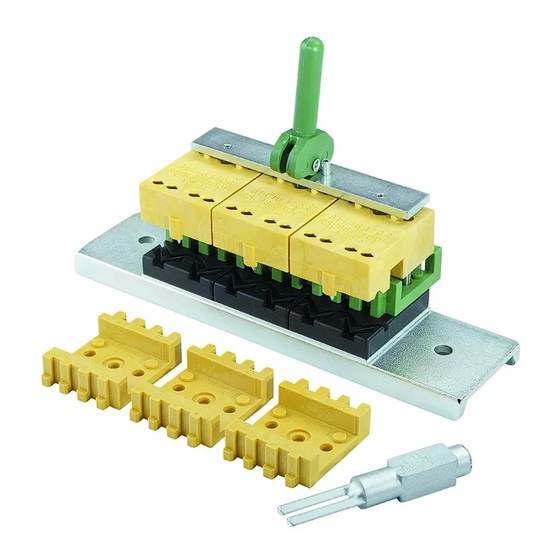
Page 5: Installation Tools
Alligator Staple ® Installation Tools Alligator RSC187 Installation Tool ® The RSC187 Installation Tool securely holds fasteners in proper alignment and guides staples as they are driven. Installs two staples simultaneously for fast and simple splicing. Also provides a solid anvil surface for initial staple clinching. -
Page 6: Installation Accessories
Alligator Staple ® Installation Accessories Staple Setting Plate (ST-28) Final set of the staples and proper compression of the fastener plate are necessary for long splice life. The heat- treated steel setting plate provides the required hardened surface to achieve a properly installed splice. The ST-28 also features countersunk bolt holes for mounting onto a work surface. -
Page 7: Identifying A Properly Installed Alligator Ready Set Splice
Identifying a Properly Installed Alligator Ready Set Splice ® ™ Staples should be completely driven through and properly set into pockets on bottom side of fastener plates. Incorrect Correct There should be a slight puckering of the belt at the front edge of the top plate. -
Page 8: Troubleshooting
‘Final Set’ procedure was performed on a surface other than a hardened steel plate. • A hardened steel plate, such as the Flexco ST-28 setting plate, should be used. Surfaces such as soft steel or wood will not allow staples to be fully set and/or can cause staple leg to deflect out of the pocket. -
Page 9: Tips
In the event of a misfired staple there may be the need to remove a single Staple fastener plate from the laced belt end. To do so: 1. Using the Flexco Belt Nippers, cut the back side of both loops on the fastener to be removed. -
Page 10: Alligator Lacing
Alligator Lacing Overview ® Advantages of the Alligator Lacing System: ® • Low profile • Hammer applied; Does not require special installation tools • Can be installed in the Clipper Roller Lacer and Pro Lacers ® ® with appropriate combs, if so desired. Radius Check Two Styles of Alligator Lacing: Conveyor Belt Lacing: Features a “radius check”... -
Page 11: Identifying A Properly Installed Alligator Lacing Splice
Identifying a Properly Installed Alligator Lacing Splice ® Lacing should be flush with belt surface. Points should slightly penetrate opposite side of belt. Loops of lacing should not be crushed and will easily accept the hinge pin. Troubleshooting Lacing Teeth Do Not Fully Penetrate Belt and Clinch Over Be sure to use a soft piece of wood under the fastener when first applying lacing. -
Page 12: Alligator
Alligator Rivet ® Baler Fastener Overview Advantages of Alligator Rivet Fastener System: ® • High strength splice • Superior abrasion resistance • Portable tool allows for on-site installation • Easy installation • Fasteners are available in pre-cut common baler belt widths ALLIGATOR RIVET SPECIFICATION CHART ®... -
Page 13: Identifying A Properly Installed Alligator Rivet Splice
Identifying a Properly Installed Alligator Rivet Splice ® (continued) Rivets should be fully set and curled on bottom side of splice. Loop area of fastener is oval in shape and easily accepts the hinge pin. Fasteners are inset 1/4" (6.4 mm) from each belt edge. Corners of trailing end of belt have been notched/chamfered. -
Page 14: Alligator Non-Metallic Splicing
Alligator Non-Metallic ® Splicing Overview Advantages of Alligator Non-Metallic Splices: ® • Non-metallic • Non-magnetic • Non-sparking • Quiet • Hinged splice; quicker installation on conveyor system. • Compatible with X ray machines, metal detectors, and food applications Two styles of Alligator Non-Metallic Fasteners: Alligator Spiral Lace: Low-profile, non-metallic splice that ®... -
Page 15: Troubleshooting
Troubleshooting Fasteners Are Loose Plastic rivets may not have been fully compressed during installation. Alligator Plastic Rivet Lube was not used during installation of the fasteners. • Using lube allows plastic rivets to melt at the proper speed and helps to control heat generated during the installation/melting process. - Page 16 2525 Wisconsin Avenue • Downers Grove, IL 60515-4200 • USA Tel: (630) 971-0150 • Fax: (630) 971-1180 • E-mail: info@flexco.com Visit www.flexco.com for other Flexco locations and products. ©2009 Alligator , Clipper and Roller Lacer are registered trademarks. 02-14. For Reorder: X1385 ®...
Need help?
Do you have a question about the Alligator Ready Set RSC187 and is the answer not in the manual?
Questions and answers