Table of Contents
Advertisement
Advertisement
Table of Contents

Related Manuals for Hanna Instruments HI83325


Summary of Contents for Hanna Instruments HI83325
- Page 1 HI83325 Nutrient Analysis Photometer...
- Page 2 If you need additional technical information, do not hesitate to e‑mail us at tech@hannainst.com or view our worldwide contact list at www.hannainst.com. All rights are reserved. Reproduction in whole or in part is prohibited without the written consent of the copyright owner, Hanna Instruments Inc., Woonsocket, Rhode Island, 02895, USA.
-
Page 3: Table Of Contents
1. PRELIMINARY EXAMINATION .................... 2. SAFETY MEASURES......................3. SPECIFICATIONS ......................4. DESCRIPTION........................4.1. GENERAL DESCRIPTION..................... 4.2. PRECISION AND ACCURACY..................4.3. FUNCTIONAL DESCRIPTION..................4.4. PRINCIPLE OF OPERATION..................4.5. OPTICAL SYSTEM...................... 5. GENERAL OPERATIONS..................... 5.1. POWER CONNECTION AND BATTERY MANAGEMENT............5.2. - Page 4 8. PROBE MODE........................8.1. pH CALIBRATION...................... 8.2. pH CALIBRATION MESSAGES..................8.3. pH MEASUREMENT....................8.4. pH MEASUREMENT MESSAGES / WARNINGS............... 8.5. pH GLP........................8.6. pH ELECTRODE CONDITIONING AND MAINTENANCE............. 9. METHOD PROCEDURES....................9.1. AMMONIA LOW RANGE....................9.2. AMMONIA MEDIUM RANGE..................9.3.
-
Page 5: Preliminary Examination
Remove the instrument and accessories from the packaging and examine it carefully to make sure that no damage has occurred during shipping. Notify your nearest Hanna Customer Service Center if damage is observed. Each HI83325 is supplied in carrying case with: • Sample Cuvette and Cap (4 pcs.) • 3 mL plastic pipette •... -
Page 6: Specifications
3. SPECIFICATIONS 3 x optical channels Measurement Channels 1 x digital electrode channel (pH measurement) Range 0.000 to 4.000 Abs Resolution 0.001 Abs Accuracy ±0.003 Abs (at 1.000 Abs) Light Source light emitting diode Bandpass Filter Bandwidth 8 nm Absorbance Bandpass Filter Wavelength Accuracy ±1.0 nm Light Detector silicon photocell... -
Page 7: Description
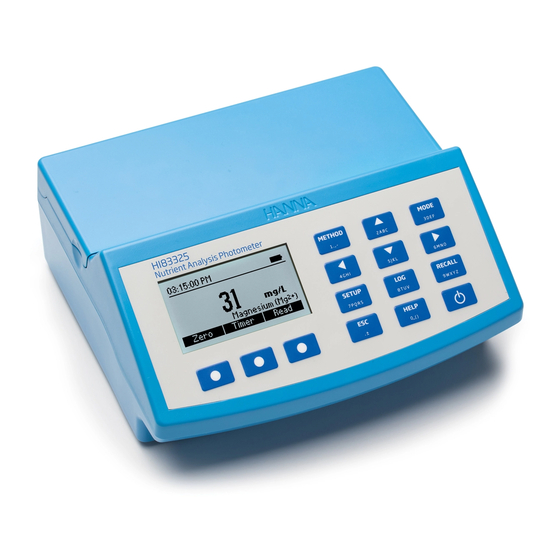
4. DESCRIPTION 4.1.GENERAL DESCRIPTION HI83325 multiparameter photometer is compact and versatile meter with two measurement modes: Absorbance and pH/ mV. Absorbance mode include CAL Check feature and 12 different methods that cover a wide variety of applications, making it ideal for both benchtop and portable operation. -
Page 8: Functional Description
4.3. FUNCTIONAL DESCRIPTION Splash‑proof keypad Liquid Crystal Display (LCD) Indexing mark Protective port covers Light‑blocking cover panel Cuvette holder ON/OFF power button 3.5 mm TRRS (jack) input for digital electrodes Standard USB host connector for data transfer to a USB flash drive 10) Micro‑USB device connector for power or PC interface... -
Page 9: Principle Of Operation
Keypad Description The keypad contains 12 direct keys and 3 functional keys with the following functions: Press the functional keys to perform the function displayed above them on the LCD. Press to access the list of photometer methods. Press to move up in a menu or a help screen, to increment a set value, or to access second level functions. -
Page 10: Optical System
4.5. OPTICAL SYSTEM Instrument Block Diagram The internal reference system (reference detector) of the HI83325 photometer compensates for any drifts due to power fluctuations or ambient temperature changes, providing a stable source of light for your blank (zero) measurement and sample measurement. -
Page 11: General Operations
5. GENERAL OPERATIONS 5.1. POWER CONNECTION AND BATTERY MANAGEMENT The meter can be powered from an AC/DC adapter (included) or from the built‑in rechargeable battery. The meter will perform an auto‑diagnostic test when it is first powered on. During this test, the HANNA logo will appear on the LCD. - Page 12 Temperature Unit (pH Only) Option: °C or °F Press the functional key to select the desired temperature unit. Backlight Values: 0 to 8 Press the Modify key to access the backlight intensity. Use the functional keys or the keys to increase or decrease the value.
- Page 13 Date Format Press the Modify key to change the Date Format. Use the keys to select the desired format. Press the Select key to confirm or ESC to return to the Setup menu without saving the new format. Decimal Separator Option: Comma ( , ) or Period ( .
-
Page 14: Using Hanna Digital Electrodes
Press the Select key to view model number, serial number and firmware version for the connected probe. Press ESC to return to the Setup menu. 5.3. USING HANNA DIGITAL ELECTRODES HI83325 can be used to perform direct pH measurements by connecting a HANNA digital ®... -
Page 15: Logging Data
5.5. LOGGING DATA The instrument features a data log function to help you keep track of all your analysis. The data log can hold 1000 individual measurements. Storing, viewing and deleting the data is possible using the LOG and RECALL keys. Storing data: You can store only a valid measurement. -
Page 16: Data Management
The following functions are available during Text Entry: • Accept: Press to accept the current displayed text. • Arrow: Press to delete the last character. • Clear: Press to delete all characters. Press to discard all changes and return to the previous screen. 5.7. -
Page 17: Contextual Help
Log data is exported as a single file containing all logged photometer and probe data. The file name is: “HI83325.csv”. The CSV file (Comma‑Separated Values) may be opened with a text editor or spreadsheet application. 5.8. CONTEXTUAL HELP HI83325 offers an interactive contextual help mode that assists the user at any time. - Page 18 PRESENT IN proteins, enzymes, chlorophyll, hormones, vitamins, DNA and RNA • is fundamental for plants in phase of growth • promotes lengthening of trunks and sprouts ACTION • increases the production of foliage • helps to absorb other nutrients (in particular phosphorus) •...
- Page 19 POTASSIUM Potassium (K) is essential in proteic synthesis. The problem of lack of potassium is quite frequent in calcareous soils. Potassium is absorbed as K tissues responsible for the growth of plants (primary and secondary PRESENT IN meristems), embryos and cell vacuole •...
-
Page 20: Preparing Nutrient Samples For Analysis
NUTRIENTS SOLUTIONS The nutrients requirements of the plant are determined by the type of plant, its age and the environmental conditions. The control of chemical composition of nutrients solutions given to the plants is an operation that allows a correct preparation of the fertilizer. In analyzing the solution it is typically necessary to perform a dilution, depending on the concentration of substances. - Page 21 Recommended Procedures/Dilutions According to Nutrient Concentration: Parameter Estimated Concentration Dilution Factor Method Selection Typical Usage Ammonia < 2.5 ppm NH ‑N No dilution Ammonia LR Irrigation Water 2.5 ‑ 9 ppm NH ‑N No dilution Ammonia MR Irrigation Water Recycled Nutrient Solution 9 ‑...
-
Page 22: Procedure For Dilution Factor: 5
6.3. PROCEDURE FOR DILUTION FACTOR: 5 Note: For a more accurate dilution, use laboratory-grade glass pipettes and volumetric flasks. • Use the graduate cylinder to measure exactly 20 mL of sample • Remove the cap and fill the Demineralizer Bottle with tap water. •... -
Page 23: Procedure For Dilution Factor: 10
• Pour the solution in the large 170 mL beaker, replace the cap and invert several times to mix. • If the solution contains some turbidity or color, follow the procedure in 6.6. REMOVING TURBIDITY AND COLOR. 6.4. PROCEDURE FOR DILUTION FACTOR: 10 Note: For a more accurate dilution, use laboratory-grade glass pipettes and volumetric flasks. - Page 24 • Remove the cap and fill the Demineralizer Bottle with tap water. • Replace the cap and shake gently for at least 2 minutes. • Open the upper part of the Demineralizer Bottle cap and squirt gently the demineralized water into the cylinder, up to the 100 mL mark.
-
Page 25: Procedure For Dilution Factor: 50
6.5. PROCEDURE FOR DILUTION FACTOR: 50 Note: For a more accurate dilution, use laboratory-grade glass pipettes and volumetric flasks. • Add 10 mL of sample to the graduated cylinder using the 5 mL syringe (twice). Note: To measure exactly 5 mL of sample with the syringe, push the plunger completely into the syringe and insert the tip into the sample. - Page 26 • Open the upper part of the Demineralizer Bottle cap and squirt gently the demineralized water into the cylinder, up to the 100 mL mark. • Pour the solution in the large 170 mL beaker, replace the cap and invert several times to mix. •...
-
Page 27: Removing Turbidity And Color
6.6. REMOVING TURBIDITY AND COLOR Turbidity and color in samples will adversely affect the nutrient analysis. This procedure removes turbidity and color. Note: Perform any necessary dilutions before attempting to remove turbidity or color. 1. If the sample is extremely turbid, pour the sample into the large 170‑mL beaker. Allow the sample to stand in the beaker until most of the solid particles have settled. -
Page 28: Photometer Mode
6. Filter the treated sample into an empty beaker. The sample is now ready. Note: Filter at least 40 mL of solution if all four methods will be tested. If the solution is still turbid or colored, treat it again with a packet of active carbon. After use, throw the filter disc away and wash the syringe and the filter assembly well. -
Page 29: Collecting And Measuring Samples And Reagents
7.2. COLLECTING AND MEASURING SAMPLES AND REAGENTS 7.2.1. PROPER USE OF SYRINGE (a) Push the plunger completely into the syringe and insert the tip into the solution. (b) Pull the plunger up until the lower edge of the seal is exactly on the mark for the desired volume. -
Page 30: Cuvette Preparation
7.3. CUVETTE PREPARATION Proper mixing is very important for reproducibility of the measurements. The proper mixing technique for each method is listed in the method procedure. (a) Invert the cuvette a couple of times or for a specified time: hold the cuvette in the vertical position. -
Page 31: Timers And Measurement Functions
Do not let the reacted sample stand too long after reagent is added. For best accuracy, respect the timings described in each specific method. It is possible to take multiple readings in a row, but it is recommended to take a new zero reading for each sample and to use the same cuvette for zeroing and measurement when possible. -
Page 32: Chemical Formula / Unit Conversions
® Standards. For accurate validation results, please perform tests at room temperature (18 to 25 °C; 64.5 to 77.0 °F). Validation of the HI83325 involves absorbance measurements of certified HANNA CAL Check ® Standards (see “Accessories”). The “CAL Check” screen guides the user through the measurement of each CAL Check Standard and applies the factory calibration corrections to each measurement. -
Page 33: Absorbance Measurements
4. Press ESC to return in Setup menu. 7.7. ABSORBANCE MEASUREMENTS Raw absorbance measurements may be performed on the HI83325 for personal or diagnostic purposes. For example, you may monitor the stability of a reagent blank by occasionally measuring its absorbance versus deionized water. -
Page 34: Probe Mode
8. PROBE MODE 8.1. pH CALIBRATION Press MODE to enter in pH/ mV measurement mode. Press Calibrate to access electrode calibration functions. Calibration Mode While in pH Calibration Mode, the display will show the current pH reading, the current temperature reading, the current selected buffer, and the buffer number (“Buffer: 1” for the 1st buffer, “Buffer: 2”... - Page 35 Preparation Pour small quantities of the buffer solutions into clean beakers. If possible, use plastic beakers to minimize any EMC interferences. For accurate calibration and to minimize cross‑contamination, use two beakers for each buffer solution: one for rinsing the electrode and one for calibration. If you are measuring in the acidic range, use pH 7.01 or 6.86 as the first buffer and pH 4.01 as the second buffer.
-
Page 36: Ph Calibration Messages
Wrong Temperature: The buffer temperature is too extreme for the selected buffer value. 8.3. pH MEASUREMENT HI83325 can be used to perform direct pH measurements by connecting a HANNA digital ® pH electrode with a 3.5 mm TRRS connector. To begin taking probe measurements, connect the electrode to the 3.5 mm port marked with EXT PROBE located at the rear of the meter. - Page 37 Press to switch to Photometer mode. Press to access the meter’s Setup menu. Press to log the current measurement. Press to review the meter’s log history. Press to view contextual help information. For high accuracy it is recommended to calibrate your electrode often. pH electrodes should be recalibrated at least once per week, but daily calibration is recommended.
-
Page 38: Ph Measurement Messages / Warnings
8.4. pH MEASUREMENT MESSAGES / WARNINGS No Probe: No probe is connected or the probe is broken. Connecting: The meter has detected a probe and is reading the probe configuration and calibration information. Incompatible Probe: The connected probe is not compatible with this device. Incompatible Calibration: The probe’s current calibration is not compatible with this meter. -
Page 39: Ph Glp
8.5. pH GLP Good Laboratory Practice (GLP) refers to a quality control function used to ensure uniformity and consistency of sensor calibrations and measurements. To view the GLP information, press the GLP key from the Probe Measurement screen. The pH GLP screen displays the following information about the last pH calibration: •... -
Page 40: Ph Electrode Conditioning And Maintenance
8.6. pH ELECTRODE CONDITIONING AND MAINTENANCE Remove the protective cap of the pH electrode. DO NOT BE ALARMED IF SALT DEPOSITS ARE PRESENT. This is normal with electrodes. They will disappear when rinsed with water. During transport, tiny bubbles of air may form inside the glass bulb affecting proper functioning of the electrode. - Page 41 Storage Procedure To minimize clogging and ensure a quick response time, the glass bulb and the junction should be kept moist and not allowed to dry out. Replace the solution in the protective cap with a few drops of HI70300 HI80300 Storage Solution or, in its absence, Filling Solution...
-
Page 42: Method Procedures
9. METHOD PROCEDURES 9.1. AMMONIA LOW RANGE SPECIFICATIONS Range 0.00 to 3.00 mg/L (as NH ‑N) Resolution 0.01 mg/L Accuracy ±0.04 mg/L ±4% of reading at 25 °C Light Source LED with narrow band interference filter @ 420 nm Method Adaptation of the ASTM Manual of Water and Environmental Technology, D1426 Nessler method. - Page 43 • Add 4 drops of HI93700A‑0 Ammonia Low Range Reagent A. Replace the cap and mix the solution. • Add 4 drops of HI93700B‑0 Ammonia Low Range Reagent B. Replace the cap and mix the solution. • Reinsert the cuvette into the instrument and close the lid. •...
- Page 44 • Diluted Samples: If the sample was diluted, multiply this result by the dilution factor to calculate the concentration of the original undiluted sample. For example, if the diluted sample yields a result of 2.74 mg/L after being diluted by a factor of 5, then the original sample concentration would be 2.74 x 5 = 13.7 mg/L.
-
Page 45: Ammonia Medium Range
9.2. AMMONIA MEDIUM RANGE SPECIFICATIONS Range 0.00 to 10.00 mg/L (as NH ‑N) Resolution 0.01 mg/L Accuracy ±0.05 mg/L ±5% of reading at 25 °C Light Source LED with narrow band interference filter @ 420 nm Method Adaptation of the ASTM Manual of Water and Environmental Technology, D1426, Nessler method. - Page 46 • Remove the cuvette. • Add 4 drops of HI93715A‑0 Ammonia Medium Range Reagent A. Replace the cap and mix the solution. • Add 4 drops of HI93715B‑0 Ammonia Medium Range Reagent B. Replace the cap and mix the solution. •...
- Page 47 • Diluted Samples: If the sample was diluted, multiply this result by the dilution factor to calculate the concentration of the original undiluted sample. For example, if the diluted sample yields a result of 2.78 mg/L after being diluted by a factor of 5, then the original sample concentration would be 2.78 x 5 = 13.9 mg/L.
-
Page 48: Ammonia High Range
9.3. AMMONIA HIGH RANGE SPECIFICATIONS Range 0.0 to 100.0 mg/L (as NH ‑N) Resolution 0.1 mg/L Accuracy ±0.5 mg/L ±5% of reading at 25 °C Light Source LED with narrow band interference filter @ 420 nm Method Adaptation of the ASTM Manual of Water and Environmental Technology, D1426, Nessler method. - Page 49 • Press the Zero key. The display will show “‑0.0‑” when the meter is zeroed and ready for measurement. • Remove the cuvette. • Add 4 drops of HI93733A‑0 Ammonia High Range Reagent A. Replace the cap and swirl the solution. •...
- Page 50 •Diluted Samples: If the sample was diluted, multiply this result by the dilution factor to calculate the concentration of the original undiluted sample. For example, if the diluted sample yields a result of 47.5 mg/L after being diluted by a factor of 5, then the original sample concentration would be 47.5 x 5 = 237.5 mg/L.
-
Page 51: Calcium
9.4. CALCIUM SPECIFICATIONS Range 0 to 400 mg/L (as Ca Resolution 1 mg/L Accuracy ±10 mg/L ±5% of reading at 25 °C Light Source LED with narrow band interference filter @ 466 nm Method Adaptation of the Oxalate method. REQUIRED REAGENTS Code Description Quantity... - Page 52 • Replace the cap and invert several times to mix. • Place the cuvette into the holder and close the lid. • Press the Zero key. The display will show “‑0.0‑” when the meter is zeroed and ready for measurement. •...
- Page 53 • After waiting 5 minutes, invert again the cuvette 10 times to mix (about 15 seconds). • Reinsert the cuvette into the instrument and close the lid. • Press Read to start the reading. The instrument displays the results in mg/L of calcium (Ca •...
-
Page 54: Magnesium
9.5. MAGNESIUM SPECIFICATIONS Range 0 to 150 mg/L (as Mg Resolution 1 mg/L Accuracy ±5 mg/L ±3% of reading at 25 °C Light Source LED with narrow band interference filter @ 466 nm Method Adaptation of the Calmagite method. REQUIRED REAGENTS Code Description Quantity... - Page 55 • Press the Zero key. The display will show “‑0.0‑” when the meter is zeroed and ready for measurement. 0.5 mL • Remove the cuvette. of sample • Add 0.5 mL of sample to the cuvette using the second 1 mL syringe. •...
- Page 56 • Diluted Samples: If the sample was diluted, multiply this result by the dilution factor to calculate the concentration of the original undiluted sample. For example, if the diluted sample yields a result of 47 mg/L after being diluted by a factor of 5, then the original sample concentration would be 47 x 5 = 235 mg/L.
-
Page 57: Nitrate
9.6. NITRATE SPECIFICATIONS Range 0.0 to 30.0 mg/L (as NO ‑ N) ‑ Resolution 0.1 mg/L Accuracy ±0.5 mg/L ±10% of reading at 25 °C Light Source LED with narrow band interference filter @ 525 nm Method Adaptation of the cadmium reduction method. REQUIRED REAGENTS Code Description... - Page 58 • Remove the cuvette and add one packet of HI93728‑0 Nitrate Reagent. • Replace the cap and shake vigorously up and down for exactly 10 seconds. Continue to mix by inverting the cuvette gently for 50 seconds, while taking care not to induce air bubbles. Powder will not completely dissolve.
- Page 59 • Diluted Samples: If the sample was diluted, multiply this result by the dilution factor to calculate the concentration of the original undiluted sample. For example, if the diluted sample yields a result of 2.1 mg/L after being diluted by a factor of 5, then the original sample concentration would be 2.1 x 5 = 10.5 mg/L.
-
Page 60: Phosphate High Range
9.7. PHOSPHATE HIGH RANGE SPECIFICATIONS Range 0.0 to 30.0 mg/L (as PO 3‑ 0.0 to 9.8 mg/L (as P) Resolution 0.1 mg/L Accuracy ±1.0 mg/L ±4% of reading at 25 °C Light Source LED with narrow band interference filter @ 525 nm Method Adaptation of the Standard Methods for the Examination of Water and Wastewater, 18th edition, Amino Acid method. - Page 61 • Add 10 drops of HI93717A‑0 Phosphate High Range Reagent A. • Add one packet of HI93717B‑0 Phosphate HR Reagent B to the cuvette. Replace the cap and shake gently until completely dissolved. • Reinsert the cuvette into the instrument and close the lid. •...
- Page 62 • Press or to access the second level functions. • Press the Chem Frm key to convert the result to mg/L of phosphorus (P) and phosphorus pentoxide (P • Press or to return to the measurement screen. INTERFERENCES Sulfide Chloride above 150000 mg/L...
-
Page 63: Potassium
9.8. POTASSIUM SPECIFICATIONS Range 0.0 to 20.0 mg/L (as K) Resolution 0.1 mg/L Accuracy ±3.0 mg/L ±7% of reading at 25 °C Light Source LED with narrow band interference filter @ 466 nm Method Adaptation of the Turbidimetric Tetraphenylborate method. REQUIRED REAGENTS Code Description... - Page 64 • Press the Zero key. The display will show “‑0.0‑” when the meter is zeroed and ready for measurement. • Add one packet of HI93750B‑0 Potassium Reagent B Replace the cap and shake gently for 1 minute. • Reinsert the cuvette into the instrument and close the lid. •...
- Page 65 • Press or to access the second level functions. •Press the Chem Frm key to convert the result to mg/L of potassium oxide (K •Press or to return to the measurement screen. INTERFERENCES Interferences may be caused by: Ammonium above 10 ppm Calcium above 10000 ppm as CaCO Chloride above 12000 ppm...
-
Page 66: Sulfate
9.9. SULFATE SPECIFICATIONS Range 0 to 150 mg/L (as SO 2‑ Resolution 1 mg/L Accuracy ±5 mg/L ±3% of reading at 25 °C Light Source LED with narrow band interference filter @ 466 nm Method Sulfate is precipitated with barium chloride crystals. REQUIRED REAGENTS Code Description... - Page 67 • Add one packet of HI93751‑0 Sulfate Reagent. • Replace the cap and invert gently for 1 minute (about 30 inversions). • Reinsert the cuvette into the instrument and close the lid. • Press Timer and the display will show the countdown prior to the measurement or, alternatively, wait for 5 minutes and press Read.
-
Page 68: Error Descriptions
10. ERROR DESCRIPTIONS The instrument shows clear warning messages when erroneous conditions appear and when measured values are outside the expected range. These messages are described below. No Light: The light source is not functioning properly. Light Leak: There is an excess amount of ambient light reaching the detector. -
Page 69: Standard Methods
11. STANDARD METHODS Description Range Method Ammonia LR 0.00 to 3.00 mg/L Nessler Ammonia MR 0.00 to 10.00 mg/L Nessler Ammonia HR 0.0 to 100.0 mg/L Nessler Calcium 0 to 400 mg/L Oxalate Magnesium 0 to 150 mg/L Calmagite Nitrate 0.0 to 30.0 mg/L Cadmium reduction Phosphate HR... -
Page 70: Ph Electrodes
Code Description HI937520‑03 150 magnesium tests HI937521‑01 50 calcium fresh water tests HI937521‑03 150 calcium fresh water tests 12.2 pH ELECTRODES Code Description HI10530 Triple ceramic, double junction, low temperature glass, refillable pH electrode with conical tip and temperature sensor HI10430 Triple ceramic, double junction, high temperature glass, refillable pH electrode with temperature sensor... -
Page 71: Ph Solutions
12.3 pH SOLUTIONS BUFFER SOLUTIONS Code Description HI70004P pH 4.01 Buffer Sachets, 20 mL (25 pcs.) HI70007P pH 7.01 Buffer Sachets, 20 mL (25 pcs.) HI70010P pH 10.01 Buffer Sachets, 20 mL (25 pcs.) HI7001L pH 1.68 Buffer Solution, 500 mL HI7004L pH 4.01 Buffer Solution, 500 mL HI7006L... -
Page 72: Other Accessories
ELECTRODE REFILL ELECTROLYTE SOLUTIONS HI7082 3.5M KCl Electrolyte, 4x30 mL, for double junction electrodes HI8082 3.5M KCl Electrolyte in FDA approved bottle, 4x30 mL, for double junction electrodes. 12.4. OTHER ACCESSORIES Code Description HI72083300 carrying case HI731318 cloth for wiping cuvettes (4 pcs.) HI731331 glass cuvettes (4 pcs.) HI731335N... -
Page 73: Abbreviations
Description HI75110/220U USB power adapter, USA plug HI76404A electrode holder HI83325‑11 CAL Check cuvette kit for HI83325 HI83300‑100 Sample preparation kit consisting of activated carbon for 50 tests, demineralizer bottle for 10 L of water, 100 mL graduated beaker with cap, 170 mL graduated beaker with cap, 3 mL pipette, 60 mL syringe, 5 mL syringe, graduated cylinder, spoon, funnel, filter paper (25 pcs.). -
Page 74: Recommendations For Users
Recommendations Before using this product make sure that they are entirely suitable for your specific application and for the environment in which they for Users are used. Operation of these instruments may cause unacceptable interferences to other electronic equipment. Take all necessary steps to correct such interferences. -
Page 75: Warranty
Returned Goods Authorization (RGA) number from the Technical Service department and then send it with shipping costs prepaid. When shipping any instrument, make sure it is properly packed for complete protection. Hanna Instruments reserves the right to modify the design, construction or appearance of its products without advance notice. - Page 76 World Headquarters Hanna Instruments Inc. Highland Industrial Park 584 Park East Drive Woonsocket, RI 02895 USA www.hannainst.com Local Office Hanna Instruments USA 270 George Washington Highway Smithfield, RI 02917 Phone: 800.426.6287 Fax: 401.765.7575 e‑mail: tech@hannainst.com MAN83325 01/17‑1 Printed in ROMANIA...
Need help?
Do you have a question about the HI83325 and is the answer not in the manual?
Questions and answers