
Related Manuals for Smanos W600


Summary of Contents for Smanos W600
- Page 1 W600 WiFi / LTE Smart Home U s e r M a n u a l Alarm System W6 0 0 W i F i / LTE Sm a r t Home Alarm Sy ste m U s e r M a n u a l...
- Page 2 Thank you for choosing our smanos W600 WiFi / LTE Smart Home Alarm System. Installing the W600 alarm system is easy and quick. Before using the product, we recommend reading the manual first. There are some parts of the installation which have to be done in the right order to complete the installation successfully.
-
Page 3: Table Of Contents
Sign Up/In and Add the Hub to Your Account ....................... 4 Add a Device ................................5-7 WiFi Connection ................................ 6-7 Cellular Connection ..............................7-9 Overview of W600 Alarm System ........................10-12 Smart Hub..................................10 Description of LCD Indicator Icon ........................11-12 Smart Hub Operation ............................13-16 Arming and Disarming the System by RFID Tag .................... -
Page 4: Things To Note Before Getting Started
-Android 5.0 or above SIM Card As W600 is a dual network system that utilizes both WiFi and cellular, when sensors are triggered, the system will notify users through app and SMS text and phone call. For the SMS and phone call function, a regular SIM card with credit would be needed. SIM... -
Page 5: How The Alarm System Works
How the Alarm System Works Arm the system ( App, RFID The smart hub enters Tags, Remotes, Hub) “Armed” mode. If a sensor is triggered Door sensor detects a PIR sensor detects an door/window opening unexpected motion The hub sounds at 93dB on-site. -
Page 6: In The Box
In the Box Smart Hub x 1 Pet-Immune PIR Motion Detector x 1 Door/Window Sensor x 2 Remote Control x 2 RFID Tag x 2 AC Adapter x 1 Desk Stand x 1 Wall Mount x 1 Quick Guide... -
Page 7: Connect The Smart Hub With App
Connect the Smart Hub with App 1. Download the “smanos One” App You can find “smanos One” in the App Store and Google Play Store or scan the QR codes below. Special Tips (For iPhone only) After installing the app, which will request permission to receive notifications from “smanos One”. -
Page 8: Add A Device
There are TWO ways to establish a connection between W600 hub and your smartphone – via WiFi or cellular. WiFi Connection Press the [+] button on the main page. Tap on [W600 Alarm], and then follow the configuration steps to set up your W600 Alarm with your home WiFi. Important: W600 does not support WiFi of 5GHz band, if dual-band (5GHz and 2.4GHz) router under the... - Page 9 1. Plug in the adaptor and switch the power from OFF to ON. Wait for about 20 seconds until the LCD screen starts to display time. 2. Input admin password (1234 by default) and press the tamper switch 3 times on the back of the hub continuously, and you will see “AP”...
-
Page 10: Cellular Connection
3. Press “Next” and you will be taken to your WiFi settings. Look for and select “W600 Alarm” hotspot to connect your mobile to the hub. When connected, return to your app. It is suggested to turn mobile data off from the phone during the configuration. - Page 11 2. Insert the SIM Card 3. Connect the hub with the provided AC adapter and turn the power switch of the hub from “OFF” to “ON”, the cellular icon on the LCD screen will stop flashing when the network is connected. * To connect hub to the appropriate network from the cellular provider, you might be required to complete the APN setting if the cellular icon keeps flashing slowly (once per second).
- Page 12 I don’t have WiFi If you don’t have home WiFi and cellular is used as the primary way for sending notifications, SMS and phone calls. Select [I don’t have WiFi] when pairing the hub. The app will require you to scan the UID code at the back side of the hub.
-
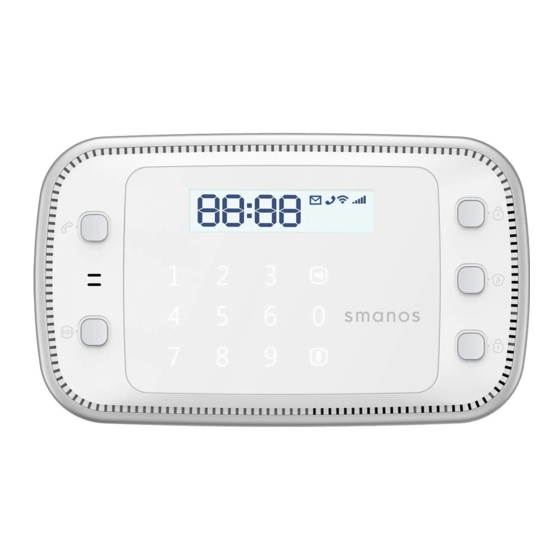
Page 13: Overview Of W600 Alarm System
Overview of W600 Alarm System Smart Hub Front View Home mode Call Disarm RFID tag reader Play recorded alarm message Touch keypad Touch keypad Play recorded alarm message Touch keypad Play recorded alarm message LCD screen Record alarm message Record alarm message... -
Page 14: Description Of Lcd Indicator Icon
Description of LCD Indicator Icon LCD Screen Meaning LCD screen lights up and Hub is in low battery condition blinks per second LCD screen shows “AP” The hub is in AP mode LCD screen shows “UP--” The hub is upgrading firmware LCD screen shows “AFI”... - Page 15 Cellular Indicator Blinking slowly: Searching for cellular network Blinking quickly: Cellular network is connected, but not connected to the server Solid: Cellular network is connected Cellular signal bar: Show the current signal strength of the cellular network connected Off: No SIM card inserted or cellular has been deactivated on the app WiFi Indicator Blinking slowly:...
-
Page 16: Smart Hub Operation
Smart Hub Operation Arming and Disarming the System by RFID Tag Hold the RFID tag close to the RFID reader and swipe once within 2 seconds, the system will be disarmed. Hold the RFID tag close to the RFID reader more than 2 seconds, the system will be armed. -
Page 17: Remote Control
Remote Control Arm Indicator Disarm Indicator Guide Point For The Blind Disarm Stay Metal Ring Button System Status All sensors will be armed. This mode is for use when the property is unoccupied. The system will be disarmed, no sensors will be triggered. You can also cancel or stop an alarm by disarming the system. -
Page 18: Pir Motion Detector
Door/ Window Sensors are set to ‘Normal Zone’ by default and are ideal for protecting entry/exit points such as front and back doors and windows. When the system is armed, and a sensor is triggered (Magnet separated from the Transmitter), a push notification including the sensor name will automatically be sent to the registered users and the hub internal siren will sound immediately. - Page 19 Flash once per 3 seconds Low battery indication, user will receive SMS notification if detector was connected with hub, please change the batteries immediately Tamper Switch The tamper switch (small black lever underneath the back bracket) will trigger an alarm notification if an unauthorized attempt is made to remove the detector from its installed location.
-
Page 20: App Operation
App Operation Device List Check device status after set up. If icon appears on the left of your device, it means the device is shared from your family or friends to you. If the device is grayed out, it means the device is OFFLINE and cannot be accessed. - Page 21 If you want to change your account name, just tap on the [ ] button and enter a new name. Account Password You can change your password on this page. Delete Account Follow the app instruction to delete your smanos account. My Shares...
- Page 22 By choosing “My Shares” on the menu and pressing the [+] add button, you can share access to your device(s) with other registered smanos accounts. Enter the email address and label (nick name) of the account you want to share with, and then select the device(s).
-
Page 23: App Control-Main Page
App Control - Main Page Arm, Disarm, Home Arm (Partial Arm) this system and trigger an emergency alarm can be done at this page. System Armed In this mode, all of the sensors are on alert; the hub’s internal siren will sound when a sensor is triggered. - Page 24 System in Home Mode Only the Motion Sensor from this kit will stop detecting (default setting; can be changed on the “Accessory Settings” on the app), which enables you and your family to move freely at home without accidentally triggering the motion sensor. The door/window sensors will still be on alert and protect the perimeter.
- Page 25 Zone. 24-Hour Zone Sensors will continuously monitor a particular area. For example, an extra smanos water sensor which has been set to 24-Hour Zone by default and installed near a washing machine would trigger alarm if water is detected, regardless of system status.
-
Page 26: Quick Switch Between Alarm And Cameras/Doorbells
Quick Switch between Alarm and Cameras/Doorbells If you purchased an alarm system & camera kit or any extra camera/doorbell that has been purchased along with it, you can directly viewing the camera on the hub’s main page. History Page Operations and triggered alerts can be reviewed from this History page, you can tap on [ ] to pick a specific day to facilitate your search of operations and alerts of interest. -
Page 27: App Settings
App Settings My Hub (1) Device Name This setting enables you to rename your W600 alarm system, and the new name will be shown on the device list. (2) Cellular Network This setting enables you to control your system through cellular data if a SIM card has been inserted: Turn the power switch OFF and then insert your own SIM card →... - Page 28 (3) APN Settings Input related APN, username, password and tap “OK” to save, the cellular icon on the hub will stop flashing after the connection is successful, and then you can operate the app via cellular. Note: The APN setting varies from country to country. Please consult the local provider on how to set the APN correctly.
- Page 29 (5) Speed-dial Number You can set speed-dial number here. When speed-dial number is set, you can long press the [ ] button 3 seconds on the hub, the system will dial the preset speed-dial number immediately. (6) Keyboard Press Tone Swap to enable keyboard press tone.
- Page 30 (8) Interference Detection The W600 hub has a feature of interference detection. If this feature is enabled, an alarm will be triggered if the radio channel is jammed continuously and the built-in siren will sound rapid beeps as a pre-alarm warning 10 seconds before a full alarm occurs.
-
Page 31: Notifications
Notifications (1) Enable Push Alert Tone Note: Because of the android system limitations, this feature won’t be available for Android 8.0 or above smartphone users. (2) Enable Online/Offline Notifications (3) Enable Status Change Notifications When the status of the system is changed, for example, you set it from Arm Mode to Disarm Mode, then you will receive app push notification. - Page 32 Keypad Commands Phone Button Function Disarm Two-way talk Turn off siren Turn on siren Listen in Hang up Note: App alert notifications will be sent firstly, and then SMS and phone calls will follow immediately. Number for receiving non-alarm notifications The stored phone number will receive the non-alarm SMS messages regarding: 1.
-
Page 33: Wireless Siren Arm/Disarm Beep(S)
Wireless Siren Arm/Disarm Beep(s) (If Purchase Separately) smanos wireless siren will beep once or twice when system is armed or partial armed (home armed). This setting enables you to turn on/off this prompt tone. This function is switched off by default. -
Page 34: Timed Arm/Disarm
Timed Arm/Disarm The system can be programmed to automatically arm and disarm the hub at predefined times by following the steps below: (1) Slide the switch to the "ON" position to activate the setting. (2) Choose any status you want the system to become (Arm/Disarm/Home Arm). (3) Choose the activate time of the status. -
Page 35: Time Settings
Time Settings (1) Synchronize Time This setting enables you to synchronize device time to your mobile, to make sure the time shown on the history and the time on push notifications are correct. (2) Date Format This setting enables you to change the format of the date shown on your app. Language This setting enables you to change the language of the SMS notifications. -
Page 36: More
More (1) Network Configuration With network configuration, you can check current network your hub is connecting and modify your WiFi when there’s stronger one without rebuilding a WiFi connection, so the hub will work more smoothly. Or you can choose reconfiguration directly to reconnect your hub and WiFi network. (2) Test Mode With test mode, you can check the range between accessories and your hub without triggering any alarm, and prevent tamper switch alarm triggered while installing the... -
Page 37: Accessory Settings
Accessory Settings Add, rename and change the zone mode of each sensor in this setting page. And if you want to delete the accessory, just press and slide the accessory to the left and then delete it. Zone Mode Tap on the zone mode icon next to the name of the sensor. Normal Zone Sensors set to Normal Zone are armed when the system is in Arm Mode (Full Arm) or Home Mode (Partial Arm). -
Page 38: Sos Function Of Remote Control
Home Zone Sensors set to Home Zone are only armed when the system is in Arm Mode (Full Arm). If Home Mode (Partial Arm) is used, these sensors are not armed and will not activate the alarm on trigger. We recommend setting PIR Motion Detectors (if purchase separately) to Home Zone because they should be installed inside the house. -
Page 39: Add New Accessories
Add New Accessories Tap on [+] add button at the right side of the detector/control on the accessory setting page, and then trigger the accessory. ≥2cm Press any button on the remote control ≥2cm Separate the transmitter from the ≥2cm magnet ≥2cm Place the PIR motion detector in a... -
Page 40: Deleting Accessories
Deleting Accessories Slide from right to left to delete an accessory. Installation Smart Hub For the best signal, we recommend that you place the hub in an open, centrally located area. Avoid placing the hub on the ground, a load-bearing wall or beside electrical appliances. -
Page 41: Door/Window Sensor
Door/Window Sensor Test your sensors before installation Step 1: Choose a suitable location The sensor can be installed on doors, windows and other objects which can be opened and closed. If you are installing the sensor on a metal door you may need to install a non-metallic spacer under the transmitter and magnet. -
Page 42: Restoring To Factory Settings
Step 2: Mount the detector on a wall by installing the wall mount with the included screws and attach the detector. Step 3: To test the detector press the test button on the back. It will enter and remain in testing mode (detect once every 10 seconds) for 3 minutes. Walk into the view of the detector and look for a red light. -
Page 43: Specifications
Specification Smart Hub Power Supply 12V DC 500 mA FDD-LTE B1/B3/B5/B7/B8/B20 (EU), LTE Frequency B1/B3/B5/B7/B28 (AU) Standby Current <365 mA Alarm Current <715 mA Transmitting Distance <80 m(open area/no interface) Back-up Battery Lithium battery 3,7V 2200 mA 18650 (1x) Built-in Siren 93dB Maximum Wireless Accessories 10 x Remote control, 50 x Sensor... -
Page 44: Md9100 Pir Motion Detector
MD9100 PIR Motion Detector Power Supply DC 3 V (AA 1.5V LR6 battery x 2 pcs) Static Current <50 μA Alarm Current <9.5 mA Detection Scope 9 m/110° Pet Immunity <20 kgs Transmitting Distance <80 m (open area/ no interference) Radio Frequency 868MHz or 915MHz *Europe: 868MHz, Australia: 915MHz...
Need help?
Do you have a question about the W600 and is the answer not in the manual?
Questions and answers