
Subscribe to Our Youtube Channel
Related Manuals for REMKO MXD202


Summary of Contents for REMKO MXD202
- Page 1 Assembly and operating instructions REMKO MXD 202, MXD 262, MXD 352, MXD 522 Ceiling cassette for inverter multi-split designed outdoor units Read the instructions prior to performing any task! 0047-2013-05 Edition 1, en_GB...
- Page 2 Read these operating instructions carefully before commis- sioning / using this device! These instructions are an integral part of the system and must always be kept near or on the device. Subject to modifications; No liability accepted for errors or mis- prints! Installation and operating instructions (translation of the orig- inal)
-
Page 3: Table Of Contents
Table of contents Safety and usage instructions......................4 1.1 General safety notes........................4 1.2 Identification of notes........................4 1.3 Personnel qualifications........................4 1.4 Dangers of failure to observe the safety notes................4 1.5 Safety-conscious working....................... 4 1.6 Safety notes for the operator......................5 1.7 Safety notes for installation, maintenance and inspection.............. -
Page 4: Safety And Usage Instructions
REMKO MXD Safety and CAUTION! usage instructions This combination of symbol and signal word 1.1 General safety notes warns of a potentially hazardous situation, which if not avoided may cause injury or mate- Carefully read the operating manual before com- rial and environmental damage. -
Page 5: Safety Notes For The Operator
"certificate of warranty" to conditions stipulated in this manual and comply REMKO GmbH & Co. KG at the time when the with all applicable regional regulations. units are purchased and commissioned. -
Page 6: Transport And Packaging
REMKO MXD 1.11 Transport and packaging The devices are supplied in a sturdy shipping con- tainer. Please check the equipment immediately upon delivery and note any damage or missing parts on the delivery and inform the shipper and your contractual partner. For later complaints can not be guaranteed. -
Page 7: Technical Data
Technical data 2.1 Technical data Series MXD 202 MXD 262 MXD 352 MXD 522 Ceiling cassette for inverter multi-split designed outdoor Operating mode units for cooling and heating 2,05 2,64 3,51 5,27 Nominal cooling output 2,34 3,22 3,81 6,00 Nominal heating output Operating range (room volume), approx. -
Page 8: Unit Dimensions
REMKO MXD Series MXD 202 MXD 262 MXD 352 MXD 522 Dimensions ceiling cassette Length Width Depth Dimensions cover Length Width Depth Weight 15,0 16,0 17,0 18,0 Weight cover Serial number 1324... 1325... 1326... 1327... Computerised part no. 1623252 1623257... -
Page 9: Design And Function
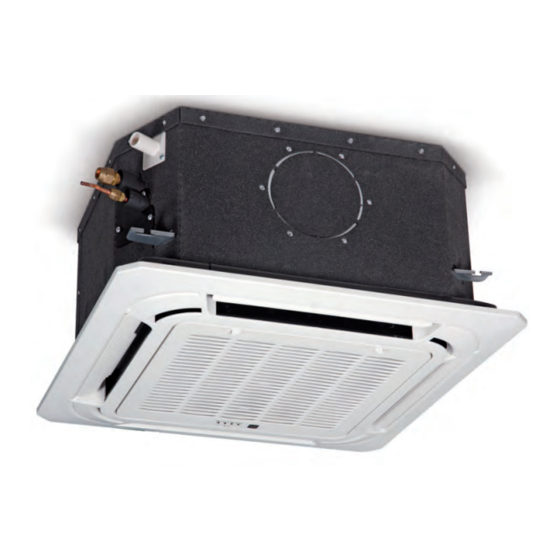
The indoor unit consists of a fin vaporiser, vapor- Outdoor area iser fan, controller and condensation pan. Indoor area The indoor unit can be combined with REMKO out- 1 a,b: Indoor units door units of series MVT 601DC, 901DC und Outdoor unit 1051DC with sufficient combinations. -
Page 10: Combinations
REMKO MXD 3.2 Combinations Combina- tion Indoor units The indoor units MXD 202-522 can be combined with MVT 601DC, 901DC und 1051DC series out- door units. The following combinations are pos- sible. Three indoor units Outdoor unit MVT 601 DC... - Page 11 Outdoor unit MVT 1051 DC (Fortsetzung) Combina- tion Combina- tion Three indoor units Four indoor units llll llll llll...
-
Page 12: Operation
REMKO MXD Operation The indoor unit is easily operated using the standard infrared remote control. The indoor unit beeps to acknowledge the correct transmission of data. If it is not possible to program the indoor unit using the remote control, it can also be manually operated. - Page 13 Display on the indoor unit The lit LED indicators show the settings: LED OPERATION green = unit is on LED TIMER yellow = timer is programmed LED DEF/FAN red = defrosting active / air circulation mode LED ALARM red = presence of a fault Fig.
- Page 14 REMKO MXD 3. Dehumidification mode Key „TIMER ON" In this mode, the room is dehumidified, thereby the This button initiates the automatic switch-on time room temperature significantly lowered. Influencing for the unit. Each time the key is pressed, the auto-...
- Page 15 Remote control display Remote control on/off The remote control's on/off function is shown at the lower right of the remote control by a "circular symbol". Fig. 7: Remote control display Automatic mode Cooling mode Dehumidifying mode Heating mode Air circulation mode Indicator signal transmission Display for temperature/timer Timer activated/deactivated...
- Page 16 REMKO MXD " " and " "-keys "MODE" key Use the MODE key to select between individual Using the key, the target temperature can be operating modes. adjusted up or down by 1°C. The temperature range lies between 17°C and 30°C A total of 5 modes are available: 1.
- Page 17 "Automatic" mode „Dehumidification“ mode In automatic mode, the controller autonomously It is recommended that the target temperature be selects between heating, circulation or cooling set to 24°C in dehumidifying mode. Due to the low mode based on the room temperature Tr and the temperature of the refrigerant, the dew point of the selected target value Ts.
- Page 18 REMKO MXD „Heating“ mode „FAN“ key In the heating mode, you can heat the room in Function spring or fall. The selected room temperature is set 1. Automatic using the " " and " " keys in 1 °C increments. If the room temperature is 1 °C below the selected...
- Page 19 „Follow-Me“ function „SLEEP“ key This function allows the transfer the measurement A programming function is activated using this key, of the room temperature from the indoor unit to the which increases the target temperature in cooling remote control. Measuring the temperature at the mode by 1°C after one hour and by 2°C after 2 remote control is then transmitted at intervals to hours.
- Page 20 REMKO MXD „TIMER ON“ key „TIMER OFF" key This key allows the unit is switched off in an This key allows the unit is switched on in an adjustable interval of 30 minutes (0.5 h) to switch adjustable interval of 30 minutes (0.5 h) to switch on the unit.
- Page 21 „TURBO/FP“ key „RESET“ key The maximum fan speed and the compressor is With this recessed key the remote control can be activated by pressing the "TURBO/FP" key. reset. TURBO SELF CLEAN RESET Fig. 21: „TURBO/FP“ key Fig. 23: „RESET“ key „LOCK“...
-
Page 22: Installation Instructions For Qualified Personnel
REMKO MXD Installation instructions Selection of installation location for qualified personnel The indoor unit is designed for horizontal mounting in suspended ceilings with Euroraster dimensions. It can also be installed in other types of suspended Important notes prior to installation ceilings with different dimensions. -
Page 23: Installation
Installation NOTICE! Installation should only be performed by authorised specialists. Unit installation The unit is mounted on four threaded rods with the cover face down. Take into account the ceiling grid and any other installations. Use the dimensions of the ceiling cassette to mark the fixing points for the threaded rods on structural parts approved to support the static load, and above the suspended ceiling. - Page 24 REMKO MXD Connecting the refrigerant lines Bby customer on-site connecting the refrigerant lines are at a corner of the unit within the false ceiling. It may be necessary to fit a reducing or extending adapter to the indoor units. These fittings are included with the indoor unit as an accessory kit.
- Page 25 There must be an opening created between the two rooms that allows the air to circulate between them. A maximum pipe length of 7 m may not be exceeded (Fig. 34). To ensure that air is transported to the adja- cent room, 1 or 2 of the 4 air outlets are to be sealed on the indoor unit.
- Page 26 REMKO MXD Fig. 35: Fresh air connection 1: Fresh air inlet A: Outdoor B: Indoor The quantity of fresh air may not exceed 10% of the nominal circulating air volume; otherwise it is possible that the unit will not work properly.
-
Page 27: Condensate Connection And Safe Drainage
Condensate connection NOTICE! and safe drainage The maximum capacity of the condensate The condensate tray should have an incline of pump is 500 mm WS. External influences, such min. 2%. This is the responsibility of the cus- as air-side back pressure, contamination, or tomer. -
Page 28: Electrical Wiring
REMKO MXD Electrical wiring 8.1 General information 8.2 Unit connection A protected mains supply cable is to be connected Make the connection as follows: to the outdoor unit and four-wire control line is to Open the air inlet grill. be connected to the indoor unit respectively and protect accordingly. - Page 29 Fig. 40: Unit connection 1: Entrance power supply 2: Dismantle the cover of the switch box 3: Connection control line from the outdoor unit...
-
Page 30: Electrical Connection Diagram
REMKO MXD 8.3 Electrical connection diagram Connection MVT 601 DC-1051 DC L(A) N(A) S(A) L(B) N(B) S(B) 230V/1~/50 Hz L(C) N(C) S(C) L(D) N(D) S(D) Fig. 41: Electrical connection diagram Outdoor unit MVT 601 DC-1051 DC Power supply Indoor units MXD 202-522... -
Page 31: Choice Of Unit
8.4 Choice of unit Fig. 42: Choice of unit with DIP-switch 1: DIP-switch 1 (SW6) 2: DIP-switch 2 (SW7) DIP-switch 1 (SW6) DIP-switch 2 (SW7) Choice of temperature Choice of unit Unit MXD 202 MXD 262 MXD 352 EEPROM-dependend MXD 522... -
Page 32: Electrical Circuit Diagram
REMKO MXD 8.5 Electrical circuit diagram MXD 202-352 202302141057 CON-debug CE-KFR20Q4/BP3TN1Y(hb)-A.D.11.NP2-1 CN12 HEAT CN5 WATER CN6 T1 T2 CN14 SWING CN10 CN15 POWER P4 NEWFAN L P1 N P5 NEWFAN N CN13 FUSE1 CN33 CN23 PUMP T5A/250VAC ALARM ON/OFF Fig. 43: Electrical circuit diagram... - Page 33 MXD 522 202302141057 CON-debug CE-KFR20Q4/BP3TN1Y(hb)-A.D.11.NP2-1 CN12 HEAT CN5 WATER CN6 T1 T2 CN14 SWING CN10 POWER P4 NEWFAN L P5 NEWFAN N CN13 CN4 H FUSE1 CN33 CN23 PUMP T5A/250VAC ALARM ON/OFF Fig. 44: Electrical circuit diagram Power supply control board External start/stop contact Swing motor DIP-switch...
-
Page 34: Commissioning
REMKO MXD Commissioning Functional test for heating mode Switch the supply voltage on. Use the remote control to switch on the unit NOTICE! and select the heating mode, maximum fan speed and highest nominal temperature. Commissioning should only be performed by... -
Page 35: Shut-Down
REMKO GmbH & Co. KG or your contractual partner will be pleased to provide a list of certified firms near you. -
Page 36: Troubleshooting And Customer Service
REMKO MXD Troubleshooting and customer service The equipment and components are manufactured using state-of-the-art production methods and tested sev- eral times to verify their correct function. If malfunctions should occur, please check the functions as detailed in the list below. For installations with an indoor unit and outdoor unit, refer to the chapter "Troubleshooting and customer service"... - Page 37 Fault Possible cause Checks Remedy Windows and doors Have there been any Close windows and open. Heating/cooling structural / usage-related doors / install additional loads increased changes? units Neither cooling nor Does the cooling symbol Correct the settings for heating mode has been appear on the display? the unit Fins on outdoor compo-...
- Page 38 REMKO MXD Fault indication by flashing code OPERA- DEF/ OU Dis- TIMER ALARM Cause Required action TION play (orange) (red) (green) (red) Normal operation, no faults: heating mode Normal operation, no faults: cooling-, recircu- lating air or automatic mode Normal operation, no...
-
Page 39: Care And Maintenance
Care and Maintenance maintenance We recommend a maintenance contract with annual maintenance interval with an appro- priate specialist company. Regular care and observation of some basic points will ensure trouble-free operation and a long service life. This enables you to ensure the operational reli- DANGER! ability of the plant at all times! Prior to performing any work, ensure the equip-... - Page 40 REMKO MXD Air filter for indoor unit Clean the air filter at intervals of no more than two weeks. Reduce this interval if the air is especially dirty. Cleaning the filter Disconnect the supply voltage to the equip- ment. Open and fold down the air inlet guard on the cover.
-
Page 41: Exploded View Of The Unit And Spare Parts List
Exploded view of the unit and spare parts list 13.1 Exploded view Fig. 48: Exploded view MXD 202-522 We reserve the right to modify the dimensions and structural design as part of the ongoing technical-devel- opment process. -
Page 42: Spare Parts List
REMKO MXD 13.2 Spare parts list No. Designation MXD 202 MXD 262 MXD 352 MXD 522 From series: 1324... 1325... 1326... 1327... Condensation tray 1111053 1111053 1111053 1111053 Vaporiser 1111076 1111077 1111078 1112509 Fan wheel 1111056 1111056 1111056 1111056 Vaporiser fan motor... -
Page 43: Index
Index Intended use............5 Adjacent room and fresh air connection.... 24 Adjacent room connection......24, 25 Keys on the remote control........ 13 Cable remote control.......... 21 Maintenance............39 Care and maintenance........39 Malfunctions Choice of temperature........31 Checks............36 Choice of unit............. 31 Possible cause.......... - Page 44 REMKO MXD...
- Page 46 REMKO MXD...
- Page 48 SFlb Customer Service Our equipment operates precisely and reliably. However, in the event of a fault, REMKO customer service is quickly at the scene. Our comprehensive network of experienced dealers always guarantees quick and REMKO GmbH & Co. KG reliable service.
Need help?
Do you have a question about the MXD202 and is the answer not in the manual?
Questions and answers