3Disc Heron IOS Quick Start Manual
Hide thumbs
Also See for Heron IOS:
- User manual (132 pages) ,
- User manual (72 pages) ,
- User manual (42 pages)
Table of Contents
Advertisement
Quick Start Guide
Tip
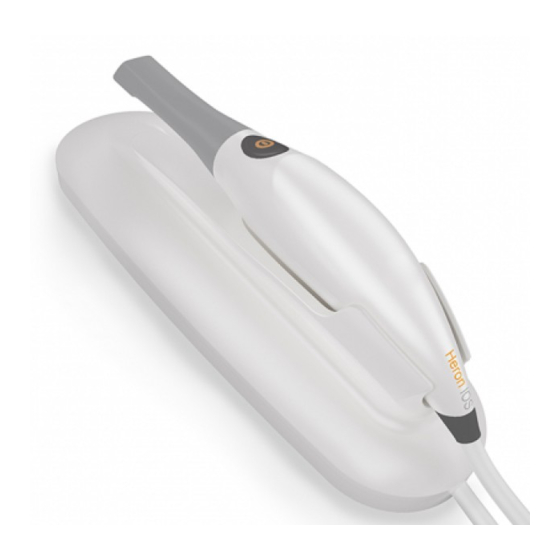
Scan Button
Handpiece
Docking Station
Contents
Installation Guide: ............................................................................................ 1
Attaching, Detaching & Rotating the Tip: ........................................................ 2
Patient Environment: ....................................................................................... 2
Tip Cleaning & Sterilization: ............................................................................. 3
Scanning Step 1: Creating a Case .................................................................... 5
Scanning Step 2: Scanning Preparation .......................................................... 5
Scanning Step 3: Basic Scanning Procedure ................................................... 6
Scanning Step 4: Finalization (A.T.R.S) ............................................................ 7
Scanning Step 5: Exporting Files with Dentalshare & STL .............................. 7
Scanning Strategy: ........................................................................................... 8
Bite Alignment Procedure: ............................................................................. 10
Packing List: .................................................................................................... 11
Contact: ........................................................................................................... 11
IOS-FPM-71-002 Rev. 3, Oct. 2018
Advertisement
Table of Contents

Related Manuals for 3Disc Heron IOS


Summary of Contents for 3Disc Heron IOS
-
Page 1: Table Of Contents
Quick Start Guide Scan Button Handpiece Docking Station Contents Installation Guide: .................... 1 Attaching, Detaching & Rotating the Tip: ............2 Patient Environment: ..................2 Tip Cleaning & Sterilization: ................3 Scanning Step 1: Creating a Case ..............5 Scanning Step 2: Scanning Preparation ............5 Scanning Step 3: Basic Scanning Procedure ........... -
Page 2: Installation Guide
Once the system has been carefully unpacked, install the system according to the following steps: Step 1: Place the docking station on a flat, stable surface and place the Heron IOS hand-piece securely in its docking station Step 2: Connect the AC/DC power adapter cable to the docking station; the connector socket is located underneath the docking station Step 3: Connect the provided USB 3.0 cable to the docking station;... -
Page 3: Attaching, Detaching & Rotating The Tip
Depress bottom button (1) and rotate tip at 90° increments (2). Tip should be locked into position prior to scanning. Patient Environment: 1. Heron IOS System 6. AC/DC Power Adapter 2. USB 3.0 Connector 7. Environment represented 3. -
Page 4: Tip Cleaning & Sterilization
Tip Cleaning & Sterilization: The included tips have not been sterilized and must be sterilized prior to use. The tip of the Heron IOS is inserted into the patient’s mouth during operation. To prevent cross-contamination between patients the tip should be cleaned and sterilized according to the following procedure. - Page 5 Step 1: Insert and seal the tip into a sterilization pouch Step 2: Sterilize the wrapped tip in a steam autoclave at a temperature of 132°C (270°F) and 210kPa (30.46 psi) for 6 minutes 132°C (270°F) 210kPa (30.46psi) 6 Minutes...
-
Page 6: Scanning Step 1: Creating A Case
Scanning Step 1: Creating a Case 1. Launch QuantorClinic software 2. In the Project window select New (A) 3. In the Name window enter patient name (B) 4. In the Job Definition window select the tooth/teeth to be worked on (C) 5. -
Page 7: Scanning Step 3: Basic Scanning Procedure
4. Continue scanning by moving the scanner slowly over and around the area of interest. The Heron IOS can scan at a range of 0 to 12mm, however, better scans are obtained at a closer range, and it is okay if the tip touches the teeth. -
Page 8: Scanning Step 4: Finalization (A.t.r.s)
7. The scan is saved automatically at each step in the workflow. 8. To restart the scan, press the reset button. This will delete the current scan and allow one to start a new scan. 9. After a scan step is complete you will see a green check mark in the workflow at the bottom of the screen beneath the appropriate icon. -
Page 9: Scanning Strategy
Scanning Strategy: The most important part of acquiring a good scan is to be slow and methodical. Quick, jerky handpiece movements will result in the target being outside of the supported field of view and/or in the loss of target tracking; both issues will be indicated by a red rectangle on the 3D model. - Page 10 3. After you complete the occlusal scan drop down to the lingual surface and scan all the lingual surfaces of all the teeth 4. End your scan path by scanning the buccal surface of the posterior teeth and the facial surface of the anterior teeth to complete your scan strategy. 5.
-
Page 11: Bite Alignment Procedure
Bite Alignment Procedure: The bite alignment procedure will be necessary to align the upper and lower jaws. This process will only be allowed if lower and upper jaw scans have been previously conducted. Once the Bite button is pressed, it may take a few seconds to load the previous scans. -
Page 12: Packing List
Packing List: Name Part Number Heron IOS System (Includes 3 Tips) IOS-FP-71-001 USB 3.0 Cable IOS-CP-00-043 AC/DC Power Adapter IOS-CP-00-088 Software Licensing Dongle, QuantorClinic IOS-CE-71-013 Software Licensing Dongle, Exocad IOS-CE-71-016 Quick Start Guide IOS-FPM-71-002 Save the Box: It is highly recommended that you store the box in a safe place and do not throw it away.
Need help?
Do you have a question about the Heron IOS and is the answer not in the manual?
Questions and answers