
Related Manuals for Defibtech Lifeline ARM


Summary of Contents for Defibtech Lifeline ARM
- Page 1 The Trainer’s Guide: A Comprehensive Training Course Reference RAC-A1515EN-BA ELECTRONIC DISTRIBUTION -300 -350 Defibtech Lifeline ARM Automated Chest Compression System -400...
- Page 3 Notices Defibtech, LLC, shall not be liable for errors contained herein or for incidental or consequential damages in connection with the furnishing, performance, or use of this material. Information in this document is subject to change without notice. Names and data used in the examples are fictitious unless otherwise noted.
- Page 4 RAC-A1515EN-BA...
-
Page 5: Table Of Contents
Troubleshooting During Operation of the Lifeline ARM . . . . . . . . . . . . . . . . . - Page 6 RAC-A1515EN-BA...
-
Page 7: Before Training Starts
Lifeline ARM. Getting Ready In addition to the basics of how to operate and maintain the Lifeline ARM, this guide includes information on how to successfully conduct your training sessions. Each training section begins with specific information... -
Page 8: Know Your Group
• Adequate power and outlets for video / PowerPoint presentations (if used) and to charge the Battery Pack of the Lifeline ARM if needed Prepare Devices, Accessories, and Training Materials Print and refer to this checklist before each session to be sure you have all materials fully prepared and ready for use. -
Page 9: Operator Training Requirements
(pages 37,39,41 and 43) Operator Training Requirements The Lifeline ARM is intended for use by qualified medical personnel certified to administer CPR. To safely and effectively operate the Lifeline ARM, it is the responsibility of the operator to obtain the following training: •... - Page 10 RAC-A1515EN-BA...
-
Page 11: Group Training Sessions
At the end of this session, your students should know: Benefits of automated chest compressions during CPR (page 12) ✓ When — and when NOT — to use the Lifeline ARM (page 13) ✓ Side effects of CPR (page 13) ✓... -
Page 12: Introducing The Lifeline Arm
The recommendation for chest compression depth for adults is at least 2 inches (5 cm). Indications for Use Before and during use of the Lifeline ARM, you should always follow the accepted guidelines and your local protocol for CPR. Once you have confirmed that the patient is unconscious and not breathing, begin manual CPR and get ready to deploy the Lifeline ARM as appropriate. - Page 13 The above side effects, as well as bruising and soreness of the chest, may commonly occur after the use of the Lifeline ARM. (Black CJ, Busuttil A, Robertson C . Chest wall injuries following cardiopulmonary resuscitation . Resuscitation . 2004 Dec;63(3):339-43 .)
-
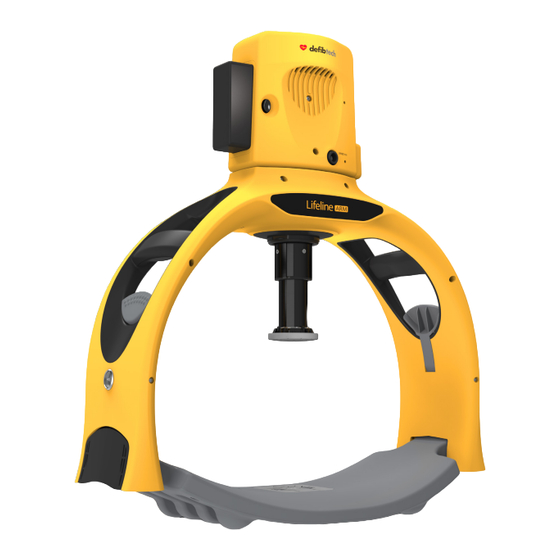
Page 14: Getting Familiar With The Lifeline Arm
Getting Familiar with the Lifeline ARM The Lifeline ARM is designed to be stored in a Carrying Case with a small number of easy- to-assemble components; it can also be stored in a fully assembled and ready-to-use state. When you receive a Lifeline ARM device, identify each component and ensure that the package is complete before use. - Page 15 The Backboard The lightweight Backboard is the base for the Lifeline ARM system. It is placed under the patient and has attachment points on either side to which the Frame latches. The Backboard should be positioned as shown on the positioning label, with the center in line with the patient’s nipple line.
- Page 16 The Compression Module The removable Compression Module contains all the active components of the Lifeline ARM system, including the User Control Panel, Battery Pack, and Compression Piston. It also houses a software-controlled motor that controls both the rate and depth of compressions.
- Page 17 The User Control Panel Trainer Tip: Point out each of the buttons on the User Control Panel as you discuss them. The simplified User Control Panel is intuitive and easy to use. It requires just two steps to initiate mechanical CPR: Press the Up/Down button to adjust the height of the Compression Piston relative to the patient’s chest Press one of two softkeys to select a rescue protocol:...
- Page 18 Here is an overview of the functions on the User Control Panel: On/Off Button — Press for at least 1 second to turn the Lifeline ARM on or off Up/Down Buttons — Use to position the Piston relative to the patient’s chest —...
- Page 19 The Battery Pack The Lifeline ARM is powered by a replaceable Battery Pack that slides into either side of the Compression Module. The Battery Pack must always be installed in the unit to operate the device, even when powered by the AC Adapter.
- Page 20 Compression Module. The Stabilization Strap and Other Accessories The Stabilization Strap holds the Lifeline ARM device securely in the correct position in relation to the patient. It snaps into the Stabilization Strap connectors located on the Frame.
- Page 21 Compression Module. Before using the Lifeline ARM, always check to be sure it is completely assembled and that all components are present and functional. Check the Battery Pack to be sure it is fully charged.
-
Page 22: Learning The Deployment Sequence
This section of the course covers the core elements of how to deploy the Lifeline ARM in a real-time emergency setting. The goal of the rescuer is to put the Lifeline ARM into action as quickly and smoothly as possible. - Page 23 Steps to Deploy the Lifeline ARM: The following instructions are for a two-rescuer scenario that begins after it has been confirmed that the patient is unresponsive and not breathing, clothing has been removed from the patients chest and manual CPR has begun.
- Page 24 Pull up on the Frame to make sure it is securely attached to the Backboard. If patient is too large for the Frame, remove Frame and continue manual CPR compressions. Do not use the Lifeline ARM if the Frame cannot be latched to the backboard. WARNING...
- Page 25 Adjust the Frame and Backboard to position the Compression Piston over the patient’s chest and directly in line with the nipples. (This is the same target point used for manual CPR.) Do not initiate Lifeline ARM compressions if the piston is not in the proper position. WARNING 6.
- Page 26 Breaths” button in accordance with your emergency response protocol. Run Continuous Run with Breaths Do not leave the Lifeline ARM running while unattended. Patient injury may result if the unit is left unattended. WARNING The Lifeline ARM can withstand the effects of an externally applied defibrillation shock.
- Page 27 9. Apply the Stabilization Strap. Remove the Stabilization Strap from the Carrying Case and place it next to the patient. Lift the patient’s head and slide the Stabilization Strap under the patient’s neck. If the patient might have head, neck, spine, or other bone-structure injuries, use accepted handling techniques.
- Page 28 SELECT IMPORTANT WARNINGS WHEN USING THE LIFELINE ARM Patient size is the determining factor when deploying the Lifeline ARM; there is no limitation ■ regarding patient weight. If the Piston cannot be adjusted to reach the patient’s chest, the patient is too small.
-
Page 29: Transporting The Patient
Pause compressions and readjust WARNING position if needed. Disassembling and Storing the Lifeline ARM When compressions are no longer needed, follow this sequence to remove the device: Turn the unit Off by pressing and holding the On/Off button for at least 1 second. -
Page 30: Recommended Maintenance For The Lifeline Arm
Recommended Maintenance for the Lifeline ARM To be sure that all components and accessories are available and ready for next use: Make sure the Battery Pack is fully charged and inserted into the Compression Module. Check the condition of the system. Make sure the Carrying Case contains all accessories, including the Patient Interface Pad(s), AC Adapter, Stabilization Strap, Wrist Straps (if used), Quick Reference Guide, and User Manual. -
Page 31: Troubleshooting During Operation Of The Lifeline Arm
Troubleshooting During Operation of the Lifeline ARM Refer to the User Manual for complete instructions on how to handle potential problems encountered before, during, or after use of the Lifeline ARM. Some examples of warnings include: Battery Pack Indicator •... - Page 32 RAC-A1515EN-BA...
-
Page 33: Hands-On Training And Practice
Depending on how many Lifeline ARM devices are available for practice, manage the teams as they rotate through the session to be sure that each student goes through the operation sequence at least three times. -
Page 34: Course Content
Carrying Case of the Lifeline ARM. Check that each step is done correctly according to the checklist, and note any feedback that may help the student later on. - Page 35 2. Place the Backboard under the patient and position it correctly. Instruct partner: “Restart manual CPR.” Essential elements: • Show that the Backboard is placed next to the patient with the positioning label facing up. • Show how to roll the manikin to slide the Backboard into the proper position, just below the armpits with the center of the Backboard in line with the nipple line of the patient.
- Page 36 7. Select compression protocol and start compressions. Essential elements: • Remind students that they have the choice of running compressions with or without breaths. Show how to start Run Continuous (top button) on the User Control Panel, then Run with Breaths (bottom button).
-
Page 37: Resources
Resources COMPETENCY CHECKLIST Student Name Performed Correctly Step Essential Skill Set — Operation Sequence (Circle One) Opens the Carrying Case and removes the Backboard. Places the Backboard under the patient and positions it correctly. Removes the Frame; lifts the patient’s arms over the head;... - Page 38 RAC-A1515EN-BA...
- Page 39 Stabilization Strap Connectors. (Stabilization Strap can be adjusted using self- adhesive Velcro.) Notes: • To minimize CPR interruptions and to most effectively use the Lifeline ARM, two rescuers are recommended. • Providing manual chest compressions takes precedence over setting up and initiating use of the Lifeline ARM.
- Page 40 RAC-A1515EN-BA...
- Page 41 The training location and facilities were comfortable and provided adequate space for practice. The training prepared me to use the Lifeline ARM in my work environment. Overall, the training was (circle one): Excellent / Good / Average / Poor / Very Poor...
- Page 42 RAC-A1515EN-BA...
-
Page 45: Contacts
Contacts Manufacturer Defibtech, LLC 741 Boston Post Road, Suite 201 Guilford, CT 06437 USA Tel.: 1-(866) 333-4241 (Toll-free within North America) 1-(203) 453-4507 Fax: 1-(203) 453-6657 Email: sales@defibtech.com (Sales) reporting@defibtech.com (Medical Device Reporting) service@defibtech.com (Service and Repair) Website: www.defibtech.com RAC-A1515EN-BA...
Need help?
Do you have a question about the Lifeline ARM and is the answer not in the manual?
Questions and answers