Table of Contents
Advertisement
Quick Links
Advertisement
Table of Contents
Troubleshooting

Related Manuals for Siemens Hematek


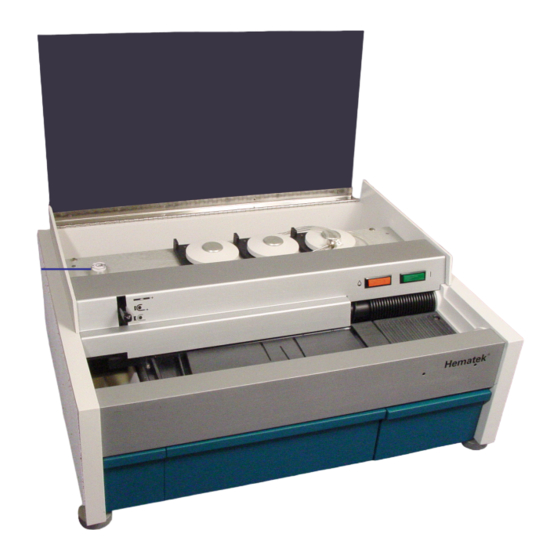
Summary of Contents for Siemens Hematek
- Page 2 If the Hematek system is used in a manner not specified by Siemens, the protection provided by the equipment may be impaired. See warning and hazard statements.
-
Page 3: Table Of Contents
Contents Section 1: Introduction.................... 1-3 General Description and Intended Use ...................1-3 .........................1-4 Theory of Operation Physical Characteristics ........................1-5 .......................1-5 Circular Bubble Level ..........................1-5 Levelers Slide Transport System ........................1-6 ........................1-6 Conveyor Spirals .............................1-6 Platen .........................1-7 Slide Drying System ...........................1-7 Slide Drawer ..........................1-7 Waste Tank Staining System... - Page 4 General Guidelines for Optimal Staining ..................3-3 Operating Procedures ........................3-3 .........................3-3 Start the Instrument ........................3-4 Prime the Tubing ....................3-5 Load the Blood Smear Slides ........................3-6 Stain the Smears .......................3-7 Clean the Tubing after Use ................3-7 Turn the Instrument Off at the End of the Day Stain Pak Replacement ........................3-7 Section 4: Specimens....................
- Page 5 Siemens Offices Worldwide Returning the Instrument for Repair, Exchange, Replacement, or Loaner ........8-7 Supplies and Replacement Parts ....................8-8 ................8-8 Hematek Stain Pak – Modified Wright’s Stain ..............8-8 Hematek Stain Pak – Modified Wright-Giemsa Stain ......................8-8 Hematek Cannula Set ......................8-9 Hematek Pump Tube Set ....................8-9...
- Page 6 Contents...
- Page 7 Section 1: Introduction.................... 1-3 General Description and Intended Use ...................1-3 .........................1-4 Theory of Operation Physical Characteristics ........................1-5 .......................1-5 Circular Bubble Level ..........................1-5 Levelers Slide Transport System ........................1-6 ........................1-6 Conveyor Spirals .............................1-6 Platen .........................1-7 Slide Drying System ...........................1-7 Slide Drawer ..........................1-7 Waste Tank Staining System ..........................1-8...
- Page 8 Page 1—2, Section 1: Introduction...
-
Page 9: Section 1: Introduction
Optimal results with the Hematek Slide Stainer are obtained by using one of the Hematek Stain Paks. The Stain Pak consists of one bottle each of stain, buffer, and rinse solutions, and is designed for easy installation and removal from the instrument. -
Page 10: Theory Of Operation
Theory of Operation The Hematek Slide Stainer is designed to produce stained slides of consistent quality in a continuous process. This is accomplished by having a fixed length of time in each of the three phases of stain, buffer, and rinse, as well as a predetermined ratio of stain-to-buffer volumes in the buffer phase. -
Page 11: Physical Characteristics
Physical Characteristics Figure 1-2. Circular Bubble Level and Leveling Feet, shows the physical characteristics of the Hematek Slide Stainer, including the circular bubble level and the leveling feet. Figure 1-2. Circular Bubble Level and Leveling Feet Circular Bubble Level Leveling Feet... -
Page 12: Slide Transport System
Slide Transport System Figure 1-3. Slide Transport System and Figure 1-4. Slide Transport and Staining System show the slide transport system, including the conveyor spirals, the platen, the platen guide rails, and the slide drawer. Figure 1-3. Slide Transport System 1 Conveyor Spirals 2 Platen 3 Platen Guide Rails... -
Page 13: Slide Drying System
Platen The platen spans the entire front of the instrument, between the conveyor spirals. The outside ridges of the platen are elevated guide rails, which give support to the slides as they are moved along the platen. It is a precision-machined component made from a high- performance plastic polymer material and is designed specifically for two main functions: 1. -
Page 14: Staining System
Staining System Figure 1-4. Slide Transport and Staining System , Figure 1-5. Staining Systems, and Figure 1-6. Sensing Switches, illustrate the staining system, including the volume control panel, pump assemblies, pump cap, pump arm, pump tubing, and cannula. Figure 1-4. Slide Transport and Staining System Slide Drawer Waste Tank Volume Control Panel... -
Page 15: Pump Tubing And Cannulas
Pump Tubing and Cannulas CAUTION Use only the Hematek Pump Tube Set with the Hematek Slide Stainer. Use of other tubing may result in incorrect measurement and improper staining, buffering, and rinsing. The pump tubing is provided as a set of three separate pieces of tubing. Notice that each... -
Page 16: Sensing Switches
Sensing Switches The sensing switches are three finger-like devices located just above the back edge of the platen. When contacted, the respective sensing switch is activated, which tells the instrument that a slide is in position for the pump to run. After a specific time delay, the pumping motor for the specific reagent is activated. -
Page 17: Electrical System
Electrical System Figure 1-7. Electrical System and Figure 1-8. Electrical System–Rear of Instrument illustrate the components of the electrical system. Figure 1-7. Electrical System Operating Lever Power Light Low Stain Light Operating Lever The operating lever is a multiple function, bar-shaped lever located at the front left side of the instrument, near the top. -
Page 18: Power Light
It is off under usual LOW STAIN POWER operating conditions; however, when the Hematek Stain Pak contains sufficient reagents to stain only about 20 slides, a weight-sensing device activates the circuit and illuminates the light. The Stain Pak should be replaced at this time. -
Page 19: Fuse Holder
Fuse Holder The fuse holder, in the center of the panel, holds the fuse that protects against serious electrical overload. A spare fuse is also located in the fuse holder. ON / OFF Switch Switch is located at the bottom of the panel and controls all power to the ON / OFF instrument. -
Page 20: Disposal Of System Waste And Supplies
Some of the wastes from the Hematek Slide Stainer can be classified as hazardous or biohazardous wastes. It is essential that the laboratory take appropriate steps to determine the laws and regulations applicable to their disposal and to effect compliance. - Page 21 Section 2: Installation....................2-3 Overview .............................2-3 Environmental Factors ........................2-3 Unpacking ............................2-4 Instrument Setup ..........................2-4 ........................2-4 Level the Instrument ....................2-5 Plug the Line Cord into an Outlet ................2-5 Performance Check (Prior to Installing Tubing) ......................2-6 Install the Pump Tubing .........................2-9 Install the Stain Pak ..................2-10 Inspect Waste Tank and Slide Drawer ..................2-10...
- Page 22 Page 2—2, Section 2: Installation...
-
Page 23: Section 2: Installation
Read this Operator’s Guide carefully before attempting to operate the instrument. Follow all instructions carefully. The Hematek Slide Stainer is a precision instrument and must be handled accordingly. Rough handling or dropping of the instrument will disturb or damage internal components. -
Page 24: Unpacking
Before opening the shipping carton, inspect it for visible signs of damage. Use the following steps to unpack the instrument. 1. Carefully remove the Hematek instrument and supplies from the shipping carton. The following items are provided with the instrument: Hematek pump tube set •... -
Page 25: Plug The Line Cord Into An Outlet
2. Adjust the two feet located under the front corners of the instrument to raise or lower the instrument to a level position. Figure 2-1. Leveling the Instrument 3. Observe the circular bubble level to indicate when the feet have been properly adjusted and the instrument is level. -
Page 26: Install The Pump Tubing
Be sure the slides are positioned in opposing slots, parallel to the inscribed lines on the platen. 4. Allow the slides to automatically feed onto the platen. 5. As the slides move down the platen, make sure the leading edge of the slides contact and activate each of the three sensing switch fingers, located along the back wall of the platen above the platen trough. - Page 27 3. Push the operating lever down to the position. UNLOCK 4. Extend each new tube to its respective pump (in numerical order from right to left) and thread the end of the tubing into the hole in the pump arm. 5.
- Page 28 8. Connect each tube to its proper recessed nipple, located on the backside of the circuit board housing. 9. Be sure that at least 7 mm (0.25 in.) of tubing is connected to the nipple for a secure connection. Figure 2-4. Attaching Pump Tubing to Nipple NOTE: If it is difficult to connect the tube to its nipple, use forceps or hemostats to grasp and attach the tubing.
-
Page 29: Install The Stain Pak
Install the Stain Pak 1. Remove the perforated tabs from the Hematek Stain Pak. Insert the carton, with the bottle to the right, into the well at the rear of the instrument. STAIN 2. Make sure the carton is all the way down and resting on the tray at the bottom of the well. -
Page 30: Inspect Waste Tank And Slide Drawer
4. Remove the cannula, turn it 1/4 turn, and insert it again into the same puncture. The double puncture creates a slightly larger hole for venting. NOTE: If additional venting is desired, a second hole can be made in the top of the bottle, near the indentation. - Page 31 Section 3: Operating Instructions ................3-3 General Guidelines for Optimal Staining ..................3-3 Operating Procedures ........................3-3 .........................3-3 Start the Instrument ........................3-4 Prime the Tubing ....................3-5 Load the Blood Smear Slides ........................3-6 Stain the Smears .......................3-7 Clean the Tubing after Use ................3-7 Turn the Instrument Off at the End of the Day Stain Pak Replacement ........................3-7...
- Page 32 Page 3—2, Section 3: Operating Instructions...
-
Page 33: Section 3: Operating Instructions
POWER will begin to slowly revolve. NOTE: When the Hematek Stain Pak contains sufficient reagents to stain only about 20 slides, the yellow light will illuminate to indicate the need for replacement of the Stain LOW STAIN Pak. -
Page 34: Prime The Tubing
Prime the Tubing 1. Lift the stainer-operating lever to the position and hold in this position until PRIME the stain, buffer, and rinse reagents all flow evenly through their tubes to the platen without any air bubbles. NOTE: If the tubing is new and does not prime easily, it may be necessary to assist the priming initially. -
Page 35: Load The Blood Smear Slides
Load the Blood Smear Slides BIOHAZARD Wear personal protective equipment. Use universal precautions. Refer to Appendix A, page A-1 for recommended precautions when working with biohazardous materials. 1. Prime the platen. The platen should be primed and wetted with reagents in order to ensure optimal results on the specimen slides. -
Page 36: Stain The Smears
4. Load the patient slides. Place the properly prepared slides into the grooves of the conveyor spirals with the blood smear side facing to the left of the operator and the feathered edge of the blood smear toward the back of the instrument. Figure 3-3. -
Page 37: Clean The Tubing After Use
If the light illuminates when the instrument is first turned on or while slides LOW STAIN are being processed, a new Hematek Stain Pak is needed. Follow these steps to replace the Stain Pak. CAUTION After replacement of the Stain Pak, the instrument must always be primed to remove any air bubbles that may be present. - Page 38 Page 3—8, Section 3: Operating Instructions...
- Page 39 Section 4: Specimens....................4-3 Overview .............................4-3 Peripheral Blood Smears ........................4-3 Bone Marrow Smears ........................4-5 Section 4: Specimens, Page 4—1...
- Page 40 Page 4—2, Section 4: Specimens...
-
Page 41: Section 4: Specimens
Section 4: Specimens Overview The Hematek Slide Stainer is designed specifically for the automatic staining of peripheral blood smears that have been prepared on standard 25 mm x 75 mm or 1” x 3” glass slides. Blood smears that are stained according to instructions will provide the examiner with high quality differential staining characteristics for all cytologic blood components. - Page 42 3. The ‘feather’ end of the blood film should be at least 1.57 cm (5/8 inch) from the opposite end of the slide to avoid extending beyond the platen surface and contact with the staining reagents. Do not allow the smear to touch the edges of the slide as large cells tend to accumulate there.
-
Page 43: Bone Marrow Smears
The procedure involves using the “squash” technique for smear preparation and staining the slide once or twice on the Hematek Slide Stainer. The following procedure has been verified as giving clinically useful staining results on bone marrow slides; however, the stain quality is dependent upon the thickness and evenness of the bone marrow smear. - Page 44 Page 4—6, Section 4: Specimens...
- Page 45 Section 5: Maintenance ..................... 5-3 General Cleaning ..........................5-3 Daily Cleaning ............................5-3 ........................5-3 Cleaning the Platen ..................5-4 Cleaning the Stain Tubing and Cannula ......................5-6 Emptying the Waste Tank Weekly Cleaning ..........................5-6 ................5-6 Cleaning Drain Troughs and Rear Guide Rail Decontamination and Removal from Operation ................5-9 Section 5: Maintenance, Page 5—1...
- Page 46 Page 5—2, Section 5: Maintenance...
-
Page 47: Section 5: Maintenance
Section 5: Maintenance The Hematek Slide Stainer is a precision instrument, designed to provide trouble-free operation with a minimum of maintenance. BIOHAZARD Wear personal protective equipment. Use universal precautions. Refer to Appendix A, page A-1 for recommended precautions when working with biohazardous materials. -
Page 48: Cleaning The Stain Tubing And Cannula
3. After priming, wipe the platen with a soft, disposable, lint-free absorbent cloth or tissue. Wipe from right to left only. Figure 5-1. Cleaning the Platen CAUTION If using frosted-end slides, it is especially important that the front guide rail be cleaned on a regular and frequent basis. - Page 49 2. Using the prime function, purge the stain from the tubing. a. Place the stain cannula, with tubing attached, into a small container of methanol and lift the operating lever to PRIME Figure 5-2. Rinsing the Stain Tubing b. Holding the lever in this position, continue to pump methanol through the stain tubing until it is thoroughly rinsed and clear solution appears on the platen.
-
Page 50: Emptying The Waste Tank
Emptying the Waste Tank Empty the waste tank once each day, as well as after installing a new Stain Pak. To avoid spilling the contents while emptying the waste tank, carefully pull the tank away from the instrument, supporting the bottom of the tank to hold it level during removal. After emptying into an appropriate receptacle, rinse the waste tank with water and reinstall it into the instrument. - Page 51 3. Loosen the two thumbscrews that are inserted through the notches in the back of the circuit board cover. Figure 5-4. Location of Thumbscrews 4. Carefully raise the circuit board cover so the back trough is completely exposed and easily accessible. Figure 5-5.
- Page 52 6. Flood both the front and back troughs with methanol to loosen any precipitated stain that may be present. Take care not to splash methanol onto the circuit board. 7. Using an applicator stick with a cotton swab attached, wipe from right to left along the length of the back and front troughs to remove the entire excess residue.
-
Page 53: Decontamination And Removal From Operation
3. Lift the used Hematek Stain Pak carton out of the well at the rear of the instrument. 4. Follow steps 3 through 8 of the Replacement of the Underplaten Tubing on page 6-11 to turn off the instrument and remove the underplaten tubing. - Page 54 Page 5—10, Section 5: Maintenance...
- Page 55 Section 6: Minor Replacements and Adjustments ..........6-3 Fuse Replacement ..........................6-3 Replacement of Light Assemblies ....................6-4 Replacement of the Pump Tubing ....................6-7 Replacement of the Underplaten Tubing ..................6-11 Pump Volume Adjustment ........................6-14 .........6-15 Check and Correct Instrument Operation Prior to Pump Volume Adjustment ................6-15 Adjust the Stain, Buffer, and Rinse Volumes Volume and Ratio Determination...
- Page 56 Page 6—2, Section 6: Minor Replacements and Adjustments...
-
Page 57: Section 6: Minor Replacements And Adjustments
This section is provided as an aid for performing minor replacements and adjustments on the Hematek Slide Stainer. Fully review and understand the procedures before attempting them, and they must be performed with care. For any adjustments or replacements other... -
Page 58: Replacement Of Light Assemblies
3. Pull the fuse holder out of the instrument. 4. Remove the fuse from the holder and discard it into an appropriate waste container. Figure 6-2. Replacing the Fuse CAUTION Use only the specified fuse to avoid damage to the instrument. 5. - Page 59 3. Loosen the two thumbscrews that are inserted through the notches in the back of the circuit board cover. Figure 6-3. Location of Thumbscrews 4. Lift the panel from the front wall, exposing the printed circuit board and the connectors for the lights.
- Page 60 5. Disconnect the wires from the circuit board for the light that is to be replaced. Using a small, blade-type screwdriver, loosen the two small screws located on the top of the connector (the screws will not come out completely), then pull on the connector wires to remove them from the connector.
-
Page 61: Replacement Of The Pump Tubing
Stain Paks have been used. If regular cleaning is not performed, or if usage is very heavy, the tubing should be changed more frequently. Use the following procedure to replace the pump tubes with new ones in the Hematek Pump Tube Set (PN 4482). - Page 62 3. Push the operating lever down to the position. UNLOCK 4. Disconnect each pump tube from its cannula and from the recessed nipple located in the wall in front of the pumps. Figure 6-8. Removing Tubing from Cannula Figure 6-9. Removing Tubing from Nipple Page 6—8, Section 6: Minor Replacements and Adjustments...
- Page 63 7. Attach the coded end of the new tube to its respective cannula. a. Replace the cannula if it appears damaged or bent using the Hematek Cannula Set (PN 4483). b. If you are re-using any cannulas, make sure the cannula previously used for stain is used only with the stain tubing.
- Page 64 8. Insert tubing into the pump assembly. a. Extend the new tube to its respective pump and thread the end into the hole in the pump arm. b. Push the thumb tab to the extreme left, as before, and push the tube through until the plastic cuff is flush against the pump arm.
-
Page 65: Replacement Of The Underplaten Tubing
Stain Paks. Use the following procedure to replace the underplaten tubing with new tubing in the Hematek Underplaten Tubing pack (Product No. 4484). 1. Remove the three cannulas from the Stain Pak. - Page 66 5. Loosen the two thumbscrews that are inserted through the notches in the back of the circuit board cover. Figure 6-13. Location of Thumbscrews 6. Carefully rotate the panel up and back. The circuit board cover is connected to the instrument by the two connectors of the lights.
- Page 67 8. Disconnect the stain tubing from the nipple that is located behind the circuit board. Figure 6-14. Disconnecting Underplaten Tubing from Nipple 9. Remove the waste tank and reach underneath the platen through the waste tank area. 10. Disconnect the stain tubing from the platen by pulling the tubing free from behind the circuit board, and then disconnect it from the spout under the platen.
-
Page 68: Pump Volume Adjustment
Be sure the panel is not resting on top of the screw heads before tightening. Pump Volume Adjustment The Hematek Slide Stainer is designed to produce stained slides of consistent quality in a continuous process. This is accomplished by having a fixed length of time in each of the three phases of stain, buffer, and rinse, as well as a predetermined ratio of stain-to-buffer volumes in the buffer phase. -
Page 69: Check And Correct Instrument Operation Prior To Pump Volume Adjustment
7. If the starting times for each phase are not correct, follow the procedure in this section. Adjust the Stain, Buffer, and Rinse Volumes Optimal staining results are achieved when the Hematek Slide Stainer is properly adjusted. Normally, proper adjustment of the instrument can be determined by observation of the amount of stain and buffer required to fill the capillary gap between the slide and the surface of the platen. - Page 70 Volume is lowest when a knob is turned fully counterclockwise and highest when turned fully clockwise. Volume increments are marked on each knob: • Stain and buffer knobs: Each evenly labeled increment changes the volume by approximately 0.1 mL per 10 slides (0.01 mL/slide). •...
-
Page 71: Volume And Ratio Determination
NOTE: As the slide moves along, the buffer should pulse from the buffer orifice and move around the two mixing grooves for complete mixing of the stain and buffer. Too much stain and/or buffer will reduce the pulsing action, causing inconsistent staining across the slide. If partial flooding occurs, it should quickly re-drain as the slide continues to move across the grooves. -
Page 72: Sensing Switch Fingers Adjustment
The stain-to-buffer ratio should be approximately 1:2 to 1:3, (i.e., the volume of buffer should be about 2 to 3 times that of the stain). Example: 1.6 mL of stain per 10 slides = 0.16 mL/slide 4.1 mL of buffer per 10 slides = 0.41 mL/slide 0.41 ÷... - Page 73 4. Carefully rotate the panel up and back. The circuit board cover is connected to the instrument by the two connectors of the lights. Rotate the panel carefully so the connectors are not LOW STAIN POWER pulled loose. 5. Check the location of each of the sensing switch fingers for the following two criteria: Each finger should point straight down into the center of the back trough of the platen, without touching the bottom.
- Page 74 7. If adjustment to a sensing switch finger is necessary, support the wire near the center and carefully bend the lower part of the wire. If bending to the right, bend the wire no more than 7 mm (1/4 in.) past perpendicular. Figure 6-19.
- Page 75 Section 7: Troubleshooting ..................7-3 Checklist for Quality of Stained Blood Smears ................7-3 Troubleshooting Chart ........................7-4 Troubleshooting, Page 7—1...
- Page 76 Page 7—2, Section 7: Troubleshooting...
-
Page 77: Section 7: Troubleshooting
Section 7: Troubleshooting The Hematek Slide Stainer is designed to give trouble-free operation when the directions for operating and cleaning the instrument are followed. If a problem occurs, refer to troubleshooting pointers in this section for help in solving the problem. -
Page 78: Troubleshooting Chart
Hematek Preservice Checklist in Appendix A, and contact your local technical support provider or distributor. Only Hematek Stain Paks should be used with the Hematek Slide Stainer. Do not use any other stain solution. For problems or questions concerning the Stain Paks, contact your local technical support provider or distributor. - Page 79 Cannula openings are Remove cannulas from solution clogged bottles and clean away debris with cloth and alcohol Pump tubing is Replace pump tubing. Refer to collapsed from use, or is Replacement of the Pump perforated Tubing on page 6-7. Underplaten tubing Replace with new tubing.
- Page 80 Slides are of variable Replace slides thickness Pale staining Proper stain-to-buffer Refer to Volume and Ratio ratio has not been Determination on page 6-17 achieved Stain volume is adjusted Refer to Pump Volume too high. Increasing Adjustment on page 6-14 stain volume may decrease stain intensity Rinse volume is too high...
- Page 81 Siemens Offices Worldwide Returning the Instrument for Repair, Exchange, Replacement, or Loaner ........8-7 Supplies and Replacement Parts ....................8-8 ................8-8 Hematek Stain Pak – Modified Wright’s Stain ..............8-8 Hematek Stain Pak – Modified Wright-Giemsa Stain ......................8-8 Hematek Cannula Set ......................8-9 Hematek Pump Tube Set ....................8-9...
- Page 82 Page 8—2, Section 8: Service, Supplies and Replacement Parts...
-
Page 83: Section 8: Service, Supplies, And Replacement Parts
Section 8: Service, Supplies, and Replacement Parts When problems arise during operation of the Hematek Slide Stainer, refer first to Section 7: Troubleshooting. Avoid problems by carefully following proper operating and cleaning procedures. When to Call for Service A call for assistance is appropriate under the following circumstances: •... -
Page 84: Siemens Offices Worldwide
Siemens Offices Worldwide www.siemens.com/diagnostics Siemens Healthcare Diagnostics Pty Ltd 885 Mountain Highway Bayswater Victoria 3153 Australia Page 8—4, Section 8: Service, Supplies, and Replacement Parts... -
Page 85: Returning The Instrument For Repair, Exchange, Replacement, Or Loaner
5. Return the container to your local technical support provider or distributor. NOTE: If Siemens does not receive your defective instrument within 15 days, you will be billed for the replacement. Section 8: Service, Supplies, and Replacement Parts, Page 8—5... -
Page 86: Supplies And Replacement Parts
Supplies and Replacement Parts To obtain the best results with the Hematek Slide Stainer, use only Hematek brand supplies. Hematek Stain Pak – Modified Wright’s Stain The Stain Pak contains a polychrome methylene blue-eosin stain and specially prepared buffer and rinse solutions. The Stain Pak is contained in a single carton that fits easily into the well inside the Slide Stainer. -
Page 87: Hematek Pump Tube Set
The Underplaten Tubing is available for periodic replacement. The tubing set consists of three tubes of equal diameter and length and, therefore, are not specific to a reagent. Ordering Information for Supplies and Replacement Parts To order the following Hematek brand products, contact your local technical support provider or distributor. Part Number... - Page 88 Page 8—8, Section 8: Service, Supplies, and Replacement Parts...
-
Page 89: Appendix A: List Of Symbols
Appendix A: List of Symbols Symbols Used With This System The following table explains the symbols used on the Hematek Slide Stainer, on the Stain Pak, and in this document. Symbol Description This symbol alerts you to a potential biohazard. - Page 90 This symbol indicates that the product has a temperature limitation. In this example, you need to store the product between 15 and 30 °C. Identifies Hematek stain. Identifies Hematek buffer. Identifies Hematek rinse. Indicates that there is power to the instrument.
- Page 91 This symbol indicates the revision letter of a part or product. This symbol indicates the number used for ordering a part or product. This symbol indicates the expiration date of the product. This symbol indicates the lot number of the product.
- Page 92 This symbol indicates that the product or container should be oriented in the direction of the arrows. Page A—4, Appendix A: List of Symbols...
-
Page 93: Appendix B: Hematek Preservice Checklist
When was the pump tubing last changed? When was the underplaten tubing last Stain: changed? Buffer/Rinse: Stain Pak Information (Check one) Wright’s Wright-Giemsa Lot #: Exp. Date: Give a brief description of the problem: Appendix B: Hematek Preservice Checklist, Page B—1... - Page 94 Page B—2, Appendix B: Hematek Preservice Checklist...
- Page 95 Pump Tube Set, description 1- 9 underplaten tubing 8- 9 calling for service 8- 3 Hematek cannula set 8- 8 cannulas Hematek pump tube set 8- 9 cleaning 5- 4 Hematek Stain Pak cannulas 1- 9 Modified Wright’s Stain 8- 8...
- Page 96 1- 9 on pump tubes 1- 9 replacement procedure 6- 7 pump volume adjustment 6- 14 offices, Siemens 8- 4 pump volume adjustment operating lever adjust stain, buffer, and rinse volumes 6- 15 electrical system 1- 11 correct instrument operation 6- 15...
- Page 97 6- 11 Hematek cannula set 8- 8 volume and ration determination 6- 17 Hematek pump tube set 8- 9 replacing the Stain Pak 3- 7 Hematek Stain Pak returning the instrument to Modified Wright’s Stain 8- 8...
- Page 98 Index-4...
Need help?
Do you have a question about the Hematek and is the answer not in the manual?
Questions and answers
are there any humidity and temperature requirements for the Hematek
The Siemens Hematek should be operated within an ambient temperature range of 18ºC to 30ºC (64ºF to 86ºF) and an ambient humidity range of 20% to 85% relative humidity. Temperature should be kept relatively constant for optimal stability, and the instrument should be placed in a well-ventilated area, avoiding exposure to temperature extremes and corrosive vapors.
This answer is automatically generated
Should the hematek ever fail, can we stain the slides manually as a back up using the hematek stain and buffers poured into coplin jars? Is this procedure written?
The conveoyor spirals have rotated out of alignment and slides aren't moving down the platen. can the spirals be adjusted? They suddenly seem to be rotating at different speeds