Advertisement
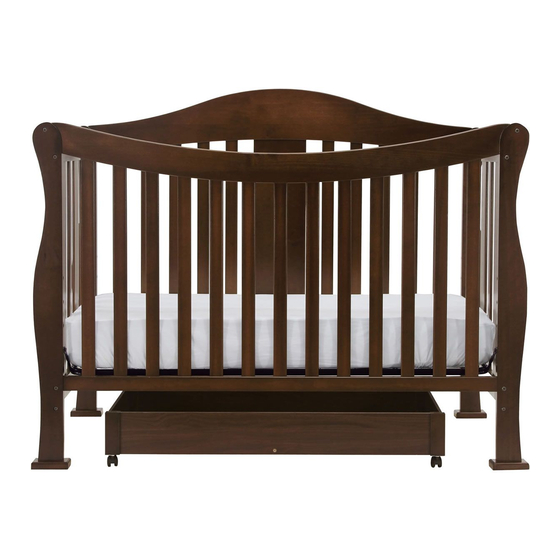
Crib (5101) -
Assembly and Operation Manual
Lit à barreaux (5101) -
Manuel d'assemblage et d'utilisation
Congratulations on purchasing an MDB Family product. This crib will provide many years of service if
you adhere to the following guidelines for assembly, maintenance and operation. This crib is for residen-
tial use only. Any institutional use is strictly prohibited.
Please be sure to follow the instructions for proper assembly. Use a Phillips head screwdriver for assem-
bling the crib in addition to the Allen wrench included in the hardware box. Do not use power screwdriv-
ers. All of our cribs are made from natural woods. Please understand that natural woods have color vari-
ations which are the result of nature and not defects in workmanship.
DO NOT SUBSTITUTE PARTS. ALL MODELS HAVE THE SAME QUANTITY OF PARTS AND HARD-
WARE. YOUR MODEL MAY LOOK DIFFERENT FROM THE ONE ILLUSTRATED DUE TO STYLISTIC
VARIATIONS.
Nous vous félicitons de votre achat d'un produit MDB Family. Ce lit de bébé vous procurera des années
de service si vous suivez les directives ci-dessous pour l'assemblage, l'entretien et l'utilisation. Ce lit est
destiné uniquement à une utilisation résidentielle. Toute utilisation dans une institution est strictement
interdite.
Prenez soin de suivre les instructions pour réaliser correctement l'assemblage. Utilisez un tournevis
cruciforme pour l'assemblage, en plus de la clé hexagonale incluse dans la boîte de quincaillerie.
N'utilisez pas un tournevis électrique. Tous nos lits d'enfants sont fabriqués en bois naturel. Il faut com-
prendre que le bois présente des variations de couleur attribuables à la nature et non à un défaut de
fabrication.
NE PAS UTILISER DES PIÈCES DE SUBSTITUTION. TOUS LES MODÈLES ONT LE MÊME
NOMBRE DE PIÈCES ET D'ACCESSOIRES DE MONTAGE. VOTRE MODÈLE PEUT DIFFÉRER DE
CELUI ILLUSTRÉ EN RAISON DE VARIATIONS STYLISTIQUES.
*The crib can later be converted into
a toddler bed or a full-size bed. To
convert to a toddler bed, turn to
page 10. To convert to a full-size
bed, turn to page 11.
* Le lit de bébé peut être converti
plus tard en un lit pour tout-petit ou
en un lit à une place. Pour convertir
le lit en un lit pour toutpetit, passez à
la page 10. Pour convertir le lit en un
lit à une place, passez à la page 11.
page 1
revised 31JAN2013
Advertisement
Table of Contents

Subscribe to Our Youtube Channel
Related Manuals for MDB Family 5101


Summary of Contents for MDB Family 5101
- Page 1 WARE. YOUR MODEL MAY LOOK DIFFERENT FROM THE ONE ILLUSTRATED DUE TO STYLISTIC VARIATIONS. Nous vous félicitons de votre achat d’un produit MDB Family. Ce lit de bébé vous procurera des années de service si vous suivez les directives ci-dessous pour l’assemblage, l’entretien et l’utilisation. Ce lit est destiné...
- Page 2 PARTS • PIÈCES B. Front Rail A. Headboard C. Spring Frame D. Side (2) A. Tête de lit B. Traverse avant C. Support de matelas D. Côté latéraux (2) Tools Needed (not included) Outils nécessaire (pas inclus) E. Foot (4) G.
- Page 3 STEP 1. Remove 4 barrel nuts (Q) from 4 Allen head bolts (S) and insert the 4 barrel nuts (Q) into the top and bottom holes on the left and right sides of the headboard. Attach the feet (E) to the bottom of the legs with wood screws (K).
- Page 4 H / J STEP 5. Insert bolt with metal cap (V) into the lowest holes in the four legs (H & J). Outer side Inner side Étape 5. Insérer les boulon avec calottes métallique (V) dans les trous les plus bas au cours des quatre Bolt Metal cap pieds (H &...
- Page 5 STEP 8. Swing out four hangers at corner of the spring frame (C) carefully. Attach spring frame FLAT SIDE UP. Choose the height of the spring frame. Start at the highest level and adjust accordingly. Bolt the spring frame (C) to headboards using Allen head bolts (O), washers (N), lock washers (U) and Allen wrench (M).
- Page 6 CAUTION: ANY MATTRESS USED IN THIS CRIB MUST BE AT LEAST 27 1/4 INCHES (69CM) BY 51 5/8 INCHES (131CM) WITH A THICKNESS NOT EXCEEDING 6 INCHES (15CM). WE WILL ASK YOU FOR YOUR SERIAL NUMBER FOR ALL Please refer to the label (sample below) on the inside face of the headboard.
- Page 7 Securely tighten loose bolts and other fasteners. DO NOT use crib if any parts are missing, damaged or broken. DO NOT substitute parts. Contact MDB FAMILY for replacement parts and instructional literature if needed. • DO NOT use a water mattress with this crib.
- Page 8 NE PAS utiliser le lit si des pièces sont manquantes, endommagées ou brisées. NE PAS UTILISER DES PIÈCES DE SUBSTITUTION. Communiquer avec MDB FAMILY pour obtenir des pièces de rechange et des instruc- tions.
- Page 9 CHANGE OU MANQUANTES, VISITEZ-NOUS À : PLEASE VISIT US AT: WWW.THEMDBFAMILY.COM WWW.THEMDBFAMILY.COM OR YOU CAN CONTACT US BY MAIL: OU CONTACTEZ-NOUS PAR LA POSTE : MDB FAMILY MDB FAMILY 855 WASHINGTON BLVD. 855 WASHINGTON BLVD. MONTEBELLO, CA 90640 MONTEBELLO, CA 90640...
- Page 10 Crib (5101) - Daybed conversion assembly Lit à barreaux (5101) - Assemblage pour la conversion en lit de jour G. Guard Rail G. Barre protectrice U. Lock washer (4) R. 2” Allen head bolt (4) U. Rondelle de R. Boulon Allen de 2" (4) blocage (4) STEP 1.
- Page 11 The mattress intended for use on the bed shall be a full-size mattress having minimum dimensions of 51 5/8" (1310 mm) in length, 27 1/4"(690 mm) in width and 4" (100 mm) in thickness and not exceeding 6" (152 mm). Le matelas à...
- Page 12 Assurez-vous de bien garder les boulons et pièces restantes pour une utilisation ultérieure. Crib (5101) - Trundle drawer assembly Lit à barreaux (5101) - Assemblage du tiroir détachable A. Drawer Back A. Face arrière du tiroir E. Left Front Corner G.
- Page 13 STEP 1. Slide the left (G) and right (H) rear corners onto the drawer back (A). Secure with Phillips head screws (L). Slide the left (E) and right (F) front corners onto the drawer front (B). Secure with Phillips head screws (L). Étape 1 Faire glisser le coin a l’arrière gauche (G) et le coin à...
Need help?
Do you have a question about the 5101 and is the answer not in the manual?
Questions and answers
where can I get more parts
You can find more MDB Family part number 5101 parts by contacting MDB Family for replacement parts and instructions.
This answer is automatically generated