Sun Oracle Netra Blade X3-2B Getting Started Manual
Module
Hide thumbs
Also See for Netra Blade X3-2B:
- Service manual (136 pages) ,
- Installation manual (44 pages) ,
- Security manual (16 pages)
Table of Contents
Advertisement
Quick Links
Netra Blade X3-2B
(formerly Sun Netra X6270 M3 Server Module)
Getting Started Guide
IMPORTANT – The Netra Blade X3-2B was formerly named the Sun Netra X6270 M3 server module. The
product name change does not indicate any change in product features or functionality.
This guide describes the minimum steps you must perform to install your server module (blade) into a
supported chassis and power it on for the first time.
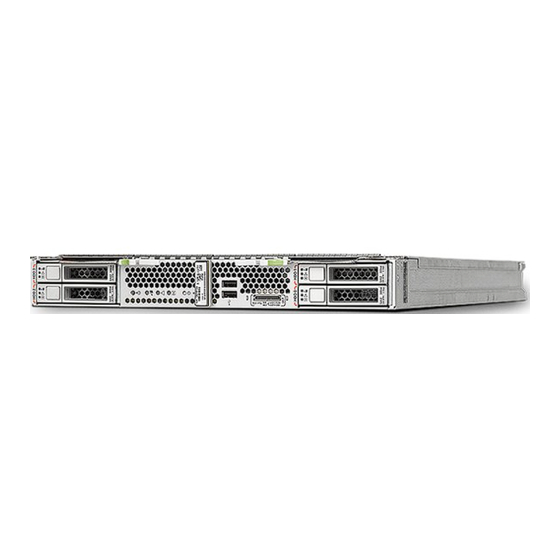
Front Panel Description
Blade Front Panel Features
Figure Legend
1
Locate LED (white). Press button to identify server.
2
Ready to Remove LED (blue). Full power removed.
3
Service Action Required LED (amber). A fault condition has
occurred.
OK/Power LED (green). Modes:
4
• SP booting - fast blink, 0.125 second on, 0.125 second off.
• Standby power - blink, 0.1 second on, 2.9 seconds off.
• Host booting - slow blink, 0.5 second on, 0.5 second off.
• Full power - steady on.
Power button. Press briefly to toggle server between standby and
5
full power.
Caution - Pressing the Power button for more than 4 seconds when
in full power initiates immediate shutdown to standby power. This
action can cause data loss.
6
NMI button - for Oracle Service use only.
7
Serial number label.
8
Two USB 2.0 ports.
9
Universal connector port (UCP). Used for multi-port (dongle)
cable.
Hard drives (HDDs) or solid state disks (SSDs).
10-
13
1
Advertisement
Table of Contents

Related Manuals for Sun Oracle Netra Blade X3-2B


Summary of Contents for Sun Oracle Netra Blade X3-2B
-
Page 1: Getting Started Guide
(formerly Sun Netra X6270 M3 Server Module) Getting Started Guide IMPORTANT – The Netra Blade X3-2B was formerly named the Sun Netra X6270 M3 server module. The product name change does not indicate any change in product features or functionality. -
Page 2: Install Optional Components
Information for Sun Hardware Systems (in the system accessory kit). ▼ Review Supported Hardware and Software and Identify Known Issues Review the Netra Blade X3-2B Product Notes for information on supported software and hardware and any known issues for the blade. - Page 3 If Oracle System Assistant is not embedded and you want to access it through Oracle ILOM, see the ■ instructions in the Netra Blade X3-2B Administration Guide. If you want to use Oracle ILOM or Oracle Hardware Management Pack, see the instructions in the ■...
- Page 4 Oracle VM, Oracle Linux, or • Oracle System Assistant, or: Windows • Netra Blade X3-2B Installation Guide for Oracle Virtual Machine Software • Netra Blade X3-2B Installation Guide for Oracle Linux Operating Systems • Netra Blade X3-2B Installation Guide for Windows Operating Systems Oracle Solaris OS or Oracle •...
-
Page 5: Service And Technical Support
System Assistant to view the serial number. For service and technical support, go to: http://www.oracle.com/us/support/contact-068555.html Related Documentation Documentation Links All Oracle products http://www.oracle.com/documentation Netra Blade X3-2B http://docs.oracle.com/cd/E26403_01 Sun Netra 6000 modular system http://docs.oracle.com/cd/E19945-01 Oracle ILOM 3.0 http://docs.oracle.com/cd/E19860-01 Oracle Solaris and other system http://www.oracle.com/technetwork/indexes/documentation/#sys_sw... - Page 6 Feedback Provide feedback on this document at: http://www.oracle.com/goto/docfeedback Support and Accessibility Description Links Access electronic support through https://support.oracle.com My Oracle Support. For hearing impaired: http://www.oracle.com/accessibility/support Learn about Oracle’s commitment to http://www.oracle.com/us/corporate/accessibility accessibility. Copyright © 2012, Oracle and/or its affiliates. All rights reserved. Copyright ©...
Need help?
Do you have a question about the Netra Blade X3-2B and is the answer not in the manual?
Questions and answers