Table of Contents
Advertisement
Quick Links
Advertisement
Table of Contents

Related Manuals for Sonel MMR-640


Summary of Contents for Sonel MMR-640
- Page 3 LOW RESISTANCE METER MMR-640 USER MANUAL SONEL S.A. Wokulskiego 11 58-100 Świdnica, Poland Version 1.01 09.05.2019...
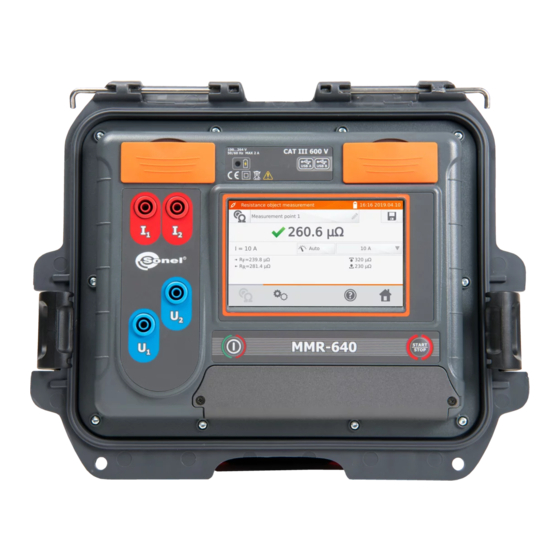
- Page 4 Thank you for purchasing our low-resistance meter. MMR-640 is a modern, high-quality measuring device, which is easy and safe to use. Please acquaint yourself with this manual in order to avoid measuring errors and prevent possible problems in operation of the meter.
-
Page 5: Table Of Contents
5 Power supply ....................38 5.1 Monitoring the power supply voltage ............... 38 5.2 Replacing the battery pack ..................38 5.3 General rules for using Li-Ion rechargeable batteries ..........39 6 Cleaning and maintenance ................39 7 Storage ......................40 MMR-640 – USER MANUAL... - Page 6 8 Dismantling and Disposal ................40 9 Technical specifications ................40 10 Equipment ...................... 41 10.1 Standard accessories ....................41 10.2 Optional accessories ....................42 11 Manufacturer ....................42 12 Laboratory services ..................43 MMR-640 – USER MANUAL...
-
Page 7: Safety
In case of measurements on systems, components and devices that may be under dangerous voltage, MMR-640 may be used only by qualified persons who are authorized to work on electric installations. Unauthorized use of the meter may result in its damage and may be a source of seri- ous hazard to the user. -
Page 8: General Settings - Menu
In the main menu, select icon Select Meter settings. 2.1.1 Energy saving In order to save its rechargeable battery, the meter automatically shuts off or blanks the screen af- ter an adjustable inactivity period. Select Energy saving. MMR-640 – USER MANUAL... -
Page 9: Sound Settings
Set the inactivity time for blanking the screen and turn- ing the meter off. 2.1.2 Sound settings Select Sound settings. Select the box to turn on ( or off the sound signals. MMR-640 – USER MANUAL... -
Page 10: Pin Code Settings
The PIN code is used for communication with PC. The default code is 123. 2.1.4 Display brightness settings Select Display brightness. Use + and - icons to set the desired brightness. Confirm it by pressing OK. MMR-640 – USER MANUAL... -
Page 11: Memory Settings
Use icons to switch between USB memory and meter memory. Use icon to initiate the process of copying clients to the USB memory and vice versa. MMR-640 – USER MANUAL... -
Page 12: Object Types Database
The meter has default types saved in its memory. Use icon to add a new type of the tested object. Enter a new type of the object being tested. Added types may be deleted by pressing MMR-640 – USER MANUAL... -
Page 13: Object Names Database
It is a list of names of tested objects or measurement points. Select Object names data- base. The meter has 4 default names saved in its memory. icon to add a new name. Enter the name of the object. Added names may be deleted by pressing MMR-640 – USER MANUAL... -
Page 14: Resistance Limits Database
The specified limits may be used to automatically assess the validity of the results of resistance measurements. Select Resistance limits da- tabase. Select to add a new limit. Tap Limit name box. Enter the name of the limit. icon to go to the lower limit setting. MMR-640 – USER MANUAL... - Page 15 Enter the lower limit. Use icon to go to the upper limit setting. You can set only one of the limits. to save the limit in the memory. By pressing may exit without saving. to delete the limit. MMR-640 – USER MANUAL...
-
Page 16: Software Update
Read the displayed text. To perform an update insert the USB drive with the update files and select Update but- ton. The meter is downloading software. Select OK to run the update or close the window to cancel. MMR-640 – USER MANUAL... -
Page 17: Service
Service This function is available for factory servicing and is protected by password. User interface settings In the main menu, select icon Select User interface set- tings. MMR-640 – USER MANUAL... -
Page 18: Language Selection
2.5.1 Language selection Select Language button. Select the language. 2.5.2 Selecting the startup screen Select Startup screen but- ton. Select the desired startup screen. The screen will be au- tomatically shown after turn- ing the meter on. MMR-640 – USER MANUAL... -
Page 19: Changing The Date And Time
Similarly, you may set the time. To make changes, se- lect Change button. Information about the Meter In the main menu, select icon Select About the meter. The screen will display infor- mation on the meter and its manufacturer. MMR-640 – USER MANUAL... -
Page 20: Factory (Default) Settings
list of object names, list of R limits, list of T limit, sound settings, default startup screen, PIN code settings, energy saving settings, display brightness. MMR-640 – USER MANUAL... -
Page 21: Measurements
Auto/Manual switching (auto / manual range selection): Auto - the measuring current is limited to a value not ex- ceeding the set value, Manual - measuring current has the set value. Setting the measuring current. MMR-640 – USER MANUAL... - Page 22 If necessary, select resistance limits from the database (Limit settings name) or set the required limits for the performed measurement by clicking Lower limit and/or Upper limit. To deactivate the limit delete the lower and upper values. MMR-640 – USER MANUAL...
- Page 23 – resistance at the measuring current flowing in the assumed negative direction – upper limit – lower limit The measuring current is obtained from a current source. The result may be entered into the memory by pressing icon (see sec. 4.2). MMR-640 – USER MANUAL...
-
Page 24: Memory
4.1.1 Entering the clients Select Memory management to enter the memory. Select to add a client. By selecting the individual fields, enter customer data using the keyboard. Client name (box marked in orange) is mandatory. MMR-640 – USER MANUAL... -
Page 25: Entering Objects, Subobjects, Measurement Points
4.1.2 Entering objects, subobjects, measurement points 4.1.2.1 Entering objects and subobjects Select associated with the selected client. To add an object or measur- ing point select MMR-640 – USER MANUAL... - Page 26 Select one of the default names or enter your own. In the box Description you may attach an additional de- scription. In the box Object type box you may select the default type of or enter your own. MMR-640 – USER MANUAL...
- Page 27 By clicking you can add more objects. By clicking the object field icon, you may enter subobjects in the object etc. - up to 4 levels. MMR-640 – USER MANUAL...
-
Page 28: Entering Measurement Points
Measuring points may be entered at any memory level, i.e. at the level of client, object or subobject. Select associated with the client, and then at the level of the object (subobject) press Select Measurement point. Select Measurement point name box to name the object (mandatory). MMR-640 – USER MANUAL... - Page 29 Select one of the default names or enter your own. By clicking Measurement point type box, you may se- lect the default type of or en- ter your own. icon to save a meas- uring point to the memory. MMR-640 – USER MANUAL...
-
Page 30: Storing The Measurement Results In The Memory
The measurement result may be entered only to the measuring point or to logger. 4.2.1 Entering the results of measurements with previously organized memory icon after finishing the measurement. Select the client by tapping icon next to its name. Select the object/subobject. MMR-640 – USER MANUAL... -
Page 31: Entering The Results Of Measurements Without Previously Organized Memory
Select the measuring point (in- dicated by orange border). Save the result by selecting icon. 4.2.2 Entering the results of measurements without previously organized memory 4.2.2.1 Method 1 icon after finishing the measurement. Select icon to add a client. MMR-640 – USER MANUAL... - Page 32 After adding and saving the object (also subobjects if necessary), select to add the measurement point. After adding and saving the measuring point, select The result is saved to memory. The meter returns to the measuring mode. MMR-640 – USER MANUAL...
-
Page 33: Method 2
After finishing the measurement press icon. Select to add a client. After saving the client: select icon next to its name and then select icon to add the object. MMR-640 – USER MANUAL... -
Page 34: Viewing Memory Data
- on the displayed screen - select again . The measuring point with the measurement result will be saved automatically. Viewing memory data Select Memory management. Select of the selected object and then select on the object, subobjects and measuring point. MMR-640 – USER MANUAL... -
Page 35: Search" In The Memory
In any of the client's window, se- lect icon. Enter the name or its several subsequent Mark letters. appropriate positions Enter the object type or select the default type Enter the rele- Selecting sorting by vant dates name or date MMR-640 – USER MANUAL... - Page 36 After entering all the search criteria, select icon again. Search results. To perform the search, enter the name (or its part) or one of the dates. The size of letters in the name of searched item is ignored. MMR-640 – USER MANUAL...
-
Page 37: Copying Client Data From The Memory To Usb Stick And Vice Versa
Insert the USB stick into the appropriate USB slot of the meter. Select icon. Select to save data in the USB stick. Select to copy data from the USB stick to the memory of the meter. MMR-640 – USER MANUAL... -
Page 38: Deleting Data
Main menu ► Memory management To delete a client: in location 1 select a client and then icon at the bottom bar, in location 2 select icon associated with its name. ► Memory settings ► Memory management MMR-640 – USER MANUAL... -
Page 39: Deleting An Object
Main menu ► Memory management using icon go to the cli- ent’s content, using icon start to edit the selected object… …and then select Select Yes to confirm deleting or No to cancel it. MMR-640 – USER MANUAL... -
Page 40: Power Supply
Replacing the battery pack MMR-640 is equipped with a rechargeable lithium-ion battery pack and a charger. The battery pack is placed in the battery compartment. Battery charger is installed inside the housing of the meter and is compatible only with the manufacturer’s rechargeable battery pack. -
Page 41: General Rules For Using Li-Ion Rechargeable Batteries
The casing of the meter may be cleaned with a soft, damp cloth using all-purpose detergents. Do not use any solvents or cleaning agents which may scratch the casing (powders, pastes, etc.). The electronic system of the meter does not require maintenance. MMR-640 – USER MANUAL... -
Page 42: Storage
200.0…1999.9 Ω 0.1 Ω 1 mA Resistance measurement in the presence of noise of 50 Hz or 60 Hz Additional Signal/noise ratio Signalling uncertainty N ≥ 0.02 0.02 > N ≥ 0.004 N < 0.004 unspecified MMR-640 – USER MANUAL... -
Page 43: Equipment
L11 – WAFUTL11, USB cable – WAPRZUSB, Li-Ion 7.2 V rechargeable battery – WAAKU27, operating manual, calibration certificate – LSWGBMMR640, PC software (Sonel Reader), guarantee card. MMR-640 – USER MANUAL... -
Page 44: Optional Accessories
The manufacturer of the device and provider of guarantee and post-guarantee service: SONEL S.A. Wokulskiego 11 58-100 Świdnica Poland tel. +48 74 858 38 60 fax +48 74 858 38 09 E-mail: export@sonel.pl Web page: www.sonel.pl NOTE! Service repairs must be performed only by the manufacturer. MMR-640 – USER MANUAL... -
Page 45: Laboratory Services
National Metrological Institute. According to ILAC-G24 „Guidelines for determination of calibration intervals of measuring instru- ments”, SONEL S.A. recommends periodical metrological inspection of the instruments it manufac- tures no less frequently than once every 12 months. - Page 46 NOTES MMR-640 – USER MANUAL...
- Page 47 SYMBOLS DISPLAYED BY THE METER Memory Measurement setup mode Settings Saving to memory Return to the main menu Help Adding a client, object or Exit from the option measuring point Searching for an object or Entry to client objects measurement point There was a limitation of Entry to client edition, object the measuring current to a...
Need help?
Do you have a question about the MMR-640 and is the answer not in the manual?
Questions and answers