Table of Contents
Advertisement
IMPORTANT SAFETY INFORMATION: Always read this manual first before attempting to service this log grate. For your
safety, always comply with all warnings and safety instructions contained in this manual to prevent personal injury or prop-
erty damage.
Dimplex North America Limited
1367 Industrial Road Cambridge ON Canada N3H 4W3
1-888-346-7539 www.dimplex.com
In keeping with our policy of continuous product development, we reserve the right to make changes without notice.
© 2016 Dimplex North America Limited
Service Manual
Model
RLG20
RLG25
Part Number
6909740159
6909760159
REV
PCN
DATE
00
-
19-OCT-16
7400950000R00
Advertisement
Table of Contents

Related Manuals for Dimplex RLG20


Summary of Contents for Dimplex RLG20
- Page 1 Dimplex North America Limited 1367 Industrial Road Cambridge ON Canada N3H 4W3 19-OCT-16 1-888-346-7539 www.dimplex.com In keeping with our policy of continuous product development, we reserve the right to make changes without notice. © 2016 Dimplex North America Limited 7400950000R00...
-
Page 2: Table Of Contents
RLG20 ........ -
Page 3: Operation
OPERATION RLG20 Manual Control The manual controls for the Revillusion are located on the right-front leg of the log grate. Power Press to activate the current standby state (On/Off). Power • Standby State On Press to turn the flame effect on and activate the Press to turn everything Off. -
Page 4: Rlg25
To operate correctly, the remote control must be pointed toward the front of the unit. Color Themes Press multiple times to change the flame base colors from Yellow to Blue to Off. (Feature is active only when the flame effect is On.) www.dimplex.com... -
Page 5: Maintenance
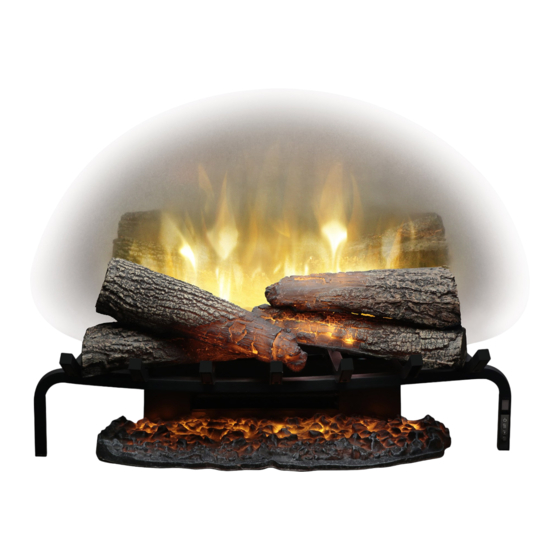
MAINTENANCE General Maintenance Inspect the log set regularly, depending upon conditions, and at a minimum yearly intervals. Remove dust and clean the logs, mat, grate, and base as required. Except for installation and cleaning described in this manu- al, an authorized service representative should perform any other servicing. -
Page 6: Exploded Parts Diagram - Rlg20
EXPLODED PARTS DIAGRAM - RLG20 REPLACEMENT PARTS LIST - RLG20 Main Control Board ....3001740100RP Logset, 20” ......0441910100RP IR Key Board . -
Page 7: Exploded Parts Diagram - Rlg25
EXPLODED PARTS DIAGRAM - RLG25 REPLACEMENT PARTS LIST - RLG25 Heater-Blower Assy with Cutout ... 2203730100RP Logset, 25” ......0441940100RP Flame LEDs, 4x1W . -
Page 8: Wiring Diagram
4 x 0.20mA RGB STRIP 4-7 x 0.20mA LED STRIP ASH MAT ASSEMBLY 2 PIECES 360° COLOUR LIGHTS 6 x 0.20mA RGB HARNESS IR EYE/KEY BOARD CONTROL BOARD REMOTE RLG20 CUTOUT +T° +T° BLOWER MOTOR FLICKER MOTOR FLAME LIGHTS 3 x 1W LEDs 4-7 x 0.20mA LED STRIP... -
Page 9: Back Log Replacement
WARNING: Disconnect power before attempting any maintenance to reduce the risk of electric shock or damage to persons. RLG20 1. Lift the flame panel from the unit and put it aside in a safe place. Bottom Assembly 2. -
Page 10: Flame Led Strip And Coloured Led Strip Replacement
Tools Required: Philips head screwdriver to persons. WARNING: If the log grate was operating prior to ser- RLG20 vicing, allow at least 10 minutes for the heating elements to 1. Lift the flame panel from the unit and put it aside in a cool off to avoid accidental burning of skin. -
Page 11: Power Supply Replacement
each corner on both ends. (Figure 4) 6. Trace the wires to the main control board and the wire nuts and replace the old connections with the new con- 4. Gently tilt the unit onto the back and lower the bottom nections. -
Page 12: Flicker Motor Replacement
RLG20 7. On the heater assembly, there is a plastic spacer that 1. Lift the flame panel from the unit and put it aside in a channels the air from the heater assembly out of the safe place. - Page 13 Figure 9 Connecting Screws Plastic Spacer NOTE: Use a flat head screwdriver to gently pry be- tween the end of the connector and the heater assembly to release the wires. WARNING: Ensure wires do not come in contact with moving parts by securing wires in wiring tie wraps.
-
Page 14: Troubleshooting Guide
Replace main control board. Refer to Operation Section Colour themes dim or not ap- Improper operation pearing Loose connection of coloured LEDs Check wiring connections Defective coloured LED wiring Replace coloured LED assembly Defective main control board Replace main control board. www.dimplex.com... - Page 15 CAUSE SOLUTION PROBLEM Heater Refer to Operation Section Heater is not turning Off Improper operation Defective main control board Replace main control board. Refer to Operation Section Heater is not turning On Improper operation Loose wiring Check wiring connections Defective heater assembly Replace heater assembly Heater is turning off after a Build up of dirt/dust in heater assembly...
Need help?
Do you have a question about the RLG20 and is the answer not in the manual?
Questions and answers