Biomeme Franklin User Manual
Real-time pcr thermocycler
Hide thumbs
Also See for Franklin:
- User manual (42 pages) ,
- User manual (38 pages) ,
- User manual (26 pages)
Table of Contents
Advertisement
Quick Links
Advertisement
Table of Contents

Related Manuals for Biomeme Franklin


Summary of Contents for Biomeme Franklin
- Page 1 US ER M AN UAL Franklin Real-Time PCR Thermocycler...
-
Page 2: Table Of Contents
Thermocycler Buttons & Layout LED Status Indicators Turning Thermocycler On/Off Charging & Checking Battery Status Enabling/Disabling Bluetooth Recovering & Reattaching Test Data Transferring Data Loading Sample into Go-Strips Placing Go-Strips into Thermocycler Maintenance & Cleaning Troubleshooting Disclaimer © Biomeme, Inc. 2019 1000003.01-01.2018... - Page 3 3 targets each. Just under 3 lbs, hand-held, and battery-operated for maximum portability enabling a full day’s work out in the field on a single charge. For your convenience, we offer 3 different variations of the Franklin - one9, two9 and three9.
-
Page 4: Technical Specifications
*Note that the Darwin one9 is limited to the FAM/SYBR (Green) channel and the Darwin two9 is limited to the FAM/SYBR (Green) and ATTO647N (Red) channels only. You can upgrade your thermocycler(s) at any time! © Biomeme, Inc. 2019 1000003.01-01.2018... -
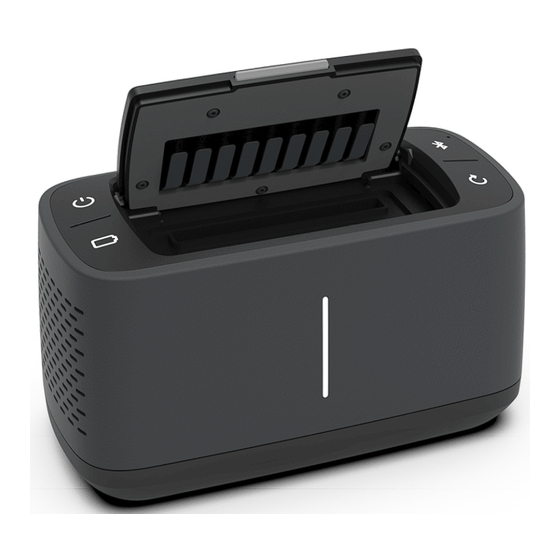
Page 5: Thermocycler Buttons & Layout
Thermocycler Button Layout There are a total of 4 buttons located on the top of your Franklin thermocycler: Power Button Bluetooth Radio Button power-of Bluetoot Turn thermocycler on/off Enable/disable Bluetooth Battery- Battery Button Recovery Button redo Check current battery Restore thermocycler to... -
Page 6: Led Status Indicators
LED Status Indicators Vertical LED on the front of your Franklin thermocycler The Franklin has 5 LEDs on the front of the unit. The LEDs are used to convey various states of the thermocycler as outlined in the table below. -
Page 7: Charging & Checking Battery Status
If your battery is running low, simply plug the AC power adapter into an outlet and insert the power connector into the back of your thermocycler. When the battery button is held, the LED on the front of your thermocycler Battery- indicates the battery charge status as follows: © Biomeme, Inc. 2019 1000003.01-01.2018... -
Page 8: Enabling/Disabling Bluetooth
“Confirm”. The LED on the front of your thermocycler will flash white indicating it’s connected. If you prefer wired control over wireless, connect your smartphone and Franklin unit using your preferred OTG adapter and micro USB cable. © Biomeme, Inc. 2019 1000003.01-01.2018... -
Page 9: Recovering & Reattaching Test Data
If this happens, you can easily reattach your smartphone to the thermocycler. To do so, relaunch the Biomeme mobile app and on the app home screen tap the “Reattach Test” button. From there, select your test from the list of incomplete runs. -
Page 10: Transferring Data
3. A menu will slide in with sharing options; select “Bluetooth” and transition to the “Choose Bluetooth Device” screen NOTE Instructions could vary depending on your computer and/or smartphone Operating System. If you require further assistance, please contact support@biomeme.com. © Biomeme, Inc. 2019 1000003.01-01.2018... - Page 11 If you start your test with a serial connection, you must finish your test on a serial connection. NOTE Instructions could vary depending on your computer and/or smartphone Operating System. If you require further assistance, please contact support@biomeme.com. © Biomeme, Inc. 2019 1000003.01-01.2018...
-
Page 12: Loading Sample Into Go-Strips
NOTE Bubbles may remain at the top of a tube. This is acceptable. Bubbles at the BUBBLES bottom of the tube, however, are not acceptable. © Biomeme, Inc. 2019 1000003.01-01.2018... - Page 13 Placing into Biomeme Thermocycler Open the lid of the Biomeme thermocycler. Place your test strip, with the void filling cap inserted, into a 3-well slot. Don’t worry if the void filling cap feels slightly loose. When the lid of the thermocycler is closed it will further secure the caps into place.
-
Page 14: Maintenance & Cleaning
In the case of thermocycler failure or damage, please contact support@biomeme.com. The Franklin thermocycler can be cleaned using 70% ethanol, 10% bleach or a disinfecting wipe (e.g. Lysol) solution. Do not spray or pour solution directly onto the thermocycler when cleaning. Ensure no excess liquid is used when cleaning as it may damage the unit. -
Page 15: Troubleshooting
If your test fails, the smartphone will notify you of the error returned from the thermocycler. Your last run will be saved in the Biomeme mobile app up to the point of failure, but the data will not be processed resulting in no CQ values, baseline, or graph of smooth data. - Page 16 If starting still fails after many retries, please contact support@biomeme.com. The USB failed to send the protocol... Make sure your thermocycler is on. If on and still failing, power cycle your thermocycler and go through the setup again. © Biomeme, Inc. 2019 1000003.01-01.2018...
- Page 17 MAC address for the thermocycler(s) requiring an upgrade which can be found on the label on the bottom of your unit(s). Start by navigating to the settings menu (COG) in the Biomeme mobile app and tap upgrade. From there, you'll be re-directed to our mobile-friendly online store where you can purchase additional color channels such as ATTO647N (Red) and TexasRedX (Amber).
-
Page 18: Disclaimer
For Research Use Only. Not for use in human or veterinary diagnostics. The performance characteristics of this product have not been established. Biomeme products may not be transferred to third parties, resold, modified for resale or used to manufacture commercial products or to provide a service to third parties without written approval of Biomeme, Inc.
Need help?
Do you have a question about the Franklin and is the answer not in the manual?
Questions and answers