Advertisement
Quick Links
Advertisement

Related Manuals for CycleOps PowerBeam Pro


Summary of Contents for CycleOps PowerBeam Pro
- Page 1 PowerBeam Electronic Trainer User Guide...
- Page 2 Congratulations! You’ve purchased the best electron- · Do not attempt to ride the bike at high RPM’s or in ic trainer available. With the CycleOps PowerBeam a standing position until you have practiced at Pro Trainer, you’ll be able to create personalized lower RPM’s.
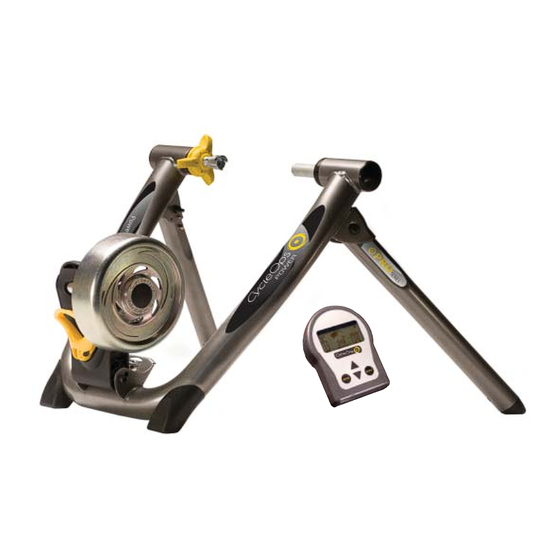
- Page 3 DVD (J) • Warranty registration card (Not Shown) (you can also register your CycleOps trainer at www.cycleops. com) If you do not fi nd all of these items in the box, please contact Saris customer service at 800-783-7257 (op-...
- Page 4 1.2: Trainer Assembly Next, insert the resistance unit power cable into the resistance unit as shown below. To begin assembling your trainer, extend the legs as shown below, then set the trainer on a fl at surface. Press Extend Plug the power supply into the wall outlet. Use the zip ties to secure the cadence sensor to the non-drive-side chain-stay of your bicycle as shown Turn the thumb wheel as shown below to level the...
- Page 5 1.3: Attaching your Bike to the Trainer Pull the yellow cam lever down and rotate 90 de- grees clockwise to unlatch the resistance unit. Pivot The CycleOps PowerBeam Pro trainer is designed the resistance unit down to allow clearance for your to be used with the provided skewer.
- Page 6 Using harder rubber composed tires will improve their life. Note: The CycleOps PowerBeam Pro trainer can be used without the CycleOps PowerBeam Pro com- puter. Simply plug the resistance unit in and it will provide a resistance curve similar to that of riding on...
- Page 7 1.4: Attaching the CycleOps PowerBeam Pro com- 1.5 Detaching your Bike from the Trainer puter to your Bike Pull the yellow cam lever down and rotate 90 de- Attach the CycleOps PowerBeam Pro computer to grees clockwise to unlatch the resistance unit. Pivot...
-
Page 8: Part 3: Ride Mode
To return to the main menu (see Part you’re riding. The faster you pedal, the more resis- 2), press and hold mode and select together for two tance you’ll need to overcome, just like riding up an seconds. actual hill. The resistance the CycleOps PowerBeam... - Page 9 Note: When the battery is changed out in the heart to achieve the target power. When the CycleOps Pow- rate strap, you will need to re-learn the device to the erBeam...
- Page 10 Press select while the interval box is highlighted to it is found, the data is displayed on the CycleOps go to the “interval memory” mode. PowerBeam Pro computer. If none is found, the unit will time out and stop searching. If you attach your The screen remains dark, and you’ll be able to check...
-
Page 11: Part 4: Workout Mode
From the Main Menu, select “Workouts.” You’ll see a 4.3: Power screen that offers a number of workouts, including any you have saved to the CycleOps PowerBeam This box displays your current power output in watts. Pro computer. Use the arrow buttons to highlight the (See Section 3.3 for more detail). -
Page 12: Part 5: Setup Mode
Each option is explained in detail in the following sections. This option allows you to work with the available memory in your CycleOps PowerBeam Pro com- puter. There are two choices on this screen. - Page 13 PowerAgent , calibration information and odometer data are still stored. “Odometer” displays the total number of miles (or kilometers) you have ridden on the CycleOps Power- Beam Pro trainer. 5.3 Calibration Once at 18 mph, hold this speed for two minutes.
- Page 14 CycleOps PowerBeam Pro trainer. Attach the power meter to your handlebars so you can read both the PowerTap CPU as well as the CycleOps Pow- erBeam computer. 5.4.1: Time/Date This option allows you to set the time and date.
- Page 15 This screen displays the version number for the Learn 2 is used if there are other like devices in the fi rmware running on the CycleOps PowerBeam area. Note this requires you to remove and re-insert Pro computer and the Saris Cycling Group customer...
- Page 16 Part 3: Using the CycleOps PowerBeam in a Group Environment CycleOps utilizes ANT+ technology to ensure a robust and reliable connection between the various sensors used in our products. Sensors are defi ned as power meter sensors, heart rate strap sensors, cadence sensors, speed sensors, and controlled resistance sensors.
- Page 17 The original purchaser must provide proof of pur- chase. Service calls and/or transportation to and All Saris Cycling Group CycleOps PowerBeam from the Authorized Saris Cycling Group Dealer are products are warranted to the original retail purchas- the responsibility of the purchaser.
- Page 18 However, there is no guarantee that interference will not occur in a particular installation. Saris Cycling Group, Inc. 5253 Verona Rd. Madison, WI 53711 800-783-7257 www.saris.com www.cycleops.com 17946c 11/09...
Need help?
Do you have a question about the PowerBeam Pro and is the answer not in the manual?
Questions and answers