Table of Contents
Advertisement
Full HD 1080p Indoor
Video Doorbell
Pan & Tilt
Security Wi-Fi Camera
with Siren
Waiting for
Raul's pic
Model AWF71D
Model AWF33-S2
User Guide
User Guide
Please read these instructions completely
Wireless Made Simple.
Please read these instructions completely
Wireless Made Simple.
before operating this product.
before operating this product.
Advertisement
Table of Contents

Subscribe to Our Youtube Channel
Related Manuals for ALC AWF71D

Summary of Contents for ALC AWF71D
- Page 1 Full HD 1080p Indoor Video Doorbell Pan & Tilt Security Wi-Fi Camera with Siren Waiting for Raul’s pic Model AWF71D Model AWF33-S2 User Guide User Guide Please read these instructions completely Wireless Made Simple. Please read these instructions completely Wireless Made Simple.
-
Page 3: Table Of Contents
REMOTE ACCESS ......................11 Overview..........................11 Requirements For Remote View ..................11 Connecting to the Internet ....................12 Connecting Via the App ....................13 ALC SightHD App Icons ....................15 To Take Snapshots ......................18 To View and/or Take Videos ....................20 Motion Recordings ......................21 To Play Videos .........................22 To Delete Videos ......................25... -
Page 4: Important Safety Instructions
IMPORTANT SAFETY INSTRUCTIONS PRODUCT SAFETY: When used in the directed manner, this unit has been designed and manufactured to ensure your personal safety. Improper use of this product can result in potential electrical shock or fire hazards. Please read all safety and operating instructions carefully before installation and use, and keep these instructions handy for future reference. - Page 5 IMPORTANT SAFETY INSTRUCTIONS WARNING: STRANGULATION HAZARD: Infants have STRANGLED in power cords. Keep power cords more than 3 feet away from cribs, bassinets, play yards, and other safe sleep environments for infants. IMPORTANT SERVICE SAFETY INSTRUCTIONS Damages caused by non-compliance with this operating manual will void the warranty! Read and Follow Instructions - All the safety and operating instructions should be read before the product is operated.
- Page 6 IMPORTANT SAFETY INSTRUCTIONS 10. Attachments - Do not use attachments unless recommended by the product manufacturer as they may cause a hazard. 11. Water and Moisture - Do not use receivers or video monitors near water — for example, near a bath tub, wash bowl, kitchen sink or laundry tub, in a wet basement, near a swimming pool and the like.
-
Page 7: Introduction
After unpacking, you will have the following items: Camera Template 16GB microSD card (installed) Brackets Digital Adapter and Sticker 1 with tabs, 1 without tabs Video Doorbell Model AWF71D QUICK START GUIDE Wireless Made Simple. Screw Kit Quick Start Guide Wire — 5 —... -
Page 8: Getting To Know Your Doorbell
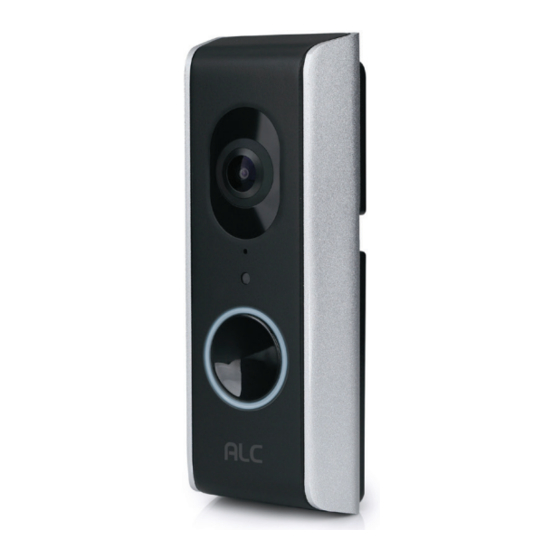
INTRODUCTION Getting to Know Your Doorbell Video Doorbell HD Camera Microphone Light sensor Reset Button Push Button Terminals Speaker NOTE: Avoid installing in a location which requires the wireless signal to pass through cement, concrete and metal structures. This will reduce the transmission range. Recommendations for best system performance: •... -
Page 9: Installation
INSTALLATION Installation Tips • Before you install the doorbell, plan where and how it will be positioned, either next to the door or on a side wall, usually replacing an existing standard doorbell. • Determine if your doorbell is a standard or digital doorbell and use the applicable installation instructions. -
Page 10: Installing The Doorbell
INSTALLATION Installing the Doorbell - Replacing a Standard Doorbell If you have a mechanical doorbell (looks similar to image at the right), which will make the traditional “ding-dong” sound, then do the following: IMPORTANT: Please set up the doorbell first before mounting and stay in close range with the doorbell during setup. Turn off power to the doorbell. - Page 11 INSTALLATION Installing the Doorbell - Replacing a Digital Doorbell If you have a digital doorbell (looks similar to image at the right), which usually plays a short musical tune, then do the following: IMPORTANT: Please set up the doorbell first before mounting and stay in close range with the doorbell during setup. Turn off power to the doorbell.
- Page 12 INSTALLATION Installing the Doorbell IF DOORBELL IS NEXT TO THE DOOR Install the bracket with tabs where the previous doorbell was, next to the door, using the template, the 2 small screws and if necessary, the anchors. Make sure the wires are fed through the appropriate square opening in the bracket.
-
Page 13: Remote Access
REMOTE ACCESS Overview The doorbell’s camera allows you to view live video from an iPhone , iPad , iPod Touch ® ® ® Android smartphone or tablet. Free apps are available through the Apple App Store or the Android Market/Google Play. Up to three remote users can access live video at the same time as long as they have the Device ID (DID) Code and Security Code. -
Page 14: Connecting To The Internet
Download the ALC SightHD App as follows: APPLE DEVICE: From your iPhone or iPad, go to the App Store and search for ALC SightHD. ANDROID DEVICE: From your Android smartphone or tablet device, go to Google Play and search for ALC SightHD. -
Page 15: Connecting Via The App
90 seconds, the LED ring will blink 3 times when ready. Now Launch the ALC SightHD App and the Setup Wizard will appear. Tap + to start the Wizard and then tap Doorbell. - Page 16 REMOTE ACCESS Connecting Via the App Select your home network from the menu, and then enter your home network’s Wireless Password. If you get an error, make sure to enter the correct password and repeat. At the next screen enter a new password/ security code twice and remember it or write it down.
-
Page 17: Alc Sighthd App Icons
REMOTE ACCESS ALC SightHD App Icons Main Screen A still picture will appear when on the main screen. Tap the still screen to access the live video screen. See the next page for icon descriptions. Live View Screen The following icons appear when on the Live View Screen. - Page 18 REMOTE ACCESS ALC SightHD App Icons Icon Icon Description Add System Tap this icon to enter the setup wizard; see page 13. Edit Setting Tap this icon to access the App’s options. See below: Tap this icon to set up camera configuration or make changes to your existing settings.
- Page 19 REMOTE ACCESS ALC SightHD App Icons Icon Icon Description Snapshot Tap to capture screen images. The snapshots will be saved into the camera roll of your mobile device. See page 18 for more details. Record Tap to record and tap again to stop recording.
-
Page 20: To Take Snapshots
REMOTE ACCESS To Take Snapshots From the Main screen, tap to remote view your camera system. Tap the SNAPSHOT icon to take a snapshot of the current image; “Snapshot is successful” will appear briefly. To View Snapshots FOR iOS: Your snapshots will be named with the time stamp and saved into the Camera Roll >... - Page 21 REMOTE ACCESS To Take Snapshots PINCH AND ZOOM: To zoom in or out, use the simple pinch and zoom gesture with this app. — 19 —...
-
Page 22: To View And/Or Take Videos
REMOTE ACCESS To View and/or Take Videos From the main screen, tap to remote view your camera system. Tap the Record icon to start recording (the recording icon appears at the top-right corner). The App will record for 1 minute. See page 22 to playback videos. -
Page 23: Motion Recordings
REMOTE ACCESS To View and/or Take Videos PINCH AND ZOOM: To zoom in or out, use the simple pinch and zoom gesture with this app. Motion Recordings If set to Software Sensitivity when motion is detected on the video camera, the camera will automatically record for one minute and then stop recording. -
Page 24: To Play Videos
REMOTE ACCESS To Play Videos From the main screen, tap the Edit Setting icon. Tap the Event icon; the “Select Event Filter” pop-up will appear. — 22 —... - Page 25 REMOTE ACCESS To Play Videos Select the desired Start Time/Date of the videos you want to view by tapping on the respective option (date or time) and then setting. When finished, tap Done. Repeat for Stop Time/Date, then tap OK; the Event List will appear. —...
- Page 26 REMOTE ACCESS To Play Videos Tap the video name once to play the video clip. When playing back a video, tap the Pause icon to pause the video. Tap again to resume. To Mute, tap the Mute icon. To take a snapshot, tap the Snapshot icon. DOWNLOAD A VIDEO: To download a video to your Android or Apple device, press the Download icon and it will download to your...
-
Page 27: To Delete Videos
REMOTE ACCESS To Delete Videos Access the Events List as shown in steps 1 to 4 on pages 22-23. To delete one video, tap the Delete One icon. Then tap Delete next to the respective file you want to delete. To delete all video, tap the Delete All icon. -
Page 28: Information Screen Options
REMOTE ACCESS Information Screen Options From the main screen, tap the Information icon; a pop-up will appear. To view information (Version, etc.), tap About. Android Screen — 26 —... - Page 29 Launch Settings/System Preferences from your Home screen on the Apple device. Tap Notification Center; a list of Apps will appear. Scroll down to find “ALC SightHD” App and click on it. The Setting screen displays. Turn the notification ON or OFF as desired.
-
Page 30: Setting Screen
REMOTE ACCESS Setting Screen From the main screen, tap the Edit Setting icon. Tap the Setting icon; the System Information Screen will appear. — 28 —... - Page 31 REMOTE ACCESS Setting Screen On this screen you can change the name of your System (camera) and access the Advanced Settings menu. You can also enable E-Mail alerts. — 29 —...
-
Page 32: Advanced Settings
REMOTE ACCESS Advanced Settings From the main screen, tap the Edit Setting icon. Tap the Setting icon; the System Information Screen will appear. — 30 —... - Page 33 REMOTE ACCESS Advanced Settings Tap on the Advanced icon. Enter your Admin password (Default was 123456 unless it was changed), then tap OK. See the following pages for descriptions of advanced settings. — 31 —...
- Page 34 REMOTE ACCESS Advanced Settings Tap on Base Settings and the Base setting options will appear. Perform the following on this screen: ADMIN PASSWORD: Tap to change the Admin Password from the default 123456. Admin Password is used to get into this screen. DEVICE SECURITY CODE: Tap to change the Security Code which is used to access the device.
- Page 35 REMOTE ACCESS Advanced Settings Tap on Video Setting and the Video setting options will appear. Perform the following on this screen: VIDEO QUALITY: Tap to set the Video Quality. Tapping VGA will allow for faster video streaming, but the picture will not be as clear.
- Page 36 REMOTE ACCESS Advanced Settings Tap on Push Notification Setting and the Push Notification options will appear. Perform the following on this screen: Notify Enable: Enable this setting and when motion is detected or the doorbell is pressed, you will get an alert on your mobile device. This feature is to turn notifications On or Off from specific cameras.
- Page 37 REMOTE ACCESS Advanced Settings Tap on Melody Setting and the Melody options will appear. Perform the following on this screen: Change Melody Type: Tap and the doorbell will play the new chime. Repeatedly press to select the desired melody. Adjust Melody Volume: Tap and the doorbell will play the chime in the new volume.
-
Page 38: Cloud Account Setup
To sign up for a free account, go to: www.google.com/drive www.dropbox.com There is no charge from ALC to use this feature. It is free! After setting up your Google Drive or Dropbox account, you will need to establish an ALC Cloud account. To do this go into Advanced Settings as shown on page 36. - Page 39 REMOTE ACCESS Cloud Account Setup On the Sign in screen, tap Create or log into your previous created account. To create your Cloud account, enter a valid email address and create a password. Agree to the privacy policy. Enter the verification code and tap Submit.
- Page 40 REMOTE ACCESS Cloud Account Setup After creating the account, a welcome screen appears. Tap OK to dismiss the message. When the Device List appears, tap on the desired option; Google Drive or Dropbox, to create the binding. — 38 —...
- Page 41 REMOTE ACCESS Cloud Account Setup To confirm binding, tap on the Dropbox or Google Drive icon. Now, you will need to sign in onto your Google Drive or Dropbox account. Enter your email and password and tap Sign in. Congratulations! Your Cloud setup is complete.
-
Page 42: Maintenance
MAINTENANCE Doorbell When dust and grime builds up on the camera lens and glass, it will affect the night vision capability. The infrared light reflects off of the dust and grime, limiting the camera’s “vision.” Use a microfiber cloth to regularly clean the camera or when night vision video is cloudy or unclear. Reset To reset the doorbell, press and hold the Reset button for 10 seconds until the light around the button blinks rapidly... -
Page 43: Troubleshooting
TROUBLESHOOTING If you have any trouble with your system, try these simple steps which should handle most common issues. Problem Possible Solution Make sure there is power is to the camera. Make sure your network supports DHCP protocol. Make sure the doorbell and mobile device are on the The App cannot locate the doorbell. - Page 44 TROUBLESHOOTING Problem Possible Solution The camera’s infrared LEDs shine invisible light that reflects off of surfaces such as glass and will cause white A white image appears at light. Place the camera on the other side of the window night. to improve the night vision or place it in a well-lit area (recommend to install a security lamp to improve lighting).
- Page 45 If you cannot remember what the Security Code is, you must reset your camera back to factory defaults, delete the camera setup in the ALC SightHD app, and set the camera back up as if it were brand new. Ensure that you have added the Digital Adapter to the I have a digital door chime digital chime.
-
Page 46: Product Specifications
PRODUCT SPECIFICATIONS Doorbell Communication Range................300 ft in open space Camera Resolution ....................1920x1080 Operating Temperature...............14°F ~ 122°F (-10°C ~ 50°C) Operating Voltage....................10-24V AC Night Vision........................20ft Dimensions..............2.6 x 1.8 x 5.2 in (66 x 46 x 132 mm) MicroSD Card Time (16GB). -
Page 47: Warranty
WARRANTY One-Year Limited Warranty — 45 —... - Page 48 WARRANTY 2019 — 46 —...
- Page 49 Wireless Made Simple. ALCWireless.com 041819_v1...
- Page 50 Wireless Made Simple. ALCWireless.com...
Need help?
Do you have a question about the AWF71D and is the answer not in the manual?
Questions and answers
Where do I install the SD card?
The ALC AWF71D comes with a 16GB microSD card pre-installed. The microSD card is used for saving recorded videos. If you need to install or replace the SD card, refer to the device's SD card slot, which is likely located inside or on the back of the unit.
This answer is automatically generated