
Related Manuals for RoadScan Canada RSC DC3


Summary of Contents for RoadScan Canada RSC DC3
- Page 1 5/10/2019 DC3 MANUAL MAY 2019 - Google Docs RoadScan Canada CAR DVR RSC DC3 USER INSTRUCTION MANUAL ...
-
Page 2: Camera Layout
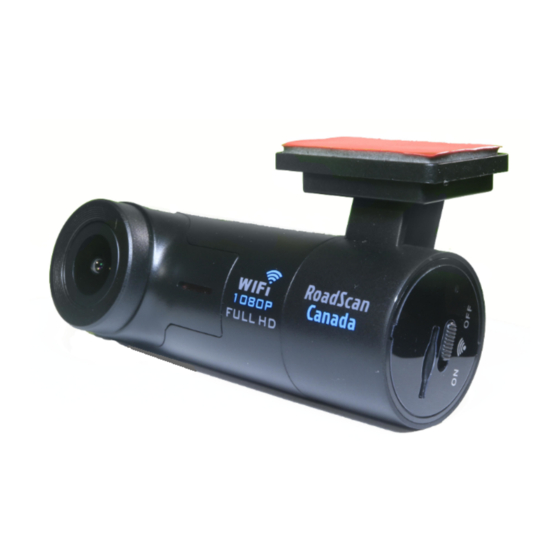
5/10/2019 DC3 MANUAL MAY 2019 - Google Docs CAMERA LAYOUT 1.Lens 2.WiFi Indicator 3.WiFi On/Off 4.TF Card Slot 5.Power 6.Recording 7.Power/USB 8.HDMI 9.Reset 10.Recording Indicator 11.Charging Indicator BOX CONTENTS Hardwire Kit Car Charger USB Cable Fixed plate Suction Cup GPS (Optional) Page 1 https://docs.google.com/document/d/1qYmI7wbmAt6WKfde1xo3CxyMcvJ-JY94QiQhq-uymfE/edit# 2/19... -
Page 3: Installation
5/10/2019 DC3 MANUAL MAY 2019 - Google Docs INSTALLATION 1.Insert one TF card to the DVR as shown in figure below Figure 1 NOTE: IT IS IMPORTANT TO FORMAT THE SD CARD ON INITIAL INSTALLATION AND TO DO SO AT MINIMUM ONCE EVERY 30 DAYS. FAILURE TO DO SO MAY RESULT IN VIDEO NOT BEING RECORDED. CHECK SD CARD IS WORKING DAILY. FAILURE TO DO SO MAY RESULT IN VIDEO NOT BEING RECORDED. RoadScan Canada Inc DOES NOT TAKE RESPONSIBILITY IF VIDEO IS NOT RECORDED DUE TO SD CARD ISSUES. 2.Slide the fixed plate to the DVR. As shown in figure below Figure 2 Page2 ... - Page 4 5/10/2019 DC3 MANUAL MAY 2019 - Google Docs INSTALLATION 3.Attach the fixed plate to the appropriate place on the inside of the windshield with the best placement being in the middle of the windshield to allow for optimal view and capturing of video . T h e camera is not designed to be affixed outside of the vehicle at anytime for usage. 4.Adjust the visual angle of the DC3. It is recommended to place the camera as much as possible behind the mirror so that the driver’s view is not blocked . N OTE: Figure 1 is strictly a representation of the camera attached to the windshield and not a suggestion of the placement on the windshield. Figure 2 demonstrates a installation behind a mirror, center windshield. Figure 3 ...
-
Page 5: Operation
5/10/2019 DC3 MANUAL MAY 2019 - Google Docs OPERATION 1. P ower: the camera turns on when the car charger enters the USB port. Hold the power button (on side with USB port) to turn off/on (if required). If the camera is professionally installed with a hard wire kit (purchased separately), then the camera will turn on/off automatically when power is supplied or disconnected. If equipped, vehicles may have automatic power supplied to the 12 volt adaptor at which time power will automatically be supplied. 2. R ecording : After power turns on, the DVR will automatically start to record. If required, press the button with the video symbol beside it (on side with USB port) to stop/start recording. 3 . WiFi On/Off : Move the switch to the on position to initiate WiFi. A flashing green light will flash beside the WiFi switch and will turn solid (this may take up to a minute). 4. R eset : To reset to the factory default settings, press the reset button (located on bottom of camera) when abnormal circumstances occur – hitting the reset button will not erase your data. 5. Charging Indicator : Red light at bottom of camera stays on while camera is plugged in. 6. ... - Page 6 5/10/2019 DC3 MANUAL MAY 2019 - Google Docs OPERATION FOR SMART CLIENT 1. D ownload and install APP software onto your cell phone : Search “LinkinEyes” software in Google Play or App Store, download and install. Figure 6 2. C onnect WiFi : To connect the DC3 WiFi, locate SSID AMBA_BOSS (Amba), wait for the WiFi signal to indicate that there is a connection, enter password 1234567890, 123456789 or 12345678. Figure 7 Figure 8 3. Opening App: A fter connection is established, open Linkin Eyes app, if there is a static spinning hourglass and failure to open / operate the app, uninstall the app and reinstall the app. * *Android phones are more prone to this than iPhones**. ...
- Page 7 5/10/2019 DC3 MANUAL MAY 2019 - Google Docs OPERATION FOR SMART CLIENT 3. View realtime recording : Once opened, live video feed from the DC3 will be displayed and recording. Figure 9 SETTINGS 1. Video must be stopped prior to viewing data or going to the settings menu. Stop the recording by pressing ...
- Page 8 5/10/2019 DC3 MANUAL MAY 2019 - Google Docs SETTINGS 2. Press the settings button to access the menu (Figure 11). Figure 11 3. The Setting Menu will display. (Figure 12) ...
- Page 9 5/10/2019 DC3 MANUAL MAY 2019 - Google Docs SETTINGS 4. FORMAT THE SD CARD This must be done a minimum of every 30 days. I M PORTANT ALL DATA WILL BE DELETED WHEN FORMATTING, MAKE SURE ALL DATA IS SAVED PRIOR TO FORMATTING. 5. It is imperative the Time Settings are updated for your time zone. Enter ‘Time Settings’ and the date/time will be automatically updated. Once complete hit ‘ok’ (Figure 13) ...
- Page 10 5/10/2019 DC3 MANUAL MAY 2019 - Google Docs SETTINGS Video Resolution: 2560x1080 30P 21:9/2304x1296 30P 16:9/1920x1080 30P 16:9/HDR 1920x1080 30P 16:9/1280x720 60P 16:9/1280x720 30P 16:9/HDR 1280x720 30P 16:9/1920x1080 45P 16:9; Default 2304x1296 30P 16:9 Photo Resolution: 4M(2688x1512 16:9)/9M(4000x2250 16:9)/13M(4800x2700 16:9); Default 4M(2688x1512 16:9) Video Stamp Date: On/Off/Cancel; Default On Video Stamp Driver ID: On/Off/Cancel; Default On Video Quality: S.Fine/Fine/Normal/Cancel; Default S.Fine Photo Stamp Date : On/Off/Cancel; Default On Photo Stamp Time: On/Off/Cancel; Default On Photo Quality: S.Fine/Fine/Normal/Cancel; Default S.Fine Format Camera Storage Space: Format/Cancel Time settings Default Setting: Ok/Cancel File Sort: Date Ascending/Date Descending/Cancel; Default Date Ascending Microphone: On/Off/Cancel; Default On Language: English/Simplified Chinese/Traditional Chinese/Russia (Please note: language is based on your cellphone language. In another way, if you set your cellphone language to English, it will show English; if set your cellphone language to Chinese, it will show Chinese) GSensor: Off/Low/Mid/High/Cancel; Default Off Video Loop Record: 1min/2min/3min/5min/Cancel; Default 2min Camera Storage Space: Free Space/Total Space App Version, eg., 1.4.18(420) Product Name: LinkinEyes Camera Firmware Version, eg., API 2.0 ambarella v160122 Clear stage folder: Cancel/Ok (clear temporary files). A bout: show APP copyright ...
-
Page 11: Photo Mode
5/10/2019 DC3 MANUAL MAY 2019 - Google Docs PHOTO MODE To reach photo mode, stop the recording button (figure 10), tap the ’photo button’ (Figure 13) and the camera switches to photo mode. To take a photo, tap the red photo button. Figure 13 To return to video mode, tap the grey video button. FILE PLAYBACK 1. Ensure recording is stopped, then press the file icon in the lower right corner of the screen (Figure 14). ... - Page 12 5/10/2019 DC3 MANUAL MAY 2019 - Google Docs FILE PLAYBACK 2. The screen in Figure 15 will be displayed with the list of menus at the top. Tap the menu to view. Videos that are part of an event or incident will be placed into the ‘event’ folder these files cannot be deleted on the camera and can only be deleted on the computer. Once in the video list, videos will populate (this may take a minute or two depending on the size of file and the number of files) Figure 16. To view a video, tap the one wished to be viewed. Two options are presented, view or download. Should download be chosen, the file will be downloaded and saved into your camera roll or alternatively, files can be deleted in this screen. The same options are presented for the photograph files, Figure 17. If no files are present, a message will be displayed showing ‘no files’, Figure 18. ...
- Page 13 5/10/2019 DC3 MANUAL MAY 2019 - Google Docs TO VIEW YOUR FILES ON YOUR PC Plug your camera into your PC via the USB cord (provided) into the USB connection. Find the location of camera on your PC. The computer should recognize the camera as D, E, F or G drive (or designated drive for your company), Figure 19. Open NORMAL folder to view all files on the sd card. From NORMAL, open media001 file to view all media files on your camera. Videos will show as .MOV, photos as .JPEG and audio as .WAV, Figure 20. Figure 19 ...
- Page 14 5/10/2019 DC3 MANUAL MAY 2019 - Google Docs GPS PLAYER INSTRUCTIONS If an optional GPS unit was purchased GPS Player zip file is included in the GPS player folder on the SD card, extract it and execute the player. The DATAKAM GPS software link is located on the RoadScan Canada website. The GPS player, Datakam that can be downloaded ( h ttp://datakam.ee/player ) , Figure 21. 1.Open the GPS player 2. Click on the file wished to be opened 2.Playback the video in the playlist, double click to play. GPS Player Instruction Conditions: 1.The video with GPS signal is recorded only if the satellite can be registered by the GPS unit. Camera use out of satellite range will not work as designed (ie, underground parking), however the video component will still function. 3.The computer must have internet access to utilize the GPS Player function. GPS Player features Play Stop Refresh the playlist Delete file from the playlist ...
-
Page 15: Recommendations / Troubleshooting
5/10/2019 DC3 MANUAL MAY 2019 - Google Docs RECOMMENDATIONS / TROUBLESHOOTING ● It is recommended to reformat the TF card once a month ● If the video captured is long, it is recommended to download and view on the computer as the length in time to download will be reduced. ● If your data is time stamped for 2015, go back into the settings, click on the time setting, then click the ‘ok’ button’ the hour glass will spin and stop, once it is done spinning the time WILL BE SET. ● It is recommended to use the fixed plate instead of the suction cup as the suction cup does have limitations pertaining to extreme heat or cold and may not hold as well as desired. ● To use the suction cup, follow these steps: 1) Attach the suction cup to the DVR (similar to the fixed plate) as shown below: Figure 22 2) Similar to installing with the fixed plate, it is recommended to place the camera behind the mirror onto the windshield out of view of the drivers site line. Once attached press the suction cup towards the windshield and push the switch up on the suction cup towards the windshield, as shown in Figures 23 and 24. ... -
Page 16: Camera Specifications
5/10/2019 DC3 MANUAL MAY 2019 - Google Docs CAMERA SPECIFICATIONS Item Parameter Product Size 90*38.4*30mm Chipset Ambarella A7 Lens Fix Focus Lens(150 degrees) Video Resolution 1296P, 1080P, 720P, HDR 1080P, HDR 720P File Format Video mp4, H.264; JPG USB Port USB2.0 high Speed HDMI Output Support External Memory card TF card,up to 32GB Gsensor Support WiFi Support Power Source Two pcs supercapacitors FEATURES 1. Use the world leading Ambarella H.264 video compression technology, intelligent circulating video recording without second leakage, and resolution of 1080P 30. 2. Intelligent collision detection and writeprotection, which can protect your important data. ... - Page 17 provide any specific legal advice. • Please check the RSC DC3’s features periodically to ensure that it is opera ng as required. • Please use the RSC DC3 as a tool while driving and use driver’s safety while driving. • RoadScan Canada Inc shall not be held responsible for any traffic viola ons related to the posi oning or ...
- Page 18 manufactured for these purposes. • DO NOT use this product to carry out any illegal ac vi es such as sneak preview, etc. RoadScan Canada Inc shall not ...
-
Page 19: Warranty
this product, and specifically disclaims any warranty for merchantability or fitness for a par cular purpose. RoadScan Canada Inc. DOES NOT warranty installa ons. Improper installa ons will void the warranty. LIMITATION OF LIABILITY The liability of RoadScan Canada Inc, arising from this warranty and sale shall be limited to a refund of the ...
Need help?
Do you have a question about the RSC DC3 and is the answer not in the manual?
Questions and answers