Table of Contents

Subscribe to Our Youtube Channel
Related Manuals for Rowenta VITALITY DH3110


Summary of Contents for Rowenta VITALITY DH3110
- Page 1 VITALITY / VITALITY LINENDRY Notice d'emploi Instructions for use DH3110 / DH4010-4020 Gebrauchsanweisung Gebruiksaanwijzing Instruzioni per l'uso Modo de empleo NC00017828 - 23/10 Instruções de utilização...
-
Page 2: Descriptif Produit
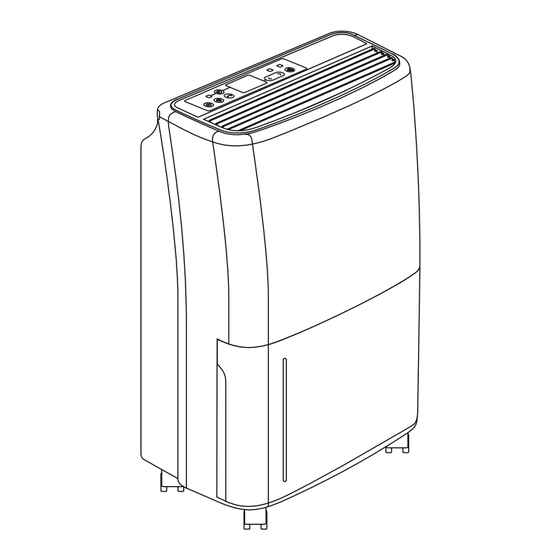
DESCRIPTIF PRODUIT 1 - Tableau de bord 2 - Poignée de transport 3 - Grille de sortie d’air 4 - Réservoir récupérateur d’eau 5 - Fenêtre indicatrice de remplissage du réservoir 6 - Poignées du réservoir 7 - Flotteur 8 - Roulettes 9 - Support pré-filtre amovible 10 - Grille d’entrée d’air 11 - Bouton d’ouverture pour drainage permanent... - Page 3 DESCRIPTIF TABLEAU DE BORD Tableau de commande - Bouton ON/OFF de mise en marche / arrêt B - Bouton de sélection des taux d’humidité relative objectifs C - Bouton de sélection des vitesses d’air D - Bouton Fonction DRY (Mod. DH4010 & 4020) E - Bouton Fonction SWING (Mod.
-
Page 4: Principe De Fonctionnement
Un air trop humide rend une maison inconfortable et peut créer de nombreuses nuisances. Votre déshumidificateur VIT LITY permet d’évacuer l’air humide en recueillant l’excès de va- peur d’eau en suspension dans l’air ambiant. Il protège votre habitat des effets néfastes d’une humidité... - Page 5 AVERTISSEMENTS Il est essentiel de lire attentivement cette notice et d'observer les recommandations suivantes: • Pour votre sécurité, cet appareil est conforme aux normes et réglementations applicables (Direc- tives Basse Tension, Compatibilité Electromagnétique). • Cet appareil est destiné à un usage domestique uniquement. Il ne peut donc pas être utilisé pour une application industrielle.
-
Page 6: Mise En Marche De L'appareil
FONCTIONNEMENT ssurez-vous avant la mise en marche de votre appareil que : - le positionnement de l’appareil décrit dans cette notice soit respecté, - les grilles d’entrée et de sortie d’air soient totalement dégagées, - l’appareil soit sur une surface plane et stable. MISE EN MARCHE DE L’APPAREIL Brancher le cordon et appuyer sur le bouton de Mise en marche ( ) Sur l’afficheur, le pictogramme (L) apparaît vous indiquant la température et le taux d’humidité... - Page 7 Fonction TIMER Cette fonction vous permet d’utiliser votre appareil pendant une durée de 1 à 24H dans des condi- tions préalablement établies : Température et humidité de la pièce Voyant bleu allumé Timer Vitesse Humidité Votre appareil étant en marche, vous pourrez sélectionner : - la vitesse de ventilation (bouton C) - et le taux d’humidité...
-
Page 8: Vidange Du Reservoir
Fonction « DRY » SÉCHAGE DU LINGE ( ) (Mod DH4010 & DH4020) ppuyer sur le bouton DRY (D) pour mettre en marche la fonction séchage du linge. Une 3ème vitesse plus élevée, la déshumidification en continu et l’oscillation de la grille de sortie d’air se mettront en marche automatiquement pour un meilleur séchage du linge. -
Page 9: Entretien
ENTRETIEN • Il est impératif d'arrêter votre appareil avec le bouton ( ) et de le débrancher avant toute opération d'entretien. • Vous pouvez le nettoyer avec un chiffon légèrement humide. • Important : Ne jamais utiliser de produits abrasifs qui risqueraient de détériorer l’aspect de votre appareil. -
Page 10: En Cas De Probleme
EN CAS DE PROBLEME • Ne jamais démonter votre appareil vous-même. Un appareil mal réparé peut présenter des risques pour l’utilisateur. • vant de contacter un Centre Service agrée de notre réseau, assurez-vous que l’appareil soit en po- sition normale de fonctionnement et que les grilles d’entrée et de sortie d’air soient totalement dé- gagées. -
Page 11: Product Description
PRODUCT DESCRIPTION 1 - Control panel 2 - Carrying handle 3 - ir outlet grill 4 - Water collection tank 5 - Tank water level viewing window 6 - Tank handles 7 - Float 8 - Rollers 9 - Removable pre-filter holder 10 - ir entry grill 11 - Permanent drainage opening... -
Page 12: Control Panel Description
CONTROL PANEL DESCRIPTION Control panel - ON/OFF button B - Objective relative humidity selection button C - Speed selection button D - DRY function button (Mod. DH4010 & 4020) E - SWING function button (Mod. DH4010 & 4020) F - PROG/TIMER function button G - Prog/Timer indicator lamp H - Tank full indicator lamp I - utomatic defrosting indicator lamp... -
Page 13: Operating Principle
Excessive atmospheric humidity makes a house uncomfortable and can have adverse consequences. Your Vitality dehumidifier allows you to remove damp air from your home by collecting the ex- cess water vapour suspended in the air. It protects your living environment from the damaging effects of excessive humidity. -
Page 14: Very Important
WARNINGS It is essential to read these instructions carefully and to observe the following recommendations. • For your safety, this appliance is compliant with applicable standards and regulations (Low (Vol- tage and Electromagnetic Compatibility Directives). • This appliance is intended only for domestic use. It may not be used for industrial purposes. •... - Page 15 OPERATION Before switching on your appliance, make sure that: - the appliance is positioned in accordance with these instructions, - the air inlet and outlet grills are completely unobstructed, - the appliance is placed on a flat and stable surface. START-UP OF THE APPLIANCE Plug the lead in and press the start button ( ).
- Page 16 TIMER Function This feature allows you to use your appliance for a period of 1 to 24 hours under previously defined conditions: Temperature and humidity of the room Blue light on Timer Speed Humidity With the appliance on, you can select the ventilation speed (button C) and the objective relative hu- midity (button B).
-
Page 17: Emptying The Tank
“DRY” Function for Drying clothes ( ) (Mod DH4010 & DH4020) Press the DRY button (D) to turn on the laundry drying function. 3rd higher speed, continuous dehumidification and the oscillation of the air outlet grill will come on automatically for improved clothes drying. SWING Function (Mod. -
Page 18: Technical Characteristics
CARE • It is imperative that you turn off your appliance using the button ( ) and disconnect it before any cleaning operation. • It can be cleaned with a damp cloth. • Important : Never use abrasive cleaners, these will damage the surfaces. TRANSPORT Check the water level in the tank before transport, empty it if need be. -
Page 19: In Case Of Problem
IN CASE OF PROBLEM • Never dismantle your appliance. poorly repaired appliance may pose risks to the user. • Before contacting an approved Service Centre in our network, ensure that the appliance is in a nor- mal operating position and that the air inlet and outlet grills are completely unobstructed. Type of problem Points to check - Water tank full. - Page 20 BESCHREIBUNG 1 - Bedienfläche 2 - Transportgriff 3 - Luftaustritt 4 - Wasserauffangtank 5 - Befüllungsanzeigefenster des Wasserauffangtanks 6 - Griff des Wasserauffangtanks 7 - Schwimmer 8 - Rollen 9 - Träger des abnehmbaren Filters 10 - Lufteintritt 11 - Öffnung zum blauf des Kondensationswassers...
- Page 21 BESCHREIBUNG DER BEDIENUNGS- UND DISPLAY-ELEMENTE Bedienfeld - ON/OFF Knopf zum Ein- und usschalten B - Einstellknopf für die objektive relative Luftfeuchtigkeit C - Einstellknopf zur Einstellung der verschiedenen Geschwindigkeitsstufen für die Ventilation D - Knopf zum Einstellen der DRY Funktion (Mod. DH4010 & 4020) E - Knopf zum Einstellen der SWING Funktion (Mod.
- Page 22 Erscheinungen wie Krankheiten, Schä- den am Haus usw. auftreten können. Ihr Luftentfeuchter von Rowenta entfernt die Feuchtigkeit aus der Luft, indem er den in der Raumluft befindlichen Wasserdampf aufnimmt. Er schützt Ihre Wohnung vor den schädlichen uswirkungen von zu feuchter Luft.
- Page 23 HINWEISE Bitte lesen Sie diese nleitung aufmerksam durch und befolgen Sie die folgenden Hinweise: • Um Ihre Sicherheit zu gewährleisten, entspricht dieses Gerät den gültigen Normen und Bestim- mungen (Niederspannung, Elektromagnetische Verträglichkeit). • Dieses Gerät ist ausschließlich für den Hausgebrauch bestimmt und darf deshalb nicht für indus- trielle Zwecke genutzt werden.
-
Page 24: Betrieb
BETRIEB Versichern Sie sich vor der Inbetriebnahme des Geräts, dass: - das Gerät wie in dieser nleitung beschrieben aufgestellt ist, - der Luftein- und austritt nicht behindert wird, - das Gerät auf einer ebenen und stabilen Fläche aufgestellt ist. INBETRIEBNAHME DES GERÄTS Schließen Sie das Stromkabel an und drücken Sie den Einschaltknopf ( ). - Page 25 Funktion TIMER Mit dieser Funktion kann das Gerät unter zuvor eingestellten Bedingungen für eine Zeitdauer zwi- schen 1 und 24 Stunden in Betrieb gesetzt werden: Temperatur und Luftfeuchtigkeit im Raum blaues Lämpchen an Timer Geschwindigkeitsstufe Luftfeuchtigkeit Ihr Gerät muss sich in Betrieb befinden; nun können eingestellt werden: - Die Geschwindigkeitsstufe für die Ventilation (Knopf C) - und die objektive Luftfeuchtigkeit (Knopf B);...
- Page 26 Funktion „DRY“ Wäschetrocknen ( ) (Mod. DH4010 & DH4020) Drücken Sie den DRY Knopf (D), um die Funktion Wäschetrocknen in Betrieb zu setzen. Um die Wäsche besser zu trocknen, wird automatisch eine dritte, höhere Geschwindigkeitsstufe ein- geschaltet, die Entfeuchtung geht in Dauerbetrieb und die Oszillation des Gebläses setzt ein. Funktion SWING (Mod.
- Page 27 INSTANDHALTUNG • Vor Instandhaltungsmaßnahmen aller rt muss das Gerät unbedingt am Schalter ( ) ausgeschaltet und anschließend ausgesteckt werden. • Reinigen Sie das Gerät mit einem leicht angefeuchteten Tuch. • Wichtig: Benutzen Sie keine Scheuermittel, da diese das ussehen des Geräts beeinträchtigen könnten.
- Page 28 WENN ES PROBLEME GIBT - Nehmen Sie das Gerät auf keinen Fall selbst auseinander. Ein nicht fachgerecht repariertes Gerät kann eine Gefahr für den Benutzer darstellen. - Versichern Sie sich, dass sich das Gerät in der normalen Betriebsstellung befindet und dass der Luftein- und austritt nicht behindert wird, bevor Sie mit einem unserer anerkannten Kundendienst- zentren in Kontakt treten.
- Page 29 BESCHRIJVING 1 - Bedieningspaneel 2 - Transporthandgreep 3 - Luchtuitlaatrooster 4 - Wateropvangreservoir 5 - Inspectieluikje waterniveau reservoir 6 - Handgreep van het reservoir 7 - Vlotter 8 - Wieltjes 9 - fneembare filterhouder 10 - Luchtinlaatrooster 11 - Opening voor permanente drainering...
- Page 30 BESCHRIJVING BOORDPANEEL Bedieningspaneel - ON/OFF-knop voor in-/uitschakelen B - Selectieknop streefwaarden relatieve luchtvochtigheid C - Selectieknop luchtsnelheid D - DRY functieknop (Mod. DH4010 & 4020) E - SWING functieknop (Mod. DH4010 & 4020) F - PROG/TIMER functieknop G – Prog/Timer controlelampje H –...
- Page 31 Wanneer de lucht te vochtig is, voelt het thuis onaangenaam en koud aan, wat tot talrijke ongemakken kan leiden: ziektes, schade in huis… Met uw Calor ontvochtiger wordt de vochtige lucht afgevoerd door de in de omgevingslucht zwevende waterdamp op te vangen. De ontvochtiger beschermt uw huis tegen de schadelijke werking van overtollig vocht.
- Page 32 WAARSCHUWINGEN Het is belangrijk deze handleiding aandachtig door te lezen en de navolgende aanbevelingen in acht te nemen: • Voor uw veiligheid beantwoordt dit apparaat aan de toepasselijke normen en regelgevingen (Richt- lijnen Laagspanning en Elektromagnetische Compatibiliteit). • Dit apparaat is uitsluitend bestemd voor huishoudelijk gebruik. Het kan derhalve niet gebruikt wor- den voor industriële doeleinden.
- Page 33 WERKING Controleer voor het inschakelen van uw apparaat dat: - het apparaat op de in deze handleiding beschreven plaats staat, - de luchtinlaat- en –uitlaatroosters niet verstopt zijn, - het apparaat op een vlakke, stevige ondergrond staat. INSCHAKELING VAN HET APPARAAT Steek de stekker in het stopcontact en druk op de anknop ( ).
- Page 34 TIMER-functie Met deze functie kunt u uw apparaat 1 tot 24 uur lang achter elkaar gebruiken onder van tevoren inges- telde voorwaarden: Temperatuur en luchtvochtigheid van het vertrek blauw lampje brandt Timer Snelheid Luchtvochtigheid Wanneer uw apparaat werkt kunt u de volgende elementen selecteren: - de ventilatiesnelheid (knop C) - en de streefwaarde van de luchtvochtigheid (knop B);...
- Page 35 “DRY” functie, het drogen van het wasgoed ( ) (Mod DH4010 & DH4020) Druk op de DRY-knop (D) om de droogfunctie voor het wasgoed in te schakelen. Een 3e, hogere snelheid, de continue luchtontvochtiging en het heen-en-weer bewegen van het luchtuit- laatrooster worden automatisch ingeschakeld, om het wasgoed sneller te drogen SWING-functie (Mod.
-
Page 36: Technische Gegevens
- Verwijder de dop en sluit de slang op de draineeruitgang aan. - Zorg dat de helling tussen de 2 uiteinden van de slang het normaal wegstromen van het water mogelijk maakt. - Zet het reservoir terug op zijn plaats, het controlelampje FULL gaat uit. ONDERHOUD •... -
Page 37: In Geval Van Problemen
IN GEVAL VAN PROBLEMEN • Nimmer het apparaat zelf demonteren. Een slecht gerepareerd apparaat kan gevaar voor de ge- bruiker opleveren. • Controleer, alvorens contact op te nemen met een erkend Servicecentrum (zie het telefoonnummer aan het einde van de handleiding) of het apparaat in de normale werkstand staat en of de luchtin- laat- en –uitlaatroosters niet verstopt zijn. - Page 38 DESCRIZIONE 1 - Pannello comandi 2 - Maniglia di trasporto 3 - Griglia di uscita dell'aria 4 - Serbatoio per il recupero dell'acqua 5 - Indicatore di livello di riempimento del serbatoio 6 - Impugnatura del serbatoio 7 - Galleggiante 8 - Rotelle 9 - Supporto del filtro amovibile 10 - Griglia d'entrata dell'aria...
-
Page 39: Descrizione Del Pannello Di Controllo
DESCRIZIONE DEL PANNELLO DI CONTROLLO Quadro comandi - Pulsante ON/OFF di accensione / spegnimento B - Pulsante di selezione dei tassi di umidità relativa obiettivi C - Pulsante di selezione delle velocità dell’aria D - Pulsante Funzione DRY (Mod. DH4010 & 4020) E - Pulsante Funzione SWING (Mod. -
Page 40: Principio Di Funzionamento
L'aria troppo umida trasforma la casa in un ambiente freddo e poco confortevole col rischio di dare origine a numerosi fastidi, fra cui malattie e deterioramento dell'abitazione. Raccogliendo il vapore acqueo presente nell'aria, il deumidificatore Rowenta consente di elimi- nare l'aria umida e di proteggere la casa dagli effetti nocivi dell'eccesso di umidità. - Page 41 AVVERTENZE Vi invitiamo a leggere attentamente questo manuale d'uso e a osservare le seguenti raccomanda- zioni: • Per garantire la vostra sicurezza, l'apparecchio è conforme alle norme e ai regolamenti vigenti (di- rettive sulla bassa tensione, compatibilità elettromagnetica). • L'apparecchio è destinato al solo uso domestico e non può quindi essere utilizzato per applicazioni industriali.
-
Page 42: Funzionamento
FUNZIONAMENTO Prima di accendere l'apparecchio assicuratevi che: - il posizionamento descritto nelle istruzioni sia rispettato; - le griglie d'entrata e d'uscita dell'aria siano completamente libere; - l'apparecchio sia posizionato su una superficie piana e stabile. ACCENSIONE DELL’APPARECCHIO Collegare il cavo alla corrente e premere il pulsante di accensione ( ). Sul display, compare il pittogramma (L) che indica la temperatura e il tasso di umidità... -
Page 43: Funzione Timer
FUNZIONE TIMER Questa funzione vi permette di utilizzare l’apparecchio per una durata compresa tra 1 e 24 ore in condizioni stabilite in precedenza: Temperatura e umidità della stanza Spia blu accesa Timer Velocità Umidità Quando l’apparecchio è in funzione, potrete selezionare: - la velocità... - Page 44 Funzione “DRY” Asciugatura del bucato ( ) (Mod. DH4010 & DH4020) Premere il pulsante DRY (D) per avviare la funzione asciugatura del bucato. Per una migliore asciugatura del bucato si metteranno automaticamente in funzione una 3a velocità più elevata, la deumidificazione continua e l’oscillazione della griglia di uscita dell’aria. Funzione SWING (Mod.
-
Page 45: Manutenzione
MANUTENZIONE • Prima di effettuare qualsiasi operazione di manutenzione, spegnete l'apparecchio premendo il pul- sante ( ) e scollegatelo dalla presa elettrica. • Potete pulirlo utilizzando un panno leggermente umido. • Importante: evitate l'utilizzo di prodotti abrasivi che potrebbero deteriorare la superficie dell'appa- recchio. - Page 46 IN C SO DI PROBLEMI - Non smontate mai l’apparecchio da soli. Un intervento inappropriato sull'apparecchio può compor- tare rischi per l'utente. - Prima di contattare un Centro ssistenza autorizzato della nostra rete, assicuratevi che l'apparec- chio sia in posizione normale di funzionamento e che le griglie d'entrata e d'uscita dell'aria siano completamente libere.
- Page 47 DESCRIPCIÓN 1 - Panel de mandos 2 - sa para transporte 3 - Rejilla de salida de aire 4 - Depósito recuperador de agua 5 - Ventana indicadora de llenado del depósito 6 - sa del depósito 7 - Flotador 8 - Ruedecillas 9 - Soporte del filtro extraíble 10 - Rejilla de entrada de aire...
-
Page 48: Descripción Del Panel De Control
DESCRIPCIÓN DEL PANEL DE CONTROL Panel de control - Botón ON/OFF de encendido/apagado B - Botón de selección de los porcentajes de humedad relativa objetivos C - Botón de selección de la velocidad del aire D - Botón Función DRY (Mod. DH4010 & 4020) E - Botón Función SWING (Mod. -
Page 49: Principio De Funcionamiento
Un aire demasiado húmedo puede hacer una casa inconfortable, fría y puede conllevar nu- merosos inconvenientes: enfermedades, deterioro de la vivienda… El deshumidificador de Rowenta permite evacuar el aire húmedo, recogiendo el vapor de agua en suspensión en el aire ambiental. Protege la vivienda de los efectos nocivos del exceso de humedad. - Page 50 ADVERTENCIA Es muy importante leer atentamente este manual y seguir las recomendaciones siguientes: • Para su seguridad, este aparato es conforme a las normas y reglamentaciones aplicables (Directi- vas Baja Tensión, Compatibilidad Electromagnética). • Este aparato está destinado únicamente al uso doméstico. No puede utilizarse para aplicaciones in- dustriales.
-
Page 51: Puesta En Marcha Del Aparato
FUNCIONAMIENTO ntes de la puesta en marcha del aparato, asegúrese de que: - la colocación del aparato descrita en este manual ha sido respetada, - las rejillas de entrada y de salida de aire están totalmente libres, - el aparato está colocado sobre una superficie plana y estable. PUESTA EN MARCHA DEL APARATO Conecte el cable y pulse el botón de puesta en marcha ( ). - Page 52 Función TIMER Esta función le permite utilizar el aparato de 1 hora a 24 horas en unas condiciones previamente es- tablecidas: Temperatura y humedad de la habitación Piloto azul encendido Timer Velocidad Humedad Cuando el aparato esté en marcha podrá seleccionar: - la velocidad de ventilación (botón C) - y el porcentaje de humedad objetivo (botón B);...
-
Page 53: Vaciado Del Depósito
Función “DRY” SECADO DE ROPA ( ) (MOD DH4010 & DH4020) Pulse el botón DRY (D) para poner en marcha la función secado de ropa. Una 3ª velocidad más elevada, la deshumidificación en continuo y la oscilación de la rejilla de salida del aire se pondrán en marcha automáticamente para secar mejor la ropa. -
Page 54: Mantenimiento
MANTENIMIENTO • Es necesario parar el aparato mediante el botón ( ) y desconectarlo antes de realizar cualquier operación de mantenimiento. • Puede limpiarlo con una trapo ligeramente húmedo. • Importante: No utilice nunca productos abrasivos que pudieran deteriorar el aspecto del aparato. TRANSPORTE - Compruebe el nivel de agua en el depósito antes de transportarlo, por si tuviera que vaciarlo. -
Page 55: En Caso De Avería
EN CASO DE AVERÍA - No desmonte nunca el aparato usted mismo. Una reparación defectuosa puede entrañar riesgos para el usuario. - ntes de ponerse en contacto con un Servicio Técnico utorizado de nuestra red (contacte con el teléfono de atención al consumidor 902 312 500), asegúrese de que el aparato está en posición nor- mal de funcionamiento y que las rejillas de entrada y de salida de aire están totalmente libres. - Page 56 DESCRITIVO 1 - Painel de controlo 2 - Pega de transporte 3 - Grelha de saída do ar 4 - Reservatório recuperador de água 5 - Janela indicadora do nível de enchimento do reservatório 6 - Pega do reservatório 7 - Flutuador 8 - Rodízios 9 - Suporte do filtro amovível 10 - Grelha de entrada do ar...
- Page 57 DESCRITIVO DO PAINEL DE BORDO Painel de comando - Botão ON/OFF de entrada em funcionamento / paragem B - Botão de selecção das taxas de humidade relativa objectivas C - Botão de selecção das velocidades de ar D - Botão Função DRY (Mod. DH4010 & 4020) E - Botão Função SWING (Mod.
-
Page 58: Princípio De Funcionamento
Um ar demasiado húmido torna uma casa desconfortável, fria e pode causar uma série de incómodos: doenças, deterioração do meio… O seu desumidificador Rowenta permite evacuar o ar húmido ao recolher o vapor de água em suspensão no ar circundante. Protege o seu meio dos efeitos nefastos do excesso de humi- dade. -
Page 59: Tensão De Alimentação
ADVERTÊNCIAS É fundamental ler este modo de utilização bem como respeitar as seguintes recomendações: • Para a sua segurança, este aparelho está em conformidade com as normas e regulamentos aplicá- veis (Directivas sobre Baixa Tensão, Compatibilidade Electromagnética). • Este aparelho destina-se somente a um uso doméstico. Não pode, portanto, ser empregue para uma aplicação industrial. - Page 60 FUNCIONAMENTO ntes de ligar o seu aparelho, certifique-se de que: - o posicionamento do aparelho descrito no presente modo de urilização é respeitado, - as grelhas de entrada e de saída do ar estão totalmente soltas, - o aparelho está situado sobre uma superfície plana e estável, ENTRADA EM FUNCIONAMENTO DO APARELHO Ligue o cabo e prima o botão de Entrada em funcionamento ( ).
- Page 61 Função TIMER Esta função permite-lhe utilizar o aparelho entre 1 a 24 h em condições previamente determinadas: Temperatura e humidade do compartimento Indicador azul aceso Timer Temporizador Humidade Com o aparelho em funcionamento, poderá seleccionar: - a velocidade de ventilação (botão C) - e a taxa de humidade objectiva (botão B);...
-
Page 62: Esvaziamento Do Reservatório
FUNÇÃO “DRY” SECAGEM DA ROUPA ( ) (MOD. DH4010 & DH4020) Prima o botão DRY (D) para colocar a função de secagem da roupa em funcionamento. Uma 3.ª velocidade mais alta, a desumidificação em contínuo e a oscilação da grelha de saída do ar começam a funcionar automaticamente para uma melhor secagem da roupa. - Page 63 MANUTENÇÃO - É obrigatório suspender o funcionamento do seu aparelho através do botão ( ) e desligá-lo antes de qualquer operação de manutenção. - Pode limpá-lo com a ajuda de um pano ligeiramente húmido. - Importante: Nunca utilize produtos abrasivos passíveis de deteriorarem a aparência do seu apa- relho.
- Page 64 NO CASO DE OCORRÊNCIA DE PROBLEMAS - Nunca desmonte o aparelho você próprio. Um aparelho mal reparado pode constituir um risco para o uti- lizador. - ntes de contactar um Centro de ssistência Técnica autorizado pertencente à nossa rede, certifique-se de que o aparelho está...
Need help?
Do you have a question about the VITALITY DH3110 and is the answer not in the manual?
Questions and answers