Table of Contents
Advertisement
Quick Links
Download this manual
See also:
Operator's Manual
Advertisement
Table of Contents

Related Manuals for Nonin SenSmart X-100


Summary of Contents for Nonin SenSmart X-100
-
Page 2: Table Of Contents
Table of Contents Introduction ............................1 Indications for Use ...........................2 Theory of Operation ..........................2 What is rSO and How is it Measured? ......................2 What is %SpO ? ............................... 3 System Components ..........................4 System Setup ............................5 X-100H Hub ..............................5 Connect/Disconnect the Hub to the Monitor ..................... 5 X-100HH Hub Holster ............................ - Page 3 Setting High and Low Alarm Limits for rSO or SpO ................. 19 Graph Position ............................19 Review Current Preset ..........................20 Presets Menu ..............................20 Case Menu ..............................21 System Menu ..............................22 Review System Menus ........................... 24 System Alarm Indicators ........................25 High Priority Alarms ............................
-
Page 4: Introduction
SenSmart™ Model X-100 Universal Oximetry System In-Service Training Introduction This In-Service Training material is designed to help you become familiar with the SenSmart Model X-100 Universal Oximetry System components and functions. It is not intended to replace the SenSmart System Operator’s Manual, which includes warnings, cautions, complete functions of all components, and technical information about the SenSmart System. -
Page 5: Indications For Use
• Nonin’s patented dual light emitter/dual detector architecture allows the sensor to spatially resolve the differences between shallow tissue artifacts and deeper target tissue. -
Page 6: What Is %Spo
SenSmart™ Model X-100 Universal Oximetry System In-Service Training What is %SpO Pulse oximetry provides a noninvasive method that enables rapid measurement of oxygen saturation of hemoglobin in arterial blood. It can rapidly detect oxygen saturation changes thus providing early warning of dangerous hypoxemia. -
Page 7: System Components
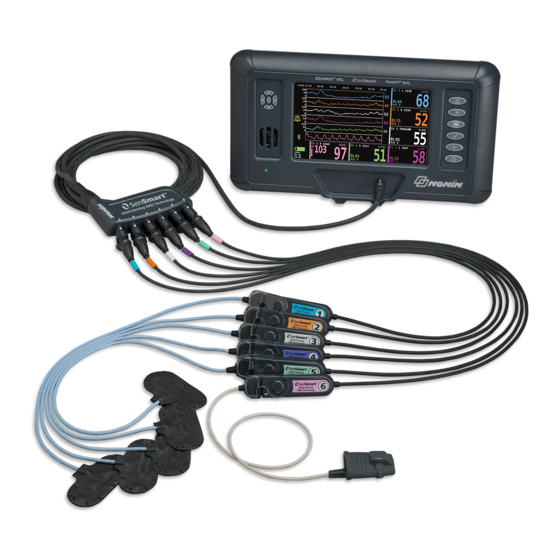
In-Service Training System Components The SenSmart System is a modular oximetry system comprised of the components, described in Table 1, and uses Nonin-branded SenSmart sensors to measure rSO and SpO Figure 1. The SenSmart Model X-100 Universal Oximetry System. Table 1. SenSmart System components and description... -
Page 8: System Setup
SenSmart™ Model X-100 Universal Oximetry System In-Service Training Component Description Available to measure rSO and SpO SenSmart Sensors Sensors are described in more detail in the SenSmart Sensor section on page 7. Power supply and cord (not shown) SenSmart Download Software (CD not Data management software... -
Page 9: X-100Sp Signal Processors
SenSmart™ Model X-100 Universal Oximetry System In-Service Training 2. To remove the Hub from the Hub Holster: a. Pull the clip back on the tip of the Hub Holster and pull the Hub out of the Hub Holster as shown in Figure 4C. Figure 4A. -
Page 10: Connect/Disconnect A Signal Processor
Flip the sensor lock back to disengage the lock from the sensor. Pull the sensor connector to remove the sensor from the Signal Processor. Sensors Nonin offers sensors to facilitate a wide range of regional oxygen saturation patient monitoring. The following information will assist in sensor selection: Table 3. SenSmart rSO EQUANOX™... -
Page 11: Rso 2 Sensor Application
SenSmart™ Model X-100 Universal Oximetry System In-Service Training Sensor Application See the Sensor IFU for complete instructions, cautions and warnings. 1. Signal Processor site(s) and cable pathways: a. Select an appropriate site to clip or otherwise stabilize the Signal Processor. The ideal site avoids the patient’s body resting on the Signal Processor or the Signal Processor pulling unnecessarily on the sensor. -
Page 12: Spo 2 Sensors
Note: If these measurements are not clearly identified or alarm conditions are generated, consult the Troubleshooting section on page 26. WARNING: Use only Nonin-branded SenSmart Signal Processors, sensors, and accessories. The sensors are manufactured to meet the accuracy specifications for this System. Using other manufacturers’... -
Page 13: X-100Ec Extension Cables
SenSmart™ Model X-100 Universal Oximetry System In-Service Training 3. Sensor Connections: a. Flip the sensor lock on the Signal Processor back to expose the sensor connector port. b. Insert the sensor connector into the Signal Processor connector port. c. Flip the Signal Processor sensor lock over the sensor connector and click into place. d. -
Page 14: Review Of The Model X-100 Universal Oximetry System Setup
SenSmart™ Model X-100 Universal Oximetry System In-Service Training Review of the Model X-100 Universal Oximetry System Setup To practice making all the connections to the System, please complete the following tasks in the order they presented. 1. Connect the Hub to the Monitor. 2. -
Page 15: Monitor Features
SenSmart™ Model X-100 Universal Oximetry System In-Service Training Monitor Features This section describes the physical features of the System Monitor that are used to configure and control system functions to assist in patient monitoring. Figure 13. The SenSmart System monitor features navigation buttons, display, cable port and speakers. Table 5. -
Page 16: Controls And Navigation
SenSmart™ Model X-100 Universal Oximetry System In-Service Training Controls and Navigation Configuring the System is controlled using the Navigation buttons on the left and the Function buttons on the right side of the Monitor. Figure 14. The SenSmart System features buttons to navigate all menus and control display functions of the system. - Page 17 SenSmart™ Model X-100 Universal Oximetry System In-Service Training Feature How to Use 1. Press to open the Settings screen which contains 4 operating menus: a. Settings –Assign sensor site to channel, select sensor type (rSO or SpO ), set limits and graphs, and review presets. b.
-
Page 18: System Display
SenSmart™ Model X-100 Universal Oximetry System In-Service Training System Display The system can display up to six (6) channels of patient data in bright, easy to read numbers, trend lines, and plethymograms during operation. This section describes all the information that is provided on the display. - Page 19 SenSmart™ Model X-100 Universal Oximetry System In-Service Training Feature Description Information -Gray = disabled (Off) Alarms can be silenced: Alarm Silence Status of audible -For 2 minutes using Alarm Silence button icon alarms -Indefinitely by setting Alarm Volume to ‘0’ in System menu ...
-
Page 20: System Configuration Screens And Menus
SenSmart™ Model X-100 Universal Oximetry System In-Service Training System Configuration Screens and Menus The System has four (4) operating menus to configure the system for specific needs. 1. Settings 2. Presets 3. Case 4. System All menus are accessed via the Menu button and are then navigated using the Navigation buttons on the left side of the Monitor. -
Page 21: Sensor Site
SenSmart™ Model X-100 Universal Oximetry System In-Service Training Sensor Site This setting allows the user to select, customize, or clear a Sensor Site name. Commonly used sensor sites are available in the Category menus to Select (Figure 19) or the user can create a Custom location using the Navigation buttons and the alphanumeric keyboard. -
Page 22: Setting High And Low Alarm Limits For Rso Or Spo
SenSmart™ Model X-100 Universal Oximetry System In-Service Training Setting High and Low Alarm Limits for rSO or SpO 1. Connect a sensor to the Signal Processor. 2. Use Left/Right and Up/Down to move to and Select the desired channel and the alarm limit setting (shown in the red rectangle). -
Page 23: Review Current Preset
SenSmart™ Model X-100 Universal Oximetry System In-Service Training Review Current Preset This setting (at the bottom of the Settings menu screen in the middle) shows the current Preset (discussed in the next section Presets Menu) that is displayed in each channel in the Settings menu. -
Page 24: Case Menu
SenSmart™ Model X-100 Universal Oximetry System In-Service Training 6. Enter Preset name (maximum of 11 alphanumeric characters) using the Navigation buttons on the alphanumeric keyboard. See Figure 25. 7. Press Down to highlight Save, and Select to save and activate the Preset. 8. -
Page 25: System Menu
Channel designation for pulse tone: Channels 1 – 6. Unique once-per-second, real-time data output formats for: Data Output Modes* Bluetooth: Nonin 1 – Nonin 5 RS-232: Nonin 1 – Nonin 5, Printer Deletes all patient data recordings from Monitor and attached Clear Memory signal processors. - Page 26 SenSmart™ Model X-100 Universal Oximetry System In-Service Training To select and change the System settings: 1. Use the Navigation buttons to move to and Select the desired feature in the System Menu. 2. Press Up/Down and Left/Right to edit settings and Select to save the setting. 3.
-
Page 27: Review System Menus
SenSmart™ Model X-100 Universal Oximetry System In-Service Training Review System Menus To review what you have learned about the System menus during configuration of the System, please complete the following tasks: 1. In the Settings Menu: a. Set the Sensor Site for Channel 1 to Left Cerebral. b. -
Page 28: System Alarm Indicators
SenSmart™ Model X-100 Universal Oximetry System In-Service Training System Alarm Indicators The System has audio and visual alarm indicators to alert the user when immediate patient attention may be required or an equipment alarm occurs. High Priority Alarms High priority alarms require immediate attention to the patient and include high and low •... -
Page 29: Troubleshooting
• Save all suspect components for return to Nonin Technical Service for evaluation. • If these actions do not resolve the problem, please contact Nonin Technical Service at: USA and Canada 800-356-8874 Outside USA and Canada... - Page 30 E01, E02, E03, E04, E06, E08 2. Turn the Monitor on again. encountered 3. If the error persists, note the error code and contact Nonin an error. Technical Service. THE UNIT IS IN ALARM MODE, BUT NO AUDIBLE ALARMS CAN BE HEARD.
-
Page 31: System Memory
Channels in Use Figure 31. Clear Memory menu options. System Data Outputs The System features 5 different once-per-second, real-time data output formats, Nonin 1 – Nonin 5. Data output formats can be selected through the Data Output Modes option in the Systems ... -
Page 32: Cleaning The System Components
SenSmart™ Model X-100 Universal Oximetry System In-Service Training Cleaning the System Components 1. Wipe all components (Monitor, Signal Processors, Hub, Hub Holster, and SenSmart 8100SX Pulse Oximetry Soft Sensors) with a soft cloth dampened with a mild detergent or a 10% bleach solution (household bleach [5.25% sodium hypochlorite]). -
Page 33: Warranty
Europe +46 650 401500 Technical Service email: USA and Canada technicalservice@nonin.com Europe serviceintl@nonin.se Contact Nonin Technical Service for a return authorization number (RAN) which is required before returning any product to Nonin. For more information, visit nonin.com/techservices. 30 of 31... - Page 34 SenSmart™ Model X-100 Universal Oximetry System In-Service Training 31 of 31...
Need help?
Do you have a question about the SenSmart X-100 and is the answer not in the manual?
Questions and answers