Table of Contents
Advertisement
Available languages
Available languages
Quick Links
Trinkwasser-Nachspeisemodul Aqua-Center Basic
DE
Anleitung für Einbau und Wartung GRAF Trinkwasser-
Nachspeisemodul Aqua-Center Basic
>> Seite 1-11
EN
Installation instructions and maintenance for the GRAF
drinking water feeding module Aqua-Center Basic
>> Page 12-22
FR
Notice d'installation et d'utilisation du coffret d'alimentation
Aqua-Center Basic Graf (selon norme EN1717)
>> Page 23-34
IT
Istruzioni di installazione e manutenzione console di
alimentazione acqua potabile Aqua-Center Basic GRAF
>> Pagina 35-45
Advertisement
Chapters
Table of Contents

Subscribe to Our Youtube Channel
Related Manuals for Graf Aqua-Center Basic Series


Summary of Contents for Graf Aqua-Center Basic Series
- Page 1 Trinkwasser-Nachspeisemodul Aqua-Center Basic Anleitung für Einbau und Wartung GRAF Trinkwasser- Nachspeisemodul Aqua-Center Basic >> Seite 1-11 Installation instructions and maintenance for the GRAF drinking water feeding module Aqua-Center Basic >> Page 12-22 Notice d’installation et d’utilisation du coffret d’alimentation Aqua-Center Basic Graf (selon norme EN1717) >>...
-
Page 2: Table Of Contents
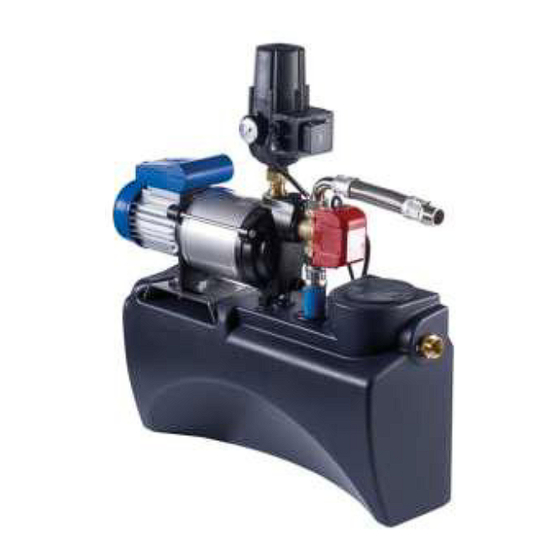
Anleitung für Einbau und Wartung GRAF Trinkwasser- Nachspeisemodul Aqua-Center Basic Trinkwasser-Nachspeisemodul Aqua-Center Basic 15/4 Art. Nr. 350021 Trinkwasser-Nachspeisemodul Aqua-Center Basic 25/4 Art. Nr. 350022 Inhaltsübersicht Die in dieser Anleitung beschriebe- ALLGEMEINE HINWEISE nen Punkte sind unbedingt zu beach- Sicherheit ten. -
Page 3: Allgemeine Hinweise
Tragkraft der Wand bzw. Halterung zu sorgen. Die Firma GRAF bietet ein umfangreiches Sortiment an Zubehörteilen, die alle aufeinander abgestimmt sind und zu kompletten Systemen ausgebaut werden können. Die Verwendung, nicht von GRAF freige- gebener Zubehörteile führt zu einem Ausschluss der Gewährleistung/Garantie. -
Page 4: Technische Daten
3. Technische Daten Abmessungen und Gewicht Gewicht: ca. 30 kg Druckseite 1" AG Saugseite 1" AG Trinkwasseranschluß 3/4" AG freier Auslauf nach DIN Notüberlauf DN 50 3 / 45... -
Page 5: Steuerung
Wiederinbetriebnahme nach Trockenlauf der Pumpe durch Betätigung der „RESET“ Taste möglich. Sind in der Anlage Druckstöße durch schnell schließende Armaturen (z. B. Magnetventile in Hochdruckrei- nigern) zu erwarten, halten Sie bitte Rücksprache mit Fa. GRAF. Pumpe Einphasen-Wechselstrommotor 220-240 V / 50 Hz mit eingebautem Über- Antrieb lastschutz, IP 44, Isolationsklasse F. -
Page 6: Technische Daten
3. Technische Daten 3.6.2 Trinkwasser-Nachspeisemodul 25/4 Leistungsaufnahme 800 W Förderhöhe max. 43 m Druck max. 4,3 bar Fördermenge max. 4200 l/h (siehe Diagramm 2) Saughöhe max. Sauglänge 15 m Bezüglich Saughöhe als Funktion der Sauglänge siehe auch Diagramm 1. -
Page 7: Montage Und Einbau
4. Montage und Einbau Die GRAF Trinkwasser-Nachspeisemodul aus der Transportverpackung nehmen, im gleichen Karton be- findet sich auch das Zubehör. Die gesamte Anlage sofort auf eventuelle Beschädigungen überprüfen. Be- schädigungen müssen vor der Montage gemeldet werden. Wandmontage Die GRAF Trinkwasser-Nachspeisemodul ist zur Aufhängung (oberhalb der Rückstauebene) in frostge- schützten, überflutungssicheren und trockenen Räumen vorgesehen. -
Page 8: Anschluss Notüberlauf
4. Montage und Einbau Anschluss Notüberlauf Der Notüberlauf wird mit handelsüblichem DN 50 Rohren hergestellt und an das Abwassernetz ange- schlossen. Wir empfehlen den Notüberlauf mittels 86° HT-Bögen zu einem Siphon auszubilden. Die Anlage darf nur in Räumen mit Bodenablauf eingebaut werden, da bei einem Störfall Wasser aus der Anlage aus- treten kann. -
Page 9: Anschluss Saugleitung
4. Montage und Einbau Anschluss Saugleitung Die 1“ Saugleitung wird in einem Leerrohr stetig steigend, ohne Durchbiegungen zum Installationsort der Trinkwassernachspeisung geführt. Ist dies nicht möglich, ist an der höchsten Stelle der Saugleitung ein Entlüftungsventil zu installieren. Der Anschluss an das Trinkwasser-Nachspeisemodul erfolgt oberhalb des 3-Wege-Umschaltventils am 1“... -
Page 10: Anschluss Schwimmerschalter
4. Montage und Einbau Anschluss Schwimmerschalter Das Schwimmerschalterkabel wird vom Erdtank durch das Leerrohr zur Trinkwasser-Nachspeisemodul verlegt, der Spezial-Doppelstecker wird in eine 230 V - Steckdose eingesteckt. An diesem Doppelstecker wird das 3-Wege-Ventil angeschlossen. Der Schwimmerschalter ist im Behälter so zu fixieren, dass der Schwimmerkopf im gestreckten Zustand ca. -
Page 11: Wartung Und Pflege
5. Inbetriebnahme Ist ein Befüllen der Saugleitung wie oben beschrieben nicht möglich, kann diese auch vom Installationsort der Trinkwasser-Nachspeisemodul befüllt werden, dabei muss das Fußventil der Saugleitung im Behälter geöffnet werden. Die Befüllung muss so lange erfolgen, bis am zisternenseitigen Ende Wasser austritt. -
Page 12: Störung Und Abhilfemaßnahmen
7. Störung und Abhilfemaßnahmen Reparaturen an elektrischen Anlagenteilen dürfen nur von Fachfirmen durchgeführt werden! Störung Ursache Fehlerbehebung - Netzstecker einstecken oder - Netzspannung fehlt Netzspannung überprüfen Pumpe läuft nicht an - Pumpe von einem Fachbetrieb - Pumpenrad blockiert... - Page 13 Installation instructions and maintenance for the GRAF drinking water feeding module Aqua-Center Basic Drinking water feeding module Aqua-Center Basic 15/4 Order No. 350021 Drinking water feeding module Aqua-Center Basic 25/4 Order No. 350022 Table of contents The points described in these instruc-...
-
Page 14: General Notes
The GRAF Company offers an extensive range of accessories that are all compatible with one another and may be used to construct a complete system. The use of accessories that have not been approved by GRAF results in the exclusion of the warranty/guarantee. -
Page 15: Technical Data
3. Technical Data Dimensions and weight Weight: about 30 kg Pressure side Suction side 1“ outside threads Druckseite 1" AG 1“ outside threads Saugseite 1" AG Drinking water connection ¾“ outside threads Trinkwasseranschluß 3/4" AG free outlet accord-... -
Page 16: System Control
Restarting after dry running the pump is possible by means of the "RESET" button. If there is a water pressure hammering in the system due to the rapid closing of valves (e.g. solenoid valve in the high pressure cleaner) then please contact the GRAF Company. Pump Single phase AC motor 220 –... - Page 17 3. Technical Data 3.6.2 Drinking water feeding module 25/4 Power consumption 800 W Pump head height max. 43 m Pressure max. 4,3 bar Pump discharge rate max. 4200 l/h (see also Diagramm 2) Suction height max. Suction length max.
-
Page 18: Installation And Assembly
Wall assembly The GRAF drinking water feeding module must be installed above the back surge level and in a frost free and dry environment that is above any possible regional flood levels. -
Page 19: Emergency Overflow Connection
4. Installation and assembly Emergency overflow connection The emergency overflow is to be constructed with commercial 50 mm canalisation pipes for the connection to the main canalisation. We advise that the emergency overflow should be so constructed with an 86°... -
Page 20: Suction Pipe Connection
4. Installation and assembly Suction pipe connection A 1“ suction pipe is installed in an empty conduit that rises steadily without sagging or bending downward to the connection at the mains water supply point. If this proves to be not possible then an air bleeding valve must be installed at the highest point. -
Page 21: Float Switch Connection
4. Installation and assembly Float switch connection The float switch cable from the underground tank is passed through the empty conduit to the drinking water feeding module and the special double plug is connected to the 230 V socket. The 3 way valve is then connected to the special double plug. -
Page 22: Service And Care
5. Commisioning Finally the commissioning is competed by opening the drinking water feeding module to the back-up supply tank. This fills the tank and before the water flows out of the overflow the float valve must close off the inlet. -
Page 23: Fault Finding And Corrective Action
7. Fault finding and corrective action Working on the electrical system may only be carried out by a professional electrician! Fault Cause Corrective action - Plug into or check the electrical - No electrical power supply Pump does not run... - Page 24 Lisez éga lement toutes les notices des DONNÉES TECHNIQUES autres éléments fournis par la société Dimensions et poids GRAF. Vous trouve rez les notices de Mise en marche montage jointes dans l’emballage. Vanne à flotteur Electrovanne 3 voies Avant de positionner la cuve dans la Contrôleur de pression “Controlmatic”...
-
Page 25: Généralités
Le coffret d’alimentation doit être installé au dessus du niveau de la cuve. Le coffret d’alimentation Graf doit être placé dans un endroit sec, hors gel et bien ventilé. Les chapitres qui sui- vent vous expliquent comment effectuer l’installation et l’entretien de votre coffret d’alimentation Graf. -
Page 26: Données Techniques
3. Données techniques Dimensions et poids Poids: env. 30 kg Trop plein de sécurité selon norme EN1717 à l’arrière du bac de disconnexion Refoulement vers toilettes et lave-linge 1 ‘’ Druckseite 1" AG Aspiration de la cuve 1‘’... -
Page 27: Mise En Marche
3. Données techniques Mise en marche Le basculement eau du réseau/eau de pluie s’effectue par le biais du câble sonde se trouvant dans la cuve Vanne à flotteur Température de fonctionne- 30°C max. ment 0,3 – 4,5 bar (Dans le cas d’une pression d’eau trop élevée, utiliser un ré-... - Page 28 3. Données techniques 3.6.2 Coffret d’alimentation 25/4 Puissance absorbée 800 W Hauteur de refoulement 43 m max. Pression max. 4,3 bar Débit délivré max. 4200 l/h (voir schéma 2) Hauteur d’aspiration max. Longueur d’aspiration max. 15 m En ce qui concerne la hauteur d’aspiration en fonction de la longueur d’aspiration, voir le schéma 1.
-
Page 29: Montage Et Installation
4. Montage et installation Retirer le coffret d’alimentation de son emballage ainsi que les éléments se trouvant dans le même carton. Véri- fier que l’installation n’a subi aucun dommage durant le transport. Les dégradations doivent être signalées avant le montage. -
Page 30: Raccordement Du Trop-Plein
4. Montage et installation Raccordement du trop-plein Raccorder le trop-plein de sortie en utilisant des tuyaux PVC DN 50 disponibles dans le commerce et raccorder au réseau d’assainissement. Nous conseillons de réaliser ce trop-plein en forme de siphon à l’aide de coudes 86°. -
Page 31: Raccordement Du Tuyau De Tirage
Le tuyau d’aspiration doit être posé dans un fourreau PVC DN 100 ou DN 150 et être raccordé sur le flexible inox, sur le haut de l’électrovanne. Installer dans la cuve un kit d’aspiration ou une crépine GRAF équipé d’un clapet anti-retour. Toujours vérifier la propreté du matériel installé. Avant de poser le tuyau d’aspiration, nettoyer la gaine PVC : veiller à... -
Page 32: Branchement Du Câble Sonde
4. Montage et installation Branchement du câble sonde Brancher la prise de l’électrovanne 3 voies sur la double-prise du flotteur (voir schéma page 12). Les 20 m de câble du flotteur équipé du contrepoids jaune doivent être posés dans un fourreau PVC. Le contrepoids jaune doit être positionné... -
Page 33: Entretien Et Maintenance
5. Mise en service de l’installation Dans le cas où le remplissage du tuyau de tirage comme décrit ci-dessus est impossible, celui-ci peut aussi être rempli à partir de l’extrémité reliée au coffret d’alimentation. Pour cela, remplir le tuyau d’eau jusqu’à ce que ce dernier déborde. -
Page 34: Erreurs Frequentes Et Mesures Correctives
7. Erreurs fréquentes et mesures correctives Panne Cause Solution - Brancher la prise murale et/ou vérifier - Pas de tension la tension La pompe ne démarre pas - Faire vérifier et/ou nettoyer la pompe - Mécanisme bloqué par un spécialiste - Crépine hors de l’eau... -
Page 35: Schema De Branchement Du Coffret D'alimentation Sur Console
8. Schéma de branchement du coffret d’alimentation sur console Brancher la pompe sur la prise du Controlmatic Refoulement vers les toi- lettes, le lave-linge ou ro- binets de puisage extérieur Aspiration de la cuve Electrovanne voies, permet l’alimentation automatique en eau du réseau lorsque la cuve... - Page 36 Istruzioni di installazione e manutenzione console di alimentazione acqua potabile Aqua-Center Basic GRAF Console di alimentazione acqua potabile Aqua-Center Basic 15/4 N. art. 350021 Console di alimentazione acqua potabile Aqua-Center Basic 25/4 N. art. 350022 Sommario I punti descritti nelle presenti istruzio-...
-
Page 37: Avvertenze Generali
L'acqua piovana può essere utilizzata per irrigare il giardino, per lo scarico del bagno, la lavatrice e le puli- zie. La console di alimentazione acqua potabile GRAF è prevista per il montaggio in ambienti asciutti, al sicuro da inondazioni e al riparo dal gelo. Per ulteriori indicazioni sulla progettazione dell'impianto, il montaggio e il comando, vedere i seguenti capitoli. -
Page 38: Dati Tecnici
3. Dati tecnici Dimensioni e peso Peso: circa 30 kg Lato mandata Tubo aspirazione 1‘‘ 1““ AG Druckseite 1" AG Saugseite 1" AG Troppopieno Ingresso aqua potabi- Trinkwasseranschluß 3/4" AG retro secondo le, raccordo ¾“AG freier Auslauf nach DIN norma DIN Notüberlauf DN 50... -
Page 39: Comando
Rimessa in funzione in seguito a funzionamento a secco della pompa possibile mediante attivazione del tasto "RESET". Se nell'impianto si prevedono colpi d'ariete dovuti alla chiusura repentina di valvole (ad es. elettrovalvole in pulitori ad alta pressione), contattare GRAF. Pompa Motore monofase a corrente alternata 220-240 V / 50 Hz con protezione da Azionamento sovraccarico integrata, IP 44, classe di isolamento F. - Page 40 3. Dati tecnici 3.6.2 Console di alimentazione acqua potabile 25/4 Potenza assorbita 800 W Altezza di sollevamento max. 43 m Pressione max. 4,3 bar Portata max. 4200 l/h (v. il diagramma 2) Altezza di aspirazione max. Lunghezza di aspirazione 15 m Per l'altezza di aspirazione in rapporto alla lunghezza di aspirazione, v.
-
Page 41: Montaggio E Installazione
Montaggio a parete La console di alimentazione acqua potabile GRAF è prevista per il montaggio sospeso (al di sopra del livel- lo di riflusso) in ambienti asciutti, al sicuro da inondazioni e al riparo dal gelo. -
Page 42: Collegamento Troppopieno Di Emergenza
4. Montaggio e installazione e installazione Collegamento troppopieno di emergenza Il troppopieno di emergenza viene realizzato con i comuni tubi DN 50 in commercio e collegato alla rete fognaria. Consigliamo di sviluppare il troppopieno in un sifone utilizzando gomiti ad alta temperatura 86°. -
Page 43: Collegamento Tubazione Di Aspirazione
4. Montaggio e installazione e installazione Collegamento tubazione di aspirazione La tubazione di aspirazione 1“ viene condotta all'interno di un tubo vuoto costantemente inclinata verso l'alto e senza flessioni fino al luogo di installazione dell'alimentazione di acqua potabile. Se questo non è... -
Page 44: Collegamento Interruttore A Galleggiante
4. Montaggio e installazione e installazione Collegamento interruttore a galleggiante Il cavo dell'interruttore a galleggiante viene posato dal serbatoio da interro attraverso il tubo vuoto fino alla console di alimentazione acqua potabile, lo speciale connettore doppio viene inserito in una presa da 230 V. -
Page 45: Manutenzione E Cura
5. Messa in funzione Se non è possibile riempire la tubazione di aspirazione come descritto sopra, questa può essere riempita anche dal luogo di installazione della console di alimentazione acqua potabile, in questo caso la valvola di fondo della tubazione di aspirazione nel serbatoio deve essere aperta. Il riempimento deve continuare fin- ché... -
Page 46: Guasti E Risoluzione
7. Guasti e risoluzione Le riparazioni sulle parti dell'impianto elettriche devono essere eseguite solo da aziende specializzate! Guasto Causa Risoluzione del problema - Inserire la spina o controllare la - Tensione di rete assente tensione di rete La pompa non si avvia... - Page 47 Notizen / Notes / Notas...
Need help?
Do you have a question about the Aqua-Center Basic Series and is the answer not in the manual?
Questions and answers