
Related Manuals for Harken MKIV


Summary of Contents for Harken MKIV
- Page 1 MKIV Jib Reefing & Furling Installation Manual Unit 0 WARNING!: Strictly follow all instructions to avoid an accident, damage to your vessel, personal injury or death. See www.harken.com for additional safety information.
-
Page 2: Table Of Contents
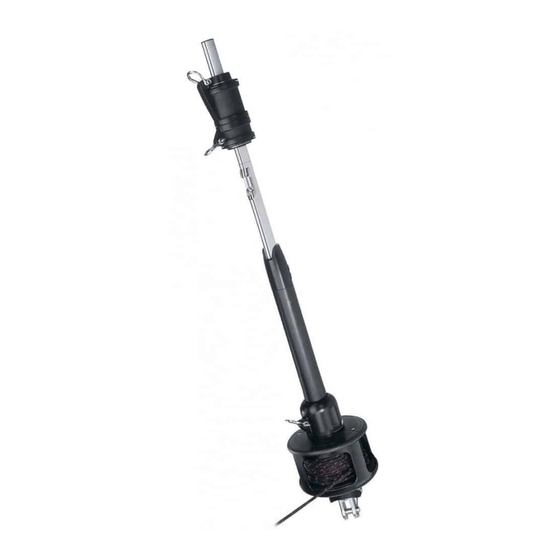
2) Crosspin 6) 2' (610mm) Bottom Foil 10) 7' (2.13m) Foil 14) Halyard Swivel 3) Shackles 7) Feeder 11) Connector Screws 15) Trim Cap 4) Drum Assembly 8) Connector Bushing 12) Connector Wedge 16) Trim Cap Screws MKIV Unit 0 7/16/08... - Page 3 See www.harken.com for additional safety information. 2. Harken does not recommend drilling boat’s chainplate or toggle. In some cases bushings are available to fit boats with smaller clevis pin sizes. 3. Will drum fit on bow? See page 6. If necessary, use an additional toggle to slightly raise unit.
-
Page 4: Preassembly
Quantity Description H-39713 Feeder with screw and tab HFG594 55' (16.7m) 7mm Single braid polyester 2110 6mm Bow shackles HFG725 Injector, 1 oz. 5200 Adhesive (HFG722) Tools Quantity Description 1 Each 2.5, 3, 5mm Allen wrenches MKIV Unit 0 6/06/08... - Page 5 2. Mating turnbuckle components must be purchased separately. rigger before reusing. Wire that is 3. Headstay may require cutting and shortening to fit Harken toggle. old or damaged may break suddenly Headstay may remain uncut by replacing lower stud of turnbuckle causing an accident, damage to your with stud/eye thus eliminating extra toggle.
-
Page 6: Dimensions/Sailmaker's Instructions
" (13mm) Sun cover " Sun covers may be installed on either side of the sail. (1003mm) Be sure to match other sails in customer's inventory. 41" (1041mm) " (47mm) " (140mm) " (210mm) " (59mm) MKIV Unit 0 9/29/09... -
Page 7: Toggle Deductions/Stay Into Foil Options
® 3. Rod adapter nosepiece for Harken rod adapter stud: Threaded nosepiece must have a positive lock of as well as adhesive. Use Harken stud with cotter pins (see page 19). WARNING!: Using a threaded nosepiece with only adhesive at the... -
Page 8: Top Foil Length
G Crosspin to Clevis Pin Pin-to-Pin Length G Toggle Distance from Lower Clevis Pin to Crosspin Hole Toggle Part No. Type Clevis Pin G Distance 7410.20 3/8 Eye/Jaw " 9.5mm 1.3" 33mm 7410.20 7/16 Eye/Jaw " 11.1mm 1.4" 36mm MKIV Unit 0 5/30/07... -
Page 9: Short Top Foil
" - 2 above top connector. Cut connector right at cross formed Under " (13mm) Eliminate top foil and run foil by glue dispersion channels. Use single foil screw in top higher in drum assembly. foil only. 5/30/07 MKIV Unit 0... -
Page 10: Foil Length
Foil Length Confirm foil length by laying foils alongside stay with turnbuckle components. Pull stay out so it is straight. Attach Harken toggle to bottom of stay. Make sure toggle straps are straight. Adjust turnbuckle so that length of stay with Harken toggle will fit boat. - Page 11 Tip: Mark top foil to distinguish from cutoff piece. Scribe line on top of foil to mark drill holes. Lay top foil alongside cutoff piece and use a flat metal object (i.e. metal ruler) to scribe top line of foil. 5/30/07 MKIV Unit 0...
- Page 12 .8" or 13/16" (20mm) Drill two (2) 1/8" (3.2mm) holes for trim cap. Lay top foil in line with others. Slide stay into top foil and down line of foils or slide each foil up stay. MKIV Unit 0 5/30/07...
- Page 13 Install trim cap screws. Place halves of plastic bushings on stay so hooked part of longer section faces out. Tip: With foil screw holes up as shown below, place longer half of bushing with hook on upper half. 5/30/07 MKIV Unit 0...
- Page 14 Hold injector at an angle with applicator tip facing down. Squeeze adhesive into tube so lower half of injector is full as shown. Keep tip free of sealant to let air inside. Adhesive in lower half MKIV Unit 0 5/30/07...
-
Page 15: Assembly Foils/Connectors
You are now ready to begin injecting adhesive. Put a drop of adhesive into screw holes. Hold plastic wedge in place with thumb as you insert into foil. Line foil holes with connector screw holes. 5/30/07 MKIV Unit 0... - Page 16 Tighten screws into connector holes. Make sure a drop of adhesive entered each screw hole. If not, apply to screw. Use bushings, connector, wedge and adhesive in other screw hole and insert into other foil. Use 1/4 - 1/2ml of adhesive. MKIV Unit 0 2/15/10...
-
Page 17: Halyard Swivel
Make sure to use adhesive in screw holes. Continue assembly. Use 10" (254mm) bot- tom connector to assemble bottom foil. Slide halyard swivel onto foil above feeder window. Make sure taller “half” is up as shown. 5/30/07 MKIV Unit 0... -
Page 18: Drum Assembly
Assembly Drum Assembly/Turnbuckle/Harken Toggle Loosen foil clamp screws at top of drum assembly. Slide drum assembly onto foils. Tip: Face clamp downward so it clears foil notches during installation. MKIV Unit 0 5/30/07... - Page 19 Insert two cotter pins and spread. Clean excess Loctite ® from terminal body using special care to ensure that there is no red Loctite ® threaded stud. 5/30/07 MKIV Unit 0...
- Page 20 Assembly Attach Turnbuckle/Toggle Assemble turnbuckle and attach Harken toggle. Note: If using Sta-Lok or Norseman ® ® stud, you must use a washer above stud as shown below. Washer Eye/Jaw Toggle Assembly MKIV Unit 0 4/13/09...
-
Page 21: Turnbuckle
Clevis Pin death. See www.harken.com for additional safety information. Crosspin at 90° to Clevis Pin Check foil height at top, set and secure using Allen wrench. - Page 22 Tighten screw. Note: Screw will turn with some difficulty. It is plastic coated to prevent loosening due to vibration. Important—When removing screw, loosen no more than one full turn. Slide screw up and remove feeder. MKIV Unit 0 5/30/07...
-
Page 23: Commissioning Turnbuckle
Failure to do so may cause an accident, damage to your vessel, personal injury or death. See www.harken.com for additional safety information. Adjust turnbuckle. Replace used cotter pins. Lower drum assembly and install clevis pin and new cotter pin. -
Page 24: Line To Cockpit
This can cause an accident, damage to your vessel, personal injury or death. See www.harken. com for additional safety information. Enclosed Window Note location of sun cover. Charge system by rotating furler to wrap line on drum. -
Page 25: Halyard Wrap/Prevent Halyard Wrap
See www.harken.com for additional safety information. If Halyard Wraps If halyard wraps, do not force unit to turn. Attempt to open sail by carefully furling in and out a little at a time. -
Page 26: Pendants/Halyard: Restrainer/Tension
Restrainers tend to limit sail luff length and may cause problems if not installed properly. If your boat needs a halyard restrainer, use Harken Part No. 945 or 1988. Restrainer should be mounted as high as possible on face of mast. -
Page 27: Operation
They permit a very tight headstay to be eased when boat is not in use. For best performance, consider adding a backstay adjuster; either a block and tackle, a mechanical adjuster like those offered by Harken, or a hydraulic adjust- Remember to keep headstay tight for best performance when furling or reefing. -
Page 28: Raise Sails
Consult the Troubleshooting Guide on page 32. Do not use a winch to force a system to turn. If you are certain that the system is operating properly, you may use a winch to make furling easier. MKIV Unit 0 5/30/07... -
Page 29: Secure Sail
You may also lock your system by aligning holes in bottom of drum and basket and then using a line to secure drum. Be sure that mooring lines are not placed across furling line where they may cause chafe. 5/30/07 MKIV Unit 0... -
Page 30: Race Conversion
2) Use 5mm Allen wrench provided to remove 2 screws on bottom of guard assembly and remove two halves. Be careful—screws are not captive. 3) Use a 2.5mm Allen wrench to loosen four screws in plastic cover and flange. MKIV Unit 0 5/30/07... -
Page 31: Maintenance
Inspect foil to make sure that it has not dropped into drum assembly. Periodically inspect wire for signs of wear or unraveling. Replace Line " (7mm) diameter line. Use either Harken replacement or double-braid polyester line. Storage – Mast Down In areas where it freezes, do not store system where water can accumulate in foils. - Page 32 Line is not led through windows. Pull line through enclosed window. Line jams between guard and plastic spool plate. Warranty — Online at www.harken.com or call, write, email or fax Harken, Inc., Pewaukee, WI USA MKIV Unit 0 5/30/07...
- Page 33 MKIV Unit 0 Parts List Description Order Part No. HFS980 Top Cover Assembly w/Screws HFG683 Top Cover H-38817 H-38817 Top Cover Screw HFS980 Bottom Flange Assembly w/Screws HFG684 Flange H-38818 HFS980 Bottom Flange Screw HFS980 H-38818 Description Order Part No.
- Page 34 Installation Manual Unit 0 57 mm Carbo Ratchet Assembly 7402 WARNING!: Strictly follow all instructions to avoid an accident, damage to your vessel, personal injury or death. See www.harken.com for additional safety information. 7404 40 mm Carbo Assembly 7401 Horn Cleat...
- Page 35 Battcars let you keep the performance of your existing sail. Fits boats 21-42 ft TECH TIP #2: When reefing or dousing the sail, use a Harken Lazy Jack system to flake the main on the boom. For the Top 10 Q&A on Battcars see www.harken.com/usa...
- Page 36 Email: info.harken.com.au Harken New Zealand, Ltd. 30-36 Fanshawe Street Auckland 1001, New Zealand Telephone: (64) 9-303-3744 Fax: (64) 9-307-7987 • Web: www.harken.co.nz Email: harken@harken.co.nz Please visit: http://www.harken.com/dealers/dealers.php for an up-to-date list of Harken dealers and distributors Printed in USA 4416-04/29/10...
Need help?
Do you have a question about the MKIV and is the answer not in the manual?
Questions and answers