Advertisement
Quick Links
AUBER INSTRUMENTS
Instruction Manual
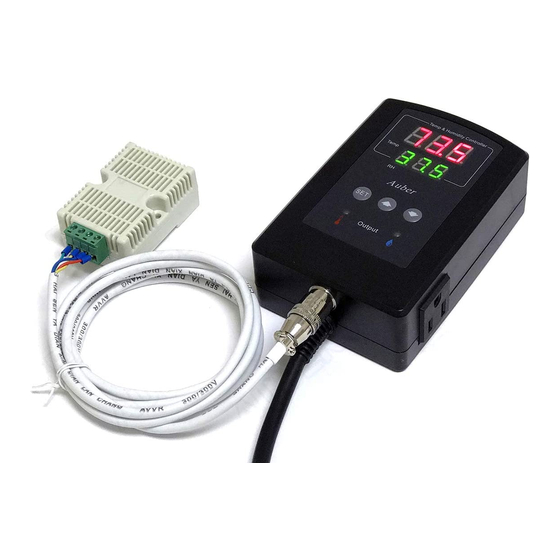
TH220A TEMPERATURE AND HUMIDITY CONTROLLER
1. Overview
This plug-n-play temperature and humidity controller is designed for high
relative humidity (>85%) and condensing environments, where slight
temperature drop may cause condensation and could damage the sensor. This
controller equipped with one of the most robust humidity sensors on the
market. It can be fully recovered even immersed in water. Ideal for curing
Fridge. The controller can control both temperature (heating or cooling) and
humidity (humidifying or dehumidifying) at the same time.
2. Specifications
Temperature Control Range
Temperature Resolution
Temperature Accuracy
Temperature Control Mode
Temperature Control Output
Humidity Control Range
Humidity Resolution
Humidity Accuracy
Humidity Control Mode
Humidity Control Output
Operating Temperature
Dimension
Input Power
Sensor Cable Length
Power Cable Length
* Please note: Although both temperature and humidity output can handle up to 15A, the
combined total power of the two channels are limited to 15A due to the limitation of input
power cord.
3. Front Panel
Figure 1. Front Panel.
2019.05
INSTRUCTION MANUAL
- 40°C ~ 80°C, - 40°F ~ 176°F
0.1°C (between -9.9°C ~ 80°C)
1°C (between -40°C ~ 10°C)
0.1°F (between -9.9°F ~ 99.9°F)
1°F (between -40°F ~ 10°F,100°F ~176°F)
0.5°C
On/Off Control. Heating or Cooling
15 A, 120 V or 240 V AC *
0 ~ 99.9% RH
0.1% RH
4% RH
On/off control.
Humidifying or dehumidifying
15 A, 120 V or 240 V AC *
0°C ~ 50°C
91 x 140 x 46 mm
85 ~242 V AC, 50 Hz / 60 Hz
6 ft (2 m)
3 ft (1 m)
Version 1.3 (May, 2019)
Measured temperature window: In normal operating mode, this window
shows measured temperature. In parameter setting mode, this window shows
parameter name.
Measured humidity window: In normal operating mode, this window shows
measured humidity. In parameter setting mode, this window shows parameter
value.
Alarm indicator: When the alarm is muted, the alarm indicator (the small dot
on the last digit) will be on.
SET key: Access the program settings and parameter settings.
UP key (Unmute): Increase the value. Press down momentarily to unmute the
alarm.
DOWN key (Mute): Decrease the value. Press down momentarily to mute the
alarm.
Temperature socket: Supply power to heater/cooler.
Temperature indicator: Red LED indicator; it is on when the temperature
socket is energized.
Humidity socket: Supply power to the humidifier/dehumidifier.
Humidity indicator: Green LED indicator; it is on when the humidity socket is
energized.
4. Getting Started
4.1 Power up the controller and connect the sensor
To power up the controller, simply plug its power plug to a wall outlet. Then
connect the 4-pin connector from the humidity sensor to the sensor input port
on the bottom of the controller. Please align the notch on the sensor plug with
the key on the sensor socket. You can refer to the Section 6 in the manual for
details.
4.2 Displayed Information
The top LED window displays the measured temperature, and the bottom LED
window displays the relative humidity reading. If sensor is not connected or
defective, the controller will show "ERR" in its display window.
There is one LED indicator on each side of the controller to show the output
status of each output socket. The red LED on the left is for the temperature-
control socket, and the green LED on the right is for the humidity-control
socket.
4.3 Decide the Control Mode for Each Output Socket
The temperature-control socket can be set either to drive a heating device or to
drive a cooling device. This temperature-control mode is determined by the
parameter tCM (tCM), which can be set to "Ht" for heating, or "CL" for
cooling.
Similarly, the humidity-control socket can be set either to drive a humidifying
device or to drive a dehumidifying device. This humidity-control mode is
determined by the parameter hCM (hCM), which can be set to "H" for
humidifying, or "DeH" for dehumidifying.
WWW.AUBERINS.COM
P1/5
Advertisement

Subscribe to Our Youtube Channel
Related Manuals for Auber Instruments TH220A


Summary of Contents for Auber Instruments TH220A
- Page 1 AUBER INSTRUMENTS WWW.AUBERINS.COM Instruction Manual TH220A TEMPERATURE AND HUMIDITY CONTROLLER INSTRUCTION MANUAL Version 1.3 (May, 2019) 1. Overview Measured temperature window: In normal operating mode, this window shows measured temperature. In parameter setting mode, this window shows This plug-n-play temperature and humidity controller is designed for high parameter name.
- Page 2 AUBER INSTRUMENTS WWW.AUBERINS.COM The user should decide the appropriate configuration for each output socket 5. Parameter Settings based on the user’s particular application. Please refer to section 4.5 and All parameters are listed in Table 1. When a parameter is displayed in the top second 5 for details.
- Page 3 Figure 5. Humidity output is decided by HSP and HDF. Note 1: The TH220 model doesn’t have SYS menu and the parameter PSD. Only the TH220-W and TH220A-W have the password parameter PSD. Small differential gives tight control. Large differential reduces the frequency of Note 2: These parameters, HDM, HDT, HOS, HOD, and RST are only available in cycle on and off, and it will extend the life of relay and compressor.
- Page 4 Note 11. PSD is the Device Access Password (only available to TH220-W and humidity output. It has three available modes, which are listed and explained in TH220A-W model). This parameter is used to lock the access to parameter the table below.
- Page 5 Copyright 2007-2019, Auber Instruments All Rights Reserved. No part of this manual shall be copied, reproduced, or transmitted in any way without the prior, written consent of Auber Instruments. Auber Instruments retains the exclusive rights to all information included in this document.
Need help?
Do you have a question about the TH220A and is the answer not in the manual?
Questions and answers