Advertisement
Quick Links
Introduction
Thank you for purchasing the Auber WS series temperature controller. We sincerely
appreciate your decision and trust that our machine will meet your expectations in both
the quality of the result and the value of our product. While we are delighted that you may
be anxious to operate the controller for your project, a few minutes of your time reading
through this manual will only serve to enhance your experience in the months and years
ahead. In particular, we would urge you to read through the safety warnings below.
Although this plug-and-play controller is very easy to operate, the process involves high
temperature and high wattage appliances and your safety is paramount.
• This controller is designed only to be used with devices that have limited power
and their own thermal cut off protection, such as a thermostat or thermal fuse in
case of controller failure. Do not use it with a cook top or hot plate.
• Do not place any objects on the top of controller surface which is used to vent
excess heat during its operation.
• When open the cover of a rice cooker or slow cook that has been running for
extended period of time, the cover will carry a lot of condensation that can drip to
everywhere. Avoid drip the water over the controller.
• The maximum electric current this controller can handle is 15 ampere. For 120
volt ac in US and Canada, this limits the heater power to1800 watts. In addition, if
the heater power is more than 1400 watts, the volume of the pot is also limited to
less than 10 gallons (or 38 liters). Due to its compact size and the splash proof
design for kitchen applications, the controller has a limited ability to dissipate the
*
Patent pending
Operation Instruction Manual
WS-1500A
Precision PID Temperature Controller
Version 1.0
Auber Instruments
730 Culworth Manor
Alpharetta, GA 30022
770-569-8420
www.auberins.com
March 2008
SAFETY WARNINGS
1
*
Advertisement

Related Manuals for Auber Instruments WS-1500A


Summary of Contents for Auber Instruments WS-1500A
- Page 1 Operation Instruction Manual WS-1500A Precision PID Temperature Controller Version 1.0 Auber Instruments 730 Culworth Manor Alpharetta, GA 30022 770-569-8420 www.auberins.com March 2008 Introduction Thank you for purchasing the Auber WS series temperature controller. We sincerely appreciate your decision and trust that our machine will meet your expectations in both the quality of the result and the value of our product.
- Page 2 Instruments only. Using it to control a not recommended device can be dangerous and cause fire. Auber Instruments is not liable for damages caused by misuse of the controller. If you are not sure the controller can be used, please contact Auber Instruments before use.
-
Page 3: Specifications
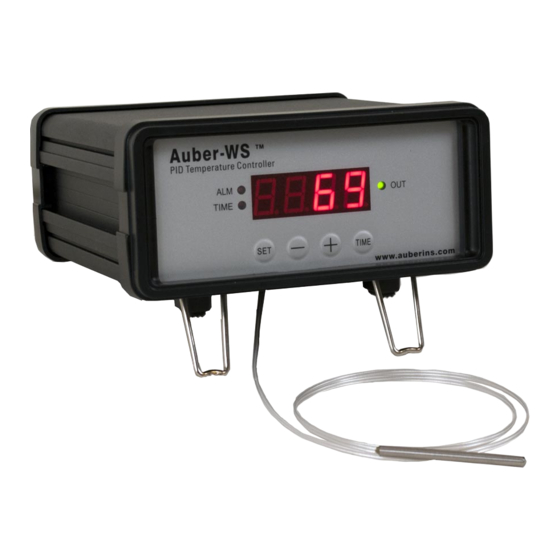
your local health department. • If you don’t have proper food core temperature sensor probe, always cook at desired core temperature setting for the duration as specified by reliable recipes plus a safety factor of at least 25% longer. Cooking at core temperature setting, food can never over-cook from a temperature perspective. - Page 4 Fig 1. Front Panel 1) Parameter Window (LED) - for displaying temperature values and controller's system parameters. 2) Temperature status indicator - In normal mode, this LED indicates the heater status. When it is on (lit), the heater is powered. When it is off, the heater power is off.
- Page 5 Fig 2, Back Panel 2) Connecting and operating the controller Fig 3. Typical connection between the controller and the heating device (in this example, the cooker). The connection of controller should be done in the following steps. • Plug the temperature sensor to the back of the controller. •...
- Page 6 off position. Put the sensor inside the container to be controlled. • Turn on the controller. • Turn on the heating device. 3) Setting the temperature. Press SET key twice. Both 2) and 7) will start to flash. The LED shows the current temperature setting.
- Page 7 Symbol Display Commercial Rice cooker Electric kettle, 1.5 liter NESCO 18 quart Roaster Home use rice cooker, Home use rice cooker, wine fermentation. (PD mode) Switch set at Warm position Slow cooker, 7 quart Slow cooker, 4 quart Slow cooker, PD mode (low overshoot) Bradley Smoker Table 1.
- Page 8 When Should the Controller be Tuned? If your cooker is not listed in the Table 1 of our pre-selected cookers, or the PID parameters we provided are not working for your liking, you can use the auto-tuning function to let the controller to determine the PID parameters automatically. Auto-tuning function (it’s often known as self-tuning) can automatically optimize the PID parameters for your chosen cooking system.
- Page 9 and cooling cycle. If the temperature of the cooker takes a long time to drop -when heater is off- the auto-tuning could be a very long tuning process. This is especially true with a well insulated cooker. The auto-tuning should be able to tune most of your chosen with fairly good result.
- Page 10 change. This will allow the controller to act sooner. It will turn the heater to full power before the temperature drops too much • T, cycle rate. The unit is second. This unit determines how long for the controller to calculate each action. This parameter should remain at 2 second for almost all applications.
- Page 11 7) Setting other system parameters These are the parameters that normally do not need to be changed. The lock code to access them is 155. • SC, calibration offset. The parameter is used to make the input offset to compensate the error produced by sensor. e.g. if the temperature displays 2.0 C in ice water mixture, set SC=-2.0 will make the display to shown 0.0 degree.
- Page 12 Fig 6. Code 155 Parameter setup flow chart Press and hold SET key for 4 second until Parameter Window displayed “LCK”. Release the SET. The display will show “0”. Use “+” and “-“ keys to adjust the display to 155 (another pass code) and press SET.
-
Page 13: Warranty
Alpharetta, GA 30022. If the appliance is found by Auber Instruments to be defective in material or workmanship, Auber Instruments will repair or replace it free of charge. A dated proof of purchase may be required. The liability of Auber Instruments is limited solely to the cost of the repair or replacement of the unit at our discretion. - Page 14 In no event is Auber Instruments liable for incidental or consequential damages of any nature whatsoever. Some states/provinces do not permit the exclusion or limitation of incidental or consequential damages and therefore the above may not apply to you.
- Page 15 Appendix 1 Managing the heat generated by the controller The heat dissipation of the controller is directly related to the electric current drawing power of the heater. If your cooker consumes less than 12 ampere of current or your pot is less than 5 gal (19 liters), you do not need to worry about the heat generated by the controller.
- Page 16 minute will provide enough energy to heat 10 gallon (38 liters) of water up by 108F (60 C). If your have a pot that is bigger than 10 gallon and the heater is drawing 15 A, and you need to raise the temperature by 108 F, you better use one of the methods mentioned below to reduce the heat in the controller.
- Page 17 Appendix 2 Controlling the Temperature of Slow Cooker For long duration sous-vide cooking, water bath temperature stability can be easily achieved with a slow cooker. Almost any PID parameters’ settings will hold the set temperature within one degree, if given enough time. However, the time needed for a slow cooker to stabilize at the set temperature is sensitive to the settings of the PID parameters.
- Page 18 Depending on the amount of water in the cooker, the performance may vary slightly. If the temperature still overshoots too much, increase the P value. If the temperature stabilizes one degree below the set point, reduce the P value. Technical explanation For people used to a conventional thermocouple or RTD sensor based PID controller, they may think a PD controller can’t hold the temperature within one degree, because a few degree temperature offset is needed for the controller to output enough power to...
- Page 19 This study is preliminary. It will give you a guide on how to achieve a good stability control. We will keep you updated when better results are obtained from our tests or from our customers. Appendix 3 Controlling the kettle for making French Press Coffee 1) Make sure the sensor is immersed in the kettle.
Need help?
Do you have a question about the WS-1500A and is the answer not in the manual?
Questions and answers