
Related Manuals for Clarion VTM1


Summary of Contents for Clarion VTM1
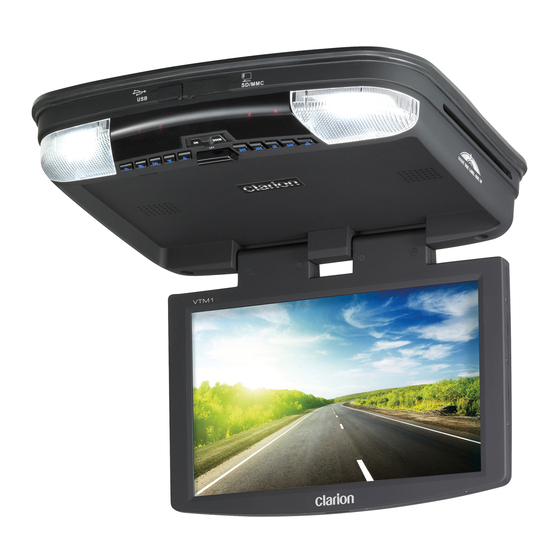
- Page 1 VTM1 10.2” TFT LCD Roof Mount Monitor with DVD Player, USB 2.0 and SD/MMC Ports OHM107VD...
-
Page 2: Table Of Contents
Notes ............................19 Welcome Thank you for purchasing the Clarion VTM1 Roof Mount LCD Monitor & DVD/USB/SD/MMC Media player. Please read this manual carefully before using your player to get the most from its features and functions. We suggest you keep this manual in a safe place as it can be a valuable tool in helping you to understand its operation and fully enjoy your multimedia system. -
Page 3: Safety Information
• Protect your Media! Heat & humidity can cause damage. Remove any USB Key, SD card and eject any disc from your VTM1 before departing from your vehicle and store them away from direct sun light. • It is also wise to close the LCD panel when you leave your vehicle to minimise possible screen damage. -
Page 4: Dvd Video Features
The DVD Video System assigns a Region number to the DVD video player and to the DVD disc according to its Global Sales/Marketing location. The Region number of a disc is marked as shown below, on the disc and its case. Example : VTM1... -
Page 5: Controls And Functions
Press to select a different filming Angle. correct position (Refer Page 16). Please refer to the vehicle’s wiring manual for the correct connection details. Angle VTM1 Please note that this feature only works if the DVD is recorded with multiple angles. -
Page 6: Controls And Functions : Remote Unit
Controls and Functions : Remote Unit Item Name Function or control Power Press to turn the VTM1 On or Off. Setup Press to access the setup menu and modify the player settings. Mute Press to switch the sound On or Off. - Page 7 Press [STOP] button twice to fully stop playback, Press [PLAY] or [ENTER] button to start Stop playing at the beginning of DVD. Press to Display the Playback Information- Display (Title, Chapter, Track and Time). Go To Press to Start Playback at a selected Chapter, Track or Time. VTM1...
-
Page 8: Operations
Random Press to Fast Reverse playback Press to play ch Skip back Press to go to the Previous Chapter on DVD VTM1 Random Previous Press to play chapters or tracks Press to repeat or Track on CD. - Page 9 Notes: 1. Some DVDs only allow access to this function through the DVD menu. 2. This is not available for AVI files on any media. VTM1...
- Page 10 Press to select the desired This icon in front of an item indicates it’s a folder. i t i tracks you want, or the VTM1 plays the tracks in Return Press to return the main m f i l d i f the order that they were placed onto the media.
-
Page 11: System Setup
PARENTAL: Restricts the viewing of movies to children of appropriate age levels only. You can select 1 to 8. PASSWORD: Uses the number key”0” to “9” to input 4-digit password. The default password is 3308. DEFAULT: Resets all settings to the factory defaults. VTM1... -
Page 12: Customizing Dvd Settings - Usb Stick And Sd Memory Card Use
1. Insert the USB Stick or SD/MMC Card into the appropriate socket on the VTM1 as shown. 2. Using the SRC button on your Remote Control select DVD-IN mode, then press and hold the SRC button for >2 sec. The VTM1 will read the contents of your memory device and display its contents. 3. Press to navigate through this menu and press ENTER to make your selection. -
Page 13: Maintenance
Never play a disc with an adhesive label, • cellophane tape or glue on its surface. If you try to play such a disc it may become jammed in your player, causing serious damage and requiring product servicing. VTM1... -
Page 14: Troubleshooting
Player must not be in AV1 or AV2 mode. Discs are only accepted or Press the SRC button to select DVD mode. ejected in DVD mode. Disc cannot be inserted or ejected The Car ACC or IGN is OFF. Turn the IGN key to ACC VTM1... -
Page 15: Specifications
Infrared Headphones ST4.2x16 screw CM 4x10 screw Metal mounting plate User’s manual Rubber Gasket Use only the contents of this package to install and use this player. The use of any other accessories not provided may result in damage. VTM1... -
Page 16: Installation
IMPORTANT: Only adjust this switch to its correct position BEFORE connecting the Green Door Lead. Do not adjust this switch while the VTM1 is switched on. This may result in damage. 10. USB and SD/MMC Sockets For use with USB Keys and SD/MMC cards containing JPEG,. -
Page 17: Installing The Player
For your safety, be sure to close the LCD panel when not use it. 7. Connect input and output cables. 8. Connect the wire harness in the following or- der: Ground wire (Black), Battery wire (Yellow), +ACC wire (Red) and Door wire (Green). VTM1... -
Page 18: Installing The Remote Control Battery
(The type of battery: CR2025) 3. Push the holder back. Using the finger to push in the holder back until the locking sound is heard. 4. Aim the IR Remote Control directly at the DVD player, then press any button to operate. VTM1... -
Page 19: Notes
Notes VTM1... - Page 20 Clarion Co., Ltd. All Rights Reserved. Copyright 2010: Clarion Co., Ltd. Printed in China / www.clarion.com OHM107VD...
Need help?
Do you have a question about the VTM1 and is the answer not in the manual?
Questions and answers