Advertisement
Quick Links
Advertisement

Related Manuals for Belling IB608FPYP


Summary of Contents for Belling IB608FPYP
- Page 1 IB608FPYP OPERATING AND INSTALLATION INSTRUCTIONS OF PYROLYTIC BUILT-IN OVEN...
- Page 2 Dear Customer, We take offering quality products more than your expactation as goal, offers you the products produced in modern facilities carefully and particularly tested for quality. Your manual is prepared in order to help you to use your appliance that is manufactured by the most recent technology, with confidence and maximum efficiency.
- Page 3 Contents 1- Presentation and size of product 2- Warnings 3- Preparation for installation and use 4- Using the oven 5- Cleaning and maintenance of your product 6- Service and Transport...
-
Page 4: Part 1: Presentation And Size Of Product
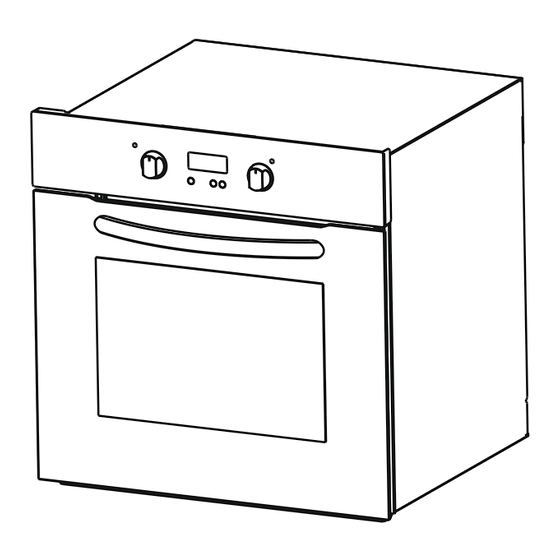
PART 1: PRESENTATION AND SIZE OF PRODUCT Figure 1 LIST OF COMPONENTS : 1- Control panel 8- Wire Grill 2- Handle 9- Racks 3- Oven Door 10- Oven Light 4- Door Lock 11- Turbo Heating Element(behind the plate) 5- Tray 12- Fan (behind the plate) 6- Lower Heating Element (behind the plate) 13- Air Outlet Shutters... - Page 5 PART 2: WARNINGS READ THESE INSTRUCTIONS CAREFULLY AND COMPLETELY BEFORE USING YOUR APPLIANCE, AND KEEP IT IN A CONVENIENT PLACE FOR REFERENCE WHEN NECESSARY. THIS MANUAL IS PREPARED FOR MORE THAN ONE MODEL IN COMMON. YOUR APPLIANCE MAY NOT HAVE SOME OF THE FEATURES THAT ARE EXPLAINED IN THIS MANUAL. PAY ATTENTION TO THE EXPRESSIONS THAT HAVE FIGURES, WHILE YOU ARE READING THE OPERATING MANUAL.
- Page 6 - The appliance is not intended to be operated by means of an external timer or separate remote-control system. - During use, the appliance becomes hot. Care should be taken to avoid touching heating elements inside the oven. - During use, handles held for short periods in normal use can get hot.
- Page 7 - Your appliance is produced in accordance with all applicable local and international standards and regulations. - Maintenance and repair work must be made only by authorized service technicians. Installation and repair work that is carried out by unauthorized technicians may endanger you.
- Page 8 During usage - When you first run your oven a certain smell will emanate from the insulation materials and the heater elements. For this reason, before using your oven, run it empty at maximum temperature for 45 minutes. At the same time you need to properly ventilate the environment in which the product is installed.
-
Page 9: Part 3: Preparation For Installation And Use
PART 3: PREPARATION FOR INSTALLATION AND USE Manufactured with best quality parts and materials, this modern, functional and practical oven will meet your needs in all respects. Make sure to read the manual to obtain successful results and not to experience any problems in the future. The information given below contain rules that are necessary for correct positioning and service operations. - Page 10 3.2. INSTALLATION OF BUILT_IN OVEN...
- Page 11 The dimensions and material of the cabinet in which the oven will be installed must be correct and resistant to increases in temperature. In a correct installation, contact with electrical or insulated parts must be prevented. Insulating parts need to be fitted in a way to ensure that they cannot be removed by using any kind of tool.
- Page 12 3.3. WIRING AND SAFETY OF BUILT_IN OVEN The instructions given below must be followed without fail during wiring : The earthing cable must be connected via the screw with the earthing mark. Supply cable connection must be as shown in Figure 3. If there is no earthed outlet conforming to regulations in the installation environment, call the Authorized Service immediately.There is to install an all pole disconnector inside they supply circuit with a contact openning of at least 3mm ( rated 16A).
- Page 13 3.4. GENERAL WARNING AND PRECAUTIONS Your appliance is produced in conformity with the relevant safety instructions relating to electrical appliances. Maintanance and repair works must be performed only by Authorized Service technicians. Installation and repair works, performed without observing the rules may be dangerous. The outer surfaces is heated while your appliance is operating.
-
Page 14: Part 4: Using The Oven
PART 4: USING THE OVEN 4.1 CONTROL PANELS Built_in Oven Oven Function Digital Timer Oven Thermostat Button Control Button Door Lock Light Oven Thermostat Light 4.2. USING THE OVEN PART OF THE APPLIANCE Oven Function Control Knob: For you to select the oven functions (Figure 4). Explained in the next part and in Table 1. - Page 15 4.3. USING THE OVEN FUNCTION CONTROL BUTTON Availability of the functions explained below vary depending on the product model. Defrost Function : You can start the defrost operation by putting the frozen food into oven and bringing the button to the indicated mark.
- Page 16 Turbo Fan Function : The turbo fan function evenly disperses the heat in the oven. All foods on all racks will be cooked evenly. Adjust the thermostat button to the desired degree. Turn the function button so it will point to the Tubo function symbol.
- Page 17 Grill Fan Function : The oven's thermostat and warning lights will be turned on, the grill heating element will start operating. The function is used for grilling and toasting foods, use the upper shelves of oven. Lightly brush the wire grid with oil to stop foods sticking and place foods in the center of the grid. Always place a tray beneath to catch any drips of oil or fat.
- Page 18 Pyrolytic cleaning function Before activating pyrolytic cleaning function,remove any excessive spillage and make sure that the oven is empty. Do not leave any thing inside the oven cavitiy (e.g. pans,grids,baking tray,dripping pan, etc.. ) As this could heavily damage them. Before activating the pyrolytic function, remove the oven shelves, shelf supports and wire shelves.
- Page 19 Pyrolytic Cleaning The oven cavity is coated with a special emanel resistant to high temperatures. During the pyrolytic cleaning operation, the temperature inside the oven can reach about 475 C does burning food residuals. For your security,during the pyrolytic cleaning operation,the oven door automaticly locks. Upon completion of the cleaning operation the oven door will be locked until the oven cavity has cooled down.
- Page 20 The minute minder symbol will appear on the time display. Once a countdown time has been set, it is possible to shorten or lengthen the time by using the "minus" or "plus" buttons after pressing "mode" button once. An alarm will sound when the countdown time has elapsed. The alarm can be silenced by pressing the "mode"...
- Page 21 Setting the start and end time function This function will allow you to set a time in the future that the oven switches on at and a time that the oven will switch off at. Use the thermostat control knob to set the temperature and oven function selector knob to select mode of cooking that you require.
- Page 23 4.5. ACCESSORIES USED IN THE OVEN It is recommended that you use the containers indicated on the table depending on the food you will cook in your oven, you can also use glass containers, cake cutters, special oven trays suiatble for use in your oven, available in the market. Pay attention to the information given by the mufacturer firm concerning this issue.
- Page 24 Pan anti-tilting wire To locate grid correctly in the cavity, put it to any rack and push the grid up to the end. The pan anti-tilting wire must be placed inside of the cavitiy. Installation of the Shelves 5. Rack 4.
-
Page 25: Maintenance
PART 5: CLEANING AND MAINTENANCE OF YOUR OVEN 5.1. CLEANING Before starting to clean your oven, be sure that all control buttons are off and your appliance is cooled off. Unplug the appliance. Do not use cleaning materials containing particles that might scratch the enamelled and painted parts of your oven. -
Page 26: Part 6: Service And Transport
PART 6: SERVICE AND TRANSPORT 6.1. REQUIREMENTS BEFORE CONTAINING TO SERVICE If the oven does not operate : The oven may be plugged off, there has been a black out. On models fitted with a timer, time may not be regulated. If the oven does not heat : The heat may be not adjusted with oven’s heater control switch. - Page 27 52204333...
Need help?
Do you have a question about the IB608FPYP and is the answer not in the manual?
Questions and answers