
Related Manuals for Grundig VCC 4350 A


Summary of Contents for Grundig VCC 4350 A
- Page 1 VACUUM CLEANER VCC 4350 A ENGLISH...
- Page 3 ________________________________________________________...
- Page 4 SAFETY ______________________________________________ ▪ Please read this manual complete- Do not use the appliance to ly before using your appliance! vacuum cigarette butts, fireplace Follow all the safety instructions ashes or matchsticks. These ob- to avoid damage caused by im- jects may cause fire. proper use! ▪...
- Page 5 Please contact a service centre handling. in this case. ▪ Our GRUNDIG Household Ap- pliances meet all the applicable safety standards; thus if the ap- pliance or the power cord is damaged, it must be replaced...
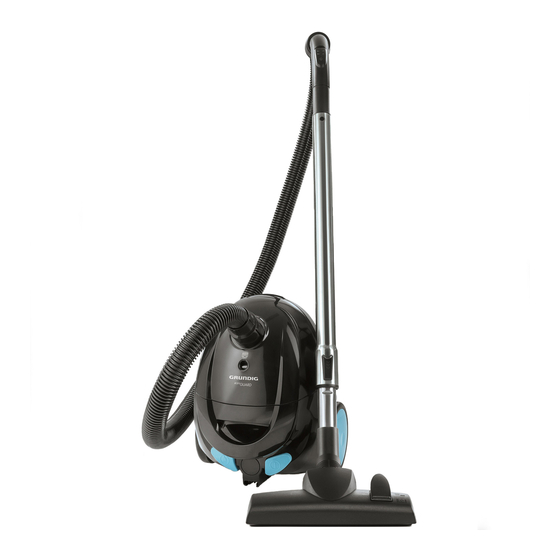
- Page 6 Congratulations on your purchase of your new vacuum cleaner VCC 4350 A. Suction control Read the following user notes carefully to Lower body ensure full enjoyment of your quality GRUNDIG Metal telescopic tube product for many years to come. Flexible hose adapter Responsible_approach!
-
Page 7: Operation
OPERATION ________________________________________ Preparation Note Install all snap-on elements by pushing and ■ Your appliance is provided with a dust bag. The rotating to each other and remove them by appliance is ready for use when all parts are pulling and rotating. installed together. - Page 8 OPERATION ________________________________________ Switching_on_and_off P ull the power cord out to a suitable length. Caution The maximum cable length is indicated by ■ a red mark. Never try to pull out the power cord beyond the red mark. P lug the power cord plug into the wall socket. 3__Switch on the appliance by pressing On/Off button Rewinding_the_power_cord...
- Page 9 You should use dust bags from Swirl®, Type Y ■ dust. It shall also indicate if a big object blocks 05® or Menalux®, Type 1840 for VCC 4350 A. the hose or suction clearance. Caution Do not use the appliance without the dust ■...
- Page 10 INFORMATION _ ___________________________________ Replacement_or_cleaning_of_the_ Clean_the_exhaust_air_fan_filter filter_ R emove the filter bracket by pressing on the release button (on the rear of the appliance). Caution Install the dust bag and filter before operating ■ R emove the filter from filter bracket. the appliance;...
-
Page 11: Troubleshooting
C heck whether the vacuuming tools are blocked. C heck dust bag and motor protection filter. C ontact your dealer or GRUNDIG service center if the appliance still cannot be operated. Storage If you do not intend to use the appliance for a ■... -
Page 12: Technical Specifications
INFORMATION _ ___________________________________ Environmental_information This product is manufactured with high-quality parts and materials which can be reused and recycled. Therefore, do not dispose of the product with normal household waste at the end of its service life. Take it to a collection point for the recycling of electrical and electronic equipment. - Page 13 Grundig Intermedia GmbH Beuthener Strasse 41 D–90471 Nürnberg www.grundig.com 15/27 72011 908 0700...
Need help?
Do you have a question about the VCC 4350 A and is the answer not in the manual?
Questions and answers