Table of Contents
Advertisement
Quick Links
Advertisement
Table of Contents

Related Manuals for Grundig BODYGUARD ECO VCC 9851


Summary of Contents for Grundig BODYGUARD ECO VCC 9851
- Page 1 CYLINDER VACUUM CLEANER BODYGUARD ECO VCC 9851 EN FR...
- Page 3 ________________________________________________________...
- Page 4 Change the filter when necessary. ■ operation in order to prevent injury and dam- ages. Only use original GRUNDIG accessories or ■ Swirl dust bags for replacement. The appliance is designed for domestic use ■...
- Page 5 SAFETY____________________________________ Our GRUNDIG Household Appliances meet ■ all applicable safety standards; thus if the ap- pliance or the power cord is damaged, it must be replaced by the dealer, a service centre or a similarly qualified and authorised service person to avoid any danger arising. Faulty or unqualified repair work may cause danger and risk to the user.
-
Page 6: Special Features
Operating radius approx. 9 metres Please read the following user notes carefully ■ to ensure you can enjoy your quality Grundig Multi-level extendable tube for adjusting to ■ product for many years to come. -
Page 7: Hepa Filter
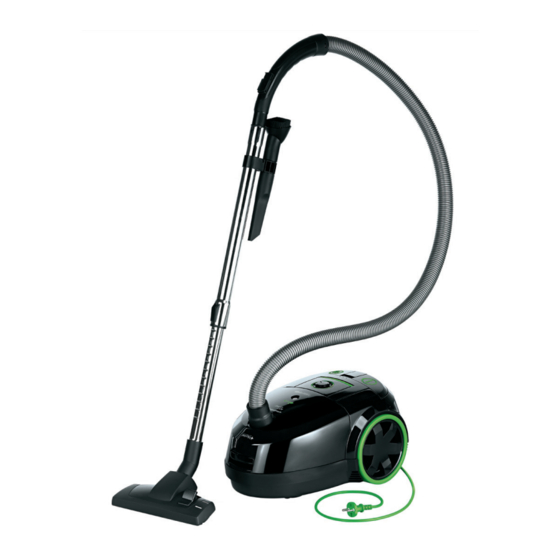
GRUNDIG offers an effective way to clean hygi- enically with the impressive Microban technol- ® ogy. The GRUNDIG dust filters and dust bags are equipped with the integrated Microban ®... - Page 8 OVERVIEW________________________________ Controls and individual parts See the illustration on page 3. Extendable power cord Brush holder Button for retracting the power cord ON/OFF button Handle Suction power control Dust level display Dust container cover Suction intake on the appliance Flexible hose Handle for guiding the appliance Suction control Suction brush attachment Extendable suction tube...
- Page 9 INDIVIDUAL_PARTS________________________ Flexible hose Note The nozzle can also be inserted into the The flexible hose is the connection between upper end (handle) of the flexible hose the appliance and the extendable suction tube. Suction attachment for upholstery Insert the flexible hose with the flexible con- tact into the suction intake on the appli-...
- Page 10 PREPARATION_ _ ___________________________ Check if the mains voltage on the type plate 2 Insert the other end (handle) of the flexible (on the bottom of the appliance) corresponds to hose into the extendable suction tube your local mains supply. Insert the required brush or attachment into the lower end of the extendable suction tube Assembly Your appliance is supplied with a dust bag.
-
Page 11: Switching On And Off
OPERATION_______________________________ Switching on and off Suction control 1 Pull out the power cord to the length you A suction control is located on the handle require. which you can operate with your thumb. If the control is fully closed, the maximum suction Caution power is reached. A yellow mark appears at the end of the cord. -
Page 12: Moving The Appliance
OPERATION_______________________________ Moving the appliance Retracting the power cord 1 Disconnect the power cord from the wall The appliance can also be carried with the handle socket. Caution 2 Hold the power cord in one hand and press Before moving the appliance to another and hold down the button. -
Page 13: Changing The Dust Bag
CLEANING_AND_CARE_____________________ Changing the dust bag Close the cover of the dust housing. Note 1 Disconnect the power cord from the wall Check, whether the appliance works after socket. changing the dust bag. If the suction power 2 Open the dust housing by pressing down on is still inadequate, accessories tubes or filter the catch of the dust housing and then lift... - Page 14 CLEANING_AND_CARE_____________________ The air outlet blower (exhaust filter) Remove the filter from the holder. Open the air outlet grille by pressing down on the catch. Shake the filter vigorously, then clean it in warm soapy water, rinse thoroughly and leave it to dry. 2 Firstly, remove the grille of the HEPA filter. Caution Never put the filter in the washing machine or dry it with a hair dryer.
-
Page 15: Troubleshooting
5 Plug in the appliance again and switch it on. It should now work properly. 6 If the appliance does not switch on, wait 20 minutes and then try again. If it still does not work, contact your dealer or GRUNDIG Service Center. ENGLISH... -
Page 16: Environmental Note
INFORMATION____________________________ Environmental note Technical data This product conforms to the European This product has been manufactured with directives 2004/108/EC, 2006/95/EC high-quality parts and materials which can be and 2009/125/EC. re-used and recycled. Power supply Therefore, do not dispose of the 220 - 240 V ~ , 50 Hz product with normal domestic waste at the end of its service life. - Page 17 AUS GUTEM GRUND www.grundig.com 72011 908 1800 11/48...
Need help?
Do you have a question about the BODYGUARD ECO VCC 9851 and is the answer not in the manual?
Questions and answers