Advertisement
Available languages
Available languages
Quick Links
Franklin Electric Co., Inc.
Oklahoma City, OK 73157-2010
www.LittleGiantPump.com
customerservice@lgpc.com
INTRODUCTION
EN
Little Giant Wastewater Kits are carefully packaged, inspected and tested to ensure
safe operation and delivery. When you receive your unit, examine it carefully to
determine that there are no missing, broken or damaged parts that may have
occurred during shipment. If damage has occurred, make notation and notify the
firm you purchased the unit from. They will assist you in replacement or repair, if
required. Read this manual carefully and also the enclosed pump manual.
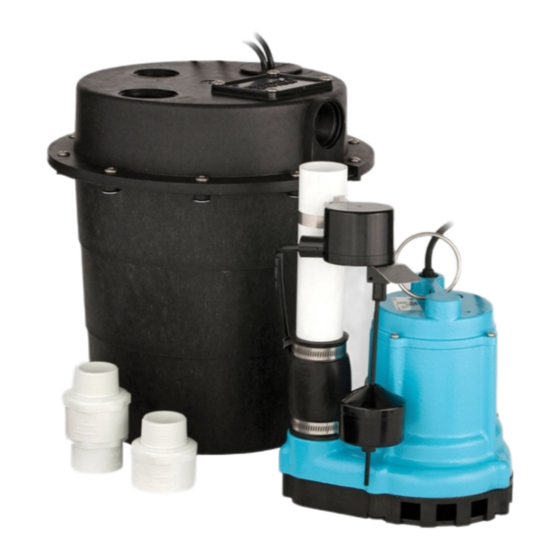
This unit is designed to pump wastewater from laundry trays, washing machines,
sinks, or dehumidifiers. The unit is not designed to pump raw sewage or flu-
ids other than water. The unit is capable of removing fluids with solids up to
3/4" spherical. Maximum fluid temperature is 125°F. The unit is designed to fit
under most sinks so in many cases it is not necessary to recess the unit into
the floor.
ITEMS TO PURCHASE
NOTE: Some state or local codes require all electrical and/or plumbing con-
nections to be made by a licensed contractor. It is the customer's responsibility
to determine codes involved and to comply with these codes. If user can install
unit, items to purchase are:
1. Inlet piping, with trap and union (basin cover has 1-1/2" FNPT fitting)
2. Discharge piping, with swing check valve and union (basin cover has 1-1/2"
FNPT fitting)
3. Vent piping (basin cover has 2" FNPT fitting) and 2" union
SAFETY GUIDELINES
1. CAUTION: Make certain that the unit is disconnected from the power
source before attempting to service or rework any components.
2. Read all instructions and safety guidelines thoroughly. Failure to follow the
guidelines and the instructions could result in serious bodily injury and/or
property damage.
3. Check local electrical and building codes before installation. The installa-
tion must be in accordance with their regulations.
During normal operation the pump is immersed in water. Caution must be
used to prevent bodily injury when working near the pump.
a. The plug must be removed from the receptacle prior to touching, servic-
ing or repairing the pump.
b. To minimize possible fatal electrical shock hazard, extreme care should
be used when changing fuses. Do not stand in water while changing
fuses or insert your finger into fuse socket.
ELECTRICAL CONNECTIONS
All wiring must meet local codes, and a licensed electrical contractor is rec-
ommended. The pump is supplied with a 3-prong vented plug. Plugs must
be plugged into a grounded receptacle and should be on a separate circuit
with fuse or circuit breaker and GFCI (ground fault circuit interrupter). Be sure
AUTOMATIC OPERATION ï FONCTIONNEMENT AUTOM ATIQUE
ï FUNCIONAMIENTO AUTOM¡TICO
Grounded Receptacle ï RÈceptacle de Mis ‡ la Terre
ï Recept·culo Conectado a Tie rra
Automatic Switch Power Cord (with piggyback plug)
ï Cordon d'alimentation Avec Interrupteur Automatique
(avec prise mixte) ï Cable de AlimentaciÛn Para
Interruptor Autom·tico (con enchufe incorporad o
Figure 1
WRS-9EN
WASTEWATER
REMOVAL SYSTEM
Pump Power Cord ï C‚ble d'
Alimentation de la Pompe ï Cable
de AlimentaciÛn de la Bomba
electrical supply matches pump nameplate data. Do not use extension cord. If
installed in basement, plug connection should be 4' or more above floor, espe-
cially if basement floods. Be sure electrical connections cannot be reached
by rising water. Under no circumstances should outlet box or receptacle be
located where it may become flooded or submerged by water.
INSTALLATION
All plumbing must meet local codes. A licensed plumbing contractor is recom-
mended. All fixtures connected to the WRS-9EN Basin Kit must be vented accord-
ing to state and local codes.
STEP 1: Determine proper location for unit. Unit should be located so that inlet
is gravity-fed. Unit will not draw water up from a lower level. Position and level
basin. Keep basin away from any item that could puncture basin.
The position selected for the basin should be convenient to inlet, discharge and
vent piping and electrical supply.
STEP 2: Plumb inlet. Using 1-1/2" threaded pipe, plumb inlet to basin cover fitting.
Use a P-trap and a union next to the basin. Use pipe joint compound and hand
tighten only on plastic fittings. Do not reduce below 1-1/2" piping.
STEP 3: Plumb discharge. Using 1-1/2" threaded pipe, plumb discharge to
basin cover fitting. Use of a check valve is recommended to prevent backflow
of water into sump. Install check valve as close to the top of the basin as possible
to prevent cycling of pump. Be sure check valve is installed in proper flow direction.
If check valve is installed backwards, no water will flow out of unit. Be sure the
discharge piping is sealed with pipe joint compound and the lift height of pump
is not exceeded. Hand tighten only on plastic fittings.
Figure 2
ITEM
PArT No.
ArTIclE
Nº DE PIEcE
ArTículo
No. DE PIEzA
1
925011
Cord Grommet • Cordon Oeillet • Cable Anillo Protector
2
113130
Cover, Basin • Couvercle, Bassin • Cubierta, Cubeta
Seal Ring, Nitrile • Anneau de cachet, Nitrile
3
924065
• Anillo del sello, Nitrilo
4
109310
Discharge Pipe • Refoulement Tuyau • Descarga Tubo
5
113129
Basin • Bassin • Cubeta
6
945006
Coupling, Pipe • Tuyau de Raccordement • Tubo de Acople
Adaptor, Discharge • Adaptateur, évacuation
7
109308
• Adaptador, Descarga
Screw, Machine, 1/4 - 20 x 1/2" • Vis Mécanique,
8
901709
1/4 - 20 x 1/2 po • Tornillo, Máquina, (1/4 - 20 x 1/2 pulg.)
9
113132
Plate, Screen • Plaque, Grille • Placa, Malla
O-Ring, Nitrile• Joints toriques, Nitrile
10
924066
• Junta tórica, Nitrilo
11
599261
Switch, RVMS • Commutateur, RVMS • Interruptor, RVMS
12
509267
9EN-CIM Pump • Pompe • Bomba
DEScrIPTIoN
QuANTITY
NoMENclATurE
QuANTITé
DEScrIPcIóN
cANTIDAD
1
1
1
1
1
1
1
14
1
1
1
1
1
Advertisement

Related Manuals for Franklin Electric Little Giant WRS-9EN


Summary of Contents for Franklin Electric Little Giant WRS-9EN
-
Page 1: Electrical Connections
Be sure electrical connections cannot be reached WRS-9EN by rising water. Under no circumstances should outlet box or receptacle be located where it may become flooded or submerged by water. Franklin Electric Co., Inc. WASTEWATER Oklahoma City, OK 73157-2010 INSTALLATION www.LittleGiantPump.com... - Page 2 STEP 4: Plumb vent. Plumb vent using 2" threaded pipe to fitting in basin cover. and volute passage. Do not use strong solvent on impeller. Clean using a mild Use pipe joint compound on threads and hand tighten only on plastic fittings. detergent and water and reinstall.
- Page 3 ÉTAPE 3 : Installer l'évacuation bien d'aplomb. Utiliser un tuyau fileté de 38 mm INTRODUCTION (1-1/2 po) pour installer l'évacuation d'aplomb avec le raccord du couvercle. Il est recommandé d'utiliser un clapet de non-retour pour éviter le refoulement de Les ensembles pour eaux usées de Little Giant sont soigneusement emballés et l'eau dans le puisard.
- Page 4 Pour l’aide technique, entrez s’il vous plaît en contact ..1.800.701.7894 Para la ayuda técnica, por favor póngase en contacto ..1.800.701.7894 www.LittleGiantPump.com customerservice@lgpc.com Form 998718 - 03/2012 Rev. 001 © 2012 Franklin Electric Co., Inc. Little Giant® is a registered trademark of Franklin Electric Co., Inc.
Need help?
Do you have a question about the Little Giant WRS-9EN and is the answer not in the manual?
Questions and answers