Dacor DOP36M96GL Series User Manual
Modernist pro range
Hide thumbs
Also See for DOP36M96GL Series:
- Installation instructions manual (52 pages) ,
- User manual (320 pages)

Related Manuals for Dacor DOP36M96GL Series


Summary of Contents for Dacor DOP36M96GL Series
- Page 1 User Manual Modernist Pro Range DOP36M96GL* NX9900R_PRO RANGE_DOP36M96GL_DG68-01105C-00_EN.indd 1 2019-02-06 2:30:19...
- Page 2 WARNING: Failure to follow the instructions in this manual exactly may cause a fire or explosion, and, consequently, property damage, personal injury, or death. • DO NOT keep or use gasoline or other flammable products near this appliance. • IF YOU SMELL GAS: - DO NOT light any appliances.
- Page 3 c) If you move the range and then move it back into place, ensure the anti-tip device is re-engaged at the right or left rear of the range bottom. d) Do not operate the range without the anti-tip device in place and engaged.
-
Page 4: Table Of Contents
Contents Contents Before you begin Important Energy saving tips Oven vent/cooling vent Regulatory Notice Important safety instructions Overview Layout Display What’s included Using the cooktop Burners Ignition Cookware Grates Wok grate Using the oven Basic settings – Clock, Date & Time, Language Kitchen timer Timed cooking Delay start... - Page 5 Care and maintenance - Cooktop Cleaning the cooktop surface Stainless steel surfaces Control knobs Burner grates and components Burner caps and heads Burner bases Electrodes Burner head and cap replacement Care and maintenance - Oven Care and cleaning of the oven Removing the oven doors Reinstalling the oven doors Changing the oven light...
- Page 6 Website: www.dacor.com/customer-care/contact-us Thanks for choosing Dacor for your home. We are a company built by families for families, and we are dedicated to serving yours. We are confident that your new Dacor range will deliver top-level performance and enjoyment for decades to come.
-
Page 7: Before You Begin
Before you begin Important Installer • To promote safety and minimize problems, read this manual thoroughly before starting the installation. Leave this manual with the user. • Write the appliance’s model/serial numbers in this manual for service/ maintenance reference. User •... -
Page 8: Oven Vent/Cooling Vent
Before you begin Oven vent/cooling vent Both the oven vent and the cooling vent Oven vent are located at the back of the oven range. Cooling vent Proper air circulation prevents combustion Oven vent problems and ensures good performance. • Do not block the vent or its surroundings with objects. -
Page 9: Regulatory Notice
Regulatory Notice 1. FCC Notice CAUTION FCC CAUTION: Any changes or modifications not expressly approved by the party responsible for compliance could void the user’s authority to operate the equipment. This device complies with Part 15 of FCC Rules. Operation is Subject to following two conditions: 1) This device may not cause harmful interference, and 2) This device must accept any interference received including... - Page 10 Regulatory Notice • Connecting the equipment to an outlet that is on a different circuit than the radio or TV. • Consulting the dealer or an experienced radio/TV technician for help. FCC RADIATION EXPOSURE STATEMENT: This equipment complies with FCC radiation exposure limits set forth for an uncontrolled environment.
- Page 11 Equipment EUT Unintentional Emitter per FCC Part 15 Type Gas Range Kind of product Trade Name Dacor Model DOP36M96GL* Variant Model 47 CFR Part 15, Subpart B / ANSI C63.4-2014 Applied Rules ICES-003 Issue 6 Samsung Electronics America QA Lab U.S.
- Page 12 Regulatory Notice General safety instructions This unit has been tested and found to comply with the limits for a class B digital device, pursuant to Part 18 of the FCC rules. These limits are designed to provide reasonable protection against harmful interference in a residential installation.
-
Page 13: Important Safety Instructions
Important safety instructions Read all instructions before using this appliance • All electrical and gas equipment with moving parts can be dangerous. Be sure to read the Important Safety Information in this manual. The instructions must be followed to minimize the risk of property damage, injury, or death. •... - Page 14 Important safety instructions California Proposition 65 Warning WARNING Cancer and Reproductive Harm - www.P65Warnings.ca.gov. Commonwealth of Massachusetts This product must be installed by a licensed plumber or gas fitter qualified or licensed by the State of Massachusetts. When using ball-type gas shut-off valves, you must use the T-handle type.
- Page 15 • When disposing of the range, cut off the power cord and remove the door to prevent children and animals from getting trapped. • Unplug the range before service/maintenance. • Make sure all meat and poultry is cooked thoroughly. Meat should always be cooked to an internal temperature of 160 °F (71 °C).
- Page 16 Important safety instructions Gas safety WARNING To reduce the risk of fire, electric shock, personal injury, or death, observe these precautions: If you smell gas: • Close the valve and do not use the range. • Do not light a match, candle, or cigarette. •...
- Page 17 Electrical and grounding safety WARNING To reduce the risk of fire, electric shock, personal injury, or death, observe these precautions: • Plug the range into a grounded 4-prong outlet. • Do not remove the ground prong. • Do not use an adapter or an extension cord. •...
- Page 18 Important safety instructions Location safety WARNING To reduce the risk of fire, electric shock, personal injuries, and/or death, observe the following precautions. • This range is for indoor, household use only. Do not install the range outdoors or anywhere that it will be exposed to weather/water or wind/strong drafts. •...
- Page 19 Cooktop safety WARNING To reduce the risk of fire, electric shock, personal injury, or death, observe these precautions: • Make sure all burners are off when not in use. • Do not use aluminium foil to line the grates or any part of the cooktop. This can cause carbon monoxide poisoning.
- Page 20 Important safety instructions • Use a minimum amount of oil when shallow pan-frying or deep-frying. Do not fry frozen, icy, cold, or wet food. • Before moving cookware full of fats or oils, make sure it has completely cooled. • To prevent delayed eruptive boiling, always allow heated liquids to stand at least 20 seconds after you have turned off the burner so that the temperature in the liquid can stabilize.
- Page 21 Oven safety WARNING To reduce the risk of fire, electric shock, personal injuries, and/or death, observe the following precautions. • Do not use the oven for non-cooking purposes such as drying clothes or storage. Use the oven for cooking only. •...
- Page 22 Important safety instructions Self-cleaning oven safety WARNING To reduce the risk of fire, electric shock, personal injuries, and/or death, observe the following precautions. • The self-cleaning feature operates the oven at temperatures high enough to burn away food soils in the oven. The range is extremely hot during a self-cleaning cycle. Do not touch any surfaces of the range during a self-cleaning cycle.
-
Page 23: Overview
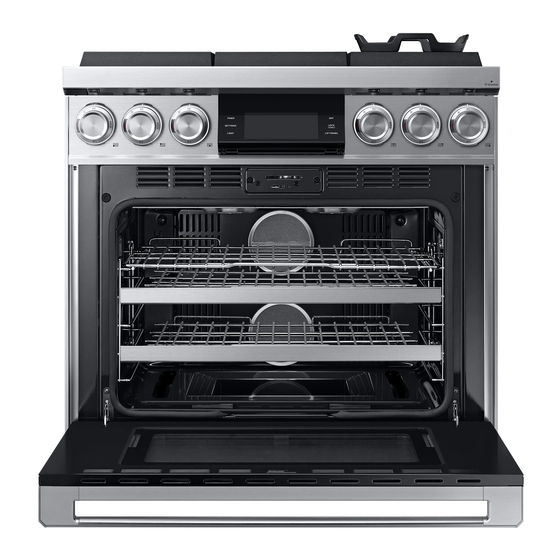
Overview Layout 01 Grate 02 Control panel 03 Oven vent cover 04 Surface burners 05 Surface burner knobs (6 pcs) 06 Removable oven door English 23 NX9900R_PRO RANGE_DOP36M96GL_DG68-01105C-00_EN.indd 23 2019-02-06 2:30:22... -
Page 24: Display
Overview Display 4:35 PM Convection Bake OVEN MODE Faster, more even baking °F Temp Probe Cook Time Delay Start °F None None START 01 Indicator area • Timer ( ): When the timer is set, the timer indicator is displayed. When more than 2 timers are set, the number (1, 2, 3, etc.) of set timer is shown. -
Page 25: What's Included
What’s included Grates (3) Burner heads (6) and Flat rack (1) Burner caps (6) Convection filter (2) Temperature probe (1) Gliding racks (2) Wok ring (1) Anti-tip bracket (1) Brass burner caps (6) Front leg covers (2) The range is supplied with two different types of burner caps (brass and porcelain) to suit the customer’s preference. -
Page 26: Using The Cooktop
Using the cooktop Burners There are three different types of burners on your range. See the diagram below for heat output and location. Each burner generates a spark when the knob is rotated to the "flame symbol" spark position. (Do not use the cooktop if the spark is not activated). When the burner ignites, the spark stops automatically. - Page 27 Each burner is designed for a specific purpose, as detailed in this table: Burner Position Purpose Food type Left Front (LF) Power heating / Boiling food Dual burner 22K BTU Low simmering Tomato sauce Right Front (RF) Left Rear (LR) Delicate food that Quick heating / Dual burner 18K BTU...
-
Page 28: Ignition
Dacor’s Smart Flame feature. A normal flame is steady and blue. Foreign material in the gas line, especially in new construction, may cause a temporary orange flame during initial operation. - Page 29 Tips • Food cooks just as quickly at a gentle boil as it does at a vigorous, rolling boil. Boil foods gently to conserve energy, flavor, and nutrients. • Use a low or medium flame when cooking with utensils that are poor heat conductors (glass, ceramics, cast iron).
-
Page 30: Cookware
Using the cooktop Cookware WARNING • Cookware with rough bottoms can permanently damage the grate surfaces. • To avoid burns, always turn pan handles to a position where they cannot be easily hit. Handles should not extend over adjacent burners or the front edge of the cooktop. Always set utensils gently onto the grates and center them so that they are well- balanced. - Page 31 Material characteristics • Aluminum: An excellent heat conductor. Some types of food may cause the aluminum to darken. However, anodized aluminum cookware resists staining and pitting. • Copper: An excellent heat conductor but discolors easily. • Stainless steel: A slow heat conductor with uneven cooking performance but is durable, easy to clean, and resists staining.
-
Page 32: Grates
Using the cooktop Grates Gently set the grates on the top of the spill tray. Put the legs of each grate into the corresponding dimples. NOTE The grates are heavy. Be careful handling the grates. NOTE Before installing grates, check the words under the grates. The words inform you where the front side is and the proper position of grate, right, center or left. -
Page 33: Wok Grate
Wok grate Woks are often used for stir frying, pan frying, deep frying, and poaching. The provided wok grate supports 12” to 14” woks. 1. Turn off all burners, and wait until the grates completely cool down. 2. Place the wok grate on the grate over the 22K BTU Dual burner. -
Page 34: Using The Oven
Using the oven Basic settings – Clock, Date & Time, Language Clock theme To change the clock theme. 1. Tap SETTINGS and then tap Display. 2. Tap Clock theme and select the theme you want to use. You can see the provided clock theme by swiping the display. Date &... -
Page 35: Kitchen Timer
Kitchen timer The kitchen timer serves as an extra timer that will beep when the set time has elapsed. It does not start or stop cooking functions. You can use the kitchen timer with any of the other oven functions. How to set the timer 1. - Page 36 Using the oven How to change timer name You can change the timer name to identify Timer + ADD what you are timing, for example, a Timer 01 chicken defrosting. TIMER 00 : 00 : 20 LOCK SETTINGS 1. Tap the timer name area. START LIGHT LIFT PANEL...
-
Page 37: Timed Cooking
Timed cooking In timed cooking mode, the oven turns on immediately and cooks for the length of time you select. At the end of the cooking time, the oven turns off automatically. • You can use the timed cooking feature only with another cooking operation. (Bake, Convection Bake, Convection Roast, Pro Convection, Proof, Stone Bake Mode, Dehydrate). - Page 38 Using the oven 4. The cooking time is displayed in the Cook Time area on the screen. 4:35 PM Convection Bake OVEN MODE NOTE Faster, more even baking TIMER °F LOCK SETTINGS You can cancel a cook time at any time by Cook Time Delay Start LIGHT...
-
Page 39: Delay Start
Delay start In delay start cooking mode, the oven’s timer turns the oven on at a preset time. You can have the oven turn off automatically after a set time has elapsed by setting the Timed Cooking function as well. •... -
Page 40: Oven Functions
Using the oven Oven functions Oven Oven functions Bake, Convection Bake, Convection Roast, Broil, Convection Broil, Pro Basic oven Convection, Special Function. Cooking mode Select the cooking mode you want. Set the temperature you want. See Setting the temperature on page 43 and Basic baking and broiling instructions starting on page 44. - Page 41 Mode Instruction • Convection Bake uses a fan to circulate the oven’s heat evenly and continuously within the oven. • This improved heat distribution allows for even cooking and excellent results while using multiple racks. • Provides the best performance for cookies, biscuits, brownies, cupcakes, cream puffs, sweet rolls, angel food cake and bread.
- Page 42 Using the oven Mode Instruction • Convection Broil is similar to Broil, but with the additional benefit of air circulation by the motorized fan in the rear of the oven. • During Convection Broil mode, the broil element cycles on and off to Convection maintain oven temperature as the fan circulates air for even cooking.
-
Page 43: Setting The Mode
Setting the mode Swipe the screen • Swipe the screen left or right to select a 4:35 PM cooking mode. Convection Bake OVEN MODE Faster, more even baking TIMER °F LOCK SETTINGS Cook Time Delay Start LIGHT LIFT PANEL None None START Summarized mode... -
Page 44: Basic Baking And Broiling Instructions
Using the oven Basic baking and broiling instructions 1. Select the cooking mode you want. 4:35 PM Convection Bake OVEN MODE Faster, more even baking TIMER °F LOCK SETTINGS Cook Time Delay Start LIGHT LIFT PANEL None None START 2. Set the temperature you want. (See 4:35 PM the Setting the temperature section on Convection Bake... - Page 45 How to adjust the temperature while cooking Tap the temperature area, enter the new temperature using the numeric keypad. 4:35 PM Bake OVEN MODE °F °F TIMER LOCK SETTINGS Preheating... Cook Time LIGHT LIFT PANEL None • Place food in the oven after preheating if the recipe calls for it. Preheating is very important for good results when baking cakes, cookies, pastry, and breads.
-
Page 46: Using The Oven Racks
Using the oven Using the oven racks Recommended rack positions for cooking Rack Type of food position Steak Hamburgers, Toast, Steak, Fish, Small cuts of poultry Cakes, Muffins, Brownies, Cookies, Pound cake Angel food cake, Pies, Roasts, Casseroles, Pizza Turkey, Large roasts, Pizza •... - Page 47 Multi-rack baking • For dual-rack baking of cakes or cookies, place the racks at Levels 2 and 4. • For 4 baking pans on two racks: Place two pans in the rear of the upper rack and the other two in the front of the lower rack.
- Page 48 Using the oven Before using the racks Each rack has stops that need to be placed correctly on the supports. These stops will keep the rack from coming completely out. Removing the racks 1. Pull the rack straight out until it stops. 2.
-
Page 49: Using The Gliding Rack
Using the gliding rack The fully extendable gliding rack makes food preparation easier, especially when you are preparing heavier dishes. The gliding rack has 2 glide tracks that allow you to extend the rack well out of the oven without touching the sides of the oven walls. Installing the gliding rack •... - Page 50 Using the oven Removing the gliding rack • With the gliding rack in the closed position and the oven off and cool, grasp the rack and frame and pull both forward to remove. CAUTION • Do not attempt to place a gliding rack one level above a wire rack.
- Page 51 Broiling recommendation guide The size, weight, thickness, starting temperature, and your doneness preference will affect broiling times. This guide is based on meats at refrigerator temperature. Always use a broiler pan and its grid when broiling. Always preheat the oven for 5 minutes before broiling.
-
Page 52: Using The Special Function Feature
Using the oven Using the special function feature 1. Swipe the screen to the Special 4:35 PM Function. The display will show the Special Function OVEN MODE Additional Cooking Modes specialized cooking options. TIMER LOCK SETTINGS Keep Warm Proof LIGHT LIFT PANEL Stone Bake Mode Dehydrate... - Page 53 Mode Instruction • Proof provides an optimal temperature for the bread proofing process. - 95 °F / 105 °F • For the best results, always start the Proof option with a cool oven. • Proof mode functions properly only if oven temperature is below 125 °F.
- Page 54 Using the oven Rack position chart for special cooking options Mode Rack position Keep Warm Proof 2 or 3 Stone Bake Mode 1 or 2 Dehydrate 2 or 3 For some common features, refer to Using the oven page. Common features are as follows. •...
-
Page 55: Using The Healthy Cook Feature
Using the healthy cook feature 1. Swipe the screen to the Healthy Cook. 4:35 PM The display will show the specialized Healthy Cook OVEN MODE Pre-programmed temperature cooking options. TIMER Baked potato Grilled chicken Salmon steak LOCK SETTINGS White fish fillet Roasted vegetables LIGHT LIFT PANEL... - Page 56 Using the oven Food Instruction • Baked potato is specially designed to cook potatoes or sweet Baked potato potatoes. • Grilled chicken is specially designed to cook chicken pieces or Grilled chicken chicken breasts. To prevent over-browning and drying of the skin, wrap each piece or breast of the chicken in foil.
-
Page 57: Using The Temperature Probe
Using the temperature probe For many meats, especially roasts and poultry, measuring the internal temperature is the best way to determine if the food is properly cooked. The temperature probe lets you cook meat to the exact internal temperature you want. This function can be used with Bake, Convection Bake, Convection Roast, or Pro Convection. - Page 58 Using the oven 2. Plug the temperature probe fully into the socket on the upper-side wall of the oven. 3. Swipe to the cooking operation (Bake, Convection Bake, Convection Roast, or Pro Convection) you want. Select the cooking mode you want. Set the cooking temperature. (See page 43.) 4.
- Page 59 Temperature table Type of food Internal temperature (°F) Rare 140-150 Beef / Lamb Medium 160-170 Well done 175-185 Pork 175-185 Poultry 185-195 NOTE If you cover the meat with aluminum foil and allow it to stand for 10 minutes after cooking, the Internal temperature will rise 5-10 degrees.
-
Page 60: Using The Clean Feature
Using the oven Using the clean feature Self Clean During self-cleaning, the oven heats up well above normal cooking levels to burn off and reduce cooking residue to a fine powder that you can wipe away with a damp cloth. CAUTION •... - Page 61 Self Clean • Keep the kitchen well ventilated during a self-cleaning cycle. • Remove the racks, rack supports, and all foreign/loose items from the oven. • Wipe up debris from the oven bottom. (Fig. 1) • Clean the oven door and front frame around the gasket with hot water and soap-filled steel-wool pads or non- abrasive cleansers.
- Page 62 Using the oven How to run a self cleaning cycle 1. Swipe the screen to Clean. 4:35 PM 2. Tap Self Clean. Self Clean OVEN MODE Oven cleaning TIMER 3. Tap Clean Time. LOCK SETTINGS Delay Start Clean Time LIGHT LIFT PANEL None START...
- Page 63 9. Remove all pans, racks and filters from 4:35 PM Self Clean oven. Please remove all pans and racks from oven TIMER LOCK SETTINGS LIGHT LIFT PANEL 10. If you need to stop or interrupt a self 4:35 PM cleaning cycle, tap OFF. Self Clean OVEN MODE...
-
Page 64: Using The Sabbath Feature
Using the oven Using the Sabbath feature (For use on the Jewish Sabbath & Holidays) For further assistance, guidelines for proper usage, and a complete list of models with the Sabbath feature, visit : http:\\www.star-k.org. You can use the Sabbath feature with baking only. The oven temperature may be set higher or lower after you set the Sabbath feature. - Page 65 4. Tap SETTINGS > Sabbath, to use the Settings Sabbath feature. Help The oven will not beep or display any About device TIMER Sabbath LOCK SETTINGS 12th further changes. You may change LIGHT Demo mode LIFT PANEL DEMO the oven temperature once baking has started.
-
Page 66: Using The Iq Control Feature
Using the oven Using the iQ Control feature To use the oven’s iQ Control feature, you must download the SmartThings app to a mobile device. Functions that can be operated using the SmartThings app may not work smoothly if communication conditions are poor or the oven is installed in a place with a weak Wi-Fi signal. -
Page 67: To Start The Oven Remotely
To start the oven remotely Tap SETTINGS > Connections > iQ Control, 4:35 PM and then tap ON. TIMER LOCK SETTINGS LIGHT LIFT PANEL When iQ Control is on you can: • Remotely change oven settings (mode, time, temperature) using your mobile device. •... -
Page 68: Child Lock
Using the oven Child Lock This feature renders the touchpad inoperable and locks the oven door. You can only activate Child Lock when the oven is in standby mode. How to activate the Child Lock feature 1. Cancel or turn off all functions. 4:35 PM 2. -
Page 69: Settings
Settings In Settings, you can change the default settings to your preference or diagnose problems with the network connection. Tap SETTINGS. The display will show the 4:35 PM Setting item. Convection Bake OVEN MODE Faster, more even baking TIMER °F LOCK SETTINGS Cook Time... - Page 70 Using the oven Display • Brightness You can change the brightness of the display screen. • Tap SETTINGS > Display > Brightness, and then use the bar next to Brightness to adjust the brightness of the screen. • Screen saver If screen saver is turned off, the Clock theme and Timeout menu are disabled.
- Page 71 • Tap SETTINGS > Volume, and then use the bar next to Volume to adjust the volume. Lighting Dacor's Pro range provides two distinct lighting features, "Shower lighting" and "Welcome lighting". "Shower lighting" is a feature that lights knobs from the LED above them.
- Page 72 Using the oven Hood connectivity By connecting to the hood, the hood turns on/off automatically when you use the cooktop. 1. Tap SETTINGS > Connections > Hood connectivity. 2. Turn on Bluetooth on the hood. 3. Tap CONNECT on the LCD display to connect to the hood. Hood-Control Range Hood DHD30M967W*...
-
Page 73: Care And Maintenance - Cooktop
Care and maintenance - Cooktop WARNING Be sure electrical power is off and all surfaces are cool before cleaning any part of the cooktop. Wearing gloves is mandatory while cleaning. Some burners and cooktop parts have sharp edges. Be careful while cleaning. Cleaning the cooktop surface You should clean up spills as soon as possible. -
Page 74: Stainless Steel Surfaces
Care and maintenance - Cooktop Stainless steel surfaces 1. Remove any spills, spots, and grease stains using a soft, wet cloth. 2. Apply an approved stainless steel cleaner to a cloth or paper towel. 3. Clean one small area at a time, rubbing with the grain of the stainless steel if applicable. -
Page 75: Control Knobs
Control knobs Turn off all burner knobs. 1. Pull the knobs off their valve stems. 2. Clean the knobs in warm, soapy water, then rinse and dry them thoroughly. 3. Clean the stainless-steel surfaces using stainless-steel cleaner. 4. Re-attach the knobs in the OFF position to the control valve stems. -
Page 76: Burner Grates And Components
Care and maintenance - Cooktop Burner grates and components Turn off all surface burners and make sure they have all cooled down. 1. Remove the burner grates. 2. Remove the burner caps from the burner heads. 3. Remove the burner heads from the valve manifolds to reveal the starter electrodes. -
Page 77: Burner Caps And Heads
Burner caps and heads NOTE Before removing the burner caps and heads, remember their size and location. Replace them in the same location after cleaning. Wash burner caps and burner heads in warm, soapy water and rinse with clean running water. -
Page 78: Electrodes
Care and maintenance - Cooktop Electrodes WARNING Do not turn on the valve while touching the electrode. Electric chock might occur. CAUTION Do not attempt to remove the electrode from the cooktop or burner bases. You should never be cooking while you’re cleaning the cooktop. -
Page 79: Burner Head And Cap Replacement
Burner head and cap replacement Dual Burner head / caps 1. Orient the burner head so the electrode opening aligns with the electrode itself. 2. Install the burner head so the electrode passes through its opening in the head. Verify that the burner head lies flat on the cooktop. -
Page 80: Care And Maintenance - Oven
Care and maintenance - Oven Care and cleaning of the oven WARNING Be sure electrical power is off and all surfaces are cool before cleaning any part of the appliance. Cleaning painted parts and decorative trim • For general cleaning, use a cloth with hot, soapy water. •... - Page 81 Removing your oven’s convection filter When the oven is cool, put your fingers around the edges of the filter and gently push up. To clean the filter Soak the filter in hot, soapy water, and rinse well. You may also place it in a dishwasher on the top rack.
- Page 82 Care and maintenance - Oven Oven racks • If the racks are left in the oven during a self-cleaning cycle, their color will turn slightly blue and the finish will be dull. After the self-cleaning cycle is complete and the oven has cooled, rub the sides of the racks with wax paper or a cloth containing a small amount of oil.
- Page 83 To lubricate the slides of the gliding rack 1. Remove the rack from the oven. See removing the gliding rack in the Using the gliding rack section on page 49. 2. Fully extend the rack on a table or countertop. Newspaper may be placed underneath the rack for easy cleanup.
- Page 84 Care and maintenance - Oven 5. Repeat for the right (front and back) slide mechanism of the rack. 6. Open and close the rack several times to distribute the lubricant. 7. Replace the cap on the lubricant and shake it again. Turn the rack over and repeat steps 3, 4, 5, and 6.
- Page 85 Rack support Rack supports can be removed for cleaning. (Self Clean and Manual clean). Removing the rack supports 1. Grasp the center of the bottom wire, which is on the supporter, and lift it. 2. Tilt the rack support approximately 45°.
- Page 86 Care and maintenance - Oven Reinstalling the rack supports 1. Insert the upper tips of the rack support into their respective holes in the oven wall. 2. Grasping the bottom wire, gently swing the rack support toward the oven wall. 3.
- Page 87 Oven door • Use soap and water to thoroughly Do not hand clean the top, sides, and front of the clean the oven door gasket. oven door. Rinse well. You may use a glass cleaner on the outside glass of the oven door.
-
Page 88: Removing The Oven Doors
Care and maintenance - Oven Removing the oven doors CAUTION • The door is very heavy. Be careful when removing and lifting the door. • Do not lift the door by the handle. Use two hands to remove an oven door. 1. - Page 89 4. Partially close the door to engage the door latch locks. The door will stop at this point. 5. Grasp each side of the door below the handle, and lift the door slightly to expose the cabling at the base. NOTE LED light's Wire Harness should be disconnected.
-
Page 90: Reinstalling The Oven Doors
Care and maintenance - Oven Reinstalling the oven doors CAUTION The door is very heavy. You may need help lifting the door high enough to slide it into the hinge slots. Do not lift the door by the handle. 1. Using two hands, grasp the side edges of the door at the midpoint. - Page 91 5. Open the door fully. If the oven door does not open to a full 90°, repeat steps 1 through 4. 6. At the bottom corners of the door, flip the hinge locks forward to lock them. See Step 3 (illustration A) in the “Removing the oven doors”...
-
Page 92: Changing The Oven Light
Care and maintenance - Oven Changing the oven light The oven light is a standard 40-watt appliance halogen bulb. It comes on when the oven door is open. When the oven door is closed, touch LIGHT to turn the light on or off. It will not work during a self-cleaning cycle. -
Page 93: Troubleshooting
Troubleshooting If you run into unexpected trouble, look first for a solution in the tables below. If you are still having trouble after trying the suggested solution, call 833-35-ELITE (833-353-5483). Gas safety Problem Possible cause Action You smell gas. The surface burner knob is Turn the burner knob to OFF. - Page 94 Troubleshooting Problem Possible causes Action The burners do Burner components are not Review page 79. not burn evenly. assembled correctly. Burners are dirty. • Clean the burner components. • Review pages 76, 77, 78. Very large or The wrong burner orifice is Check the burner orifice size, and yellow surface installed.
- Page 95 Oven Problem Possible cause Solution The oven will not The oven is not completely Make sure the electrical plug turn on. plugged into the electrical outlet. is inserted into a live, properly grounded outlet. A fuse in your home may be Replace the fuse or reset the blown or a circuit breaker may circuit breaker.
- Page 96 Troubleshooting Problem Possible cause Solution Food does not The serving size may not be Refer to the Broiling broil properly. appropriate. recommendation guide for serving sizes on page 51, and then try again. The rack has not been properly See the Broiling recommendation positioned.
- Page 97 Problem Possible cause Solution Excessive smoke There is excessive soil in the Press OFF. Open the windows during a self- oven. to rid the room of smoke. Wait cleaning cycle. until the self-cleaning cycle is cancelled. Wipe up the excessive soil and then start the self- cleaning cycle again.
-
Page 98: Information Codes
This code occurs if the control key is them. Turn off the oven and try C-d0 short for 1 minute. again. If the problem continues, contact a local Dacor service center. This code occurs if the door lock is C-d1 mispositioned. - Page 99 Displayed Possible cause Solution code The Sub PCB sensor is open when Turn both the mode and the oven is operating. temperature selector knobs to OFF, and then restart the oven. If the problem persists, C-22 disconnect all power to the oven The Sub PCB sensor is short when for at least 30 seconds and then the oven is operating.
-
Page 100: Warranty And Service
Authorized Dealer, or other seller authorized by Dacor. If your Dacor product fails to function within one year of the original date of purchase, due to a defect in material or workmanship, Dacor will remedy it without charge to you. - Page 101 LIMITED FIRST YEAR WARRANTY If your Dacor product fails to function within one year of the original date of purchase due to a defect in material or workmanship, Dacor will furnish a new part, F.O.B. factory to replace the defective part.
- Page 102 ARE LIMITED IN DURATION TO ONE YEAR FROM THE DATE OF ORIGINAL PURCHASE. IN NO EVENT SHALL DACOR BE LIABLE FOR INCIDENTAL EXPENSE OR CONSEQUENTIAL DAMAGES.IN THE EVENT DACOR PREVAILS IN ANY LAWSUIT, DACOR SHALL BE ENTITLED TO REIMBURSEMENT OF ALL COSTS AND EXPENSES, INCLUDING ATTORNEY’S FEES, FROM THE DACOR CUSTOMER.
-
Page 103: Open-Source Announcement
Open-Source Announcement The software included in this product contains open source software. You may obtain the complete corresponding source code for a period of three years after the last shipment of this product by sending an email to mailto:oss.request@samsung.com. It is also possible to obtain the complete corresponding source code in a physical medium such as a CD-ROM;... - Page 104 We truly hope you enjoy many years of great cooking with your Dacor. If we can be of service, please contact our team at 833-35-ELITE (833-353-5483), extension 2813.
- Page 105 IMPORTANT: Your warranty will not begin until you activate it online or return this form to Dacor. If you have purchased more than one Dacor product, please return all forms in one envelope, or activate the warranty for each product online.
- Page 106 DG68-01105C-00 Dacor ∙ 14425 Clark Avenue, City of Industry, CA 91745 ∙ Phone: 833-35-ELITE (833-353-5483) ∙ Fax: (626) 403-3130 ∙ www.dacor.com NX9900R_PRO RANGE_DOP36M96GL_DG68-01105C-00_EN.indd 108 2019-02-06 2:30:45...
Need help?
Do you have a question about the DOP36M96GL Series and is the answer not in the manual?
Questions and answers