Table of Contents
Advertisement
Quick Links
3.752.5275.201
Installation and Maintenance Instructions
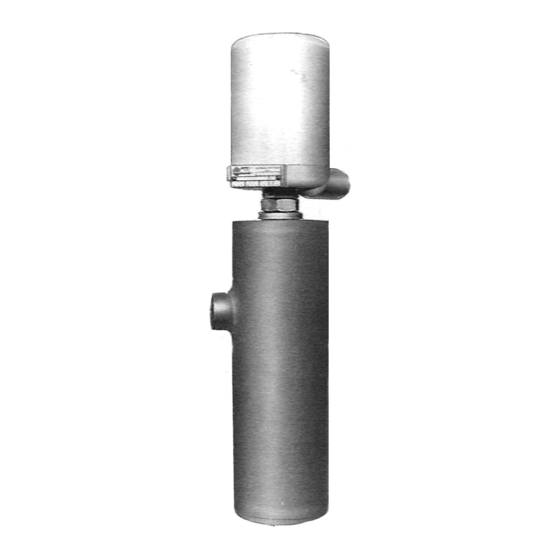
Housing
Enclosing tube
Connections to
the equipment
E X P E R T I S E
S O L U T I O N S
2200 series HEP Sensilevel
float operated level controls
with sealed chamber
Float
chamber
S U S T A I N A B I L I T Y
1. Safety information
2. Technical information
3. Installation
4. Differential and switching
levels setting
(Electric Switches 2 and 3)
5. Switch mechanism
replacement
6. Switch replacement
7. Maintenance
8. Trouble shooting
9. ATEX Conformity
EMM Issue 11 - 2018
© Copyright 2012
Advertisement
Table of Contents

Related Manuals for Spirax Sarco 2200 Series


Summary of Contents for Spirax Sarco 2200 Series
- Page 1 3.752.5275.201 EMM Issue 11 - 2018 2200 series HEP Sensilevel float operated level controls with sealed chamber Installation and Maintenance Instructions 1. Safety information 2. Technical information Housing 3. Installation 4. Differential and switching Enclosing tube levels setting (Electric Switches 2 and 3) 5.
- Page 2 3.752.5275.201...
-
Page 3: Safety Information
Note: products supplied by Spirax Sarco are classified as components and, it general, they aren't subjected to the European Machinery Directive 2006/42/EC. - Page 4 To avoid the risk of burns, wait until temperature has normalised after isolation. Equipment and consumable materials Before starting work, ensure the availability of suitable equipment and/or consumable materials. Use Spirax Sarco spare parts only. 1.10 Protective clothing Consider whether you and/or other personnel need protective clothing, against for example chemical products, high or low temperatures, noise, falling objects and hazards to eyes and face.
-
Page 5: Returning Products
According to European Community laws on Health, Safety and Environmental Protection, upon returning products for their testing and/or repairs to Spirax Sarco, customers and distributors are reminded that they must supply the necessary information on hazards and precautions to be taken with regard to the presence of contaminated product residues or instrument damage which may present a health and/or environmental safety hazard. - Page 6 Steam Mains - Do's ( ) and Dont's ( ): Prevention of tensile stressing Pipe misalignment: Installing products or re-assembling after maintenance: Do not over tighten. Flange bolts should be gradually tightened across Use correct torque figures. diameters to ensure even load and alignment. 3.752.5275.201...
-
Page 7: Thermal Expansion
Thermal expansion: Examples showing the use of expansion bellows. It is highly recommended that expert advise is sought from the bellows manufacturer. Guides Axial movement Fixing Short point distance Axial movement Guides Guides Small lateral Limit Large movement rods lateral movement Fixing point... -
Page 8: Technical Information
2. Technical information 2200 series HEP Sensilevel float operated level controls with sealed chamber This product is to be considered an accessory under pressure operating as a safety device and may be used with both Group 1 and 2 fluids. It has been designed, constructed and inspected according to ASME VIII Div 1 and it is in accordance with provisions demanded from the European Directives 2014/68/EU (PED) and 2014/34/EU (ATEX). -
Page 9: Electrical Connections
Switching levels as a function of specific gravity (mm) (They refer to one only switch mechanism type 2-3) Specific 0,35 0,42 0,50 0,55 0,56 0,60 0,63 0,70 0,80 0,90 1,00 1,10 1,20 Gravity kg/dm Level Model 2202 A 52 81 55 82 62 88 67 92 76 100 87 109 95 116 102 122 107 127 112 130 2202 B 59 85 64 90 74 98 86 108 95 116 102 122 108 127 113 131 2206 A... -
Page 10: Installation
Pneumatic connections (for pneumatic switches) In order to obtain the required function from the pneumatic switch (3 way valve, 2 way valve, selec- tor, switch) the instrument has to be connected to the pneumatic circuit using the below indicated table and diagram. Pipes must be connected to the ¼"... - Page 11 4. Differential and switching level setting (Electric Switches 2-3) In order to better understand the instructions, the following terms have to be defined: - HIGH LEVEL: liquid level for which the switch mechanism is activated when the level itself is increasing (B) - LOW LEVEL: liquid level for which the switch mechanism is activated when the level itself is decreasing (C)
- Page 12 Threaded stem Ex-factory nuts position (with little clearance) Lower nuts The differential increases by lowering the position of this pair of nuts Magnetic Piston Fig. 5 D - Modification of the switching level This operation is executed by modifying the position of the switch mechanism. In the instruments equipped with one or two switches type 2 &...
- Page 13 5. Switch mechanism replacement A - Electrical switch mechanism Turn off the power, remove the cover of the housing and proceed as follows: 1 - Remove external connections from the terminal board and record the position of each wire. Identify also the position of the mechanism on the non-magnetic pocket. 2 - Loosen the 2 fixing screws “A”...
-
Page 14: Switch Replacement
6. Switch replacement A - Electrical switch 1 - Remove switch wires from the terminal board. 2 - Remove the 2 fixing screws “D” (See fig. 7 - Electrical type) and then the switch. 3 - Replace the old switch with the new one and reassemble by performing above actions 2 and 1 reversely. -
Page 15: Maintenance
7. Maintenance Periodical inspections are necessary to guarantee a complete efficiency of the instrument. A regular maintenance program starting from its installation is recommended. The suggested precautions are important to obtain the best operating conditions of the level control. A - Keep SENSILEVEL clean To avoid damage caused by humidity and dust, leave the instrument without its housing only for the strictly necessary time. -
Page 16: Troubleshooting
8. Trouble shooting SENSILEVEL level switches are designed for long lasting and for fault-free operation. However, if a malfunction is anticipated, the below indicated checks can be performed to diagnose any problem. 1 - Is the level control correctly installed? (See instructions at point 3.2 - Installation). 2 - Is the level control operating within the limits of liquid pressure, temperature and density indicated on the identification plate? 3 - Are the electrical or pneumatic connections intact? Is the instrument powered? - Page 17 9. ATEX Conformity Here below are listed the name-plates of compliance for the standard products covered in this instruction; for all special versions derived from standard are supplied against a specific order, an "ad hoc" documentation will be issue by our Documentation and Test Departement. Explosion-proof housing for usage in areas at risk of explosion.
- Page 18 Intrinsic safety explosion-proof housing for usage in areas at risk of explosion. The instrument can be used with process liquids at an operating temperature not exceeding 85°C. The electrical cable connections utilized must have the appropriate Atex certification. During connection check inside the housing that all wires have a minimum clearance distance of 3 mm from the housing wall.
- Page 19 Explosion-proof housing for usage in areas at risk of explosion suitable for level control applications with flammable liquids, thanks to the interface design between Zone 0 and the housing inside compliant to to EN 60079-26 regulation , and to the hermetic contacts use (avoiding ignition sources inside the housing in standard operating conditions)(category 1/2G).
- Page 20 SERVICE For technical support, please contact our local Sales Engineer or our Head Office directly: Spirax Sarco S.r.l. - Technical Assistance Via per Cinisello, 18 - 20834 Nova Milanese (MB) - Italy Tel.: (+39) 0362 4917 257 - (+39) 0362 4917 211 - Fax: (+39) 0362 4917 315 E-mail: support@it.spiraxsarco.com...
Need help?
Do you have a question about the 2200 Series and is the answer not in the manual?
Questions and answers