Table of Contents
Advertisement
Available languages
Available languages
Quick Links
Advertisement
Chapters
Table of Contents

Subscribe to Our Youtube Channel
Related Manuals for Konig & Meyer Omega-E 18800-000-55


Summary of Contents for Konig & Meyer Omega-E 18800-000-55
- Page 1 »Omega-E« 18800-000-55 / 18800-010-55 Bedienungsanleitung Betjeningsvejledning Operating instructions Manual de instrucciones Mode d‘emploi Manuale di istruzioni 純正取扱説明書の翻訳 Gebruiksaanwijzing Bruksanvisning Instrukcja obsługi Manual de instruções техническое руководство Bruksanvisning...
-
Page 2: Version
Originalbedienungsanleitung DEUTSCH Keyboardtisch »Omega-E« Art-Nr.: 18800-000-55 / 18800-010-55 Bedienungsanleitung vor Erstinbetriebnahme unbedingt lesen! Sicherheitshinweise beachten! Bedienungsanleitung für künftige Verwendung aufbewahren! Februar – 2019 Version: 01 Rev.: 05... - Page 3 Informationen Diese Anleitung ist Bestandteil der Technischen Dokumentation der Anlage, gemäß EG-Maschinenrichtlinie. Die vorliegende Anleitung entspricht der „Richtlinie 2006/42/EG des Europäischen Parlaments und des Rates zur Angleichung der Rechts- und Verwaltungsvorschriften der Mitgliedstaaten für Maschinen“ (Maschinenrichtlinie), Anhang I, Punkt 1.7.4. Der Hersteller übernimmt keine Haftung für Schäden an Personen, Tieren oder Sachen sowie an der Anlage selbst, die durch unsachgemäße Anwendung, durch Nichtbeachtung oder un- genügende Beachtung der in dieser Anleitung enthaltenen Sicherheitskriterien entstehen...
-
Page 4: Table Of Contents
Informationen Identifikation ..................5 Bestimmungsgemäße Verwendung Ziele der Bedienungsanleitung Sicherheitshinweise ................7 Geltungsbereich und Symbole 2.1.1 Sicherheitssymbole – nach DIN 4844-2 2.1.2 Zusatzhinweise 2.1.3 Auffahrschutz Montage ....................12 Aufstellen des Keyboardtisches 3.1.1 Raumbedarf 3.1.2 Montageanleitung Aufbau und Funktion ................19 Technische Daten 4.1.1 Typenschild... - Page 5 Informationen Diese Bedienungsanleitung wurde auf Grundlage unserer der- Allgemeine zeitigen technischen Kenntnisse geschrieben. Information Wir arbeiten ständig an der Aktualisierung der Informationen und behalten uns daher das Recht vor, technische Änderun- gen durchzuführen. Symbole und Signalwörter Symbole und Signalwörter Nachfolgende Symbole und Signalwörter werden in der vor- liegenden Anleitung verwendet.
-
Page 6: Identifikation
Identifikation Identifikation Keyboardtisch »Omega-E« Art.-Nr.: 18800-000-55 / 18800-010-55 Baujahr: 2019 Erwartete Lebensdauer: mindestens 5 Jahre König & Meyer GmbH & Co. KG Kiesweg 2 97877 Wertheim - Germany Telefon: +49 (0)9342 806 0 Fax: +49 (0)9342 806 150 Website: www.k-m.de Bestimmungsgemäße Verwendung Der Keyboardtisch »Omega-E«... -
Page 7: Ziele Der Bedienungsanleitung
Identifikation Ziele der Bedienungsanleitung Diese Bedienungsanleitung dient als Unterstützung und bein- Ziele der haltet alle notwendigen Hinweise, die für die allgemeine Sicher- Betriebs-an- heit, den Transport, Installation, Betrieb und Wartung beachtet leitung werden müssen. Diese Betriebsanleitung mit allen Sicherheitshinweisen muss: von allen Personen, die mit dem Keyboardtisch ar- §... -
Page 8: Sicherheitshinweise
Sicherheitshinweise Sicherheitshinweise Allgemeine Sicherheitshinweise Allgemeine Si- cherheitshin- Der Keyboardtisch kann nur sicher verwendet werden, wenn weise die Bedienungsanleitung komplett gelesen wurde und die darin enthaltenen Anweisungen eingehalten werden. Der Keyboardtisch ist nicht für die Nutzung durch kleine Kinder oder geschwächte Personen ohne Aufsicht gedacht. Wenn der Keyboardtisch sichtbar beschädigt ist, darf er nicht verwendet werden. -
Page 9: Sicherheitshinweise
Sicherheitshinweise Sicherheits- hinweise Beim Fahren des Antriebs ist darauf zu achten, dass keine Ge- genstände (z.B. Möbel, Fenster, Kabel usw.) oder Körperteile eingeklemmt werden! Bei jeder Bedienung hat der Benutzer sich grundsätzlich davon zu überzeugen, dass sich keine wei- teren Personen am Tisch aufhalten und der Verfahrweg frei von Hindernissen ist. -
Page 10: Geltungsbereich Und Symbole
Sicherheitshinweise Kabel, es könnte beschädigt werden. Transportieren Sie das Sicherheits- Gerät zudem niemals am Kabel. hinweise Fassen Sie während des Betriebs nicht in den Wirkbereich der Hubsäulen. Den Keyboardtisch niemals einseitig aufsetzen, hierbei kann es Beschädigungen an den Hubsäulen geben. Den Tisch auch nie- mals fallen lassen. -
Page 11: Sicherheitssymbole - Nach Din 4844-2
Sicherheitshinweise 2.1.1 Sicherheitssymbole – nach DIN 4844-2 Verletzungsgefahr durch Missachtung der Sicherheits- WARNUNG Sicherheits- symbole symbole Es bestehen Gefahren durch Missachtung der Warnhinweise an dem Keyboardtisch und in der Anleitung. 2.1.2 Zusatzhinweise Für alle Arbeiten am Keyboardtisch gelten grundsätzlich die Zusatz- Bestimmungen der Unfallverhütungsvorschriften der Berufsge- hinweise... - Page 12 Sicherheitshinweise Belastung: Mit einem unbelasteten Tisch können Hindernisse nur schlecht bzw. gar nicht erkannt werden. Um eine sicherere Erkennung zu gewährleisten, sollte der Tisch mit einem Ge- samtgewicht von mindestens 20 kg gleichmäßig belastet wer- den. Weiche Hindernisse: Unter weichen Hindernissen verstehen sich alle Arten von Hindernissen, die bei einem Auffahren zu- nächst nachgeben, wie dies z.B.
-
Page 13: Montage
Montage Montage WICHTIG Sicherheitskapitel beachten Allgemeine Hinweise Die grundlegenden Sicherheitshinweise im Kapitel 2, „Sicher- heitshinweise“, beachten. Zusätzlich alle Sicherheitshinweise der im Anhang befindlichen Herstellerdokumentationen beach- ten. Auspacken Auspacken Packen Sie die den Keyboardtisch mit allen Einzelteilen aus. Versenden Sie den Keyboardtisch grundsätzlich in der Original- verpackung (so wie er geliefert wurde), damit dieser keinen Schaden nimmt. - Page 14 Montage Ü Überprüfen Sie die gelieferten Teile auf Vollzähligkeit, Beschädigungen oder sonstige Auffälligkeiten! Ü Wenden Sie sich bei Fragen zum Transport, Aufbau und zur Installation des Keyboardtisches an die Firma König & Meyer GmbH & Co. KG! Keyboardtisch »Omega-E« Art.-Nr.: 18800-000-55 / 18800-010-55...
-
Page 15: Aufstellen Des Keyboardtisches
Montage Aufstellen des Keyboardtisches 3.1.1 Raumbedarf Maße der An- Der vorgesehene Standort des Keyboardtisches muss fest und lage eben sein! Keyboardtisch »Omega-E« Art.-Nr.: 18800-000-55 / 18800-010-55... -
Page 16: Montageanleitung
Montage 3.1.2 Montageanleitung Verschraubungen: Verschrau- bungen Verschraubung Halterung (Schutzkappe M8; Sicherungs- mutter M8; 2x U-Scheibe ø 8,4; Sechskantschraube M8 x 60; Schutzkappe M8) Verschraubung Fußplatte (Flachkopfschraube m. Innen- sechskant und Flansch – M6 x 16) Verschraubung Halterung (Flachkopfschraube m. Innen- sechskant und Flansch –... - Page 17 Montage Folgende Montageschritte sind auszuführen: Montage-hin- weise WICHTIG Vor Montagebeginn festlegen ob das Bedienteil rechts oder links montiert werden soll! Je nach Seitenwahl das jeweils äu- ßere Loch am Halteblech zur Befestigung verwenden. Ü Bedienteil an Querrohr montieren. Hierzu U-Scheibe auf Sechskantschraube aufschieben à...
- Page 18 Montage Ü Master- und Slavesäulen mit Querrohr verschrau- ben. Hierzu 1. Querrohrseite anheben (z.B. durch 2. Person oder auf Stuhl legen) à 2. Seite anheben und Säule einschieben à Säule an Querrohr mit beiliegen- dem Innensechskantschlüssel schrauben (Anzugsmo- ment max. 7,5 Nm - Vorsicht beim Ansetzen der Schrauben).
- Page 19 Montage Ü Klettband, Netzteil und Kabelclip anbringen. Erstes Klettband durch Schlitze in Halteblech fädeln à Netzteil auf Halteblech legen und fixieren. Restlichen Klettbänder, sowie Kabelclips individuell am Keyboard- tisch zur Kabelfixierung anbringen. Klettbänder und Kabelclips nicht an den Säulenauszügen be- festigen! VORSICHT Ü...
-
Page 20: Aufbau Und Funktion
Aufbau und Funktion Aufbau und Funktion WICHTIG Sicherheitskapitel beachten! Allgemeine Hinweise Die grundlegenden Sicherheitshinweise im Kapitel 2, „Sicher- heitshinweise“, beachten. Technische Daten Technische Daten – Keyboardtisch »Omega-E« Technische Daten - Maße Breite/Tiefe/Höhe (min.): 1136 / 550 / 600 (mm) Keyboardtisch Maße Breite/Tiefe/Höhe (max.): 1136 / 550 / 1250 (mm) Nennspannung:... -
Page 21: Aufbau Und Funktion
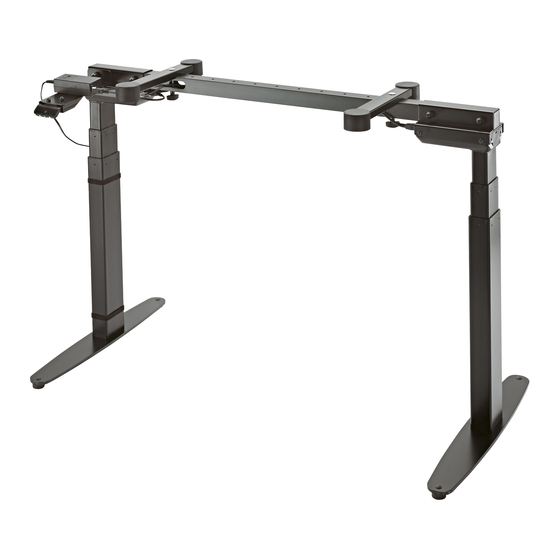
Aufbau und Funktion Gesamtdarstellung – Übersicht Gesamt-dar- stellung Fuß Auflage Anschlusskabel Mastersäule Bedienteil Netzkabel Slavesäule Netzteil Klettband Querrohr Motorkabel Zubehörteile Zubehörteile Ü Verwenden Sie ausschließlich Zubehörteile vom Hersteller des Keyboardtisches, der Firma König & Meyer GmbH & Co. KG! Ü Entnehmen Sie die Kontaktmöglichkeiten aus dem Kapitel 1, „Identifikation“! Ü... - Page 22 Aufbau und Funktion Pos. Bezeichnung Artikel-Nr. Keyboardtisch »Omega-E« 18800 Adapter 18814 Universalhalter 18817 Tablet PC Stativhalter 19790 Noten- und Konzepthalter 18805 Aufsatz 18822 Mikrofonarm 21140 Aufsatz 18811 Keyboardtisch »Omega-E« Art.-Nr.: 18800-000-55 / 18800-010-55...
-
Page 23: Inbetriebnahme/Bedienung
Inbetriebnahme/Bedienung Inbetriebnahme/Bedienung WICHTIG Sicherheitskapitel beachten Allgemeine Hinweise Die grundlegenden Sicherheitshinweise im Kapitel 2, „Sicher- heitshinweise“ beachten. Inbetriebnahme Allgemein Vorsicht Unabhängig von der Belastung darf die Einschaltdauer von 10 % (~ 6 Min./ Stunde) oder max. 2 Min. Dauerbetrieb nicht überschritten werden, da dies zu einer Überhitzung des Motors und der Steuereinheit führt. -
Page 24: Bedienung Über Bedienteil (Dpg1C)
Inbetriebnahme/Bedienung Während des Betriebes Ü Sollte die Hubsäule während des Betriebs ungewöhnli- che Geräusche oder Gerüche verursachen, unterbre- chen Sie die Stromzufuhr. Ü Achten Sie darauf, dass die Kabel nicht beschädigt sind. Ü Ziehen Sie den Netzstecker an mobilen Anwendungen, bevor diese bewegt werden. - Page 25 Inbetriebnahme/Bedienung Speichern von Speicher-po- Speichern von Speicherpositionen sitionen Speicherpositionen 1 und 2 Das DPG1C hat eine „Speichern“-Taste – symbolisiert durch ei- nen Stern. Fahren Sie den Keyboardtisch auf eine bevorzugte Position und drücken Sie die „Stern“-Taste für 2 Sekunden. Die Lichtleiste blinkt jetzt zweimal weiß, um anzuzeigen, dass der Speicher- vorgang läuft.
- Page 26 Inbetriebnahme/Bedienung wird dies im Display durch den Stern und die Speichernummer angezeigt. Das DPG1C stoppt bei allen gespeicherten Positionen, was be- deutet, dass bis zu 4 verschiedene Positionen angefahren wer- den. Wenn der Keyboardtisch bei einer gespeicherten Position stoppt, kann der Anwender das DPG1C für eine Sekunde neigen und der Keyboardtisch fährt an der gespeicherten Position vor- bei in die Richtung, in die gedrückt wird.
- Page 27 Inbetriebnahme/Bedienung Abbildung 3: Doppeltes Drücken, um den Keyboardtisch automatisch zu einer Speicher-po- gespeicherten Position zu fahren. sitionen lö- schen Speicherpositionen löschen Durch Drücken der „Memory“-Taste für 8 Sekunden werden alle gespeicherten Positionen gelöscht. Im DPG1C: Das Display zeigt einen Countdown und die Lichtleiste blinkt rot, um anzu- zeigen, wenn der Vorgang abgeschlossen ist.
- Page 28 Inbetriebnahme/Bedienung (TISCH)“ gefolgt von einer vierstelligen Nummer zusammen- Erinnerungs- setzt– suchen Sie diese ID in der Liste „Tische in der Nähe“. intervall ein- stellen Erinnerung Einstellung des Erinnerungsintervalls Das DPG1C hat auf der linken Seite eine „Erinnerungstaste“ – symbolisiert durch eine Glocke. Durch Drücken dieser Taste wird das Intervall eingestellt, wie oft Sie eine Erinnerung zum Positionswechsel erhalten werden.
- Page 29 Inbetriebnahme/Bedienung Intervall 2: Erinnerung nach 50 Minuten Sitzen (2. weißer Block leuchtet). Intervall 3: Erinnerung nach 45 Minuten Sitzen (3. Weißer Block leuchtet). Erinnerungs- intervall zu- rücksetzen Intervall aus (kein weißer Block leuchtet). Reset Erinnerung Lichtleisten- Es ist möglich, die Erinnerung auf die Standardwerte zurückzu- Erinnerung setzen, indem das „Glocken“-Symbol für 8 Sekunden gedrückt wird.
- Page 30 Inbetriebnahme/Bedienung aufzustehen. In der Stehhöhe pulsiert die Lichtleiste bis zu ei- ner möglichen Pause grün. Wenn der Keyboardtisch wieder nach unten in die Sitzposition gefahren wird, pulsiert die Licht- leiste grün, bis die Erinnerung wieder ausgeht. Nach 4 Stunden ohne Aktion geht die Lichtleiste aus. Wenn das DPG1C gedrückt wird, schaltet sich das grüne Licht wieder ein.
- Page 31 Inbetriebnahme/Bedienung Display Display Das DPG1C verfügt über ein OLED Display, das die Höhe wäh- rend des Verfahrens des Keyboardtisches anzeigt und viele Tischhöhe weitere Texte als Benutzerführung. einstellen Einstellen der Anfangshöhe des Keyboardtisches Wenn die im Display angezeigte Höhe nicht korrekt ist, kann die Höhe eingestellt werden.
-
Page 32: Bedienung Über Desk Control App
Inbetriebnahme/Bedienung Bedienung über Desk Control App Desk Control™ App Desk Control ist eine App, die für Benutzer von Sitz-Steh-Ti- schen entwickelt wurde. Die App ermöglicht es dem Anwender, sich über Bluetooth®-Funktechnologie in diesem Fall mit dem Keyboardtisch zu verbinden und erinnert den Benutzer daran, die Höhenverstellung zu nutzen. -
Page 33: Wartung, Reinigung Und Instandhaltung
Wartung und Instandhaltung Wartung, Reinigung und Instandhaltung WICHTIG Sicherheitskapitel beachten Allgemeine Hinweise Die grundlegenden Sicherheitshinweise im Kapitel 2, „Sicher- heitshinweise“ beachten. Ü Instandhaltungsarbeiten dürfen nur durch Fachpersonal vorgenommen werden. Ü Beachten Sie die allgemeinen Unfallverhütungsvor- schriften und die VDE-Richtlinien! Ü Führen Sie vorgeschriebene Einstell-, Wartungs- und Instandhaltungsarbeiten fristgemäß... -
Page 34: Verschleiß- Und Ersatzteillisten
Wartung und Instandhaltung Verschleiß- und Ersatzteillisten Teile-Nummer Bezeichnung Bemerkung 3-18800-5501 Verschraubung Halterung Nr. 1 3-18800-5502 Verschraubung Auflage Nr. 2 3-18800-5503 Verschraubung Bedienteil Nr. 3 3-18800-5504 Parkettschoner + Spreizniet Nr. 4 3-18800-5505 Fuß + Verschraubung Nr. 5 03-19-095-55 Bedienteil Nr. 6 03-19-159-55 Schaltnetzteil 03-19-187-55... - Page 35 Wartung und Instandhaltung 3-18800-5501 Verschraubung Halterung 3-18800-5502 Verschraubung Auflage 3-18800-5503 Verschraubung Bedienteil 3-18800-5504 Parkettschoner + Spreizniet 3-18800-5505 Fuß + Verschraubung Keyboardtisch »Omega-E« Art.-Nr.: 18800-000-55 / 18800-010-55...
-
Page 36: Störungen
Störungen Störungen WICHTIG Sicherheitskapitel beachten Allgemeine Hinweise Die grundlegenden Sicherheitshinweise im Kapitel 2, „Sicher- heitshinweise“ beachten. Störung Ursache/Behebung Störungen Untergrund überprüfen. Füße überprüfen. Keyboardtisch steht wa- Schraubverbindungen überprüfen und ggf. ckelig nachziehen (maximales Anziehdrehmoment beachten). Prüfen ob alle Kabel richtig eingesteckt sind (bzw. -
Page 37: Ersatzteilbestellung
Bestellung Ersatzteilbestellung Bestellung Bestellung Ü Wenden Sie sich für Ersatzteilbestellungen ausschließ- lich an ihren Fachhändler. Folgende Angaben sind notwendig: Artikelnummer und Baujahr (siehe Typenschild) so- § wie die entsprechende Ersatzteilnummer. Ersatzteile Ü Ersatzteile Verwenden Sie ausschließlich Ersatzteile und sonstige Teile vom Hersteller des Keyboardtisches! Keyboardtisch »Omega-E«... -
Page 38: Außerbetriebnahme Stilllegung
Außerbetriebnahme Außerbetriebnahme Stilllegung WICHTIG Sicherheitskapitel beachten Allgemeine Hinweise Die grundlegenden Sicherheitshinweise im Kapitel 2, „Sicher- heitshinweise“ beachten. Ü Ziehen Sie den Netzstecker. Ü Entlasten Sie den Keyboardtisch von jeglichem Gewicht. Ü Lösen Sie sämtliche Stecker und entfernen Sie die Ver- kabelung. -
Page 39: Anhang
Anhang Anhang 10.1 Registerverzeichnis Nachfolgend finden Sie ergänzende Unterlagen zu dieser Anlei- Weitere tung. Unterlagen Ü KONFORMITÄTSERKLÄRUNG Ü FEHLERCODES Keyboardtisch »Omega-E« Art.-Nr.: 18800-000-55 / 18800-010-55... -
Page 40: Anhang
Anhang Original EG-Konformitätserklärung im Sinne der EG-Maschinenrichtlinie 2006/42/EG Hiermit erklären wir, dass das nachfolgend bezeichnete Erzeugnis, aufgrund der Konzipierung und Bauart, sowie in der von uns in Verkehr gebrachten Ausführung, den einschlägigen grundlegenden Sicherheits- und Gesundheitsanforderungen der EG – Richtlinien entspricht. Bei einer nicht mit uns abgestimmten Änderung des Erzeugnisses verliert diese Erklärung ihre Gültigkeit. - Page 41 Anhang Fehlercode-Liste Fehlercode Name Beschreibung Positionsverlust Initialisieren Sie das System. Unerwarteter Reset unerwarteter Reset durch Softwarefehler oder externer Reset. LIN Fehler Fehler auf dem LIN Bus. Powerfehler Powerfehler oder Powerregulator auf unter 10% eingestellt. Kanalerkennung Anzahl der angeschlossenen Kanäle hat sich seit letzter Initialisation geändert.
- Page 42 Anhang Kanal 4 Überlast Kanal 5 Überlast Kanal 6 Überlast Kanal 1 Überlast Überlast aufwärts. Evtl. kein Signal durch abge- Kanal 2 Überlast klemmtes Kabel Kanal 3 Überlast Kanal 4 Überlast Kanal 5 Überlast Kanal 6 Überlast Kanal 1 Anti-Kollision Kanal 2 Anti-Kollision Kanal 3 Anti-Kollision Antikollisionseinstellung überschritten und Anti-...
- Page 43 Anhang Master Verbindung zum Master verloren oder Signal nicht eindeutig Slave 1 Verbindung zum Slave 1 verloren oder Signal nicht eindeutig Slave 2 Verbindung zum Slave 2 verloren oder Signal nicht eindeutig Slave 3 Verbindung zum Slave 3 verloren oder Signal nicht eindeutig E100 Zwangsinitialisierung Referenz 1...
- Page 44 Translation of the original operating instructions ENGLISH Table-style keyboard stand »Omega-E« Item no.: 18800-000-55 / 18800-010-55 Please read the operating instructions prior to using for the first time! Comply with the safety instructions! Store the operating instructions for future use! February –...
- Page 45 Information These instructions are part of the Technical Documentation of the system as per the EC Machinery Directive. These instructions correspond to “Directive 2006/42/EG of the European Parliament and of the Council on the approximation of the laws of the Member States relating to machinery” (Machinery Directive), Appendix I, Item 1.7.4.
- Page 46 Information Identification ..................5 Designated use Objective of the operating instructions Safety instructions .................. 7 Scope of validity and symbols 2.1.1 Safety symbols – acc. to DIN 4844-2 2.1.2 Additional instructions 2.1.3 Anti-collision protection Assembly ....................12 Installing the keyboard table 3.1.1 Space requirements 3.1.2...
- Page 47 Information These operating instructions were written on the basis of our General infor- current technical knowledge. mation We are constantly updating information and therefore reserve the right to make technical modifications. Symbols and signal words Symbols and The following symbols and signal words are used in these in- signal words structions.
-
Page 48: Identification
Identification Identification Table-style keyboard stand »Omega-E« Item no.: 18800-000-55 / 18800-010-55 Year of construction: 2019 Expected service life: at least 5 years König & Meyer GmbH & Co. KG Kiesweg 2 97877 Wertheim - Germany Tele- +49 (0)9342 806 0 phone: Fax: +49 (0)9342 806 150... -
Page 49: Objective Of The Operating Instructions
Identification Objective of the operating instructions These operating instructions serve to provide support and con- Objectives of tain all the necessary information that must be observed for the operating general security, transport, installation, operation, and mainte- instructions nance. These operating instructions, with all safety informations, must: Be observed, read, and understood by all persons §... -
Page 50: Safety Instructions
Safety instructions Safety instructions General safety instructions General safety instructions The keyboard table can only be used safely if the operating instructions have been read completely and the instructions it contains are observed. The keyboard table is not intended for the use of young children or impaired persons without supervision. -
Page 51: Safety Instructions
Safety instructions Safety instructions When operating the drive, ensure that no objects (e.g. furni- ture, windows, cables, etc.) or body parts become jammed! With each use, the user must verify that no other persons are located at the table and that the movement path is free of ob- stacles. -
Page 52: Scope Of Validity And Symbols
Safety instructions Safety instructions As a safeguard against electrical surges, such as may occur during thunderstorms, the installation of surge protection is advised. Ask your electrician if you need advice. Misuse Misuse The drives may not be overloaded - this can lead to personal injury or damage to the keyboard table. -
Page 53: Safety Symbols - Acc. To Din 4844-2
Safety instructions 2.1.1 Safety symbols – acc. to DIN 4844-2 WARNING Risk of injury due to disregarding safety symbols Safety symbols Dangers exist as a result of a failure to comply with warning on the keyboard table and in the instructions. 2.1.2 Additional instructions The provisions of the accident prevention regulations of the... - Page 54 Safety instructions parts, upholstered chairs, etc. Soft obstacles are difficult or im- possible to detect. Caution: In the event of a collision with an obstacle, it is pos- sible for the obstacle to become damaged because the table is moving at nominal speed! Table-style keyboard stand »Omega-E«...
- Page 55 Assembly Assembly Observe the safety chapter General information PORTANT Observe the basic safety instructions in Chapter 2, “Safety in- structions”. In addition, observe all safety information con- tained in the manufacturer’s documentation in the appendix. Unpacking Unpacking Unpack the keyboard table with all individual parts. As a rule, ship the keyboard table in its original packaging (as it was delivered) so that it does not become damaged.
-
Page 56: Assembly
Assembly Ü Check all the parts delivered for completeness, dam- age, or any other anomalies! Ü Please direct any questions regarding the transport, as- sembly, and installation of the keyboard table to König & Meyer GmbH & Co. KG! Table-style keyboard stand »Omega-E« Item no.: 18800-000-55 / 18800-010-55... -
Page 57: Installing The Keyboard Table
Assembly Installing the keyboard table 3.1.1 Space requirements System The designated location of the keyboard table must be firm and dimensions level! Table-style keyboard stand »Omega-E« Item no.: 18800-000-55 / 18800-010-55... -
Page 58: Assembly Instructions
Assembly 3.1.2 Assembly Instructions Fittings: Fittings Bracket fittings (protective cap, M8; lock nut, M8; washer, ø 8.4, hexagon bolt, M8 x 60, protective cap, M8) Base plate fittings (flat-head screw with hexagon socket and flange – M6 x 16) Bracket fittings (flat-head screw with hexagon socket and flange –... - Page 59 Assembly The following assembly steps must be followed: Assembly in- structions Prior to assembly, determine whether the control panel will be IMPORTANT mounted on the right or the left! Depending on the choice of sides, use the respective outer hole on the retaining plate for fastening.
- Page 60 Assembly Ü Fasten the master and slave columns with the transverse bar. To do so, lift the 1st side of the trans- verse bar (e.g. with a 2nd person or by placing it on a chair) à Lift the 2nd side and slide in the column à screw the column onto the transverse bar with the Allen key provided (tightening torque max.
- Page 61 Assembly Ü Attach the Velcro strap, power adapter, and cable clip. Thread the first Velcro strap through the slit in the re- taining plate à Place the power adapter on the retain- ing plate and fasten. Attach the remaining Velcro straps and cable clips to the keyboard table using the cable clamp.
- Page 62 Structure and function Structure and function IMPORTANT Observe the safety chapter! General information Observe the basic safety instructions in Chapter 2, “Safety in- structions”. Technical data Technical data – Table-style keyboard stand »Omega-E« Technical data - Dimensions width/depth/height 1136 / 550 / 600 (mm) Keyboard ta- (min.): Dimensions width/depth/height...
-
Page 63: Structure And Function
Structure and function Overall view – Overview Overall view Base Support Connection cable Master column Control panel Power cable Slave column Power adapter Velcro strap Transverse bar Motor cable Accessories Accessories Ü Only use accessories from the manufacturer of the keyboard table, König &... -
Page 64: Structure And Function
Structure and function Item Name Item no. Table-style keyboard stand 18800 »Omega-E« Adapter 18814 Universal holder 18817 Tablet PC stand holder 19790 Sheet music and concept 18805 holder Stacker 18822 Boom arm 21140 Stacker 18811 Table-style keyboard stand »Omega-E« Item no.: 18800-000-55 / 18800-010-55... -
Page 65: Starting Operation/Operation
Starting operation /operation Starting operation/operation Observe the safety chapter IMPORTANT General information Observe the basic safety instructions in Chapter 2, “Safety in- structions”. Commissioning General Caution Independently of the load, the switch-on duration of 10 % (~ 6 min. / hour) or a max. of 2 min. of continuous op- eration may not be exceeded, as this will lead to overheating of the motor and the control unit. -
Page 66: Using The Control Panel (Dpg1C)
Starting operation /operation Ü If the lifting column produces unusual sounds or odors during operation, disconnect the power. Ü Ensure that the cables are not damaged. Ü Pull the plug on mobile applications before moving them. Ü The keyboard table may only be used in an environ- ment that corresponds with its protection class. - Page 67 Starting operation /operation Storing positions Memory positions 1 and 2 The DPG1C has a “Memory” button - symbolized by a star. Move the keyboard table to a preferred position and press the “star” button for 2 seconds. The light bar will now flash twice to show that storage is in process.
- Page 68 Starting operation /operation The DPG1C stops at all prestored positions, which means that the table will move between up to 4 different positions. When the keyboard table stops at a prestored position, the user can tilt the DPG1C for one second, and the keyboard table will travel past the prestored position in the direction he is pressing.
- Page 69 Starting operation /operation Deleting memory positions Pressing the “Memory” button for 8 seconds deletes all prestored positions. In the DPG1C: The display shows a count- down and the light bar flashes red to indicate when the process is complete. Connect via Bluetooth Connecting via Bluetooth®...
- Page 70 Starting operation /operation followed by a four-digit number - look for this ID in the “Nearby tables” list”. Reminder Setting the reminder interval The DPG1C has a “reminder button” on the left side – symbol- ized by a bell. Pressing this button sets the interval for how often you receive a reminder to change the position.
- Page 71 Starting operation /operation Interval 2: Reminder after 50 minutes of sitting (2 white block lights up) Interval 3: Reminder after 45 minutes of sitting (3 white block lights up). Reset reminder in- terval Interval off (no white block lights up). Light bar re- minder Reset reminder...
- Page 72 Starting operation /operation sitting position, the light bar pulses in green until the reminder goes out again. After 4 hours without any action, the light bar goes out. If the DPG1C is pressed, the green light switches back on. Please note that when the light bar for reminders is activated, the DPG1C is no longer in ZERO mode as long as the light is switched on / active.
- Page 73 Starting operation /operation Set table height Display The DPG1C has one OLED display, which indicates the height while the keyboard table is in motion as well as many other texts for user guidance. Setting the starting height of the keyboard table. If the height shown in the display is not correct, the height can be set.
-
Page 74: Operating Via The Desk Control App
Starting operation /operation Operating via the Desk Control app The Desk Control™ app Desk Control is an app that was developed for users of sit-stand tables. Desk Control is an app developed for users of sit-stand desks. The app allows the user to connect to the desk via Blue- tooth®... -
Page 75: Service, Cleaning, And Maintenance
Service and maintenance Service, cleaning, and maintenance IMPORTANT Observe the safety chapter General information Observe the basic safety instructions in Chapter 2, “Safety in- structions”. Ü Maintenance work may only be carried out by qualified personnel. Ü Observe all general accident prevention regulations and the VDE guidelines! Ü... -
Page 76: Wear And Spare Parts Lists
Service and maintenance Wear and spare parts lists Part number Name Remark 3-18800-5501 Bracket fittings No. 1 3-18800-5502 Support fittings No. 2 3-18800-5503 Control panel fittings No. 3 3-18800-5504 End caps + expanding rivet No. 4 3-18800-5505 Base + fittings No. - Page 77 Service and maintenance 3-18800-5501 Bracket fittings 3-18800-5502 Support fittings 3-18800-5503 Control panel fittings 3-18800-5504 End caps + expanding rivet 3-18800-5505 Base + fittings Table-style keyboard stand »Omega-E« Item no.: 18800-000-55 / 18800-010-55...
-
Page 78: Malfunctions
Malfunctions Malfunctions IMPORTANT Observe the safety chapter General information Observe the basic safety instructions in Chapter 2, “Safety in- structions”. Malfunction Cause/remedy Malfunctions Check underlying surface. Keyboard table is Check bases. wobbly Check screw connections and tighten if neces- sary (observe maximum tightening torque). Check whether all the cables are plugged in correctly (and that there is power). -
Page 79: Ordering Spare Parts
Order Ordering spare parts Ordering Ordering Ü Only contact your specialist retailer for spare parts or- ders. The following information is required: Item number and year of manufacture (see data § plate) and the associated spare part number. Spare parts Ü... -
Page 80: Decommissioning
Decommissioning Decommissioning IMPORTANT Observe the safety chapter General information Observe the basic safety instructions in Chapter 2, “Safety in- structions”. Ü Pull out the plug. Ü Remove any loads from the keyboard table. Ü Pull out all plugs and remove the wiring. Ü... - Page 81 Appendix Appendix 10.1 Register In the following, you will find documents accompanying these Further instructions. documents Ü DECLARATION OF CONFORMITY Ü ERROR CODES Table-style keyboard stand »Omega-E« Item no.: 18800-000-55 / 18800-010-55...
-
Page 82: Appendix
Appendix Translation of the original EC Declaration of Conformity in accordance with the EC Machinery Directive 2006/42/EC We hereby declare that the product referred to in the following meets the relevant fundamental safety and health requirements of the EC directives with respect to its design and construction and in the form in which we have placed it on the market. - Page 83 Appendix List of error codes Error code Last name Description Loss of position Initialize the system. Unexpected reset Unexpected reset due to software error or exter- nal reset. LIN error Error on the LIN bus. Power fault Power fault or power regulator set to under 10%. Channel detection Number of connected channels has changed since the last initialization.
- Page 84 Appendix Channel 5 overload Overload upwards. Possibly no signal due to a disconnected cable Channel 6 overload Channel 1 overload Channel 2 overload Channel 3 overload Channel 4 overload Channel 5 overload Channel 6 overload Channel 1 anti-collision Channel 2 anti-collision Channel 3 anti-collision Anti-collision setting exceeded and anti-collision Channel 4 anti-collision...
- Page 85 Appendix Slave 1 Connection to Slave 1 lost or signal not clear Slave 2 Connection to Slave 2 lost or signal not clear Slave 3 Connection to Slave 3 lost or signal not clear E100 Forced initialization reference 1 E101 Forced initialization reference 2 E102 Forced initialization reference 3...
Need help?
Do you have a question about the Omega-E 18800-000-55 and is the answer not in the manual?
Questions and answers