Table of Contents
Advertisement
Quick Links
Advertisement
Table of Contents

Related Manuals for Akai APRC50UC


Summary of Contents for Akai APRC50UC
-
Page 2: Important Safety Instructions
IMPORTANT SAFETY INSTRUCTIONS IMPORTANT SAFETY INSTRUCTIONS The lightning flash with arrowhead symbol within an equilateral triangle is intended to alert the user to the presence of uninsulated dangerous voltage within the product enclosure that may be of sufficient magnitude to constitute a risk of electric shock to persons. The exclamation point within an equilateral triangle is intended to alert the user to the presence of important operating and maintenance (servicing) instructions in the literature accompanying the appliance. -
Page 3: Precautions For Unit
IMPORTANT SAFETY INSTRUCTIONS IMPORTANT SAFETY INSTRUCTIONS 17. OBJECT AND LIQUID ENTRY - Never push objects of any kind into this product through openings as they may touch dangerous voltage points or short-out parts that could result in a fire or electric shock. Never spill liquid of any kind on the product. 18. -
Page 4: Table Of Contents
Manual. Once again, thanks for purchasing this audio product. For future reference, record the serial number in the space provided. Model No: APRC50UC Serial Number: CLASS 1 LASER PRODUCT... -
Page 5: Important Notes
IMPORTANT NOTES IMPORTANT NOTES • Avoid installing this unit in places exposed to • Operate controls and switches as described in direct sunlight or close to heat radiating the manual. appliances such as electric heaters, on top of • Before turning on the power, make certain that other stereo equipment that radiates too the connecting cords, if any, and power cord much heat, places lacking... -
Page 6: Preparation For Use
PREPARATION FOR USE UNPACKING AND SET-UP • Carefully remove the unit from the carton and remove all packing material from the unit. • Remove any labels or stickers which may be on the front or top of the set, but do not remove any labels from the back or bottom. - Page 7 AUXILIARY INPUT JACKS This system includes AUX IN R/L Jacks. These jacks allow you to connect external audio equipment to this system and listen to the sound from the external equipment through the speakers of this system. Examples of the types of external equipment that may be connected are: a cassette deck;...
- Page 8 Battery Operation 1. Remove the Battery Compartment Cover by pressing down on the tabs in the direction of the arrows. 2. Insert 8 fresh “C” batteries into the battery compartment. Be sure to follow the polarity (+/-) markings inside the compartment. If the batteries are inserted incorrectly the unit will not work.
-
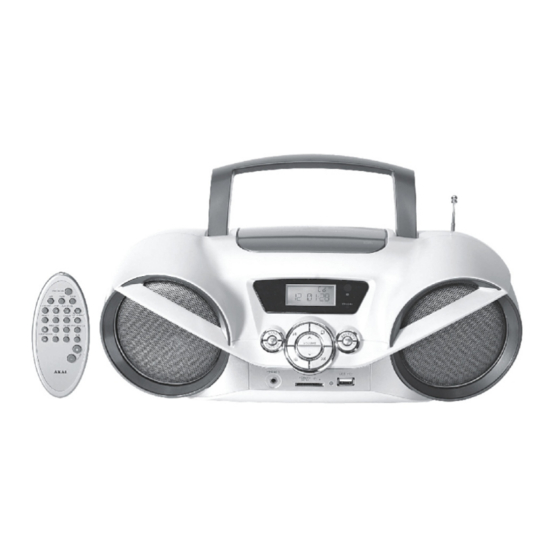
Page 9: Location Of Controls
REMOTE CONTROLS 1 2 3 4 5 6 7 8 9 10 Standby/On Tuner/Band CD Play/Pause Button Volume Control Up LCD Display CD Stop Button Pre-UP 11 12 13 14 15 18 19 Remote Sensor 9. Standby LED Indicator Preset EQ 11. - Page 10 REMOTE CONTROLS 1. Mute Button 2. Aux Button 3. FM/MW Button 4. Preset Down Album/MEM.CH Button 5. CD Play/Pause Button 6. Skip Down/Search Backward Button 7. CD Stop Button 8. Random Button 9. Sleep Button /FIND FM/MW FM/MW PROG/MEM/CLK PROG/MEM/CLK 10.
-
Page 11: Operating Instructions
OPERATING INSTRUCTIONS PRESET EQUALIZER • This unit is equipped with a preset equalizer which has been added to enhance your listening pleasure by altering the frequency response of the music. • Press the Preset EQ button on main unit repeatedly to cycle through the following equalization modes. - Page 12 OPERATING INSTRUCTIONS ANTENNA 1. Extend the telescoping FM antenna to its full length. 2. Set the Function Selector to TUNER. 3 Set the Band Selector to the desired band: AM, FM. 4 Press Skip Up/Down button to tune in a station. 5.
- Page 13 CLOCK SETTING Press the POWER button to turn the unit off standby. Press and hold the PROGRAM/CLOCK button, the 24Hr will appear on the display. Press the Skip/Search button. Once for select your suitable Hours for the clock. Press the MEMORY button ONCE. The Minutes segments display “00:00”.
- Page 14 Do not burn your disc into different sessions. Files from the second session will not be played. It is highly recommended that you create your CD by writing only once. CD-R/CD-RW PLAYBACK This unit can play CD-RW/MP3 disc NOTE: “CD-R/CD-RW play capability of this unit may vary depend on quality of media, CD burner and application software”.
- Page 15 DISC ERRORS • This compact disc player has built-in error compensation circuits to correct for minor defects in a disc. There are limits, however, to the amount of correction available. • In some cases, the CD player may skip some tracks, or parts of tracks, on a disc during disc play.
- Page 16 TO SKIP TO THE PREVIOUS TRACK ON A DISC CD/MP3 (USB.FLASH CARD) For example to skip back to the beginning of track 3 while track 4 is playing. 1. Press the Reverse Skip track button twice. Disc play will resume at the beginning of track 3.
- Page 17 REPEAT DISC PLAY CD/MP3 (USB.FLASH CARD) Use the REPEAT button to play an entire disc or album continuously. Repeat play of all tracks 1. Press the REPEAT button twice. The “ALL ” indicator appears in the display. 2. Press the Play/Pause button.
- Page 18 ENTERING A PROGRAM 1. Press the PROGRAM/Clock-Dispaly button. “PROG” appears and the following information will be display on the display: 2. Select the first desired track using the Forward and Reverse Skip Buttons. 3. Press the PROGRAM/Clock-Dispaly button. The first program selection is now stored in the program memory.
- Page 19 NOTES: • f the PLAY/PAUSE button is pressed before the PROGRAM/Clock-Display button is pressed to store a track, the track will not be programmed, and the disc will start playing from the first selected track. • Any track can be programmed to play more than once. •...
- Page 20 MODE MP3 In MP3 mode, press the MODE button (remote Conbtrol) change to title search mode, press the MODE button twice change to album search mode. Use the Skip Up & Down button to search the song. Press the MODE 2 sec, the LCD Display will show the IDT3 information. Press the MODE button again return to normal mode.
- Page 21 NOTE: • If playback the Flash Memory Card. The indicator light Red. • If playback the Flash USB. The indicator light Green. PLAYING FLASH MEMORY CARD OR FLASH USB LOADING AND UNLOADING FLASH MEMORY CARD OR FLASH USB 1. Press the STANDBY/ON button to turn the unit ‘ON’.The STANDBY/ON indicator lights’OFF’ and the LCD Backlights’ON’.
- Page 22 Auxiliary Operation You can listen to an auxiliary audio source connected to the AUX IN jacks on the back panel of this unit (refer to page 6 connection informa tion.) Press the FUNCTION button to select the Aux function. The AUX indicator appears in the display. Operate the external device as you would normally.
-
Page 23: Care And Maintenance
CARE AND MAINTENANCE Compact Disc Care • To remove a disc from its storage case, press down on the centre of the case and lift the disc out, holding it carefully by the edges. • Treat the disc carefully. Handle the disc only by its edges. Never allow your fingers to come in contact with the shiny, unprinted side of the disc. - Page 24 Cleaning The Unit • To prevent fire or shock hazard, disconnect your unit from the AC power source when cleaning. • If the cabinet becomes dusty wipe it with a soft dry dust cloth. Do not use any wax or polish sprays on the cabinet.
-
Page 25: Troubleshooting Guide
TROUBLESHOOTING GUIDE Should this unit exhibit a problem, check the following before seeking service. Symptom Possible Cause Solution Radio Noise or sound Station not tuned properly for Retune the AM or FM distorted on AM or AM or FM. broadcast station. FM broadcasts. -
Page 26: Specifications
SPECIFICATIONS SPECIFICATIONS Model: APRC50UC Specification Main Unit FM section Tuning range: 87.5 MHz - 108 MHz (50 KHz step) Usable sensitivity:(30dB S/N) 22dBµ Antenna: telescopic AM section Tuning range: 522 kHz - 1620kHz (9 KHz step) Usable sensitivity: 65dB/M Antenna:... - Page 27 IMPORTER AKAI BENELUX - ELMARC B.V. Information: www.akai.eu This symbol on the product or in the instructions means that your electrical and electronic equipment should be disposed at the end of its life separately from your household waste. There are separate collection systems for recycling in the EU.
Need help?
Do you have a question about the APRC50UC and is the answer not in the manual?
Questions and answers