
Subscribe to Our Youtube Channel
Related Manuals for MSA ALTAIR 4XR


Summary of Contents for MSA ALTAIR 4XR
- Page 1 Operating Manual ® ALTAIR Multigas Detector Order No.: 10175896/00 MSAsafety.com...
- Page 2 The Bluetooth word mark and logos are registered trademarks owned by Bluetooth SIG, Inc., and any use of such marks by MSA is under license. Other trademarks and trade names are those of their respective owners. 1000 Cranberry Woods Drive...
-
Page 3: Table Of Contents
Contents Safety Regulations ..........5 Correct Use. - Page 4 Fresh Air Setup and Zero Calibration ......35 Attach the Calibration Cap ....... . 37 Span Calibration .
-
Page 5: Safety Regulations
Safety Regulations Safety Regulations Correct Use The ALTAIR 4XR Multigas Detector is for use by trained and qualified personnel. It is designed to be used when performing a hazard assessment to: • Assess potential worker exposure to combustible and toxic gases and vapors as well as low level of oxygen. -
Page 6: Liability Information
This Class A digital apparatus complies with Canadian ICES-003. Liability Information MSA accepts no liability in cases where the product has been used inappropriately or not as intended. The selection and use of this product must be under the direction of a qualified safety professional who has carefully evaluated the specific hazards of the jobsite where it will be used and who is completely familiar with the product and its limitations. - Page 7 Observe proper battery maintenance Use only battery chargers made available by MSA for use with this device; other chargers may damage the battery pack and the device. Dispose of in accordance with local health and safety regulations.
- Page 8 Follow all relevant national regulations applicable in the country of use. Be Aware of the Warranty Regulations The warranties made by MSA The Safety Company with respect to the product are voided if the product is not used and maintained in accordance with the instructions in this manual. Please protect yourself and others by following them.
-
Page 9: Warranty
Safety Regulations Warranty ITEM WARRANTY PERIOD Chassis and electronics Four years All sensors unless otherwise specified Four years XCell EX-H Sensor One year Specific battery run-time over temperature is not warranted. This warranty does not cover filters, fuses, etc. As the battery pack ages, there will be a reduction in usable device run time. -
Page 10: Description
The alarm levels for the individual gases are factory-set and can be changed through the Setup Menu. These changes can also be made through the GALAXY GX2 Test Stand or MSA Link software. Ensure that the latest version of the GALAXY GX2 firmware or MSA Link software has been downloaded from MSA’s website www.msasafety.com. -
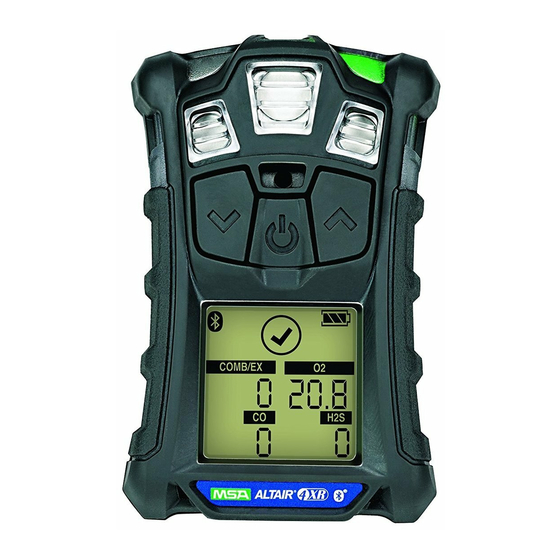
Page 11: Device Hardware Interfaces
When the device fails a bump test or when the 24-hour period expires, the red (Bump LED) LED flashes every 15 seconds. This option can be turned off through the MSA GALAXY GX2 Test Stand or MSA Link software. The red alarm LEDs are visual indications of an alarm condition or any type of (Alarm LED) error in the device. -
Page 12: On-Screen Indicators
Description Backlight The backlight automatically activates when any front panel button is pressed. The backlight remains on for the duration of the user-selected timeout. This duration can be set through MSA GALAXY GX2 Test Stand or MSA Link software. Horn The horn provides an audible alarm. -
Page 13: Battery Care
Description COMB/EX Sensor Labels Calibration Setup Cal Gas Cylinder – Indicates cal gas must be applied No Gas Cylinder – Indicates cal gas should not be applied and device must be exposed to fresh air. Hourglass – Indicates user should wait Minimum –... - Page 14 Description A Low Battery Warning indicates that a nominal 30 minutes of operation remain before the battery’s charge is depleted. The duration of remaining device operation during a Low Battery Warning depends on ambient temperatures. When the device goes into Low Battery Warning, the: •...
-
Page 15: Viewing Additional
Description Battery Charging WARNING! Risk of explosion: Do not recharge device in hazardous area. WARNING! Use of any charger, other than the charger supplied with the device, may damage or improperly charge the batteries. The charger is capable of charging a completely depleted pack in less than four hours in normal, room- temperature environments. - Page 16 10 minute exposure of 35 ppm and 5 minutes exposure of 5 ppm: (10 minutes x 35 ppm) + (5 minutes x 5 ppm) = 25 ppm 15 minutes This page can be de-activated through MSA GALAXY GX2 Test Stand or MSA Link. ® ALTAIR...
- Page 17 (12 hours x 100 ppm) = 150 ppm 8 hours This page can be deactivated through the MSA GALAXY GX2 Test Stand or MSA Link software. Time Display Current time appears on the display in a 12-hour format by default.
-
Page 18: Sensor Missing Alarm
Description Motion Alert Activation To activate or deactivate the Motion Alert feature, press the button while the Motion Alert Activation page is displayed. When the Motion Alert feature is active, the Motion Alert symbol ( chapter 2.3 "On-Screen Indicators") will flash every 3 seconds. The device will enter pre-alarm when no motion is detected for 20 seconds. -
Page 19: Monitoring Oxygen Concentration
Description If the gas concentration reaches or exceeds the alarm set point, the device: • backlight turns on • triggers a vibrating alarm • displays and flashes the Alarm symbol and either the Minimum icon (LOW alarm) or the Maximum (PEAK) icon (HIGH alarm) •... -
Page 20: Monitoring Combustible Gases
Description 2.11 Monitoring Combustible Gases The device can monitor these concentrations in ambient air: • Methane • Combustible gases The device displays the combustible gas concentration in % LEL or % CH on the Measuring page until another page is selected or the device is turned off. WARNING! If an alarm activates while using the device, leave the area immediately. -
Page 21: Operation
Operation Operation Device operation is dialog driven from the display with the aid of the three Function buttons (see Fig. 1 "Device overview"). Environmental Factors A number of environmental factors may affect the gas sensor readings, including changes in pressure, humidity and temperature. -
Page 22: Turning On And Fresh Air Setup
Operation Turning ON and Fresh Air Setup Device operation is dialog driven from the display with the aid of the three Function buttons (see Fig. 1 "Device overview"). For more information, see the flow charts in chapter 7 "Appendix". Turn the device on with the q button. The device performs a self test and then goes to Fresh Air Setup: •... - Page 23 Operation Screen Displays during Startup During the startup sequence, all automatic page display timeouts are preset to a range from two to four seconds. Several sequences and screens occur during start up: Device Self Test The device performs a self test. Device Name and Software version Software version and device name display.
- Page 24 Name of Combustible Gas Type displays, e.g. BUTANE. NOTE: Combustible gas type can be changed manually through the SENSOR SETUP menu or the MSA GALAXY GX2 Test Stand or MSA Link software. Toxic Gas Units Name of Toxic Gas Units displays (ppm or mg/m...
- Page 25 (Jan-01-2016) with time stamp (00:00). Last CAL Date and CAL Due NOTE: These display options can be set by MSA GALAXY GX2 Test Stand or MSA Link software. If these options are not set, these screens are not displayed. •...
-
Page 26: Fresh Air Setup (Fas)
Operation Fresh Air Setup (FAS) The FAS screen is prompted. Fresh Air Setup (FAS) The FAS is for automatic Zero calibration of the device. The Fresh Air Setup has limits. The zero of any sensor that is outside of these limits will not be adjusted by the FAS command. -
Page 27: Measurement Mode [Normal Operation]
Operation If this option is enabled, the device displays "FAS?", prompting the user to perform a Fresh Air Setup. Press the button to bypass the Fresh Air Setup. The Fresh Air Setup is skipped and the device goes to the Measuring page (Main page). Press the q button within 10 seconds to perform the Fresh Air Setup. -
Page 28: Device Setup
After two incorrect password entries, device enters Normal Operation mode. Correct password: device continues/beeps once. The password can be changed through the MSA GALAXY GX2 Test Stand or MSA Link software. In the Setup mode: • Press the q button to store chosen value or go to the next page. -
Page 29: Sensor Setup
Operation The following options are available by pressing the and buttons: • Sensor Setup (SENSOR SETUP) • Calibration Setup (CAL SETUP) • Alarm Setup (ALARM SETUP) • Setup Time and Date (TIME DATE) • Bluetooth Setup (BT SETUP) •... -
Page 30: Alarm Setup
Operation Fig. 5 Calibration Setup To bypass this setup, press the or button; otherwise, continue as follows. Press the q button to enter the submenu. The calibration gas concentration of the first sensor is shown. Press the or button to change the value. Press the q button to store the value. -
Page 31: Setup Time And Date
Operation Set alarms on or off by pressing the or button. Press the q button to confirm the selection. LOW ALARM settings for the first sensor display. Press the or button to change the value. Press the q button to store the value. HIGH ALARM settings for the first sensor display. -
Page 32: Enable Bluetooth Operation
Operation Enable Bluetooth Operation The device is configured with a Bluetooth capable communications feature. Press the button to enable or disable the Bluetooth communications device (ON/OFF). Press the q button to accept the setting and return to the EXIT? page. Bluetooth Operation The Bluetooth communication device must be enabled for any Bluetooth functions to operate. -
Page 33: Data Logging
Switch ON the device and align the Datalink Communication port on the device to the IR inter- face of the PC. Start the MSA Link software on the PC and start the connection by clicking the connect icon. Function Tests Alarm Test Turn on the device. -
Page 34: Bump Test
Bump test frequency is often stipulated by national or corporate regulations; however, bump testing before each day’s use is generally the accepted best safety practice and is therefore MSA’s recommendation. This test quickly confirms that the gas sensors are functioning. Perform a full calibration periodically to ensure accuracy and immediately if the device fails the Bump Test. -
Page 35: Bump Led
30 minutes before performing a Calibration. NOTE: The GALAXY GX2 Test Stand is not a CSA certified calibration method. Under normal circumstances MSA recommends calibration at least every six months, however, many European countries have their own guidelines. Please check your national legislation. - Page 36 Operation • If calibration lockout option is NOT selected: ZERO screen displays. With the device exposed to fresh air, press the q button to confirm the ZERO CAL? screen. A sensor refresh and Zero Calibration will occur. Alternatively press the button to execute a Fresh Air setup (FAS). See chapter 3.2 "Turning ON and Fresh Air Setup"...
-
Page 37: Attach The Calibration Cap
Operation Attach the Calibration Cap Attach the calibration cap to the device: Insert tab on calibration cap into slot on device. Press calibration cap as shown until it seats onto device. Press both side tabs down onto device until they snap into place. - Page 38 Operation • After the SPAN calibration completes, the device momentarily displays “SPAN PASS” or “SPAN ERR” along with the label of any sensor that failed then returns to Normal Operation mode. If a sensor is nearing its end of life, this "SPAN PASS" indication will be followed by the end of sensor life warning (...
-
Page 39: Time Of Day Testing
Manual ("Automated Testing Features" section) for a complete description of how to configure the GALAXY GX2 for this mode. On ALTAIR 4XR devices, the following settings must be configured using either MSA Link software or the GALAXY GX2 Instrument Setup page: •... -
Page 40: Maintenance
Repair or alteration of the device beyond the procedures described in this manual or by anyone other than a person authorized by MSA, could cause the unit to fail to perform properly. Use only genuine MSA replacement parts when performing any maintenance procedures described in this manual. -
Page 41: Troubleshooting
Remove from service and recharge ALARM battery. Device must be between 10° C and 36° C to charge. Charge error ERROR CHARGE Contact MSA if problem persists Missing Sensor Verify if sensor is properly installed SENSOR ERROR Device does not Low battery Charge device... -
Page 42: Live Maintenance Procedure - Replacing And Adding A Sensor
Maintenance Live Maintenance Procedure - Replacing and Adding a Sensor WARNING! Remove and reinstall sensors carefully, ensuring that the components are not damaged; otherwise device intrinsic safety may be adversely affected, wrong readings could occur, and persons relying on this product for their safety could sustain serious personal injury or death. WARNING! Before handling the PC board, ensure you are properly grounded;... -
Page 43: Cleaning
Maintenance Calibrate the device after the sensors have stabilized. WARNING! Calibration is required after a sensor is installed; otherwise, the device will not perform as expected and persons relying on this product for their safety could sustain serious personal injury or death. Allow sensors to stabilize at room temperature for at least 30 minutes before calibration (... -
Page 44: Technical Data
Technical Data Technical Data Weight 7.9 oz./224 g (device with battery and clip) Dimensions 4.4 x 3.00 x 1.37 inches/112 x 76 x 33 mm – without fastening clip (L x W x H) Four gas alarm LEDs, a charge status LED, an audible alarm and a vibrating Alarms alarm Volume of... -
Page 45: Factory-Set Alarm Thresholds And Setpoints
Technical Data The ppm to mg/m³ conversion is calculated at 20° C (68 °F) and at atmospheric pres- sure. Factory-set Alarm Thresholds and Setpoints Check the monitor or calibration certificate for exact alarm levels as they vary depending on national or corporate regulations. Sensor LOW alarm HIGH alarm... -
Page 46: Performance Specification
Technical Data Default Calibration Min. Calibration Max. Calibration Sensor Setpoint Setpoint Setpoint EX (% LEL) EX-H (% LEL) EX-M (% vol) O2 (% vol) 15.0 30.0 H2S (ppm) H2S-LC (ppm) CO (ppm) 1700 NO2 (ppm) SO2 (ppm) Feature Options Instrument password 000 - 999 Cal Due days 1 - 180... - Page 47 Technical Data Combustible Gas Cross Reference Factors for General-Purpose Calibration Using Calibration Cylinder (Part No. 10053022) Methane Calibration Pentane Simulant Calibration Combustible Gas 1.45 Vol % CH 1.45 Vol % CH Set 33 % LEL Set 58 % LEL Acetone 1.09 0.62 Acetylene...
- Page 48 Technical Data The conversion factors for the standard EX and the specialized EX-H and EX-M sensor are the same except for EX-H and Nonane and o-Xylene. The conversion factors for these two vapors are therefore especially mentioned in the table. Oxygen The oxygen sensor has built-in temperature compensation.
- Page 49 Technical Data CO Channel % Test Gas Applied Concentration (PPM) Applied Cross-sensitivity Isopropanol Hydrogen (H Hydrogen Sulphide Range 0 - 200 ppm (0 to 284 mg/m 1 ppm (1.4 mg/m Resolution for 3 to 200 ppm (4,3 to 284 mg/m ±2 ppm (2.8 mg/m S or 10 % of reading, whichever is greater (normal temperature range)
-
Page 50: Xcell Sensor Patents
Technical Data Nitrogen Dioxide Range 0 - 50 ppm NO Resolution 0.1 ppm NO ±1 ppm NO or 10 % of reading, whichever is greater (normal Reproducibility temperature range) ±2 ppm NO or 20 % of reading, whichever is greater (extended temperature range) Response time (typical) 90 % of final reading <... -
Page 51: Ordering Information
Ordering Information Ordering Information Description Part No. Sensor Replacement Kits 10106722 EX-H 10121211 EX-M 10121212 10106729 CO/H2S 10106725 CO/H2S-LC 10121213 CO-H2/H2S 10121214 CO/NO2 10121217 SO2/H2S-LC 10121215 Repair Kits Front Housing with dust filters • Charcoal 10178360 • Phosphorescent 10178361 LCD assembly 10179265 Stainless steel suspender clip, screws, &... -
Page 52: Appendix
Appendix Appendix Start Up Sequence (Power on) ® ALTAIR... -
Page 53: Fresh Air Setup (Fas)
Appendix Fresh Air Setup (FAS) ® ALTAIR... -
Page 54: Reset Screen Controls
Appendix Reset Screen Controls From Normal Operations (Main Page) Hold Hold for 5 seconds for 3 seconds Instrument off Button? CAL Mode Press BUMP Page To Calibration Press Press Button ? Press Measure Perform BUMP To Bump To Next Page ®... - Page 55 Appendix ® ALTAIR...
-
Page 56: Bump Test
Appendix Bump Test ® ALTAIR... -
Page 57: Options Setup
Appendix Options Setup ® ALTAIR... -
Page 58: Sensor Setup
Appendix Sensor Setup ® ALTAIR... -
Page 59: Calibrations
Appendix Calibrations ® ALTAIR... - Page 60 Appendix ® ALTAIR...
-
Page 61: Alarm Setup
Appendix Alarm Setup ® ALTAIR... -
Page 62: Time And Date Setup
Appendix Time and Date Setup ® ALTAIR... -
Page 63: Bluetooth Setup
Appendix 7.10 Bluetooth Setup sales@norrscope.com ® ALTAIR...
Need help?
Do you have a question about the ALTAIR 4XR and is the answer not in the manual?
Questions and answers
How can I reset password for Msa altair in order to change date